- Step-by-Step Tutorial: Install and Configure OpenLDAP in CentOS 7 Linux
- Install and Configure OpenLDAP
- Installing OpenLDAP
- Customizing the Installation
- Modifying Objects
- Replace olcSuffix and olcRootDN attribute
- Add olcRootPW attribute
- Replace olcAccess attribute
- Validate the new attribute values
- Adding Objects
- Adding an Organizational Unit
- Adding a User
- Adding a Group
- Deleting Objects
- Conclusion
- What’s Next
- References
- Related Posts
- 16 thoughts on “Step-by-Step Tutorial: Install and Configure OpenLDAP in CentOS 7 Linux”
- OpenLDAP сервер на CentOS7
Step-by-Step Tutorial: Install and Configure OpenLDAP in CentOS 7 Linux
Table of Contents
This is a multi-part article where I will cover different areas of configuration of OpenLDAP server in CentOS 7 Linux node. You can use below links to refer different parts of this tutorial

Install and Configure OpenLDAP
In my last article I gave you an overview on OpenLDAP and it’s terminologies. Before starting with this article to install and configure openldap in Linux you must be aware of basic terminologies. For the demonstration of this article I am using CentOS 7. In this article I will share detailed steps to install and configure OpenLDAP on Linux platform using ldapmodify . In legacy releases of openldap, the configuration was performed using slapd.conf but now the configuration is kept in cn=config database. So we will install and configure OpenLDAP using cn=config and ldapmodify .
Installing OpenLDAP
To get the OpenLDAP server and client components up and running, these packages are required on Fedora, RHEL, and CentOS systems:
- openldap-2*.rpm — Provides the configuration files and libraries for OpenLDAP.
- openldap-clients*.rpm — Provides the client programs needed for accessing and modifying OpenLDAP directories.
- openldap-servers*.rpm — Provides the servers ( slapd , slurpd ) and other utilities necessary to configure and run LDAP.
We make sure that the slapd service is configured to boot automatically, and we start the service.
Check the status of the service
Customizing the Installation
Once installed, we have to generate a password for the admin user. In this example, we use a simple password: “ redhat ”
Modifying Objects
Replace olcSuffix and olcRootDN attribute
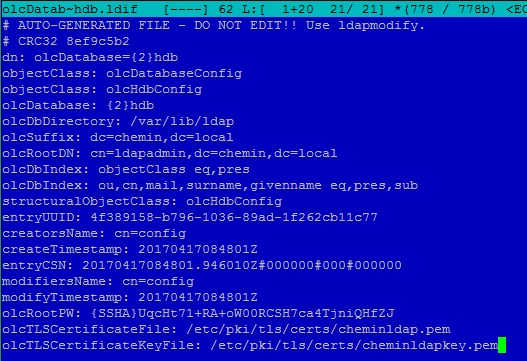
OpenLDAP actually stores its information in storage back ends. We could think of these back ends as the databases used by OpenLDAP. One of the most used back ends has always been the Berkeley DB back ends , such as bdb , or the more recent hdb . The information stored in the hdb back end can be found in the /etc/openldap/slapd.d/cn=config/olcDatabase=<2>hdb.ldif file.
In an LDIF file, we first identify the element we want to add, change, etc. To uniquely identify an element, we use the dn (distinguished name) attribute, which was created precisely for that reason. So, the first line of our LDIF file could be something like this:
Next, we specify if we want to add an attribute, modify it, etc.
If we want to modify an entry, we also must clarify whether we’ll be replacing an attribute, deleting it, etc.
And, finally, we type the new value of the modified attribute.
You’ll see many LDIF examples throughout the article, but for now, let’s get back to the /etc/openldap/s-lapd.d/cn=config/olcDatabase=<2>hdb.ldif file. We have to modify (at least) these two entries:
To make all these changes with ldapmodify , we have to prepare an LDIF file such as this:
The first line identifies the main entry in the LDAP that we are going to change. Just a moment ago, we saw the parameter olcSuffix inside the /etc/openldap/slapd.d/cn=config/olcDatabase=<2>hdb.ldif file . In this file, the dn attribute is dn: olcDatabase=<2>hdb , and as the file is inside the config folder, the full dn attribute is dn: olcDatabase=<2>hdb,cn=config .
Another, and maybe better, way to identify the data we require to create the LDIF file could be to use the ldapsearchcommand .
We save the LDIF file with an appropriate name, for example, my_config.ldif , and we execute ldapmodify .
Add olcRootPW attribute
To add a new attribute we use » add » and then the attribute name as shown in the below example.
Here we create another LDIF file (my_config2.ldif) to add the olcRootPW attribute.
And we execute ldapmodify again.
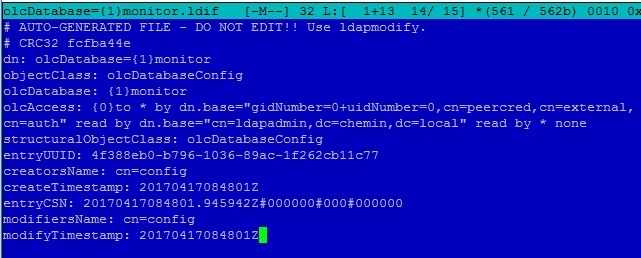
Replace olcAccess attribute
We also have to allow access to the LDAP database to the admin user we just specified before (cn=admin,dc=example,dc=com) . If we take a look at the olcDatabase=<1>monitor.ldif , file we’ll see the following line:
We’ll have to edit the file or use ldapmodify to change the entry. If we use ldapmodify, the LDIF file should be something like this:
Once again, we execute ldapmodify by passing the new LDIF file as a parameter.
Validate the new attribute values
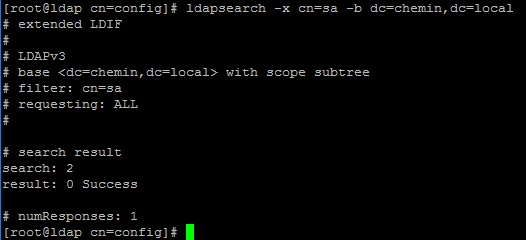
Now we can check with ldapsearch whether the value for the attribute was actually changed.
As we can see, the value was changed according to what we specified in the LDIF file.
Another tool we can use to check the configuration is the slaptest command.
Adding Objects
Now we have to manually create an entry for dc=example,dc=com in our LDAP server. The easiest way to do this is to create an LDIF file for this entry and pass it to the ldapadd command.
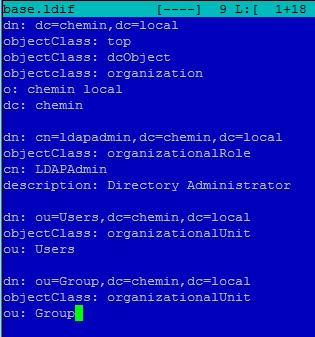
So, we create a file named example.ldif , with the following content:
We specify a series of attributes, such as distinguished name (dn), domain component (dc), and organization (o). We also define the new entry as an object of the type dcObject and organization.
Now we execute ldapadd and pass it the example.ldif file as a parameter. We specify with (-f) the name of the file, the admin user (-D), and the password we defined for that admin user (-w).
We can check whether the entry was created successfully by using the ldapsearch command.
You just saw how to add the object dc=example,dc=com to our LDAP. Now you’ll see how to add organizational units , groups, and users.
Adding an Organizational Unit
Maybe we’d like to have an organizational unit (OU) called users in which to store all LDAP users. To do so, we’ll create a new LDIF file named users.ldif , with the following content:
We execute ldapadd again to create the OU.
Adding a User
We can now include a user inside the organizational unit. The procedure is quite similar to what we have seen so far. First, we create a file named archimedes.ldif , with the following content:
Then we execute ldapadd again.
What this message means is that the object inetOrgPerson isn’t loaded in the core schema, so we’ll have to include it. In the /etc/openldap/schema folders, there are many LDIF files to extend the schema when we need it. We can see there is an inetorgperson.ldif file, which contains the schema definition for the inetOrgPerson object.
The schema itself is contained in the LDAP database, so we can add new definitions to it with the ldapadd command. As we’re going to modify the configuration itself, instead of the data, we’ll authenticate ourselves as the external root user ( -Y EXTERNAL ).
As we can see, we get an error, because the attribute type audio isn’t defined. So, we have to include this definition in the schema too .
If we perform a search of the string audio in the files located in the /etc/openldap/schema/ folder, we’ll see that the attribute audio is defined in the cosine.ldif file. So, we extend the schema with this LDIF file first.
Now we do the same thing with the inetorgperson.ldif file.
Next we also add nis.ldif file
Now we can add the user with the archimedes.ldif file we created before.
If at some point we have to take a look at the currently used schema, we can use the slapcat command like this:
Adding a Group
To add a group, we repeat the same process . First we create the group.ldif file with the following content:
And we add the group with ldapadd .
Deleting Objects
Apart from adding or editing, we can also delete objects from the LDAP server. The procedure is even easier, as we don’t have to create any LDIF file. We just execute ldapdel with the cn we want to delete.
We can check that the entry was actually suppressed.
Conclusion
In this tutorial I have shared step by step instructions to install and configure openldap from scratch on a CentOS 7 Linux node. I have tried to be descriptive while explaining every step throughout the tutorial, although I would recommend for freshers to first learn more about the openldap terminologies before jumping into the configuration.
Lastly I hope the steps from the article to install and configure OpenLDAP on Linux was helpful. So, let me know your suggestions and feedback using the comment section.
What’s Next
Now since our ldap server is configured, next we will
References
I have used below external references for this tutorial guide
Learn CentOS Linux Network Services
Related Posts
Didn’t find what you were looking for? Perform a quick search across GoLinuxCloud
If my articles on GoLinuxCloud has helped you, kindly consider buying me a coffee as a token of appreciation.

For any other feedbacks or questions you can either use the comments section or contact me form.
Thank You for your support!!

16 thoughts on “Step-by-Step Tutorial: Install and Configure OpenLDAP in CentOS 7 Linux”
I followed the instructions and it worked very well for me! Thank you for taking your time to do this tutorial!
Hello, I’ve follow your step to modify <2>hdb file, however, when I tried to replace olcSuffix and olcRootDN by
command you provided, it prompts “ldap_modify: No such object (32)
matched DN: cn=config
could you please provide some help? this has been trouble me for a day in my two machine.
Thank you very much!
I am afraid I also have no clue here, you may have to troubleshoot this by checking more symptoms locally.
Thank you for your article. I followed it and everything seems to work after I installed it on my Redhat 7 virtual machine.
What I’m trying to do right now is to connect to this server from my windows client, however, I’m unable to do it so far.
Could you please tell me if the following field values are correct based on your example?
LDAP URI: ldap://example.com
user : CN=Archimedes of Syracuse,OU=scientists,DC=example,DC=com
user root: OU=users,DC=example,DC=com
Hello,sorry but do you know how to add a user into the group?
I belive you have to look up for the term “GroupofNames”
Very Well written article. I followed it and did not have any trouble executing any steps.
I have set up LDAP before by following other articles. All them gave the same instructions as you have. However, you explain each step as to why it is done and why those particular values were chosen. Thank you for a well written tutorial.
Your comment made my day. Thank You!
Hello,
Firstly: Thank you so much for putting this out !
Secondly: Could it be possible to install OpenLDAP other than in /etc ?
Regards,
you mean to use a config file at a different location?
Thank you for your effort , just a tip
In my installation
CentOS Linux release 7.8.2003 (Core)
openldap-clients-2.4.44-21.el7_6.x86_64
openldap-servers-2.4.44-21.el7_6.x86_64
sssd-ldap-1.16.4-37.el7_8.3.x86_64
openldap-2.4.44-21.el7_6.x86_64
When I am trying to add/edit/delete binding with the user “ cn=admin,dc=example,dc=com ” without the -H option I get
ldapadd -f group.ldif -D “cn=admin,dc=example,dc=com” -w redhat
ldap_bind: Invalid credentials (49)
but with -H ldapapi:///
ldapadd -f group.ldif -H ldapi:/// -D “cn=admin,dc=example,dc=com” -w redhat
adding new entry “cn=scientists,ou=users,dc=example,dc=com”
(I hope that it helps)
Thank you for sharing!
Thanks for the well-written tutorials. Just a tiny thing. I think in the first paragraph the sentence “but not the configuration is kept in cn=config database.” contains a mistake. I’m pretty sure it should say “but NOW the configuration…” as it is opposed to what was done in legacy ldap implementations.
Regards
Thank you for highlighting this, I have corrected the text.
Superb tutorial. The best I have seen for centos.
Источник
OpenLDAP сервер на CentOS7
Понадобилась общая адресная книга в небольшой сети без домена, основной почтовый клиент Mozilla Thunderbird. Решено было использовать OpenLDAP для этих целей.
Приступаем к установке и настройке OpenLDAP. Устанавливаем пакеты openldap и migrationtools:
Создаем пароль администратора LDAP:
Получаем пароль в зашифрованном виде –
Меняем настройки конфигурационного файла:
Первым делом меняем параметры “olcSuffix” и “olcRootDN” на свои. Добавляем три строчки в файл (“olcRootPW” используем сохраненный ранее зашифрованный пароль администратора):
Изменяем конфигурацию еще одного файла:
Ранее, в конфигурацию были добавлены пути к сертификатам, сгенерируем их (сроком на 10 лет):
Проверяем наличие сертификатов в папке /etc/pki/tls/certs/:

Ошибки “checksum” можно пропустить.

Включаем и запускаем сервис:

Конфигурируем LDAP Database. Копируем “Sample Database” файл конфигурации и назначаем права к нему:
Добавляем “LDAP Schemas”
Создаем базу объектов OpenLDAP, используя установленный ранее пакет “migrationtools”. Меняем настройки файла “migrate_common.ph”
Строка 71 – свое имя домена: $DEFAULT_MAIL_DOMAIN = “chemin.local”;
Строка 74 свое имя базы $DEFAULT_BASE = “dc=chemin,dc=local”;
Строка 90 включаем $EXTENDED_SCHEMA = 1;
Сохраняем файл.
Генерируем base.ldif файл:
Вставляем свои данные в этот файл:
Создадим локального пользователя:
Filter out these user from /etc/passwd to another file:
Filter out user group from /etc/group to another file:
Конвертируем файл локальных пользователей в LDAP Data Interchange Format (LDIF). Генерируем ldif файл для пользователей
Генерируем ldif файл для групп
Импортируем эти LDIF-файлы в LDAP Database:
Если не отключали – сконфигурируем файервол. Добавим порты ldap:
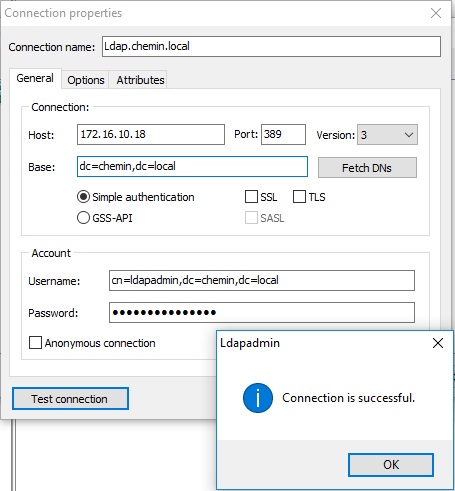
Для удобства администрирования используется утилита LDAPAdmin в Windows. Параметры подключения к LDAP:
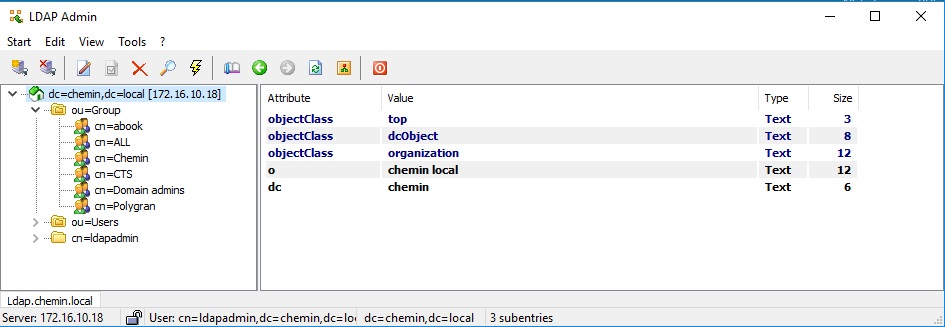
Все действия с учетными записями и группами можно производить из этой утилиты:
Подключим адресную книгу в почтовик

Фильтруем поиск по mail
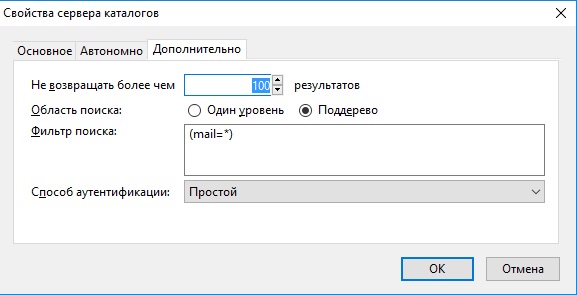
Вводим символ @ в строке поиска и видим все записи LDAP-сервера, у которых прописан e-mail
Источник


