- Linux Tutorial
- Welcome!
- Introduction
- Outline
- Structure
- Some general house rules:
- Problem Solving and Creative Thinking
- Obtaining Linux
- About the Author
- Using this material
- Disclaimer
- How to get started with Linux: A beginner’s guide
- Choose and download a Linux distro
- Running Linux live off an external drive
- Use Linux in a virtual machine
- Your Linux desktop environment
- Install Linux, or not
- How to install more software
Linux Tutorial
Welcome!
Ok, so you want to learn how to use the Bash command line interface (terminal) on Unix/Linux. Or, it’s part of a subject you’re doing and so you’re learning it because you have to. Either way, that’s great. You’re learning how to use a powerful tool that can make your life easier, and make you awesome (more so than I’m sure you already are).
Introduction
 Working through this beginners guide to the Linux command line (BASH) you will be up and running utilising powerful techniques, tips and tricks to make your life easier in no time. The following pages are intended to give you a solid foundation in how to use the terminal, to get the computer to do useful work for you. You won’t be a Unix guru at the end but you will be well on your way and armed with the right knowledge and skills to get you there if that’s what you want (which you should because that will make you even more awesome).
Here you will learn the Linux command line (Bash) with our 13 part beginners tutorial. It contains clear descriptions, command outlines, examples, shortcuts and best practice.
At first, the Linux command line may seem daunting, complex and scary. It is actually quite simple and intuitive (once you understand what is going on that is), and once you work through the following sections you will understand what is going on.
Unix likes to take the approach of giving you a set of building blocks and then letting you put them together. This allows us to build things to suit our needs. With a bit of creativity and logical thinking, mixed in with an appreciation of how the blocks work, we can assemble tools to do virtually anything we want. The aim is to be lazy. Why should we do anything we can get the computer to do for us? The only reason I can think of is that you don’t know how (but after working through these pages you will know how, so then there won’t be a good reason).
A question that may have crossed your mind is «Why should I bother learning the command line? The Graphical User Interface is much easier and I can already do most of what I need there.» To a certain extent you would be right, and by no means am I suggesting you should ditch the GUI. Some tasks are best suited to a GUI, word processing and video editing are great examples. At the same time, some tasks are more suited to the command line, data manipulation (reporting) and file management are some good examples. Some tasks will be just as easy in either environment. Think of the command line as another tool you can add to your belt. As always, pick the best tool for the job.
Outline
This Linux tutorial is divided into 13 sections. In general I recommend you work through them in order but if you’ve come here just to learn about a specific topic then feel free to just go straight to that one.
You can now jump into section 1 and get started or keep reading below to learn a little more about this tutorial.
- The Command Line — What is it, how does it work and how do I get to one.
- Basic Navigation — An introduction to the Linux directory system and how to get around it.
- More About Files — Find out some interesting characteristics of files and directories in a Linux environment.
- Manual Pages — Learn how to make the most of the Linux commands you are learning.
- File Manipulation — How to make, remove, rename, copy and move files and directories.
- Vi Text Editor — Discover a powerful Linux based text editor.
- Wildcards — Also referred to as globbing, this is a means to refer to several files in one go.
- Permissions — Learn to identify and change the permissions of files and directories and what the consequences of these are.
- Filters — An introduction to various commands that allow us to mangle data in interesting and useful ways.
- Grep and Regular Expressions — Master a powerful pattern matching language that is useful for analysing and processing data.
- Piping and Redirection — Join commands together in powerful combinations.
- Process Management — See what is currently running on your Linux system and what state the system is in, learn how to kill programs that have hung and put jobs in the background.
- Scripting — Be happy. Get the computer to do tedious and repetitive tasks for you.
- Cheat Sheet — A quick reference for the main points covered in this tutorial.
Structure
The best way to learn the Linux command line is as a series of small, easy to manage steps. This tutorial is organised as such, with each section building upon the knowledge and skills learned in the previous sections. If you work through them in order, read them fully (there is a fair bit of material but it is important for getting a proper understanding) and practice on the command line as you go I believe you should have a fairly pleasant and smooth journey to Linux command line mastery.
99 times out of 100 when a student has troubles with this stuff I find that it is not that they are incapable but that they were lazy and didn’t read the material fully.
Each section is structured in the following format:
- An introduction outlining what you will learn in that section.
- Detailed material including extensive examples.
- A summary of programs covered in that section and the most important concepts.
- A set of activities to help you solidify your knowledge and skills.
Think of the activities not as tutorial questions (such as you may get in a class at school) but as direction on where to explore in the Linux environment to benefit from your new knowledge and skills. Treat the activities as a starting point for exploration. The further you take it, the better you will do. (How well you do and how far you go depends on how unlazy you are.)
This site is also designed to work well on tablets. I know a lot of students like to be at their computer doing work and have their tablet next to them with reference material on it. If that is you then this site works quite well with that set up. Another good approach is to have your browser on one half of the screen of your computer and a terminal on the other half so you can try out the examples as you go.
Some general house rules:
- I’ll refer to Linux in the following pages, whenever I do, assume I’m actually saying Unix/ Linux. Linux is an offshoot of Unix and behaves pretty much exactly the same.
- Whenever you see , what this means is that you are to replace this with something useful. Replace the whole thing (including the ). If you see something such as then it usually means replace this with a number.
- Whenever you see [something] this usually means that this something is optional. When you run the command you may put in the something or leave it out.
Problem Solving and Creative Thinking
If you wish to succeed with the Linux command line then there are two things you need, Problem solving and Creative thinking. Here are some basic pointers to help you along the way.
- Explore and experiment. Remember, you’re learning about a set of building blocks and with them you can build almost anything. The examples you will find are intended to be an illustration of how they work, not the only thing you can do with them. I encourage you to tweak the examples and see how they behave. This will give you a much better understanding on how they work. You will have a lot of questions along the way along the lines of «What if. » and «Can I . » to which I say, «Give it a go and see what happens.» The worst you can really get is an error message. In which case you read the error message to understand why it didn’t work, then have another go. Don’t hold back!
- Read carefully and don’t skip over the fine details. I can’t stress this enough. The fine details are important and are often the difference between your command working and not working. If something isn’t working then re-read the material carefully and re look over what you have typed in to make sure you haven’t make a silly little typo.
So the general approach is:
- Create an hypothesis.
- Run your command to test this hypothesis.
- Observe the output. If it is what you were expecting, great. If not then continue.
- Analyse the output and adjust your understanding accordingly.
- Rinse and repeat till you get what you are after.
Obtaining Linux
Learning Linux is like riding a bike, you can only become proficient by actually doing. So before getting started, make sure you have access to a terminal. Luckily, you have several options available to you here.
- If you are on a Mac then you are in luck, you already have a terminal.
- Another option is to run Linux. Linux is completely free and there are many good distros out there. Some I would recommend include Ubuntu (which is quite popular and easy to use) and OpenSuSe (My personal favourite). If you take this approach then there are a few ways you can go.
- If you have a spare machine then you can just install it on that.
- You can create a dual boot system (ie both Windows and Linux are installed on the computer, you choose which to run when you boot up.). Most modern Linux distros will handle creating this for you when you install it (resizing existing windows partitions as well). Do back up any important files before doing this method though (I’ve never seen it fail but better to be safe).
- You can run Linux in a virtual machine. VirtualBox is a nice tool to use for this and it’s totally free too.
- You may also have access to a machine remotely either at work or uni. If you do then remotely logging into these to access a terminal is an option as well.
About the Author
 Hi. My name is Ryan Chadwick and I have been teaching Linux to students for over 10 years now. It’s something that I very much enjoy. In a world where we are increasingly hiding the complexities away from users (smart phones and tablets in particular), it is always satisfying to give that power back to people and allow them to do much more with their technology.
But teaching is only one of the things I do. I also develop and manage websites, and manage computer systems for a few different organisations. I feel that all my work is complementary and benefits from what I learn in the others. Combined, they give me a fairly good understanding of how technology works, and also an understanding of how people use technology, perceive technology, learn technology and work around technology.
This website is both for you, and for me. For you, it is a digital form of what I have been teaching my students over the years. For me, it is an opportunity to clarify and polish what I teach and how I deliver it. To these ends, if you have any feedback at all, be it to tell me you found a particular section confusing, or to let me know it was helpful, I would be more than happy to hear from you.
Drop us a message at
Using this material
Anyone may link to the content on this website.
If you are a teacher, academic, manager or trainer and wish to use this material in your classes or training you are more than welcome to link to these pages and refer your students here or show them in your classes, but please do not just copy my material.
I’ve put a fair amount of time and effort into creating this resource so please be cool and do the right thing.
Disclaimer
Unfortunately, in this crazy and litigious world we now live in, one has to keep themselves covered so here is my disclaimer.
To the best of my knowledge, the material contained within these pages is correct. I make no guarantees however. I also take no responsibility for any damage you may do based upon knowledge gained from here (even though the chances of doing so are relatively small at best). Please use common sense when using any of the knowledge and skills gained from using this material.
Источник
How to get started with Linux: A beginner’s guide

The world of Linux is ready to welcome you, with a shower of free open-source software you can use on any PC: hundreds of active Linux distributions, and dozens of different desktop environments you could run on them. It’s a far cry from the one-size-fits-all, this-is-just-what-comes-with-your-PC vision of Windows.
Everything from software installation to hardware drivers works differently on Linux, though, which can be daunting. Take heart—you don’t even need to install Linux on your PC to get started. Here’s everything you need to know.
Choose and download a Linux distro
The first step is choosing the Linux distribution you’ll want to use.
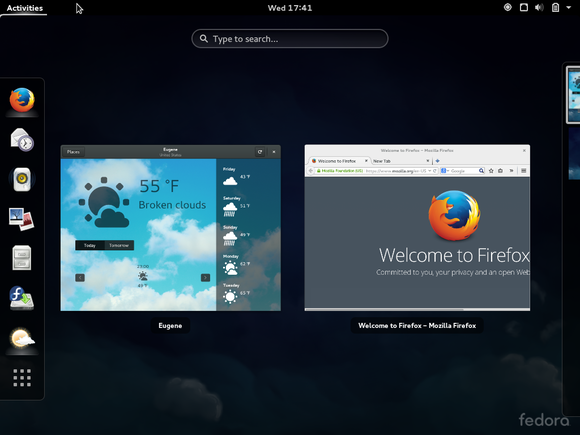
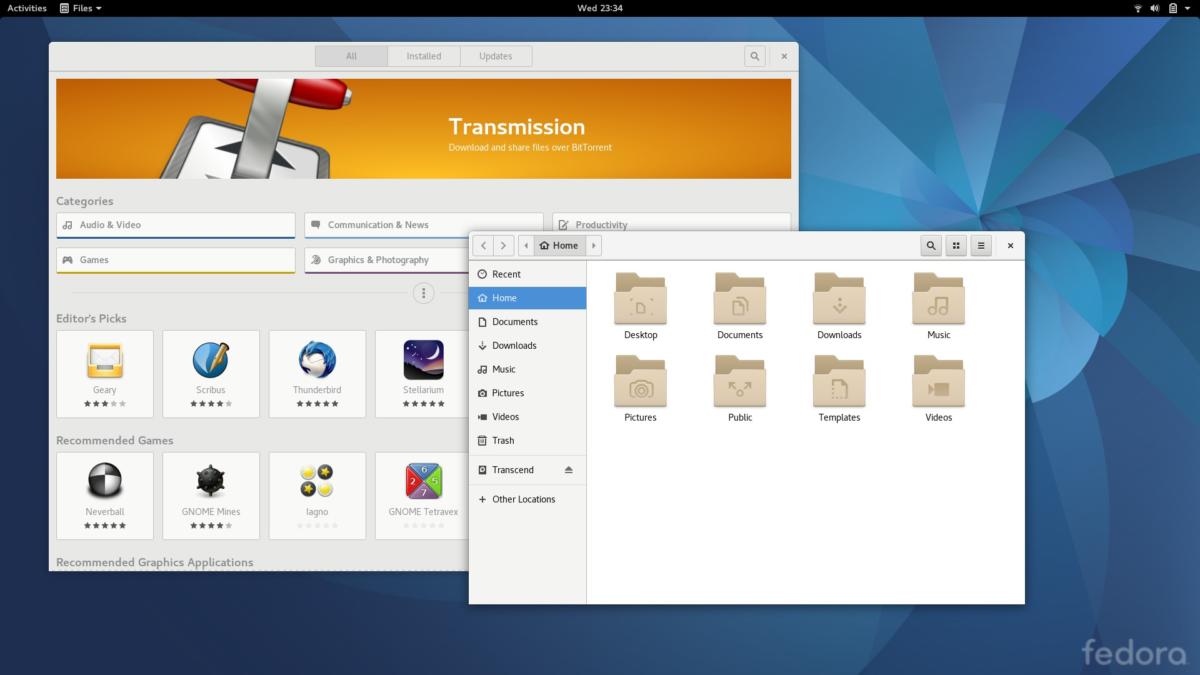
Fedora Linux with the Gnome Shell desktop.
Unlike Windows 10, there’s no single version of Linux. Linux distributions take the Linux kernel and combine it with other software like the GNU core utilities, X.org graphical server, a desktop environment, web browser, and more. Each distribution unites some combination of these elements into a single operating system you can install.
DistroWatch offers a good, in-depth summary of all the major Linux distributions you might want to try. Ubuntu is a fine place to start for former (or curious) Windows users. Ubuntu strives to eliminate many of Linux’s rougher edges. Many Linux users now prefer Linux Mint, which ships with either the Cinnamon or MATE desktops—both are a bit more traditional than Ubuntu’s Unity desktop.

The Cinnamon desktop environment running on Linux Mint 18.2.
Choosing the single best isn’t your first priority, though. Just choose a fairly popular one like Linux Mint, Ubuntu, Fedora, or openSUSE. Head to the Linux distribution’s website and download the ISO disc image you’ll need. Yes, it’s free.

You can use the Universal USB Installer to easily create a bootable thumb drive using an .ISO image of a Linux distribution.
You can now either burn that ISO image to a DVD or USB. Note that booting from USB 3.0 is faster than booting from DVD these days, and more versatile given that most laptops and many desktops no longer include a DVD drive.
To burn an image to USB, you’ll need a specialized program. Many Linux distributions recommend using Rufus, UNetbootin, or Universal USB Installer. If you’ll be using Fedora, we think the Fedora Media Writer is by far the easiest way to go.
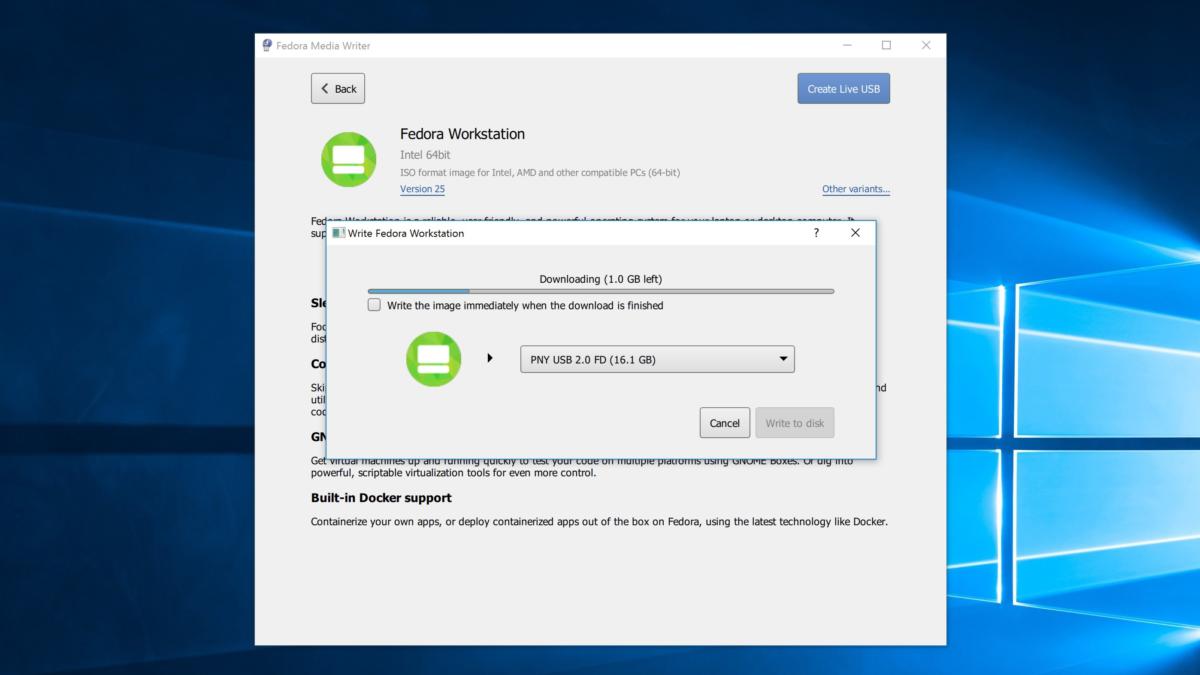
Fedora’s Media Writer utility is a thing of beauty and can run on Windows or Mac OS. It’s the easiest way to make a bootable Linux USB stick.
For most desktops and laptops, the above instructions will suffice. However, if you want to use Linux on a Chromebook, Raspberry Pi, or another type of device, there are special instructions you’ll need to follow.
Running Linux live off an external drive
Now you’ll need to boot that Linux system. Restart your computer with the disc or USB drive inserted and it should automatically boot. If it doesn’t, you may need to change your BIOS or UEFI firmware boot order, or select a boot device during the boot process.
If you’re not sure whether you’re running UEFI or BIOS, you’re probably running UEFI, unless your PC is five years old or more. To enter your BIOS or UEFI on a desktop, you’ll generally have to hit the Del or F12 key during the POST process (before Windows starts booting).
It can be a little trickier to get into the BIOS/UEFI on laptops. Many modern laptops don’t give you the option to enter UEFI by keystroke. Some laptops may include a small, unlabeled button on the side that you can hold down while you turn on the laptop. If you’re unsure about how to enter the UEFI setup screen, consult your PC’s user manual.
On younger Windows PCs running Windows 10, you may have to disable Secure Boot before booting Linux. (Secure Boot has been a headache for many Linux users.) Most of the larger Linux distributions will boot normally with Secure Boot enabled, but others won’t.
Your Linux distribution of choice probably allows you to use it in a “live” environment, meaning it runs entirely off the disc or USB drive and doesn’t actually need to be installed to your computer’s hard drive. Just use the Linux desktop normally and get a feel for it. You can even install software, and it’ll remain installed in the live system until you reboot.
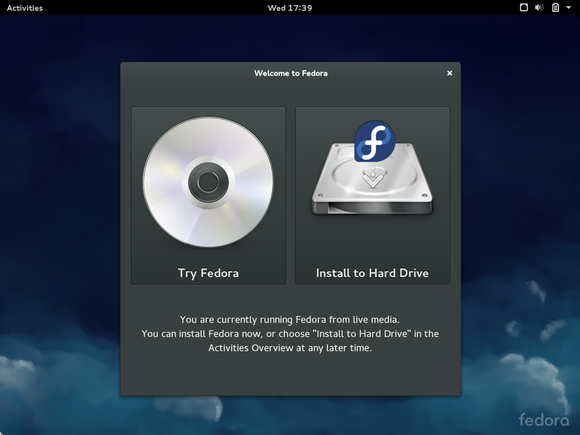
Fedora’s Live CD interface, like most Linux distributions, lets you choose to run the operating system from your bootable media or install it to your hard drive.
Even if you don’t want to use Linux as your everyday operating system, having this Linux live DVD or USB drive around can be useful. You can insert it into any computer and boot Linux whenever you want. Use it to troubleshoot Windows problems, recover files from a corrupted system, scan an infected system for malware, or provide a secure environment for online banking and other important tasks.
If you have more than one USB stick to spare, you can try different Linux distributions and pick the one you prefer. Another handy trick: If you enable the “persistence” option when putting Ubuntu on the USB drive, you can save files and settings to the drive and they’ll remain accessible every time you boot it.
To leave the live Linux system, just reboot your computer and remove the disc or USB drive.
Use Linux in a virtual machine
With free virtualization tools like VirtualBox, you can have multiple virtual machines (VMs), complete with their own boot sequences and isolated storage. One of the most popular things to do with virtual machines is to run different operating systems on one computer without needing to reboot.
It’s pretty easy to create a VM on Windows to create a virtual environment to run Linux in. VMs are easy to manage, and when you’re done using them, you can delete them. You can even back up copies of the entire virtualized (guest) operating system if you need to.
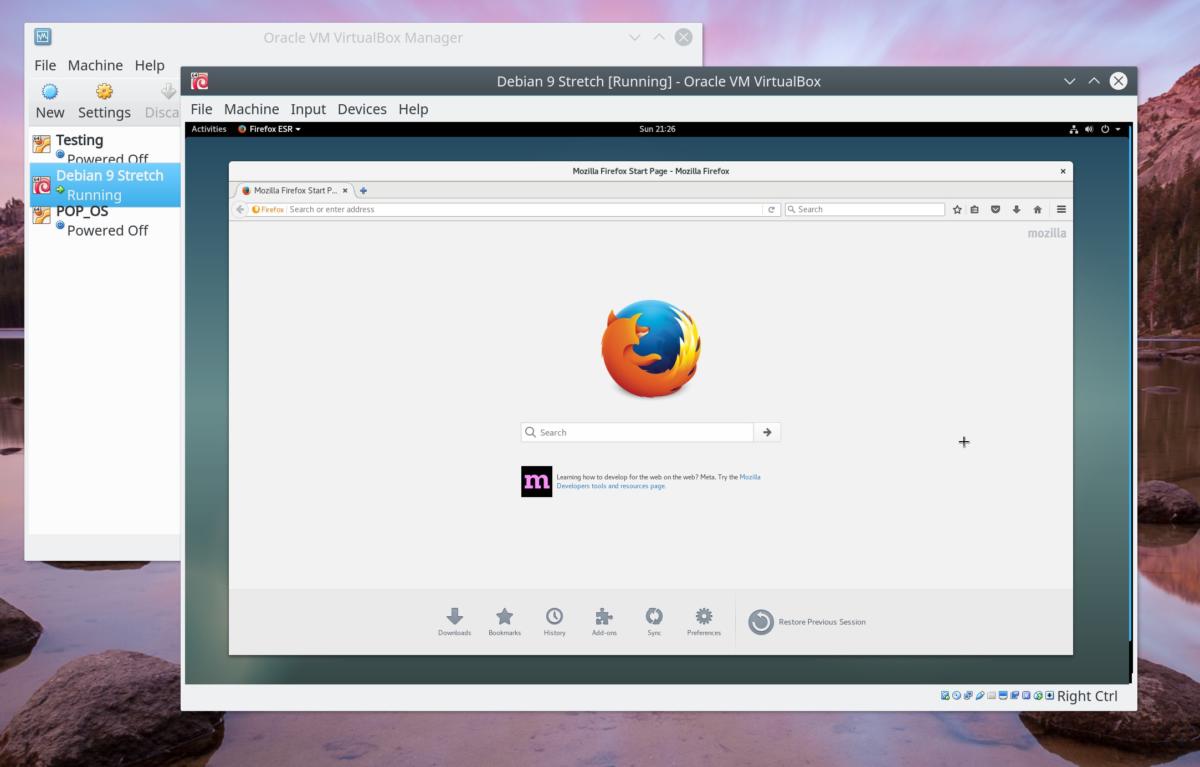
You can use VirtualBox to test different Linux distros while running Windows or Linux. Here, Debian 9 (the guest) is running in VirtualBox on Arch Linux (the host).
If you’ve never used VirtualBox before, Virtualbox is a cinch to set up. Once you have it installed in Windows 10, you can set up a VM in a couple minutes with VirtualBox’s wizard. The VirtualBox manual’s step-by-step instructions are a great resource if you’re not quite sure where to start.
While using VirtualBox is a great way to try out one or more Linux distributions, there are some disadvantages. Virtualization comes with a performance hit due to overhead, though this is reduced if your CPU has virtualization support built-in. Intel calls its virtualization support VT-x, while AMD’s is called AMD-V. To take advantage of this technology, you also have to make sure that virtualization support is enabled on your motherboard (in the UEFI or BIOS) as well.
In addition to a performance hit, virtual machines generally won’t have direct hardware access to things like video cards.
Despite the disadvantages, if you’re Linux-curious, and not ready to install Linux on your PC’s “bare metal,” virtualization offers a great way to try out Linux without the need of a USB stick.
Your Linux desktop environment
Depending on which Linux distribution and desktop environment you choose, your desktop environment and installed applications will vary—though most will cover your typical needs. Most Linux distributions ship with the Firefox web browser, for example. The open-source Chromium browser (or Google’s Chrome, if you prefer) is just a few clicks away.
The Fedora 25 desktop running GNOME’s Software and Nautilus applications.
Your desktop environment should have all the standard bits: an application menu, some sort of taskbar or dock, and a notification area or “system tray.” Click around to see what everything does. You should also find a collection of system utilities that will let you configure your hardware and make your desktop work the way you’d like.
Ubuntu 16.04’s Unity desktop can be quirky, but it’s packed with useful features you’d never find on your own, like the HUD. If you’re going with Ubuntu 16.04 or earlier, be aware that Ubuntu will be abandoning its Unity desktop in future versions. Ubuntu dropped Unity in favor of the GNOME shell that comes default on Fedora and other distributions. If you want to try Ubuntu, we recommend trying Ubuntu GNOME, which uses the GNOME desktop instead of Unity.
Additionally, be sure to enable virtual desktops (most modern Linux desktops have disabled them by default) and give them a shot, too.
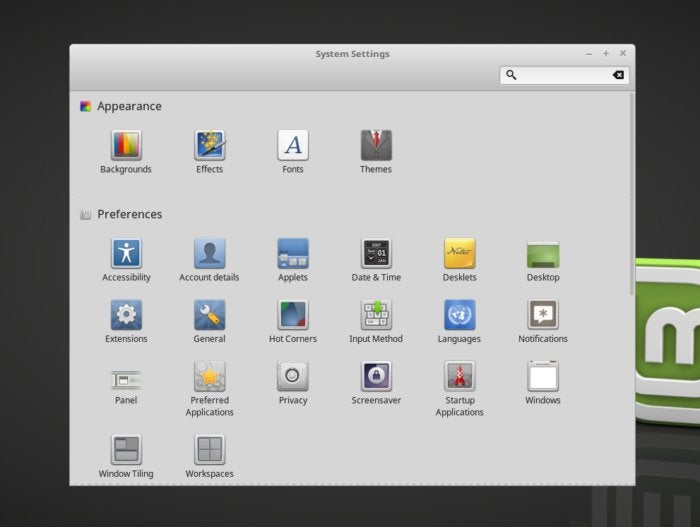
Every desktop environment has a set of tools to help you customize the look and feel how you want it to. Here, Cinnamon’s System Settings running on Linux Mint 18.2 shows the options available.
If you’re unhappy with the desktop you’re using, don’t worry. While some distributions are optimized for a particular desktop, nearly every major distribution gives you the option to install the desktop of your choice after the system is installed. As long as you have enough storage to spare, you can have GNOME, KDE, Cinnamon, XFCE, and other desktops installed at the same time. When you log in to the desktop, you can choose what desktop environment to run.
If you ever get lost, there is plenty of help online. Generally Googling your distribution’s name followed by the question will lead you in the right direction. If you prefer a more structured help environment, the Ubuntu and Fedora documentation websites are great resources. While the Arch Wiki is written with users of Arch Linux in mind, it is a great in-depth resource for Linux programs in general.
Install Linux, or not
You have choices about when and how to install Linux. You can leave it on a disc or USB drive and boot it up whenever you want to play with it. Play with it several times until you’re sure you want to install it. You can try several Linux distributions in this way—you can even re-use the same USB drive.
The big reasons to install Linux instead of just running it from a USB drive or disc are productivity and convenience. Unlike running Linux live, installed Linux will remember your settings, keep your installed software, and maintain your files between reboots.
Want to stay up to date on Linux, BSD, Chrome OS, and the rest of the World Beyond Windows? Bookmark the World Beyond Windows column page or follow our RSS feed.
Once you’re ready to take the plunge, installing Linux on your PC is easy—just launch the installer provided in the live Linux environment. You have yet another choice here, though: You could wipe away your existing Windows system (assuming that’s your current OS) and replace it with Linux, but installing it in a “dual-boot” configuration, or “alongside Windows,” in Ubuntu installer parlance, is the more flexible choice. The installer will resize your Windows partition to make room for Linux, and you can select which operating system you want to use every time you boot your computer.
Of course, you can always choose to install Windows in a virtual machine as well.
How to install more software

OpenSUSE’s YaST software management tool.
Software installation on Linux works very differently from software installation on Windows. You don’t need to open your web browser and search for applications. Instead, look for the software installer on your system. On Ubuntu and Fedora, you can install software using GNOME’s software store application (aptly called “Software”).
Software managers aren’t just fancy interfaces for downloading software from the web. Your Linux distribution hosts its own “software repositories,” containing software compiled to work with it. This software is tested and provided by the Linux distribution. (If you choose a rolling-release distribution like Arch or openSUSE Tumbleweed, the newer software can cause problems. If you prefer stability over the latest-and-greatest versions of software, stick to a “versioned” Linux distribution to start out.) If security patches are necessary, your Linux distribution will provide them to you in a standard way.
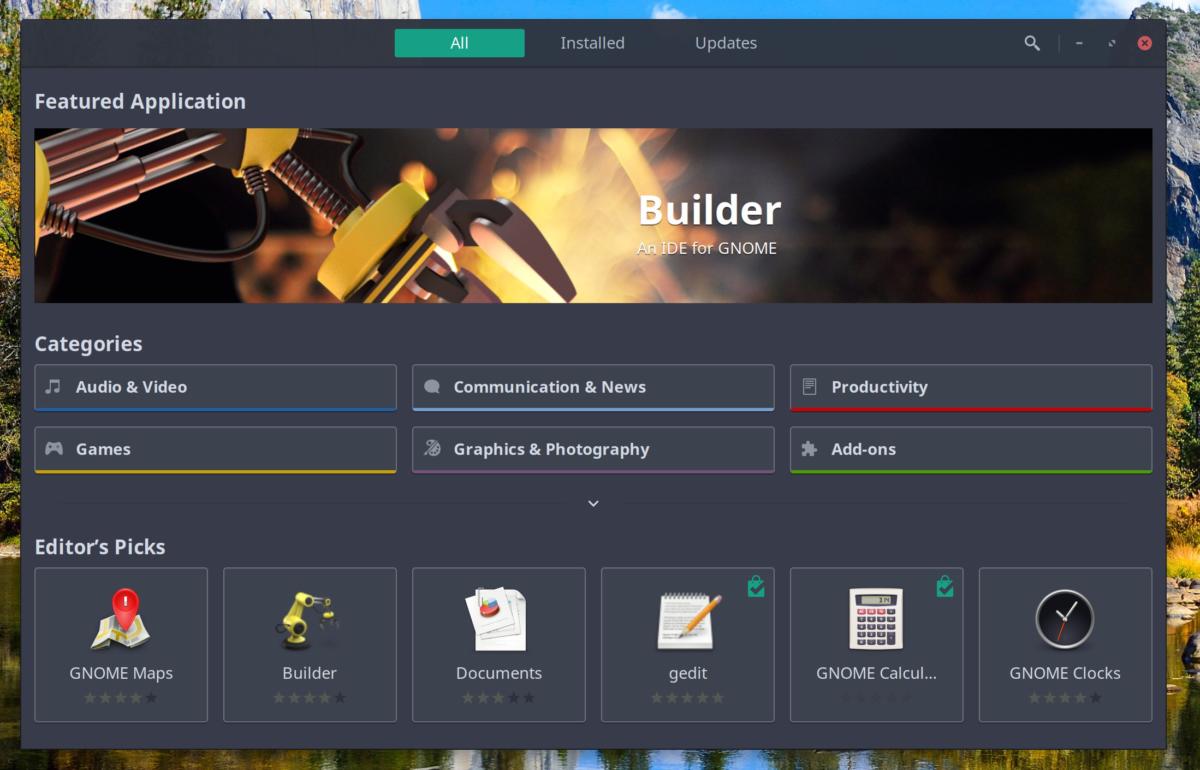
GNOME Software is an application that uses store-like interface to browse for and install software. GNOME Software is available on Ubuntu and any distribution that uses the GNOME desktop.
Basically, it’s like an app store full of free, open-source software—except Linux distributions were doing “app stores” like this long before Apple popularized the concept.
While most major distributions offer GUI programs to help you install software, all distributions have command-line tools that can do the same thing. Though it can be intimidating for newbies, we recommend users familiarize themselves with how to install applications from the command line, even if they prefer using the GUI. If an installation fails for some reason, using the command line will offer hints as to why the installation failed.
Some applications—particularly closed-source applications like Google Chrome, Steam, Skype, Minecraft, and others—may have to be installed from outside your Linux distribution’s package manager. But check your package manager first—you’ll be surprised what apps may be available through your distro’s repositories.
If you can’t find the app you need, you can download these applications from their official websites, just as you would on Windows. Be sure to download the installer package designed for the Linux distribution you’re using.
Other open-source applications can be obtained on GitHub. If the application is commonly used on the desktop, the program’s GitHub page may have a link to a package for your distro (.deb or .rpm). If not, you’ll often find directions to manually install the program on the README page.
Contrary to widespread belief, you probably don’t need to install hardware drivers manually when you install the operating system. Most of the hardware drivers you’ll need are built-in on Linux. There are a few closed-source drivers you might want—the Nvidia and AMD drivers for optimal 3D graphics performance, or Wi-Fi drivers to make your Wi-Fi hardware work right. However, most of the hardware you have (even touchscreens) should work out of the box.
It’s worth mentioning that while Nvidia’s proprietary Linux drivers are great performance-wise, Nvidia’s proprietary drivers don’t always play nice with the open-source community. (Linus Torvalds, the guy who wrote the Linux kernel, famously gave the finger to Nvidia on camera because of this.) If you’re not planning on doing a lot of gaming on Linux, Intel’s integrated graphics (which is present on pretty much all non-enthusiast Intel Core CPUs) will do the job just fine.

The Software Manager in Linux Mint 18.2’s Cinnamon desktop has a user-friendly interface.
Ubuntu and Linux Mint will recommend drivers to you via their hardware driver tools, if necessary. Some Linux distributions may not help you install these at all. For example, Fedora doesn’t want to endorse closed-source Linux drivers. If you need specialized drivers, check your distribution’s documentation. Most distros have help pages for people who have AMD or Nvidia video cards, for instance.
Despite the software installation differences, Linux should feel reasonably familiar to anyone who’s used a Windows desktop before. You’ll find windows, context menus, control panels, and more. Many of the applications you’ll use on Linux are popular programs you may have already used on Windows, from Firefox to VLC and LibreOffice.
Now you have the basic knowledge you need to get started using Linux. Happy exploring!
Editor’s note: The original version of this article posted on May 18, 2015.
Источник


