- Learn linux with raspberry pi
- What you’ll learn
- What you’ll need
- 2. Prepare the SD Card
- 3. Wi-Fi or Ethernet
- Getting setup with Wi-Fi
- Set a static IP
- 4. Boot Ubuntu Server
- Connect remotely to your Raspberry Pi
- Determining the Pi’s IP address
- Using an SSH client
- Changing the password
- Still not connected to the internet?
- 5. Install a desktop
- 6. That’s all, folks!
- How to Install Kali Linux on Raspberry Pi? (Complete Guide)
- Kali Linux introduction
- How to Install Kali Linux
- Download Kali Linux images for Raspberry Pi
- Create a new SD Card with Etcher
- First boot on Kali Linux
- Open a session on Kali Linux
- Kali Linux Configuration
- Keyboard layout
- Connect to your Network
- Ethernet:
- Get your current IP address:
- Set a static IP address
- Update Kali
- Enable SSH and VNC
- Enable SSH
- Enable VNC
- Kali Linux tools
- Change your MAC Address
- Overview
- Usage
- Hack Wi-Fi password
- Overview
- Usage
- Brute force with Hydra
- Overview
- Usage
- Packet Analyzer
- Overview
- Usage
- SQL Injection
- Overview
- Usage
- Vulnerabilities exploit
- Overview
- Usage
- Video
- Conclusion
- Raspberry Pi Resources
Learn linux with raspberry pi
In this tutorial, we walk you through the process of installing Ubuntu Server on a Raspberry Pi, connecting it to the internet and using it remotely. There are two setup methods in this tutorial: with an extra HDMI screen and USB keyboard for your Pi, or headless. Let’s start!

What you’ll learn
- How to create a bootable Ubuntu Server microSD card
- How to setup internet connectivity on the Raspberry Pi
- How to access your Raspberry Pi remotely
What you’ll need
- A microSD card (4GB minimum, 8GB recommended)
- A computer with a microSD card drive
- A Raspberry Pi 2, 3 or 4
- A micro-USB power cable (USB-C for the Pi 4)
- A Wi-Fi network or an ethernet cable with an internet connection
- A monitor with an HDMI interface
- An HDMI cable for the Pi 2 & 3 and a micro HDMI cable for the Pi 4
- A USB keyboard
2. Prepare the SD Card
Warning
Following these steps will erase all existing content on the microSD card.
First, insert the microSD card into your computer.
Now you need to install the right Raspberry Pi Imager for your operating system. You can do this with the following links:
Or, if you are on Ubuntu, you can run:
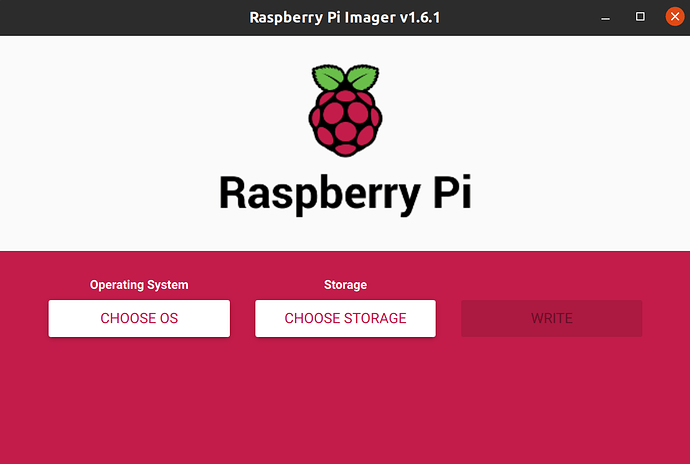
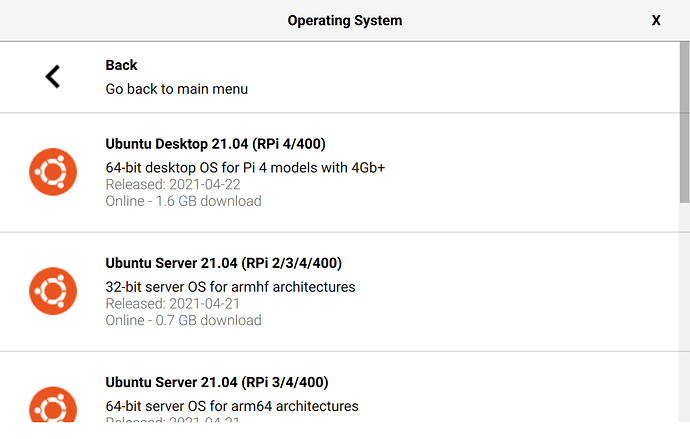
Once this is done, start the Imager and open the “CHOOSE OS” menu.
Scroll down the menu click “Other general-purpose OS”.

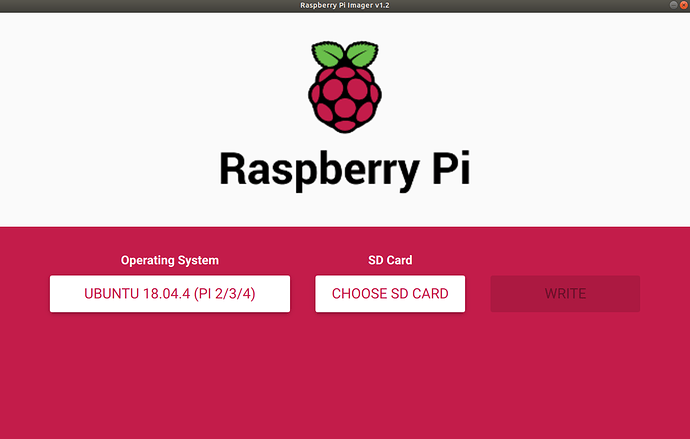
Here you you can select Ubuntu and see a list of download options. For this tutorial we recommend you select the Ubuntu 20.04 download. As indicated in the imager this will work for the Raspberry Pi 2,3, 3+ and any of the 4’s.
Select the image and open the “SD Card” menu. Select the microSD card you have inserted.
Finally, click “WRITE” and wait for the magic to happen… (This magic might take a few minutes)
3. Wi-Fi or Ethernet
If you want to use your local lan’s DHCP server to get an IP address for your pi then there are two ways to get your Pi connected to the internet:
The first is to connect your Pi to your router with an ethernet cable. In this case, you can skip this step and go to the next one in the tutorial.
The second requires a local Wi-Fi network that both your computer and Pi can be connected to. We are going to edit files you just downloaded on your SD card to ensure your Pi can connect to the Wi-Fi network at boot.
If you want to have the Pi boot to a known IP address then see the section “Set a Static IP”.
Getting setup with Wi-Fi
With the SD card still inserted in your laptop, open a file manager and locate the “system-boot” partition on the card. It contains initial configuration files that load during the first boot process.
Note: your system might look different from the screenshots here because this tutorial was written using Ubuntu 18.04 LTS. The steps are still the same even if things look a little different.

Note: Screenshots have been made on an Ubuntu desktop but it can be done on Windows and MacOS too
Edit the network-config file to add your Wi-Fi credentials. An example is already included in the file, you can simply adapt it.
To do so, uncomment (remove the “#” at the beginning) and edit the following lines:
Note: network name must be enclosed in quotation marks.
Save the file and extract the card from your laptop.
Note ⓘ: During the first boot, your Raspberry Pi will try to connect to this network. It will fail the first time around. Simply reboot sudo reboot and it will work.
Set a static IP
To set a static IP you need to replace the
line in the network-config file with lines that specify the intended IP address as well as its default gateway and DNS server. You can do this for either the eth0 or wlan0 interface (or both). It is important that you get the indenting right for this work correctly
For example, if you were planning to give the pi the address 192.168.1.23 in the 192.168.1.0/24 subnet with a default gateway of 192.168.1.1 and a DNS server of 192.168.1.53 then the following text would work. The same structure works for both the eth0 or wlan0 sections in the file:
4. Boot Ubuntu Server
If you are using an HDMI screen and a USB keyboard, ensure they are plugged in before powering the Pi. You will be able to see the boot process on the screen.
Warning
During your first boot a tool called cloud-init is doing configuration. WAIT for it to finish before trying to log in. It typically takes less than 2 minutes but there is a break between the log-in prompt and cloud-init completing. If you interrupt the process you have to start again. You’ll know it’s done when it outputs some more lines after the log-in prompt has appeared.
Once cloud-init finishes log in using “ubuntu” as both the password and login ID. After a minute or so, Ubuntu on your Raspberry Pi will have fully booted and connected to the network.
If you are using an ethernet cable and are not connected to the network at this point you may need to run:
sudo dhclient eth0
Connect remotely to your Raspberry Pi
To connect to your Raspberry Pi remotely, you need two things (we’ll help you find them):
- Its IP address on the local network
- An SSH client (SSH is a communication protocol between machines)
You have to do this if you are running your device headless, but you might also want to do this if you are not so you can access your Pi from anywhere.
Determining the Pi’s IP address
To determine the IP address of your board, open a terminal and run the arp command:
On Ubuntu and Mac OS:
If this doesn’t work and you are using the latest Raspberry Pi 4, instead run:
Information
Depending on your version of Ubuntu, you may need to install the net-tools package. Install it with sudo apt install net-tools and try the arp command again.
If this doesn’t work and you are using the latest Raspberry Pi 4, instead run:
This will return an output similar to:
Where the x’s are the IP address of any Raspberry Pi connected to the local network. Note it down.
If the command doesn’t return an IP address, you may need to wait a little longer for your Pi to join the network. If you still can’t see it after a few tries, which can happen with some home or office network configurations, we recommend you use a USB keyboard and HDMI screen to interact with your device.
Using an SSH client
On Ubuntu and Mac OS, an SSH client is already installed. Some versions of Windows 10 also include an SSH client too, but if yours does not or you’re unsure, follow these steps to install one.
Open a terminal and run the following command:
You will be asked to confirm the connection:
Type “yes” to confirm.
Changing the password
When prompted, use “ubuntu” for the password. (The cursor won’t move when you type the password.) The first thing Ubuntu will do is to ask you to change it to a secure password. Once done, you can reconnect again with the SSH command and the new password.
Success! You are now connected to Ubuntu Server running on your Raspberry Pi.
Still not connected to the internet?
Sometimes the structure of the network-config file that you modified before boot gets messed up when you book. This would cause your Pi not to be able to connect to your wifi.
To fix this you need to go into the correct file and correct the issue. Run:
sudo nano /etc/netplan/50-cloud-init.yaml
so you can edit the file. Edit it so it looks like this again, the indentation needs to be correct for the .yaml to work:
Save and exit the file with Ctrl + S and Ctrl + X .
Run sudo netplan apply and sudo reboot and when you log back in, you will be connected to your wifi.
5. Install a desktop
Optional step
Depending on what you are going to use your Pi for, you may want a desktop environment to run graphical applications. Nevertheless, this step is completely optional.
First you need to ensure your packages are updated to the latest version, run:
Then, you can use the apt install command to install a desktop environment.
Here are some popular and lightweight options:
sudo apt install xubuntu-desktop
sudo apt install lubuntu-desktop
If you run into issues with either of these check out this blog. We’re working on fixing this imminently.
Once the install finishes, reboot your pi with:
And your new desktop will come up automatically
Alternatively, if you now decide you want an Ubuntu Desktop proper, a full-fat version, you can head over to our other tutorial to re-flash your Raspberry Pi with the Ubuntu Desktop.
6. That’s all, folks!
You are done! Up and running on Ubuntu Server.
For more details about Raspberry Pi specific packages included with this image and further customisations, such as accelerated video drivers and optional package repositories, you can refer to the RaspberryPi wiki.
Источник
How to Install Kali Linux on Raspberry Pi? (Complete Guide)
Kali Linux is an open-source Linux distribution, based on Raspberry Pi OS, and including all apps for penetration testing.
I recently installed it on my Raspberry Pi and I will give you some tips to do the same on your side. We’ll also test a few tools to learn more about this system.
Download the Kali Linux image from the official website.
Then, flash it on a SD card with Balena Etcher and start the Raspberry Pi.
In this article, I will explain in 15 steps how to get started with this hacking distribution on Raspberry Pi.
Feel free to use the table of contents below to go directly to what interests you the most.
By the way, if you are really interested in improving your skills on Raspberry Pi, I highly recommend to check out my e-book here. It’s a 30-days challenge from beginner to master, with step-by-step tutorials and many projects to practice along the way.
Kali Linux introduction
Kali Linux is a Debian-based Linux distribution, which includes security and penetration testing tools.
Formerly known as Backtrack, many security companies (and also hackers) use it.
Associated with Raspberry Pi, it turns it into a perfect hacking kit.
Kali Linux is available for the ARM architecture, so the installation is relatively simple. We will now see how to install it on your Raspberry Pi.
How to Install Kali Linux
Download Kali Linux images for Raspberry Pi
Kali Linux images for the ARM architecture are available on this page of the official website.
Click on the image name to download it directly, or click on “Torrent” to download the torrent file.
If you don’t know Torrent, it’s a peer-to-peer download protocol
You need to download and install a software to use it (Transmission, Vuze, Deluge, BitTorrent, …).
On Ubuntu, for example, Transmission is part of the basic packages already installed.
As you can see, all Raspberry Pi models are now supported, including the Raspberry Pi 4. This is good news for us 🙂
I suppose it should work on Raspberry Pi 400.
Create a new SD Card with Etcher
Now that you have the image of Kali Linux, we will create an SD card to install and use it later.
If possible, I recommend installing it on another SD card than the one you use for Raspberry Pi OS, so you don’t have to redo everything if you come back on Raspberry Pi OS (8Gb minimum).
If you need more SD cards, you can check my recommended products here.
As usual, we will use Etcher to create our SD card.
If you don’t have it yet you can download it from the official website, it’s available for Linux, Windows and macOS and will make your life easier.
Once Etcher installed, start it.
Then select your image and your SD card then start the copy.
I don’t know exactly why, but Kali Linux took me longer than other distributions to flash (even if the size is almost the same as Raspberry Pi OS Full), probably more compressed than Raspberry Pi OS.
First boot on Kali Linux
Just insert the SD card into your Raspberry Pi and start.
Kali Linux will start directly the login screen.
No questions or other, insert, start, wait.
There is nothing else to do 🙂
Open a session on Kali Linux
Once Kali started, you need to log in:
The default identifiers on Kali Linux are:
– login: kali
– password: kali
It is strongly recommended changing them quickly.
You can change it by opening a terminal and typing the command:
passwd
Kali Linux Configuration
You are now on the Kali Linux Desktop, and we can move to the configuration part.
Keyboard layout
If you don’t use a US keyboard, you can change the layout in the Settings, Keyboard options.
But be careful, on the login screen you will keep the US layout for the moment, so choose your password knowing this.
Connect to your Network
This part is only to use the network if there is a DHCP server on it.
If not, or if you need to set a static IP address, look at the following step.
Ethernet:
Just connect the RJ45 cable to your Raspberry Pi and wait a few seconds for an IP address to be assigned to it, there is nothing else to do.
On the Kali desktop, click on the network icon at the top right, and choose the SSID of your Wi-Fi network.
Type the password of your access point, and wait a few moments.
Get your current IP address:
Whatever your connection mode, you can retrieve the IP address obtained with the ifconfig command:
sudo ifconfig
The addresses are indicated on the second line of each interface, after the keyword “inet”.
eth0 = Ethernet, wlan0 = Wi-Fi
I recommend not to activate both simultaneously, even if it seems to work.
I had problems of response time by moments. Probably a problem of routing (I didn’t take any longer to look at this, but by disabling the Wi-Fi it fixed the problem).
Set a static IP address
A static IP address will allow you to choose the IP address associated with your Raspberry Pi, and therefore find it more easily later:
- Open a terminal or connect with SSH
- To set a static IP open the /etc/network/interfaces file:
sudo nano /etc/network/interfaces - You will see something like this
auto eth0
iface eth0 inet dhcp - Replace it with something like this:
auto eth0
iface eth0 inet static
address 192.168.1.200
netmask 255.255.255.0
gateway 192.168.1.1
nameserver 8.8.8.8
Replace the IPs indicated by what fits your network - Reboot your Raspberry Pi or unplug/plug the network cable to update your IP
You can do the same thing for your Wi-Fi connection by replacing eth0 with wlan0.
Update Kali
As for any fresh new installation, a good practice is to update your system :
sudo apt update
sudo apt upgrade
Enable SSH and VNC
Now that we have a fixed IP address, it’s time to make our Raspberry Pi accessible from another network computer.
Enable SSH
In theory, SSH is installed and enabled by default.
If you don’t have access, it’s probably because you need to start the service:
service ssh start
If you need help with SSH, look at this tutorial here.
Enable VNC
VNC will allow you to have access to a remote desktop on your Raspberry Pi.
On the latest Kali Linux versions, TightVNC is already installed
You just need to set a password:
- Open a terminal or connect via SSH
- Use this command to define your password:
vncserver - Once done, this will also start the service
You can now connect to your Raspberry Pi on Kali Linux with any VNC Viewer.
For example, on Ubuntu :
sudo apt install xtightvncviewer
xtightvncviewer 192.168.1.200:1
On Windows, you can download TightVNC here.
Remember that VNC is not a secure protocol, and if you use it at home it’s ok, but in a more extensive network it is better to use it through an SSH tunnel for example.
You can find more details about remote desktop on Raspberry Pi in my tutorial linked here. It’s for Raspberry Pi OS, but it’s very similar.
Kali Linux tools
Ok, you are now ready to try the Kali Linux tools available directly after the installation.
There are so many apps available that it can quickly become overwhelming.
That’s why I’ll show you a few ones here, that you can easily try.
Change your MAC Address
Overview
A MAC address is a unique identifier for each network adapter. It depends on each manufacturer, and it’s often used to give access to a specific part of the network to restricted computers. A DHCP server can also assign always the same IP to a MAC Address.
For example, you can configure your Wi-Fi network to whitelist your MAC address, and prevent anyone else from connecting to it. I have a detailed article here on how to find the MAC address of your Raspberry Pi.
MacChanger is a tool which allows you to do MAC address spoofing, i.e. to pretend to be someone else.
Usage
Install it if needed:
sudo apt install macchanger
See your current MAC Address:
ifconfig eth0
- Disable your network card:
ifdown eth0 - Get a random MAC address:
macchanger -r eth0 - Set a specific MAC address:
macchanger -m XX:XX:XX:XX:XX:XX eth0 - Reboot to reset and get the standard MAC Address
Hack Wi-Fi password
Overview
AirCrack-NG is one of the most popular tools on Kali Linux.
It’s a complete suite of tools to test the wireless security of a network.
It provides tools for monitoring, attacking, testing and cracking Wi-Fi networks.
Usage
You need to disconnect the Wi-Fi on your Raspberry Pi before starting:
- Then check that your network card is compatible (it is):
sudo airmon-ng - Start monitoring:
sudo airmon-ng start wlan0 - Show wireless network available:
sudo airodump-ng wlan0mon
Brute force with Hydra
Overview
Brute force is a password cracking method, that try passwords from a dictionary or other, and try all the possibilities until it works.
Hydra is a tool to make very fast brute force from a Kali Linux software and which supports many protocols.
Usage
First, you will need a list of passwords and put it in a file, like /root/passwords.txt (one per line).
You can find most common passwords on the Internet, or generate your own
For the test, just put a few random passwords manually in the file.
Then you can try it, for example, I have decided to brute force SSH on my computer from the Raspberry Pi:
hydra -l root -P /root/passwords.txt -t 6 ssh://192.168.222.51
If I check in my /var/log/auth.log, I can see tries from the Raspberry :
Packet Analyzer
Overview
A packet analyzer (or sniffer) is a tool that can intercept traffic from the network and capture it to analyze it.
On Kali Linux, you can use Wireshark, which is the most used tool to analyze network traffic.
It’s a graphical tool, but you can capture packets with tcpdump or something else, and then open it with Wireshark.
Usage
You can find the app in the Applications menu, under Sniffing and spoofing:
- Start it and then go to Capture > Start
- You will now see all packets from the network
- Click Stop when you want
Then there are many features that you can use to filter or analyze what you have captured:
SQL Injection
Overview
SQL injection is a technique to attack insecure applications, including injecting code into user fields that are not protected.
This technique is mainly used to attack websites.
For example, if you replace a parameter of the URL, say ?user=yourname by something like ?user=yourname ‘ OR 1
If the field is poorly protected, the SQL query will be modified and will return all the data, not just those of your user.
On Kali Linux, the sqlmap tool allows testing SQL injection vulnerabilities.
Usage
Sqlmap is a straightforward tool to use.
You only need to put the URL of the page to test, something like this:
sqlmap -u https://www.domain.com/?p=123
Once you have found a security hole, it is possible to dig deeper with this tool to see what you can get. But the best thing to do is to fix it 🙂
Vulnerabilities exploit
Overview
Metasploit is a tool that will allow you to validate vulnerabilities and use them.
Metasploit allows you to automate the process of discovery and exploitation and provides you with the tools required to perform the manual testing phase of a penetration test.
Usage
You can start it in Applications > Exploitation Tools > Metasploit framework.
This tool will initialize and start a terminal that will allow you to use it.
For example, you can use nmap in the framework:
db_nmap -v -sV 192.168.222.51
You can also retrieve information about a known vulnerability, and try to use it:
db_rebuild_cache
search CVE-2018-9864
use exploit/folder/folder/name
Replace the search parameter with your vulnerability ID and use the exploit path displayed in the search results.
If you are interested, find a good tutorial on the topic, it’s not possible to explain everything in a few lines.
Video
If you want a visual explanation, you can watch this video on how to install Kali Linux on your Raspberry Pi:
Subscribe to get all the other videos about Raspberry Pi:
Conclusion
We learned how to install Kali Linux on Raspberry Pi, the first steps of the system configuration, and some exciting tools to use on this distribution.
As I said at the beginning, this article is not exhaustive. There are hundreds of apps and most are quite complicated to take in hand which would require an article each, but it was not the goal here.
I still hope you understand the basics and that this article made you want to try 🙂
Support us: Join the community on Patreon to show your support, get behind-the-scenes content and other awesome perks!
Raspberry Pi Resources
Not sure where to start?
Understand everything about the Raspberry Pi, stop searching for help all the time, and finally enjoy completing your projects.
Watch the Raspberry Pi Bootcamp course now
Master your Raspberry Pi in 30 days
Don’t want the basic stuff only? If you are looking for the best tips to become an expert on Raspberry Pi, this book is for you. Learn useful Linux skills and practice multiples projects with step-by-step guides.
Download the e-book
VIP Community
If you just want to hang out with me and show your support, you can also join the Patreon community. I share behind-the-scenes content there and give you early access to my content. You’ll also get a shoutout when you join.
More details here
Need help to build something with Python?
Create, understand and improve any Python script for your Raspberry Pi.
Learn the essentials, step-by-step, without losing time understanding useless concepts.
Get the e-book now
You can also find all my recommendations for tools and hardware on this page.
Источник


