- Get started using Python on Windows for scripting and automation
- Set up your development environment
- Install Python
- Install Visual Studio Code
- Install the Microsoft Python extension
- Open the integrated PowerShell terminal in VS Code
- Install Git (optional)
- Example script to display the structure of your file system directory
- Example script to modify all files in a directory
- 15 Free Courses to Learn Python in 2021
- A curated list of some of the free online courses to learn Python.
- Настройка среды Python для глубокого обучения в Windows 10
- Оглавление
- Что такое глубокое обучение?
- Настройка оборудования ПК
- Настройка программного обеспечения ПК
- Microsoft Visual Studio IDE
- NVIDIA GeForce Experience
- Инструментарий NVIDIA CUDA
- NVIDIA cuDNN
- Переводчик Python
- TensorFlow
- Python IDE / текстовый редактор
Get started using Python on Windows for scripting and automation
The following is a step-by-step guide for setting up your developer environment and getting you started using Python for scripting and automating file system operations on Windows.
This article will cover setting up your environment to use some of the helpful libraries in Python that can automate tasks across platforms, like searching your file system, accessing the internet, parsing file types, etc., from a Windows-centered approach. For Windows-specific operations, check out ctypes, a C-compatible foreign function library for Python, winreg, functions exposing the Windows registry API to Python, and Python/WinRT, enabling access Windows Runtime APIs from Python.
Set up your development environment
When using Python to write scripts that perform file system operations, we recommend you install Python from the Microsoft Store. Installing via the Microsoft Store uses the basic Python3 interpreter, but handles set up of your PATH settings for the current user (avoiding the need for admin access), in addition to providing automatic updates.
If you are using Python for web development on Windows, we recommend a different setup using the Windows Subsystem for Linux. Find a walkthrough in our guide: Get started using Python for web development on Windows. If you’re brand new to Python, try our guide: Get started using Python on Windows for beginners. For some advanced scenarios (like needing to access/modify Python’s installed files, make copies of binaries, or use Python DLLs directly), you may want to consider downloading a specific Python release directly from python.org or consider installing an alternative, such as Anaconda, Jython, PyPy, WinPython, IronPython, etc. We only recommend this if you are a more advanced Python programmer with a specific reason for choosing an alternative implementation.
Install Python
To install Python using the Microsoft Store:
Go to your Start menu (lower left Windows icon), type «Microsoft Store», select the link to open the store.
Once the store is open, select Search from the upper-right menu and enter «Python». Open «Python 3.7» from the results under Apps. Select Get.
Once Python has completed the downloading and installation process, open Windows PowerShell using the Start menu (lower left Windows icon). Once PowerShell is open, enter Python —version to confirm that Python3 has been installed on your machine.
The Microsoft Store installation of Python includes pip, the standard package manager. Pip allows you to install and manage additional packages that are not part of the Python standard library. To confirm that you also have pip available to install and manage packages, enter pip —version .
Install Visual Studio Code
By using VS Code as your text editor / integrated development environment (IDE), you can take advantage of IntelliSense (a code completion aid), Linting (helps avoid making errors in your code), Debug support (helps you find errors in your code after you run it), Code snippets (templates for small reusable code blocks), and Unit testing (testing your code’s interface with different types of input).
Download VS Code for Windows and follow the installation instructions: https://code.visualstudio.com.
Install the Microsoft Python extension
You will need to install the Microsoft Python extension in order to take advantage of the VS Code support features. Learn more.
Open the VS Code Extensions window by entering Ctrl+Shift+X (or use the menu to navigate to View > Extensions).
In the top Search Extensions in Marketplace box, enter: Python.
Find the Python (ms-python.python) by Microsoft extension and select the green Install button.
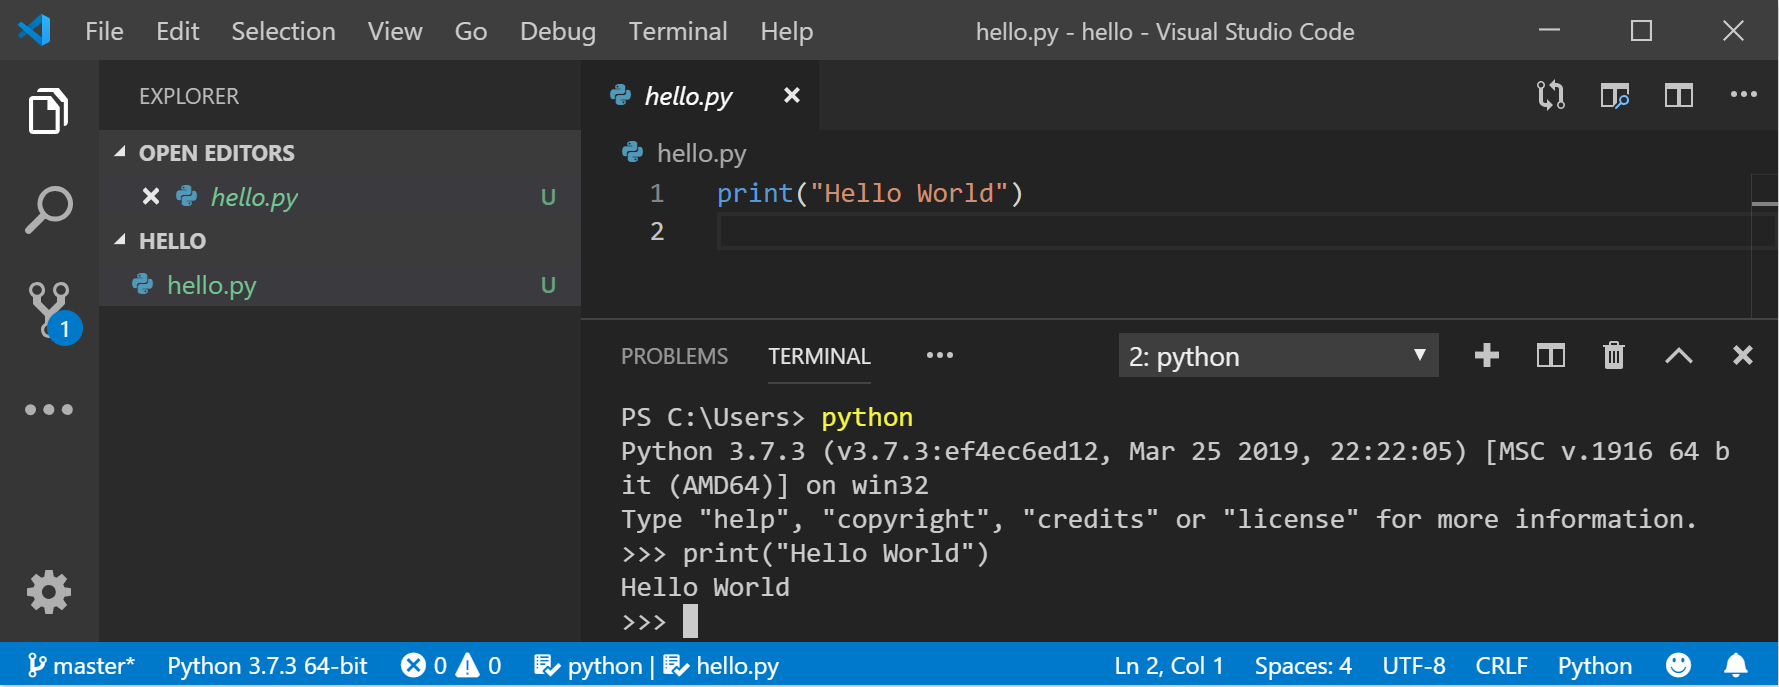
Open the integrated PowerShell terminal in VS Code
VS Code contains a built-in terminal that enables you to open a Python command line with PowerShell, establishing a seamless workflow between your code editor and command line.
Open the terminal in VS Code, select View > Terminal, or alternatively use the shortcut Ctrl+` (using the backtick character).
The default terminal should be PowerShell, but if you need to change it, use Ctrl+Shift+P to enter the command pallette. Enter Terminal: Select Default Shell and a list of terminal options will display containing PowerShell, Command Prompt, WSL, etc. Select the one you’d like to use and enter Ctrl+Shift+` (using the backtick) to create a new terminal.
Inside your VS Code terminal, open Python by entering: python
Try the Python interpreter out by entering: print(«Hello World») . Python will return your statement «Hello World».
To exit Python, you can enter exit() , quit() , or select Ctrl-Z.
Install Git (optional)
If you plan to collaborate with others on your Python code, or host your project on an open-source site (like GitHub), VS Code supports version control with Git. The Source Control tab in VS Code tracks all of your changes and has common Git commands (add, commit, push, pull) built right into the UI. You first need to install Git to power the Source Control panel.
Download and install Git for Windows from the git-scm website.
An Install Wizard is included that will ask you a series of questions about settings for your Git installation. We recommend using all of the default settings, unless you have a specific reason for changing something.
If you’ve never worked with Git before, GitHub Guides can help you get started.
Example script to display the structure of your file system directory
Common system administration tasks can take a huge amount of time, but with a Python script, you can automate these tasks so that they take no time at all. For example, Python can read the contents of your computer’s file system and perform operations like printing an outline of your files and directories, moving folders from one directory to another, or renaming hundreds of files. Normally, tasks like these could take up a ton of time if you were to perform them manually. Use a Python script instead!
Let’s begin with a simple script that walks a directory tree and displays the directory structure.
Open PowerShell using the Start menu (lower left Windows icon).
Create a directory for your project: mkdir python-scripts , then open that directory: cd python-scripts .
Create a few directories to use with our example script:
Create a few files within those directories to use with our script:
Create a new python file in your python-scripts directory:
Open your project in VS Code by entering: code .
Open the VS Code File Explorer window by entering Ctrl+Shift+E (or use the menu to navigate to View > Explorer) and select the list-directory-contents.py file that you just created. The Microsoft Python extension will automatically load a Python interpreter. You can see which interpreter was loaded on the bottom of your VS Code window.
Python is an interpreted language, meaning that it acts as a virtual machine, emulating a physical computer. There are different types of Python interpreters that you can use: Python 2, Python 3, Anaconda, PyPy, etc. In order to run Python code and get Python IntelliSense, you must tell VS Code which interpreter to use. We recommend sticking with the interpreter that VS Code chooses by default (Python 3 in our case) unless you have a specific reason for choosing something different. To change the Python interpreter, select the interpreter currently displayed in blue bar on the bottom of your VS Code window or open the Command Palette (Ctrl+Shift+P) and enter the command Python: Select Interpreter. This will display a list of the Python interpreters that you currently have installed. Learn more about configuring Python environments.
Paste the following code into your list-directory-contents.py file and then select save:
Open the VS Code integrated terminal (Ctrl+`, using the backtick character) and enter the src directory where you just saved your Python script:
Run the script in PowerShell with:
You should see output that looks like this:
Use Python to print that file system directory output to it’s own text file by entering this command directly in your PowerShell terminal: python3 list-directory-contents.py > food-directory.txt
Congratulations! You’ve just written an automated systems administration script that reads the directory and files you created and uses Python to display, and then print, the directory structure to it’s own text file.
If you’re unable to install Python 3 from the Microsoft Store, see this issue for an example of how to handle the pathing for this sample script.
Example script to modify all files in a directory
This example uses the files and directories you just created, renaming each of the files by adding the file’s last modified date to the beginning of the filename.
Inside the src folder in your python-scripts directory, create a new Python file for your script:
Open the update-filenames.py file, paste the following code into the file, and save it:
os.getmtime returns a timestamp in ticks, which is not easily readable. It must be converted to a standard datetime string first.
Test your update-filenames.py script by running it: python3 update-filenames.py and then running your list-directory-contents.py script again: python3 list-directory-contents.py
You should see output that looks like this:
Use Python to print the new file system directory names with the last-modified timestamp prepended to it’s own text file by entering this command directly in your PowerShell terminal: python3 list-directory-contents.py > food-directory-last-modified.txt
Hope you learned a few fun things about using Python scripts for automating basic systems administration tasks. There is, of course, a ton more to know, but we hope this got you started on the right foot. We’ve shared a few additional resources to continue learning below.
15 Free Courses to Learn Python in 2021
A curated list of some of the free online courses to learn Python.

Hello guys, If you are a beginner looking for some Free Python resources to start your programming journey in 2021 then you have come to the right place.
Earlier, I have shared a couple of free Python Programming eBooks sand today I’ll share a couple of good Python programming courses that are absolutely FREE!! You can take these best online courses to learn Python at your own pace, at your own time, and at your place.
This is a great advantage of online learning, the flexibility it provides is just awesome. You just need a laptop or a smartphone with an internet connection and you can learn anything.
Btw, before starting with the list of courses to learn Python programming I want to congratulate you on making the right decision to start your programming journey with Python.
Many beginners, students and people starting with programming ask this question to me every day. Should I start with Python or Java? Even though I am a Java developer, I ask people to start with Python because of its awesome and multi-purpose features.
Python is easy to learn, easier compared to even Java. You can also write small Python scripts to quickly automate things you normally do manually and that provides a great value to beginners.
Python is also powerful, feature-rich, and multi-purpose. For example, you can use Python for web development, you can use it to create scripts, and you can even use it in the space of Data Science and Machine learning.
This seriously makes learning Python an important skill that will pay you throughout your career.
I have always advised all my readers and students go along with SQL and UNIX, you should also learn Python. One of the great programming skill every programmer should have. That’s the reason I have listed is one of the essential tools for programmers.
Btw, if you don’t mind paying a small amount for learning something valuable as Python then you can also check out The Complete Python 3 Bootcamp. It’s not free but it’s completely worth your time and money.
Настройка среды Python для глубокого обучения в Windows 10
Дата публикации Sep 1, 2018

Подробное представление о том, как начать работу с Deep Learning, начиная с включения среды, подходящей для него, в Microsoft Windows 10. Для установки будут использоваться API Keras с графической версией TensorFlow от Google в качестве внутреннего движка.
Это руководство является той же процедурой, которую я использовал во время моего собственного проекта глубокого обучения, и оно мне очень помогло. Целью данного руководства является сбор всей необходимой и обновленной информации в одном месте, а не поиск по всему Google.
Оглавление
- Что такое глубокое обучение?
- Настройка оборудования ПК
- Настройка программного обеспечения ПК
- Переводчик Python
- Python IDE
Что такое глубокое обучение?
Глубокое обучение — это подмножество машинного обучения, в котором используются многоуровневые искусственные нейронные сети для обеспечения современной точности в таких задачах, как обнаружение объектов, распознавание речи, языковой перевод и другие.
Глубокое обучение отличается от традиционных методов машинного обучения тем, что они могут автоматически изучать представления на основе таких данных, как изображения, видео или текст, без введения правил, закодированных вручную, или знаний в области человеческого знания. Их очень гибкие архитектуры могут извлекать уроки непосредственно из необработанных данных и могут повысить их точность прогнозирования, когда предоставляется больше данных.
Настройка оборудования ПК

Для глубокого изучения любого набора данных, программное обеспечение / программа требует компьютерной системы, достаточно мощной, чтобы справиться с необходимой вычислительной мощностью. Поэтому требуются следующие минимальные спецификации:
1) Центральный процессор (CPU)— Процессор Intel Core i5 6-го поколения или выше. Аналогичный процессор AMD также будет оптимальным.
2) ОЗУ— Минимум 8 ГБ, рекомендуется 16 ГБ или выше.
3) Графический процессор (GPU)— NVIDIA GeForce GTX 940 или выше. Графические процессоры AMD не способны выполнять глубокое обучение независимо.
4) Операционная система— Microsoft Windows 10 (рекомендуется 64-разрядная версия) Pro или Home. Я рекомендую обновить Windows 10 до последней версии, прежде чем продолжить.
Примечание. В случае ноутбуков идеальным вариантом было бы приобрести игровой ноутбук у любого поставщика, который считается подходящим, например, ASUS, Lenovo Legion, Acer Predator, Alienware и т. Д.
Настройка программного обеспечения ПК
Теперь для глубокого изучения мы будем использовать метод, известный как вычисления на GPU, который направляет сложные математические вычисления на GPU, а не на CPU, что значительно сокращает общее время вычислений. Для этого мы устанавливаем несколько компонентов в следующем порядке:
Microsoft Visual Studio IDE

Примечание. Visual Studio 2019 в настоящее время не поддерживается следующими программами, которые нам необходимо использовать.
Visual Studio имеет решающее значение для установки следующих двух компонентов. Я рекомендую VS2017 (поскольку я его использую), поскольку его производительность превосходит все его предшественники, а установка никогда не была такой простой и быстрой, как раньше. Но есть диапазон, который вы можете использовать любую версию VS с 2010 по 2017 год.
Нам нужно использовать Visual Studio IDE, поэтому код Visual Studio не будет работать, поскольку он является только редактором кода и не может использоваться таким образом. После успешной установки IDE необходимо установить компоненты для разработки на C ++ и Windows 10 SDK (версия 10.0.15063.0).
NVIDIA GeForce Experience
Этот инструмент предназначен для обновления драйверов графического процессора NVIDIA, и сделать это гораздо проще, поэтому настоятельно рекомендуется установить его, если у вас есть графический процессор NVIDIA
Установите его, и вам нужно будет создать учетную запись, чтобы использовать его. Вы должны увидеть такой экран

В красном поле вы можете увидеть кнопку с надписью «Проверить наличие обновлений». Функция автоматического обновления не является надежной, поэтому проверяйте обновления вручную, прежде чем приступить к загрузке следующего программного обеспечения.
Если ваш драйвер обновлен, тогда вы можете двигаться дальше. Если нет, пожалуйста, обновите его, хотя CUDA Toolkit поставляется в комплекте с драйверами, но рекомендуется сделать это отсюда, так как они несут только минимальные требования к драйверам на момент выпуска (поскольку возможно, что вы используете это через определенное время после даты выпуска) ).
Инструментарий NVIDIA CUDA

Этот программный компонент — это то, что требуется для обеспечения возможности графического процессора для вычислений на графическом процессоре. Мы будем загружать версию 10.0, поскольку это совместимая версия с фреймворками, которые мы будем устанавливать.
Примечание: TensorFlow 1.13.1 и более поздние версии теперь совместимы с CUDA 10.0
Затем вам нужно перейти в папку примеров в вашей установке CUDA, где она, если вы выбрали путь по умолчанию во время установки, находится по адресу:
C:\ProgramData\NVIDIA Corporation\CUDA Samples\v10.0\1_Utilities\deviceQuery
и выберите VS Solution, соответствующий версии VS, установленной в вашей системе, и запустите ее в установленной версии Visual Studio. Если у вас Visual Studio 2017, запустите решение Visual Studio для VS 2017. В результате запуска решения вы должны были достичь

После проверки установки вам необходимо добавить CUDA Toolkit в среду Path, что выполняется следующим способом:
Шаг 1

Шаг 2

Шаг 3

Шаг № 4

Шаг № 5

NVIDIA cuDNN

Вам нужно зарегистрировать учетную запись разработчика NVIDIA, чтобы загрузить ее бесплатно, и это не сильно беспокоит. Загрузите cuDNN 7.x для CUDA 10.0.

После загрузки распакуйте его, и вы получите 3 файла, а затем выполните:
a) Copy \cuda\bin\cudnn64_7.dll to C:\Program Files\NVIDIA GPU Computing Toolkit\CUDA\v10.0\bin.
b) Copy \cuda\ include\cudnn.h to C:\Program Files\NVIDIA GPU Computing Toolkit\CUDA\v10.0\include.
c) Copy \cuda\lib\x64\cudnn.lib to C:\Program Files\NVIDIA GPU Computing Toolkit\CUDA\v10.0\lib\x64.
После завершения ваш GPU теперь готов к выполнению вычислений на GPU.
Переводчик Python

Теперь, когда мы настроили наш графический процессор, пришло время установить наш интерпретатор Python, который мы пойдем с Anaconda. Он считается гораздо лучше в использовании, чем традиционная установка Python, и будет работать намного лучше.
Мы можем установить два варианта этого интерпретатора: Anaconda и Miniconda. Чтобы выбрать, с чем идти, обратитесь к следующему руководству (взято из официальной документации):
Выберите Anaconda, если вы:
- Новичок в Конде или Питоне
- Как удобство автоматической установки Python и более 150 научных пакетов одновременно
- Иметь время и дисковое пространство (несколько минут и 5 ГБ) и / или
- Не хотите устанавливать каждый из пакетов, которые вы хотите использовать по отдельности.
Выберите Miniconda, если вы:
- Не против установить каждый из пакетов, которые вы хотите использовать по отдельности.
- Не хватает времени или места на диске для установки более 150 пакетов одновременно и / или
- Просто вам нужен быстрый доступ к Python и командам conda, и вы хотите разобраться с другими программами позже.
Я использую Miniconda сам. Анаконда раздутая. Многие из пакетов никогда не используются и могут быть легко установлены в случае необходимости.
Примечание. Рекомендуется (но не обязательно) загружать версии Python 3 для выбранного вами интерпретатора, поскольку Python 2 подходит к концу.
После того, как вы установили выбранный вами интерпретатор, пришло время установить необходимые пакеты. Откройте Anaconda Prompt и введите команду:
Для пользователей, использующих только Anaconda, после ввода указанной выше команды введите:
НЕ закрывайте подсказку Anaconda прямо сейчас.
Примечание: TensorFlow поддерживает Python 3.5, 3.6 и 3.7 в Windows 10.
Теперь пришло время создать нашу среду, мы можем легко сделать это с помощью Anaconda Prompt (в этом случае мы будем создавать среду Python 3.7 с именем TensorFlow-GPU):
И мы успешно создали новую среду.
НЕ закрывайте подсказку Anaconda прямо сейчас.
TensorFlow
Теперь мы начинаем устанавливать версию GPU tenorflow и для этого сначала активируем нашу вновь созданную среду. Просто введите:
Далее мы устанавливаем TensorFlow (последняя версия):
Версия pip официально поддерживается, в то время как версия conda поддерживается сообществом. Google рекомендует установить версию pip.
TensorFlow версии 1.13 и более поздние поставляются с предварительно установленной Keras и встроенной в TensorFlow, что позволяет пользователям устанавливать отдельный пакет Keras.
Теперь, чтобы протестировать среду, вызовите команду:
Если это результат, вы получите:
Тогда это означает, что установка прошла успешно. Теперь перейдем к IDE. Вы можете закрыть подсказку.
Python IDE / текстовый редактор
Оба следующих варианта отлично подходят для отладки, обработки и интеллектуального автозаполнения кода Python с молниеносной скоростью и точностью.
С этим вы готовы начать свое путешествие в машинное обучение и не только.


