- Classroom 4+
- Your new teaching assistant
- Apple
- Screenshots
- Description
- 8 лучших утилит для OS X, которые должен иметь каждый маковод (ч. 1)
- Chapter 3. Learning Mac OS X Basics
- About the Desktop
- Navigating the desktop
- About the Finder
- Navigating the Finder
- About the Dock
- Using the Dock
- About menus and the menu bar
- Hearing alternative functions for menu items
- About files and folders
- Copying folders and files
- About System Preferences
- About Spotlight
- Clicking the mouse
- Using sticky keys
- Using slow keys
- Using the cursor control keys
- Setting the key repeat rate
- Using buttons and other controls
- Hearing open applications and windows
- Switching between applications
- Switching between windows
- Move a window to the front
- Moving windows and objects
- Resizing windows and objects
Classroom 4+
Your new teaching assistant
Apple
Screenshots
![]()
![]()
![]()
![]()
![]()
![]()
Description
Classroom turns your Mac into a powerful teaching assistant, helping you guide students through a lesson, see their progress, and keep them on track. With Classroom, you can easily launch the same app on every student iPad at the same time or launch a different app for each group of students. Classroom helps teachers focus on teaching so students can focus on learning.
Start, focus, or pause student work
• Launch any app, website, or book for students with a click
• Lock into a single app to help students focus
• Lock screens to pause work or refocus your class
• Mute audio on student devices
See what your students see with Screen View
• See an overview of all student screens at once
• Focus on a single student screen
• Students are informed when their screens are being viewed
Share documents and links with your class using AirDrop
• Share to your entire class with just one click
• Students can also share with you
Share student work on the classroom Apple TV
• Show the great work your students are doing to the entire class
• Use AirPlay to wirelessly present a student’s screen
• Students are informed when their screens are being presented
Reset forgotten passwords right in the classroom
• Reset a Managed Apple ID password without calling IT
Organize students using groups
• Classroom automatically creates groups of students based on the apps they are using
• Teachers can create groups to break students into project teams
• Perform actions on entire groups or on individual students within groups
Assign Shared iPads to students
• Once configured, Classroom connects to nearby student iPads
• Classroom intelligently assigns students to the Shared iPad they most recently used
• Log students out of Shared iPad at the end of a session to prepare for the next class
Источник
8 лучших утилит для OS X, которые должен иметь каждый маковод (ч. 1)

OS X (Mac OS) поистине одна из лучших, да что там, лучшая операционная система на рынке. Помимо дружелюбия к пользователю, она предоставляет множество функций, упрощающих те или иные бытовые действия. Однако, всегда хочется чего-нибудь еще. Всегда найдутся те, кому стандартных функций будет мало. В случае с iOS применим Jailbrake. C OS X дело обстоит проще. Здесь разработчикам дана полная свобода и можно со всех сторон напичкать систему всевозможными утилитами и дополнениями.
По прошествии нескольких лет работы на Mac у меня образовался набор программ, без которых я уже не представляю комфортной работы. На мой взгляд это одни из лучших утилит, которые сейчас можно найти в Mac AppStore и на просторах сети. Итак, вот они:
PopClip
Вспомните процесс копирования и вставки текста в iOS. Вы выделяете его и появляется всплывающее меню с функциями «Копировать / Вставить / Вырезать». PopClip переносит этот функционал в настольную ОС. Все, что вам нужно — это выделить текст при помощи мыши. Далее появится уже знакомое меню.

Функционал PopClip огромен. Помимо стандартных функций «Копировать / Вставить» приложение может искать выделенный вами текст в Google, может отправлять его в ваш блокнот в Evernote или Day One, отправлять твиты, статусы в facebook и еще десятки различных действий, для которых можно скачать отдельные расширения на сайте разработчика.
Приложение настолько удобно, что после нескольких дней использования трудно представить себе работу без него.
LinguaLeo
Если вы любите получать информацию на англоязычных сайтах, то нет приложения для перевода лучше, чем LinguaLeo. При этом вам не придется открывать ни сайт сервиса, ни любой другой переводчик. Все, что нужно, это иметь аккаунт в LinguaLeo и загрузить расширение для своего браузера на специальной странице.
Для перевода сделайте двойной шелчек по нужному слову. Результат появится во всплывающем окне.
TranslateTab
LinguaLeo хорош, когда вы читаете статьи, но если вы занимаетесь переводом текстов или пишете собственные на иностранных языках, то здесь существенную помощь окажет TranslateTab.
Приложение работает на основе Google Translate API и находится в системной строке OS X. Основная его функция — избавление пользователя от надобности открывать сайт переводчика в браузере и делать многочисленные переключения между окнами.
DragonDrop
Бывало такое, что вам нужно перенести файл из одной папки в другую либо же отправить в Skype, а места на экране для открытия обоих окон попросту нет. Такое неудобство зачастую возникает на ноутбуках с диагональю экрана 11″ и 13″.
DragonDrop решает эту проблему, создавая промежуточный буфер обмера, находящийся поверх всех окон. Вы помещаете в него файл, переключаетесь в нужное приложение и «перетаскиваете» файл из буфера.
Такой способ работает и с папками, и с несколькими файлами, и даже позволяет сохранять изображения с веб-сайтов.
PuntoSwitcher
Многим эта утилита знакома. Многие ее не любят и критикуют, и все же она единственная в свое роде и предоставляет действительно полезный функционал. По началу PuntoSwitcher может менять раскладку не на тех словах, что нужно или не менять вообще. Проблема решается путем занесения слова в словарь. Для принудительного перевода или его отмены можно воспользоваться клавишей option. Можно перевести весь текст, выделив его и, также, нажав option.
CalcBar
Стандартные калькуляторы в OS X не всегда удобны. Тот, что в Dashbord, не поддерживает скобки, тот, что в стандартном наборе приложений, для многих может показаться громоздким. Если вам нужно сделать пару небольших вычислений, то эта утилита несомненно для вас.
Существует немало аналогов, имеющих более расширенный функционал. Однако, CalcBar имеет два преимущества: приложение распространяется бесплатно и имеет понятный не загроможденный интерфейс.
BetterSnapTool
В ОС MS Windows есть хорошая стандартная функция, позволяющая делить экран на несколько равных частей и задавать четкое положение окнам на экране. Возможно, в будущем такой функционал появится и в OS X, а пока можно воспользоваться возможностями BetterSnapTool.
Сейчас для OS X написано множество утилит и приложений, упрощающих и без того легкую и непринужденную работу с операционной системой. А какими утилитами пользуетесь вы? Какие программы стали для вас незаменимыми помощниками в работе?
Источник
Chapter 3. Learning Mac OS X Basics
This chapter introduces Mac OS X and key features such as the desktop, Finder, Dock, and Spotlight. You’ll learn how to use menus, buttons, and accessibility features that make it easier to use your computer, as well as how to work with applications and windows.
About the Desktop
The desktop is the background area of your screen. It can display icons for hard disks, CDs, and any servers connected to your computer. You can also store files and folders directly on your desktop for quick access. Using System Preferences, you can customize the appearance of your desktop and choose the types of items shown on the desktop.
Navigating the desktop
The desktop shows icons for everything it contains, such as your hard disk, folders, documents, and image files. When you open a folder on the desktop, a new Finder window opens automatically.
- To move to the desktop, press VO-Shift-D.
- To quickly move to an item on the desktop, type the first letter of the item. For example, if you have a file named “travel plans” on the desktop, type “T” to move to it.
- To move around items on the desktop, press the arrow keys.
- To open the selected item on the desktop, press Command-O.
About the Finder
The Finder is the program that manages your files, applications, disks, network connections, and devices such as printers. The Finder is always on when your computer is running, though it may be in the background if you’re using another program such as Mail. To display a Finder window, click the Finder icon in the Dock (it’s always the first icon in the Dock).
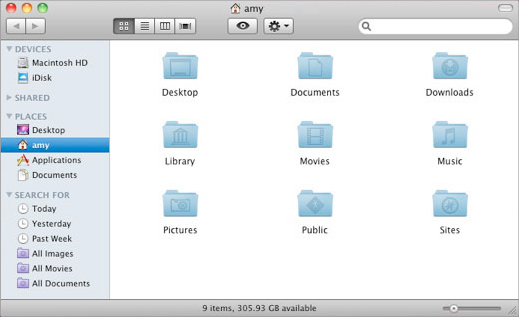
The top-left corner of a Finder window contains three colored buttons used to close the window, send the window to the Dock (minimize), or change the window to its previous size (zoom). Under the buttons, along the top of the window, is a toolbar used to navigate, change the view, find items, and perform other actions. Below the toolbar, the window is split into two sections called the “sidebar” and the “view browser.”
The Places section has icons for folders you use most frequently, including your home folder and some folders inside it, such as Documents, Music, and Pictures. The Downloads folder is the default location for any software or files you download from the Internet.
The Search For section includes Smart Folders that collect items meeting specific criteria, such as all files, folders, and applications you used yesterday, or all PDF documents. These folders are useful for quickly finding an item when you’ve forgotten where it is in your computer’s folder hierarchy.
Use the view browser to view the contents of the folder selected in the sidebar. You can use a toolbar button to view the contents in icon, list, column, or Cover Flow views.
Navigating the Finder
Finder windows display the items on your computer. You use VoiceOver commands or gestures to open and navigate Finder windows. You can use Finder shortcuts to work with selected files and folders.
Note: The instructions below assume that cursor tracking is on, and the VoiceOver cursor and keyboard focus are tracking each other.
If a Finder window was open, you go to that window. Otherwise, you go to the desktop. In that case, go to the menu bar by pressing VO-M or, if you’re using VoiceOver gestures, double-tapping near the top edge of the trackpad. Then use the Right Arrow key to navigate to the Finder menu.
Press VO-Right Arrow until you hear “view radio group” and then interact with that control. Press VO-Right Arrow key until you hear the view you want to use.
You can choose from icon, list, column, or Cover Flow view. In Cover Flow view, the browser is split horizontally into two sections. The top section is a graphical view of each item, such as folder icons or a preview of the first page of a document. The bottom section is a list view of the items.
To jump, press VO-J. If you’re using VoiceOver gestures, keep a finger on the trackpad and press the Control key.
Move to and select the item you want to open, using the method for the view you’re in:
Icon view: Use the arrow keys to move to the item you want.
List view: To move down the list rows, press VO-Down Arrow. To expand and collapse a folder, press VO-\. To move the VoiceOver cursor across a row and hear information about an item, press VO-Right Arrow. Or press VO-R to hear the entire row read at once.
Column view: To move down the list until you find the folder or file you want, use the Down Arrow key. To move into subfolders, press the Right Arrow key.
Cover Flow view: To flip through the items in the top section and move automatically through the corresponding list rows in the bottom section, press the Left Arrow or Right Arrow key.
When you find the file or folder you want to open, use the Finder shortcut Command-O or Command-Down Arrow to open it.
VoiceOver announces when you have selected an alias or a file or folder you don’t have permission to open.
You can use Finder shortcuts to work with selected files or folders.
- To open the selection, press Command-O or Command-Down Arrow.
- To move to the parent of the selection (such as the folder that contains a subfolder you have selected), press Command-Up Arrow.
- To add the selection to the Finder sidebar, press Command-T.
- To add the selection to the Favorites folder, press Control-Command-T.
To add the selection to the Dock, press Shift-Command-T.
To set a default view for new Finder windows, choose Finder > Preferences, click General, and then select a view from the pop-up menu.
You can temporarily hide the toolbar and sidebar in a Finder window to make it easier to navigate. To hide or show the toolbar and sidebar, click the button in the upper-right corner of the window.
About the Dock
You use the Dock to open applications, documents, folders, and more. By default, it appears across the bottom of the screen.
The Dock comes with icons for some applications, such as Mail and iTunes; you can add others. When you minimize a window or open an application that isn’t in the Dock, its icon appears in the Dock.
Each item in the Dock has a shortcut menu that gives you quick access to commands for that item. The shortcut menu also contains the commands “Remove from Dock” for icons that have been placed there permanently, and “Keep in Dock” for applications that are open but whose icons are only there temporarily.
You can customize the Dock by changing its magnification, repositioning it, and more. To change Dock preferences, choose Apple menu > Dock.
Using the Dock
Use the Dock to open applications, documents, folders, or stacks.
If you’re using VoiceOver gestures, double-tap near the bottom edge of the trackpad. The VoiceOver cursor moves to the Dock regardless of the Dock’s position on the screen.
Press the Escape key. If you’re using VoiceOver gestures, scrub back and forth with two fingers on the trackpad.
To know where the Dock is positioned on the screen, press VO-M to go to the Apple menu. Press VO-Down Arrow to move down the menu until you hear “Dock submenu” and then press VO-Right Arrow. Press VO-Down Arrow to move down the Dock menu until you hear the location of the Dock, such as “Checkmark Position on Bottom.”
When hiding is turned on, the Dock is hidden from view until the mouse pointer is over the area where it usually appears (such as the bottom). To make the Dock visible again without moving the mouse pointer, press VO-D.
About menus and the menu bar
The menu bar at the top of the screen contains the Apple menu, application menus, status menus, and the Spotlight menu.
- The Apple menu at the left end of the menu bar is always available. It contains commands to get information about your computer and to set system preferences, among others.
- Application menus change to match the active application but typically include File, Edit, Format, Window, and Help menus.
- Status menus display information and provide shortcuts to system and application settings, such as the volume slider, battery level indicator, or Universal Access menu.
- The Spotlight menu is at the right end of the menu bar. Use Spotlight to search your computer for documents, music, and more. You can search for an application and open it from Spotlight.
In Apple’s online Help system, the right angle bracket, or greater symbol, is used to describe a sequence of commands or other items in a menu. For example, to open a new Finder window, you open the File menu and choose New. This is written in instructions as “Choose File > New” and spoken by VoiceOver as “Choose File greater New” or “Choose File greater than New.” If a command or item is contained in submenus, you hear a series of greater or greater than symbols.
Hearing alternative functions for menu items
You can learn whether a menu item uses modifier keys (such as the Control or Command keys) to provide alternative functions.
- Move the VoiceOver cursor to a menu command.
- Press a modifier key and listen.
If an alternative function exists when that modifier is used, VoiceOver speaks it.
As you move from one item to another, VoiceOver clears the modifier key you pressed and speaks the default function for the item.
About files and folders
Most of the information in your computer is stored in files. Files include documents, images, applications, and so on. Folders are simply a collection of files. Each file or folder is represented by an icon with its name below or to the right of the icon. You can select the text in the file’s name to change it, and you can copy, move, and delete files on your computer.
Your computer comes with some folders already set up, but you can create and delete your own folders to organize your information. Most folders and files you create are stored in a home folder with your user account name. If you have multiple user accounts on your computer, each user account has its own home folder.
You click once on a file or folder icon to select it and twice to open it. Clicking twice quickly is called “double-clicking.” If you double-click an application icon, you start the application and a window for the application opens. If you double-click a file created by an application, you automatically open the application (if it wasn’t open already) and open the file. For example, if you double-click a TextEdit file on the desktop, TextEdit starts up and its icon appears in the Dock. At the same time, the document opens on the desktop.
If you can’t use a mouse to select and click, you can use VoiceOver commands instead.
Copying folders and files
You can copy a file or folder to another location using the Copy and Paste commands in Finder. Copying doesn’t remove the original from its original location.
Note: The instructions below assume that cursor tracking is on, and the VoiceOver cursor and keyboard focus are tracking each other.
- Open a Finder window and move to the item you want to copy.
Don’t open the folder; the VoiceOver cursor should be on the folder.
About System Preferences
You use System Preferences to customize your computer and choose essential system settings, such as your network configuration and Internet access. System Preferences is located in the Apple menu and has an icon in the Dock.
You can find settings to improve accessibility in these preferences:
- Displays preferences
- Keyboard & Mouse preferences
- Speech preferences
- Universal Access preferences
The easiest way to learn about the many options in System Preferences is to explore the different preference panes. Some preferences have multiple panes you access by clicking the tab buttons. Network preferences even has an “Assist me” button to help you troubleshoot connection problems.
About Spotlight
You can use Spotlight to easily find content on your computer. Spotlight is extraordinarily useful for VoiceOver users. In many cases, it may be easier to use than the Finder for opening files, folders, and applications. When you type text in the Spotlight search field, search results appear immediately in a menu below the search field.

The more complete the word or phrase, the more refined your list of results will be. Search results are grouped by category, such as Applications, System Preferences, Documents, and Folders. You click an item in the list to open it.
If you don’t find the item you want, you can search again or click Show All at the top of the results list. Clicking Show All displays a more complete list of results in a new window called the Spotlight window.
Spotlight search results include all the metadata inside files, including the kind of content, the author, edit history, format, size, and many more details. Depending on the search word you type, you may find thousands of results. Spotlight narrows its results to show you the best matches, but you can also browse the entire list if you want.
You can find more information about Spotlight in Mac Help on your computer or on the Apple website at www.apple.com/macosx.
Clicking the mouse
Generally, you select an item by pressing VO-Space bar. But if an item isn’t accessible or that VoiceOver command doesn’t work as expected, you can simulate a mouse click or double-click using a different VoiceOver command.
- If you don’t have “Mouse cursor: Follows VoiceOver cursor” set in VoiceOver Utility, move the VoiceOver cursor to the item you want to click and press VO-Command-F5 to place the pointer on the item.
If you do, go to the next step.
You can also use Mouse Keys, a Universal Access feature in Mac OS X, to control mouse movement. Note that you cannot use Mouse Keys when you are using the NumPad Commander.
Using sticky keys
The Sticky Keys feature treats a series of modifier key presses as a single key combination. For example, you can press Control and then Option, and your keyboard interprets that combination as Control and Option held down together.
- Choose Apple menu > System Preferences, click Universal Access, and then click Keyboard.
- Select the On radio button for Sticky Keys.
When you turn on Sticky Keys, you can also set options to hear a sound when a modifier key you press is accepted, and display an icon of the symbol for the modifier keys you pressed. Checkboxes for these options are below the Sticky Keys On and Off radio buttons.
Using slow keys
With the Slow Keys feature you can control the amount of time between when a key is pressed and when it is accepted by the keyboard. If you frequently press keys accidentally, you may want a longer delay.
- Choose Apple menu > System Preferences, click Universal Access, and then click Keyboard.
- Select the On radio button for Slow Keys.
- For a longer delay, move the Acceptance Delay slider to the left; for a shorter delay, move it to the right.
You can also hear audible feedback when you press keys. You hear one sound when a key is pressed and a different sound when the key is accepted. This is a very good way to monitor what’s happening if you can’t see the screen. Select the checkbox labeled “Use click key sounds” under the Slow Keys On and Off buttons to turn on audible feedback.
Using the cursor control keys
You can use the mouse, keyboard, and VoiceOver cursor to navigate to text and objects that appear on your screen. VoiceOver uses three function keys to describe the keyboard, VoiceOver cursor, and mouse pointer.
Note: If your keyboard has an Fn key, press the Fn key when you press a function key.
To hear a description of the item in the VoiceOver cursor, press VO-F3. This could be a control, text in a document, an HTML content area, and more. The description includes the current state of the item. For example, you might hear that the checkbox is selected, or hear the value settings of a slider.
F4—Keyboard Focus Key
- To hear a description of the item on which the keyboard is focused, press VO-F4. The description includes the current state of the item and, if it applies, whether it is enabled or disabled.
- To move the VoiceOver cursor to where the keyboard is focused, press VO-Shift-F4. When you move the keyboard focus, the VoiceOver cursor remains where you moved it. Use this command when cursor tracking is turned off.
To move the mouse pointer to the VoiceOver cursor, press VO-Command-F5. When you move the mouse again, the VoiceOver cursor does not move with it. Use this command when cursor tracking is turned off, or if you don’t have mouse tracking options turned on in VoiceOver Utility.
Setting the key repeat rate
If you find that keys register more than once when you press them, you can adjust the key repeat rate. The key repeat rate and key repeat delay let you control how fast keys repeat and adjust how long the keyboard waits before it begins to repeat a key press. If you have trouble releasing keys fast enough, you can set the delay very long or turn off the repeat.
- Choose Apple menu > System Preferences, click Keyboard, and then Keyboard.
- To have keys repeat slowly, move the Key Repeat Rate slider to the left; to have them repeat at a faster pace, move the slider to the right.
If you tend to make mistakes when pressing keys, moving the slider to a slow setting will help minimize the number of repeated keystrokes.
To turn off key repeating completely, move the Delay Until Repeat slider all the way to the left.
Using buttons and other controls
You can use VoiceOver commands or gestures to click buttons, select checkboxes, choose an item in a list or menu, and adjust sliders, steppers, and splitters.
Make sure you know where the keyboard focus and VoiceOver cursor are located before you select an item.
- To select or deselect a control (such as a button, radio button, or checkbox), press VO-Space bar. If Quick Nav is on, press Up Arrow-Down Arrow. If you’re using VoiceOver gestures, double-tap on the trackpad.
- To open a pop-up menu, press VO-Space bar. If Quick Nav is on, press Up Arrow-Down Arrow. If you’re using VoiceOver gestures, double-tap on the trackpad.
- To adjust a slider, stepper, or splitter, press VO-Shift-Down Arrow to start interacting with the control. Then use VO-arrow keys to increase or decrease a setting. To stop interacting with the control, press VO-Shift-Up Arrow.
If you’re using VoiceOver gestures, flick right with two fingers on the trackpad to start interacting with the slider or stepper. Then with a single finger, flick up to increase the setting or flick down to decrease the setting. To stop interacting with the control, flick left with two fingers.
Hearing open applications and windows
You can hear which applications and windows are open on your computer.
To hear which application is active and how many applications are open, press VO-F1.
To hear which window is active, press VO-F2.
Switching between applications
When you have more than one application open or more than one window open for an application, you can quickly switch to the application and window you want.

If you used the VoiceOver command to open the chooser, pressing the Space bar opens a submenu that lists all open windows, dialogs, or alerts for the application. Navigate a submenu in the same way you did the list of applications.
To exit the Application Chooser without making a selection, press the Escape key. If you’re using VoiceOver gestures, scrub back and forth with two fingers on the trackpad.
Hold down the Command key and press the Tab key repeatedly to cycle through the open applications. When you hear the application you want, release the keys. Press Command-Shift-Tab to cycle backward.
If you’re using Spaces, you can use the Spaces shortcut Command-arrow keys to navigate your spaces.
Switching between windows
When you have more than one window open for an application, you can quickly switch between windows.

To exit the Window Chooser without making a selection, press the Escape key. If you’re using VoiceOver gestures, scrub back and forth with two fingers on the trackpad.
Hold down the Command key and press the ` key repeatedly to cycle through the open windows for the current application. When you hear the window you want, release the keys. Press Command-Shift-` to cycle backward.
Move a window to the front
Sometimes the window where the VoiceOver cursor is located doesn’t move to the front of the other windows. If this happens, some of the buttons and controls in the window won’t be active. You can use a VoiceOver command to move a window to the front so you can use all the controls.
Moving windows and objects
You can move windows and some objects in applications, such as graphics and text boxes.
- Navigate to the item you want to move and press (for a window) VO-` or (for an object) VO-Command-`.
VoiceOver tells you if an item can’t be moved.
To move the window or object up, down, left, or right, use the arrow keys.
To move in smaller increments, press Shift while you use the arrow keys.
To stop moving the window or object, press the Escape key.
You can’t use other VoiceOver commands until you stop moving the item.
You can use certain number keys to quickly move windows and objects around the screen: the top left, middle, and right section using keys 1, 2, and 3; the center left, middle, and right section using keys 4, 5, and 6; and the bottom left, middle, and right section using keys 7, 8, and 9.
Resizing windows and objects
You can resize windows and some objects in applications, such as graphics and text boxes.
- Navigate to the item you want to resize and press (for a window) VO-
or (for an object) VO-Command-
VoiceOver tells you if an item can’t be resized.
To resize in smaller increments, press Shift while you use the arrow keys.
To stop resizing the window or object, press the Escape key.
You can’t use other VoiceOver commands until you stop resizing.
Источник


