Как войти в BIOS на компьютерах Lenovo?
Lenovo входит в список крупнейших компаний в мире, которые производят компьютеры. И так как спрос на продукцию данной фирмы растёт, то всё более актуальными для пользователей являются вопросы по правильной работе и эксплуатации техники Леново. И для тех, кто решил переустановить Windows, в самом начале процесса поднимается вопрос: как в Lenovo зайти в биос?

Для начала стоит разобраться, что же такое BIOS и с чем его едят. Итак, BIOS на Lenovo – это специальная микроскопическая программа, которая обеспечивает правильное и стабильное взаимодействие между всеми составляющими ПК и ОС и позволяет настраивать его. А настройка BIOS – это стандартная настройка ПК, помогающая системе вычислить те функции, которые должны быть активированы, и как должна производиться их загрузка. BIOS есть на любом компьютере, будь то Lenovo B560, Lenovo S21 или M5400.
На сегодняшний день создано несколько различных версий Биоса, которые незначительно отличаются по внешнему виду, но что касается функций – здесь всё идентично. Каждая из версий используется для первоначальной настройки компьютера и для его проверки. В функционал BIOS’a входит:

- Установка даты и времени;
- Выбор загрузочного сектора – устройства, с которого будет установлена или загружена операционная система;
- Проверка системных компонентов, включающая проверку исправности оперативной памяти и жёстких дисков;
- Подключение защиты – пароля на вашем ноутбуке для защиты персональных данных.
Как зайти в BIOS
На различных моделях Lenovo методы входа в Биос на ноутбуке могут отличаться. Для начала попробуйте стандартный способ входа – при запуске персонального компьютера нужно нажать кнопку F2 на клавиатуре, иногда перед этим зажав клавишу Fn. Далее произойдёт вызов меню параметров ПК.

Но этот способ не всегда рабочий. Для некоторых моделей Lenovo БИОС не загружается при нажатии F2 или Fn+F2 – например, Lenovo Legion Y520, Lenovo G70, G50-30 или G500. Если вы пытались войти в bios вышеописанным методом, и у вас не получилось, следующая инструкция для вас:
- На боковой грани ноутбука (там, где располагается обычно гнездо зарядки) либо прямо возле кнопки питания должна быть специальная маленькая клавиша с изогнутой стрелочкой. Она называется Novo Button, One Key Recovery или One Key Rescue System. Вам нужно выключить ноутбук и нажать на неё.
- Если вы нажали правильную кнопку, ноутбук запустится, а на экране вы увидите, что мы переходим в специальное меню запуска:

- Normal Startup (обычная загрузка);
- Bios Setup (параметры);
- System Recovery (системное восстановление);
- Boot Menu (загрузочное меню).
- Как вы уже, скорее всего, догадались, чтобы зайти в биос на Lenovo, нужно перейти в пункт BiosSetup. После того как вы его выберете, вы увидите, что ноут зашёл в биос и можете настроить его по своему усмотрению.
Два секрета запуска Bios
Но если у вас так и не получилось запустить BIOS одним из вышеописанных способов, и на ноутбуке установлена операционная система Windows 8.1 и выше, откроем вам два секрета запуска.

- Нужно включить ПК. В запущенном компьютере на рабочем столе тянем указатель мышки в нижний правый угол рабочего стола (вызываем боковое меню).
- Нам открывается меню, где мы выбираем пункты «Параметры» — «Обновление и восстановление» — «Восстановление».
- Здесь, в разделе «Особые варианты загрузки», кликаем на кнопку «Перезагрузить сейчас».
- Далее откроется синий экран с плитками. Открываем плитку «Диагностика», нажав на которую вы попадёте в дополнительные параметры.
- Нужно открыть пункт «Параметры встроенного ПО UEFI» и нажать кнопку «Перезагрузить». Готово! Вы в БИОСе!

Второй секрет. Многие пользователи Win 8.1 при попытке входа в Биос допускают ошибку. Все знают, как попасть в BIOS — нужно нажать определённую кнопку на клавиатуре. Для этого пользователь жмёт на «Завершение работы», ожидает, пока ноутбук выключится, а затем жмет кнопку для входа в Биос, но компьютер запускается по-старому – идёт загрузка ОС.
Вся проблема в том, что операционная система Windows 8.1 работает изначально с функцией быстрого запуска, которая основана на режиме сна – войдите в Биос, не отключая ПК, а перезагружая его.
Несколько полезных советов:

- После того как вход в Bios был осуществлён, перейдите к различным настройкам параметров системы и её загрузки в самом БИОСе. Будьте очень внимательны и осторожны, и лучше не трогайте то, чего не знаете, так как есть риск сделать что-то не так и совсем потерять свой компьютер. А после внесения всех изменений зайдите в раздел «Exit» («Выход») и выберите пункт «Save & exit» («Сохранить и выйти»). После этого ноутбук будет перезагружен, и при новом запуске все настройки, которые вам до этого пришлось установить, будут уже учтены.
- Если вышеописанные способы входа в Биос на ноутбуке Lenovo не работают, попробуйте при запуске устройства зажать и удерживать клавишу F12 вплоть до запуска BIOS’a – на некоторых моделях Леново этот способ работает.
- Очень редко, но всё же бывает – в кое-каких моделях работает клавиша F1 (нужно нажать её несколько раз, пока ноутбук включается).
- Производители рекомендуют настраивать параметры ПК в Биосе только с полностью заряженным аккумулятором ноутбука, так как если в процессе настройки ваш ноутбук отключится из-за того, что разрядился, то это, скорее всего, вызовет кое-какие проблемы системы в дальнейшем.
- Перед тем как выйти из БИОСа, обязательно сохраняйте все изменения, чтобы не сбились.
Помните, что настройка Bios – это очень серьёзное действие, требующее максимального понимания процесса и большой внимательности к деталям. Вы должны знать, что при неверной настройке некоторые компоненты системы могут работать некорректно, что приносит дополнительные сложности в эксплуатации. И если вы сомневаетесь в том, что знаете, как правильно нужно делать – лучше вызвать квалифицированных специалистов, это сохранит и деньги, и время, и нервы. Надеемся, что данная статья помогла вам разобраться с тем, как зайти в Bios.
Lenovo BIOS Settings Management
This post was updated on October 18th, 2020.
This post is one of 3 posts in my series on managing BIOS settings using PowerShell. I’ve also written about Dell and HP. In this post I’ll be talking about using PowerShell to manage Lenovo BIOS settings.
Lenovo, WMI, and PowerShell
Lenovo provides a WMI interface that can be used for querying and modifying BIOS settings on their hardware models. This means that we can use PowerShell to directly view and edit BIOS settings without the need for a vendor specific program. This script uses 6 of the Lenovo provided WMI classes.
The first WMI class is Lenovo_BiosSetting. This class is used to return a list of the configurable BIOS settings as well as their current values.
The second WMI class is Lenovo_SetBiosSetting. This class contains a method called SetBiosSetting which is used to modify bios setting values.
The third WMI class is Lenovo_SaveBiosSetting. This class contains a method called SaveBiosSettings which is used to commit any changes made to BIOS setting values.
The fourth WMI class is Lenovo_BiosPasswordSettings. This class is used to query the current status of the BIOS passwords.
The fifth WMI class is Lenovo_LoadDefaultSettings. This class contains a method called LoadDefaultSettings which is used the set all BIOS settings to factory default values.
The sixth WMI class is Lenovo_SetBiosPassword. This class contains a method called SetBiosPassword which is used to set or change a BIOS password. In this script, it’s used to check if the currently configured password matches the password passed to the script in the SupervisorPassword or SystemManagementPassword parameters.
For reference, when calling the SetBiosSetting, SaveBiosSetting, LoadDefaultSettings or SetBiosPassword methods, the possible return values are:
- Success
- Not Supported
- Invalid Parameter
- Access Denied – BIOS password not supplied or not correct
- System Busy – There are pending setting changes. Reboot and try again
For more detailed information on the Lenovo WMI interface, as well as a list of supported hardware models, refer to the official documentation. https://support.lenovo.com/us/en/solutions/ht100612
Manage-LenovoBiosSettings.ps1
This script takes the basic commands and adds logic to allow for a more automated settings management process. The script has four parameters.
- GetSettings – Use this parameter to instruct the script to generate a list of all current BIOS settings. The settings will be displayed to the screen by default.
- SetSettings – Use this parameter to instruct the script to set specific BIOS settings. Settings can be specified either in the body of the script or from a CSV file.
- SetDefaults – Use this parameter to instruct the script to set all BIOS settings to factory default values.
- CsvPath – Use this parameter to specify the location of a CSV file. If used with the GetSettings switch, this acts as the location where a list of current BIOS settings will be saved. If used with the SetSettings switch, this acts as the location where the script will read BIOS settings to be set from. Using this switch with the SetSettings switch will also cause the script to ignore any settings specified in the body of the script.
- SupervisorPassword – Used to specify the supervisor password
- SystemManagementPassword – Used to specify the system management password
When using the script to set settings, the list of settings can either be specified in the script itself or in a CSV file. To specify settings in the script, look for the $Settings array near the top of the script. The settings should be in the format of “Setting Name,Setting Value”
A full list of configurable settings can be exported from a device by calling the script with the GetSettings parameter. The CsvPath parameter can also be specified to output the list of settings to a CSV file.
You can then sort through the exported settings and either save them as a CSV file or add them to the $Settings array in the body of the script.
When the script runs, it will write to a log file. By default, this log file will be named Manage-LenovoBiosSettings.Log. If the script is being run during a task sequence, the log file will be located in the _SMSTSLogPath. Otherwise, the log file will be located in ProgramData\ConfigJonScripts\Lenovo. The log file name and path can be changed using the LogFile parameter. Note that the log file path will always be set to _SMSTSLogPath when run during a task sequence.
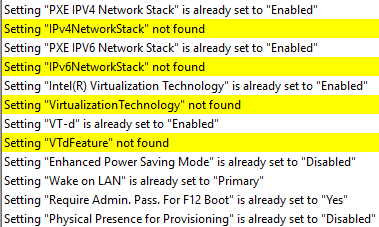
The script has logic built-in to detect if settings were already set correctly, were successfully set, failed to set, or were not found on the device. The script will output these counts to the screen at the end. More detailed information about the settings will be written to the log file.

Lenovo BIOS setting names differ between hardware models. Specifically, laptops and desktops seem to have different setting names. This means that there can be multiple different ways to specify the same setting across multiple hardware models. I have included a few example settings files in my GitHub. These settings files contain commonly configured Lenovo BIOS settings that cover multiple Lenovo hardware models.
- Settings_CSV_UEFI_SecureBoot.csv – Contains settings for enabling UEFI and Secure Boot
- Settings_CSV_TPM.csv – Contains settings for enabling and activating TPM
- Settings_General.csv – Contains other common settings
- Settings_In-Script_All.txt – Contains common settings formatted for use in the body of the script
One current limitation of the script has to do with the password check functionality. The script has logic built-in to detect if the BIOS password specified in the SupervsiorPassword or SystemManagementPassword parameter matches the currently set BIOS password. Running this password check only works one time per reboot, this means that if you need to run the script multiple times, you will need to have a reboot between each run of the script, or you will need to disable the password check portion of the script.
Examples
The script can be run as a standalone script in Windows, or as a part of a Configuration Manager task sequence. It can also be run in the full Windows OS or in WinPE.
Here are a few examples of calling the script from a PowerShell prompt.
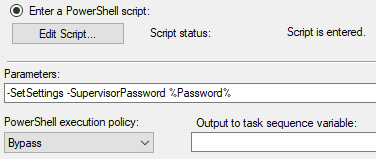
Here is an example of calling the script during a task sequence. In this example the settings are specified in the body of the script, so the script can be stored directly in the task sequence step. Also the setup password is set, so the SupervisorPassword parameter is specified.


In this second example, the script is being called from a package and the settings are being supplied from a CSV file.

Notes and Additional Reading
If a password is set, the script attempts to verify the supplied password matches the currently set password. There seems to be a bug that can cause this check to not work.
- The supervisor and system management passwords are both set
- Attempt to change the supervisor password and supply the system management password as the existing password
- The SetBiosPassword method reports success, but the password is not changed
The script then continues and attempts to change settings, but the password is incorrect, so the settings fail to change. I don’t currently have a work around for this issue, so if a supervisor password is set, ensure that password is specified.
If you’re looking for other methods to configure Lenovo BIOS settings, check out these links. The Think BIOS Config Tool is an official tool released by Lenovo that allows for changing BIOS settings through a GUI interface or at the command line. The Lenovo BIOS Configurator is a script written by Martin Bengtsson. It’s an alternate example of using PowerShell to configure Lenovo BIOS settings. For information on configuring Lenovo BIOS passwords using PowerShell, see my post Lenovo BIOS Password Management.
What is this page?
My name is Jon Anderson. I am a Senior Systems Consultant at Now Micro. This blog is a place for me to share my notes about things I’ve found helpful.


