- Решить все! Как провести диагностику ноутбука Lenovo самостоятельно
- Подготовка. Сделай это правильно
- Шаг первый
- Шаг второй
- Шаг третий
- Утилита Lenovo Solution Center
- Описание
- Lenovo Diagnostics Tool – Here’s Your Full Guide to Use It [MiniTool Tips]
- Summary :
- Quick Navigation :
- What Is Lenovo Diagnostic Tool
- What Modules and Tests Does Lenovo Diagnostic Includes
- #1. Audio
- #2. Battery
- #3. Memory
- #4. Motherboard
- #5. Storage
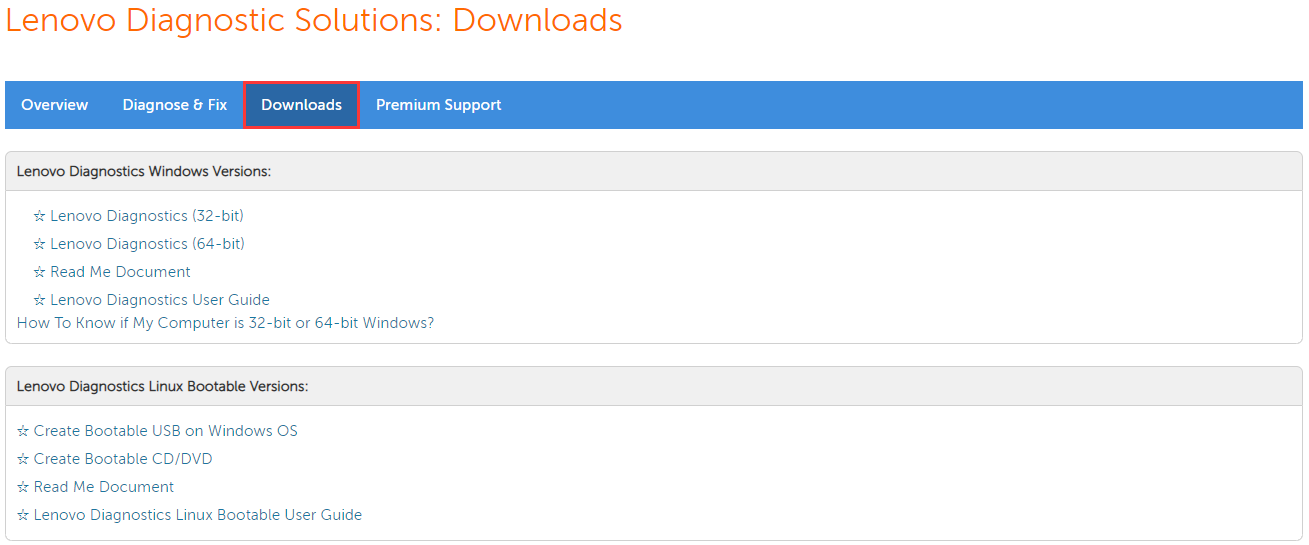
- What Tools Lenovo diagnostics Includes
- #1. Diagnostic Script
- #2. System Information
- #3. Recover Bad Sector
- #4. SMART Tool
- How to Run Lenovo Diagnostics Tool
- Alternative Tool to Test Your Storage Devices
- #1. Perform a Disk Benchmark
- #2. Check File System
- #3. Check Bad Sectors
- Bottom Line
- Lenovo Diagnostics FAQ
- ABOUT THE AUTHOR
Решить все! Как провести диагностику ноутбука Lenovo самостоятельно

Компания Lenovo создает инновационную и надежную технику, признанную во всем мире. Но непредсказуемые случаи могут произойти даже с самыми надежными устройствами. Обычно, это случается в классический «самый неподходящий момент». У тебя — разгар рабочей недели, и решать задачи нужно очень быстро — провести видеоконференцию, презентовать проект клиенту или срочно подготовить отчет. Даже если ноутбук домашний, остаться без любимого сериала и свежего обзора на YouTube или пропустить рейд — неприятно. Больше тебе не нужно срочно бежать в сервисный центр или звать знакомого «компьютерщика» в гости. Существенная часть неполадок возникает из-за того, что установленные программы не «сходятся характерами» с операционной системой и драйверами, но это можно исправить.
Благодаря инструменту от компании Lenovo для своих устройств ты сможешь удаленно и самостоятельно провести диагностику и даже решить многие ситуации без помощи сотрудников Сервисных Центров. Инструмент подходит для ThinkPad, Legion, YOGA и ideapad. Приступим.
Подготовка. Сделай это правильно
Для начала перейди на сайт службы поддержки Lenovo. Используй для этого браузеры Chrome, Opera или Mozilla Firefox.
Далее выполни диагностику с уровнем доступа «Администратор системы». На главной странице кликни «Обнаружьте свой продукт».

Дай разрешение на установку программы Lenovo Service Bridge (LSB).

После этого сайт покажет данные о твоем ноутбуке или ПК: модель серийный номер, статус гарантии. В этом окне кликни «Попробуйте наш новый инструмент: решение за 3 шага».

На стартовой странице диагностики, куда тебя должна была перенаправить система, ты приходишь к первому шагу.
Шаг первый
Кликни «Обновление драйверов». Тебе нужно установить еще одно-два приложения, подробнее об этом — ниже.

Сейчас система проверит, насколько актуальны драйверы системы и, если нужно, предложит новые. После твоего подтверждения начинается сканирование, а тебе нужно дать разрешение на установку еще одной программы.

Теперь дождись результата сканирования, обычно это занимает до пяти минут. После проверки устройства облачная диагностика показывает результат и дает рекомендации. Так, в нашем примере стоит обновить BIOS.

Возможно, в твоем случае необходимых драйверов может быть несколько. Кликай на «Обновление драйверов» и дай разрешение на скачивание и установку.

После того, как ты установишь все необходимые драйверы, что может потребовать перезагрузку устройства, запусти первый шаг снова. Сервис заново просканирует систему, и ты получишь следующий результат.

Во многих случаях на этом этапе решение найдено.. Если нет, переходи к следующему шагу.
Шаг второй
На этом этапе ты сможешь выполнить диагностику компонентов, можешь выбрать полную диагностику или выбрать конкретный компонент. Второй вариант особенно полезен, если в системе недавно что-то меняли, например, накопитель.

После запуска ты увидишь, какой компонент уже прошел сканирование, и сколько примерно времени еще осталось.

По окончании проверки система удаленной диагностики покажет тебе проблемный компонент и подскажет, что делать дальше. Советуем «Сохранить журнал диагностики», что может ускорить сервисное обслуживание.

Шаг третий
Для решения ряда случаев необходимо специальное оборудование. Если самостоятельная диагностика не позволила выявить проблему, третьим шагом может стать обращение к специалистам по сервисному обслуживанию компании Lenovo. Подготовь журнал диагностики из прошлого шага, а в сервисе после проверки расскажут, что делать дальше.

Если ты — владелец ноутбука для бизнеса ThinkPad или ThinkBook от Lenovo, не забывай, что на эти устройства предоставляется глобальная гарантия, распространяющаяся на 160 стран мира. Список стран, где на твой ноутбук действует глобальная гарантия, ты найдешь тут. В Украине ноутбуки ThinkPad и ThinkBook сопровождаются гарантийным обслуживанием с максимальным сроком ремонта до пяти рабочих дней.
Чтобы сэкономить свое время, используй «Решение за 3 шага» от Lenovo. Этот сервис поможет тебе разбираться со сбоями максимально быстро и просто.
Утилита
Lenovo Solution Center
| Автор | Lenovo (Сайт) |
| Языки | Русский , Английский |
| Системы | Windows 7 / 8 / 8.1 / 10 |
| Размер | 64,2 Мб |
| Категория | Другое |
| Версия |
Описание
Lenovo Solution Center это утилита для диагностики и контроля за состоянием ноутбуков Lenovo. Программа постоянно анализирует систему и в случае возникновения проблемы извещает пользователя сообщением на панели задач Windows, а также может предложить несколько вариантов решения проблемы, если решения нет, можно всего одним кликом соединиться с онлайн службой поддержки. При желании можно настроить сканирование оборудования и системы по расписанию. Если нужно получить детальную информацию о состоянии системы, следует открыть главное окно программы, вся информация о работоспособности, состоянии сетевых подключений и уровне безопасности будет отображена там.
Центр решений Леново помогает следить за актуальными версиями программного обеспечения, установленного на компьютере, в том числе за версиями драйверов для всех устройств. При желании можно настроить уведомления о выходе новых версий, или автоматическое обновление. LSC записывает все изменения и параметры производительности в журнал, к которому можно получить доступ через вкладку «Поддержка»
Solution Center совместим со всеми ноутбуками линеек Thinkpad, ThinkCentre, ThinkStation, Essential и IdeaCentre.
Lenovo Diagnostics Tool – Here’s Your Full Guide to Use It [MiniTool Tips]
By Ariel | Follow | Last Updated May 29, 2020
Summary :
Are you using a Lenovo computer? Do you want to test your computer’s devices? Here Lenovo diagnostics tool may be what you need. Now, MiniTool will introduce you this Lenovo hardware diagnostics tool in details and some extra useful tips.
Quick Navigation :
What Is Lenovo Diagnostic Tool
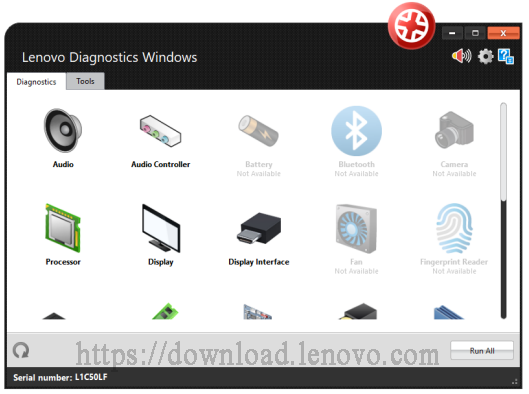
As its name implies, Lenovo diagnostics is a diagnostic tool that can only be used on Lenovo computers. The Lenovo hardware diagnostics tool is mainly composed of Modules (Tests) and Tools. Its modules allow you to test a variety of devices in Lenovo computers including audio, battery, fan, RAID, storage, memory, motherboard, mouse devices, etc.
Besides, Lenovo diagnostics includes many tools that you can use them to create a diagnostic script, analyze system information, view log history, recover bad sectors, measure network speed, show the real-time temperature of your devices, etc.
There are 2 major test types that you can choose to run this Lenovo diagnostics tool including Quick tests and Full tests. This tool also provides a customized option to perform the test. In a nutshell, Lenovo diagnostics is a practical and comprehensive hardware diagnostics tool. Now, please keep reading to know more details.
What Modules and Tests Does Lenovo Diagnostic Includes
In this part, we mainly focus on the modules and tests that Lenovo diagnostics can perform on your computer. This program supports you to diagnose 24 types of devices in Lenovo computers. Here we mainly introduce the following 5 modules that are widely performed by users.
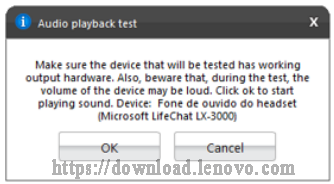
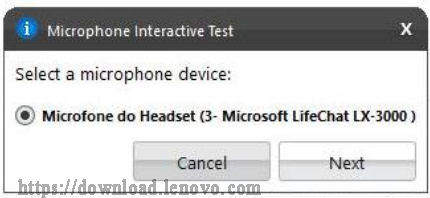
#1. Audio
The audio module is composed of the Audio Playback test and Microphone Interactive test. Both of the 2 tests belong to the Quick test. The Audio Playback test will advise the users some audio patterns and ask them if the device volume can be heard.
The Microphone Interactive test can help you test if the microphone is able to capture sound properly. You need to select a microphone to be tested and speak on it. Then this tool will listen to the audio you recorded and inform you if the sound can be captured.
#2. Battery
Battery health has a significant impact on the lifespan of your computer. A lot of people are troubled by various battery issues such as battery not charging, wrong battery percentage, and missing battery icon, etc. So, you can use the Lenovo diagnostics tool to test your battery’s health.
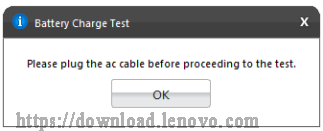
In addition, this tool also can help you make an extended discharge/charge test as well as a quick battery temperature test. For example, if the battery temporary is too high, this tool will remind you to change the battery or offer other solutions.
#3. Memory
Memory test should be one of the most commonly used operations on Lenovo diagnostics. This test includes many test items including quick random pattern test, advanced integrity test, bit low/high test, random number sequence test, block move test, and so forth.
It is not only used to test the health of your memory but also to improve the performance or cover some faults. For instance, when performing the advanced integrity test, it intends to cover some coupling faults and transition faults. The address test can help you cover any addressing faults in the accessible memory range.
#4. Motherboard
It is also important to diagnose your motherboard on a regular basis to avoid some potential risks. This Lenovo PC diagnostics tool can perform a motherboard test including chipset test, PCI/PCI-e test, RTC test, and USB test. You can refer to the following information:
- Chipset test: This test can check the status of the controllers that consist of the motherboard chipsets including the EHCI, OHCI, SATA, AHCI, etc.
- PCI/PCI-e test: It mainly checks for unexpected errors or power failure on the PCI onboard devices.
- RTC test: It checks the Real-Time Clock (RTC) properties that make sure the proper operation of the motherboard.
- USB test: It checks the errors for your USB devices.
#5. Storage
The Lenovo hardware diagnostics tool can also be used to check the status of your storage devices including HHD and SSD. The storage diagnostic test is reported by SMART so that you can identify if the device is faulty or not.
Right now, you may already have an overall understanding of the Lenovo PC diagnostic test. Apart from the above-introduced modules, you can choose other devices modules based on your needs. Next, let’s further explore the Lenovo diagnostics tools.
What Tools Lenovo diagnostics Includes
#1. Diagnostic Script
The diagnostic script is one of the most important tools that allow you to create a customized list of tests for the devices. It’s composed of the following 3 options:
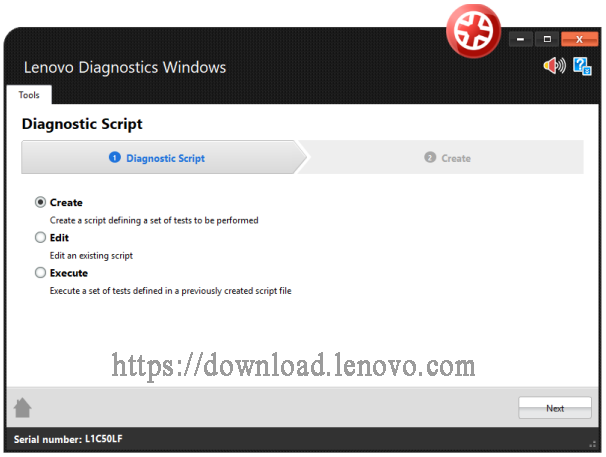
- Create: It allows you to create a new diagnostic script that you can select a set of modules.
- Edit: It allows you to edit the diagnostic script that you saved previously or select an existing diagnostic script. You can modify its configuration by changing the list of tests and modifying the execution numbers.
- Execute: It allows you to perform the test configuration that you have modified in a diagnostic script.
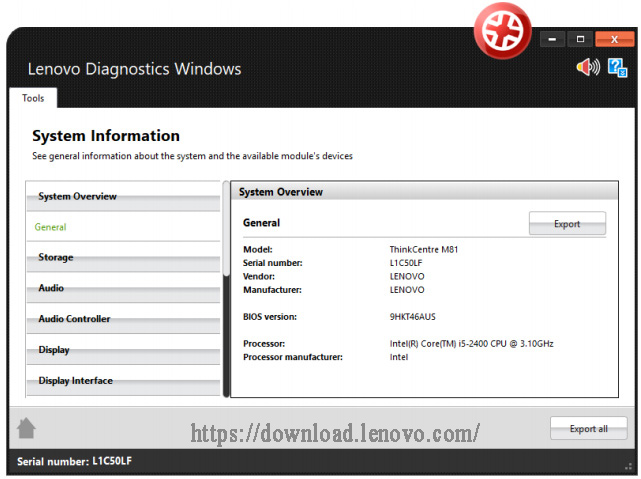
#2. System Information
The system information tool enables you to view the general information about the system including BIOS version, processor, manufacture, etc. Besides, it can explore the available devices that you can perform a diagnostic module on your Lenovo computer. You can also export the system information via modules.
#3. Recover Bad Sector
The recover bad sector tool is a practical tool that enables users to scan for bad sectors on HDD or SSD devices and repair them if possible. However, it has an obvious disadvantage. According to users’ reports, this recovery operation requires your confirmation and can lead to data loss. So, please make sure you have a backup of your disk before performing the operation.

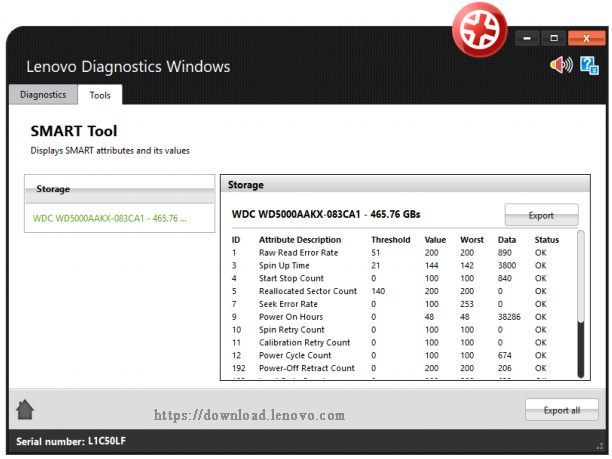
#4. SMART Tool
The SMART tool is used to export the information about the storage devices on your Lenovo computer. The information can be exported to an HTML or PDF file. According to this tool, you can know the attribute description, threshold, value, data, and worst of a storage device
After exploring its modules and tools, you may wonder how to run Lenovo diagnostics. Let’s go on.
How to Run Lenovo Diagnostics Tool
How to run Lenovo diagnostics tool? To do so, follow the full guide below:
Step 1. Download and install a suitable version on your Lenovo computer from its official website.
Step 2. In the main interface, you can choose the Diagnostics or Tools based on your needs. Here we take the modules for example. Select the Diagnostics tab to go on.
Step 3. Select a module in the Diagnostics tab. After that, you will be directed to select a device that you want to diagnose and all the test items will be displayed.
Step 4. Here click on the Select all option, or you can select the test items that you need. For example, you can select all test items or just select Target Read Test and Random Seek Test for storage test. After that, click on the Run tests button.

Step 5. Click on See Device Information and you can view the detailed information of this storage device. The results depend on your selected module.
Step 6. Click on See test description, and then you can see a brief introduction of this test and the estimated time to perform the test.
Step 7. After you specify the test execution, click on the Run test, and OK to execute this operation. Here you can choose the recommended or custom test.
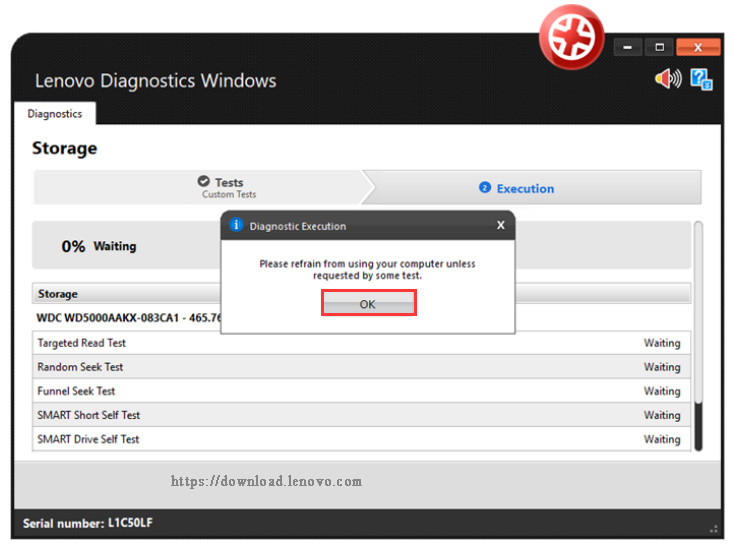
Now, the test execution starts and you need to wait for some time. According to the results, you will have a general understanding of your storage including its size, rotation rate, physical/logical sector size, model, etc.
However, the Lenovo diagnostics tool can’t measure the write speed and help you manage storage devices effectively. Besides, some users report that they encounter a BSOD crash on a ThinkPad computer when using the Recovery Media version of Lenovo diagnostics to reinstall OS.
So, you can consider using another storage management tool — MiniTool Partition Wizard to test your storage device.
Alternative Tool to Test Your Storage Devices
Do you want to test your storage device effectively? MiniTool Partition Wizard is a powerful and trusted alternative to Lenovo diagnostics. It can not only be used to test the storage devices of Lenovo computer but other external devices such as SD card, HHD, and SSD that connect to your Lenovo PC.
It can help you perform a disk benchmark, rebuild mbr, resize partition, change cluster size, migrate OS, and so on. If you encounter a BSOD error and your computer is unbootable, MiniTool Partition Wizard Pro Ultimate Edition is recommended. This is because you can use this edition to create a bootable CD/DVD that you can use it to manage your storage under WinPE.
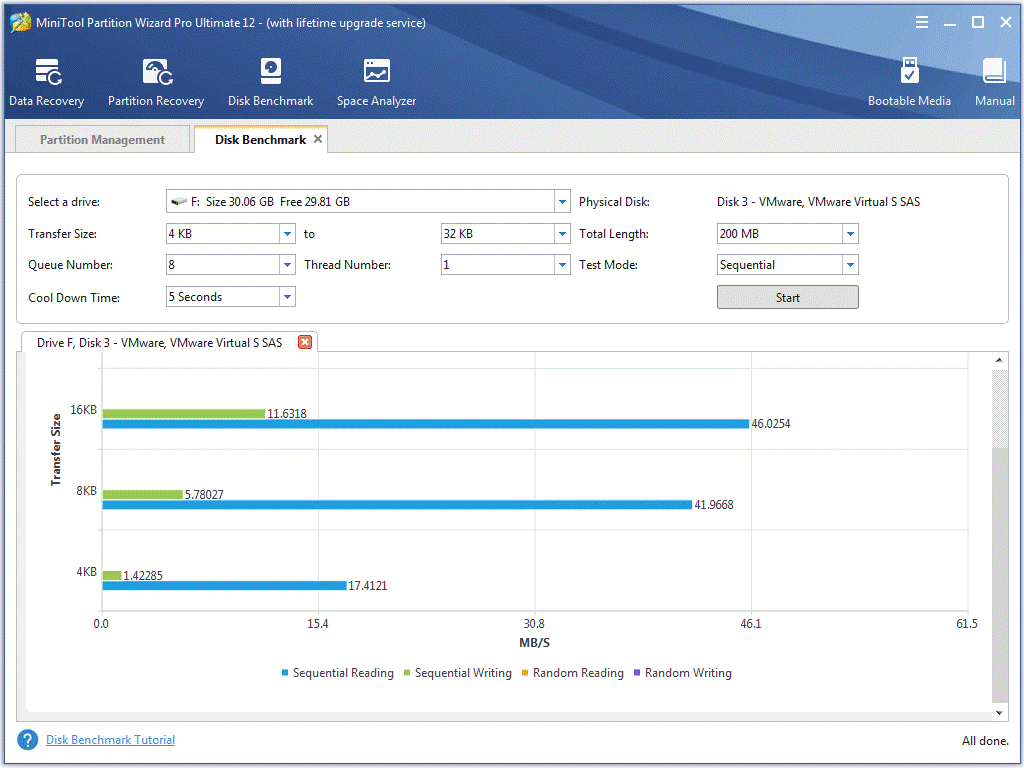
#1. Perform a Disk Benchmark
Step 1. Connect your storage device to your computer and run the MiniTool Partition Wizard to get its main interface.
Step 2. Click on Disk Benchmark on the top toolbar.
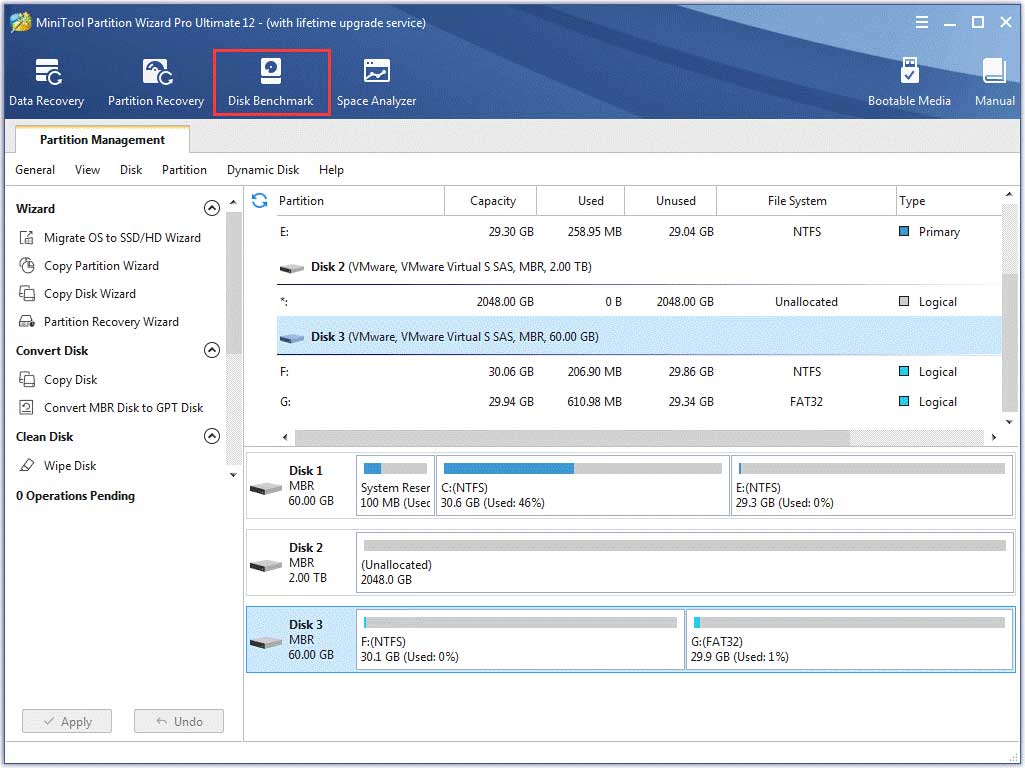
Step 3. Select the storage drive letter from the drop-down menu and click on the Start button to check your storage device.
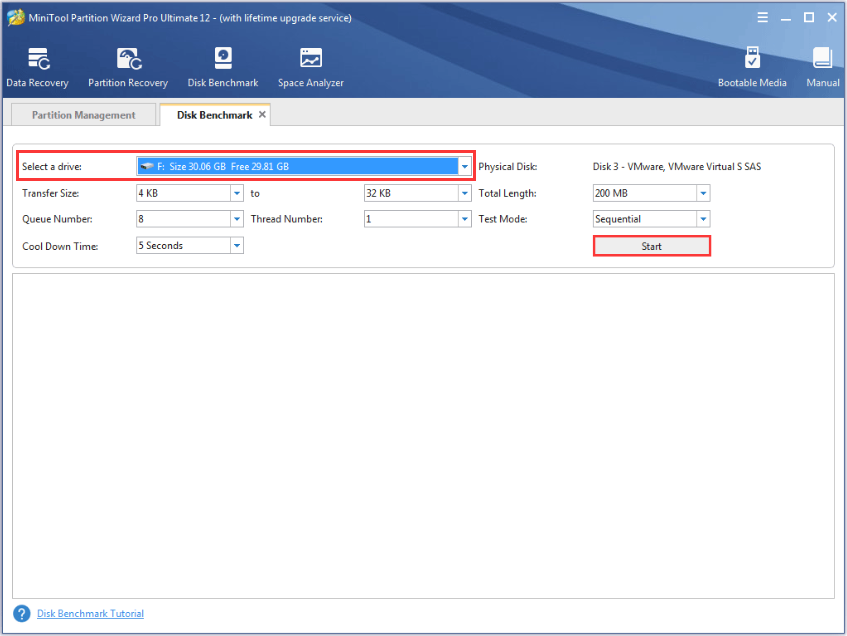
Step 4. Wait for some time, and then you will obtain the test results including transfer size, random reading and writing speed, etc.
#2. Check File System
The Check File System feature of MiniTool Partition Wizard can help you identify if there are any damaged file system and repair the File System errors on the hard drive. For that:
Step 1. Select the partition that you want to check and click on the Check File System from the left pane.
Step 2. Select the Check & fix detected errors option and click the Start button. After that, this tool will check and fix file system errors at once.

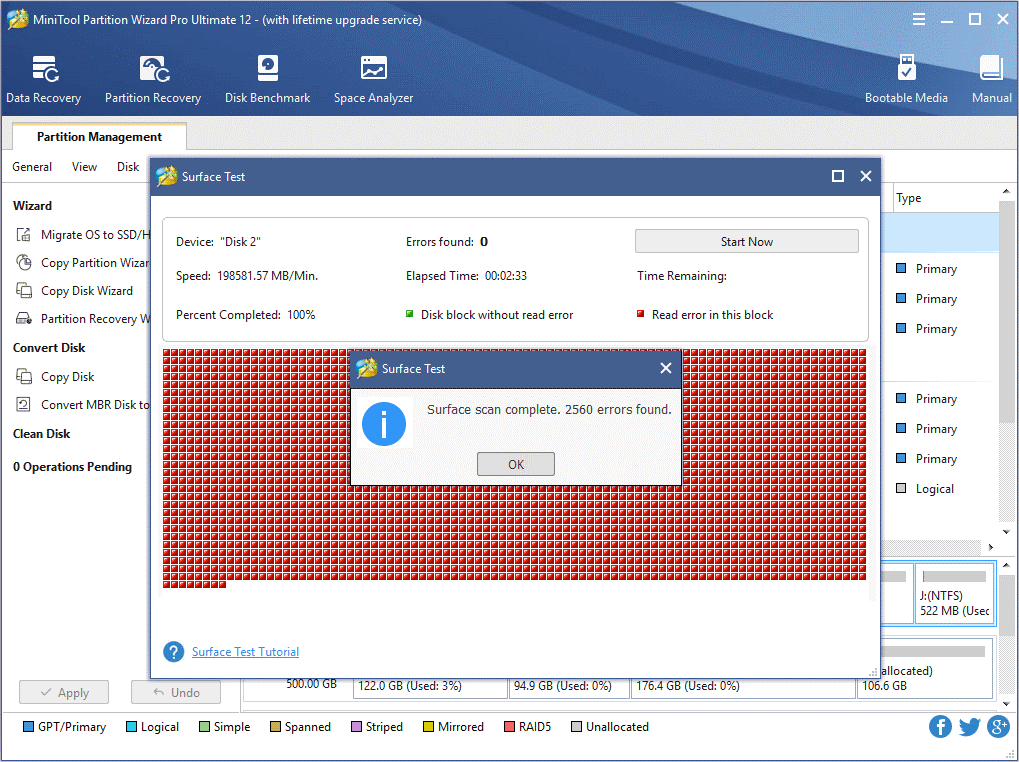
#3. Check Bad Sectors
This powerful program can also help you check the errors on your storage drive. It is very simple to operate with a few clicks.
Step 1. Select the target drive and click on the Surface Test on the left pane.
Step 2. Then click on the Start Now button in the pop-up window to check the hard drive for error.

Step 3. After that, you can check if there are any bad sectors on the drive. If there are bad sectors that are marked with red colors, you can run chkdsk /f/r command to repair or consider replacing your drive.
Bottom Line
What is Lenovo diagnostics and how to use it? I believe that you already have a deep understanding of these questions. Besides, you can use MiniTool Partition Wizard to test your storage devices. If you have any questions, please send us an e-mail via [email protected] . We also appreciate any endeavor that makes us go further.
Lenovo Diagnostics FAQ
- Launch Lenovo diagnostics tool and then go to the Dashboard view.
- Click on Edit, and then disable them by dragging updates or other unneeded items to the right Event not monitored
- Right click the Lenovo Solution center and click on Disable.
- Restart your Lenovo computer until you arrive at the Lenovo logo screen.
- Press the F12 (Fn + F12) keys for several seconds to enter Windows Boot Manager.
- Now, you can select the boot device from the BIOS list.
You can use the Windows built-in diagnostic tool to check your computer’s memory.
- press the Win + R keys to open the Run dialogue box, and then type exe in it and hit Enter.
- Select the Restart now and check for problems option in the pop-up window. Then your computer will restart and this tool will perform a memory test automatically.
ABOUT THE AUTHOR

Position: Columnist
Fall in love with the hardware technology in early 2008. Now, Ariel has been a professional columnist for partition management publications. Graduated from Purdue University in 2010, Arial has about 10 years of working experience in the field of hardware technology. As a columnist on MiniTool, Ariel has provided numerous solutions ranging from data backup, disk management, and data recovery. These solutions helped millions of users fix all kinds of tricky problems. Ariel was born in Pennsylvania and lives with her husband and a lovely dog. She always says “Life is full of magic, but writing means the world to me.”


