Lenovo ThinkPad и ThinkStation готовы к работе с Linux
Рабочие станции Lenovo ThinkStation знакомы многим. Это полностью готовые к использованию системы с новейшими процессорами Intel, профессиональными графическими картами NVIDIA, инструментами для управления энергоэффективностью и производительностью. Они легко адаптируются к потребностям конкретного предприятия.

Для максимально быстрого отклика некоторые модели оснащены 12 разъемами для DIMM-модулей. Портативные, но при этом мощные компьютеры сочетают в себе производительность и высокую скорость обработки данных. Такие устройства способны оптимизировать самые разные процессы.
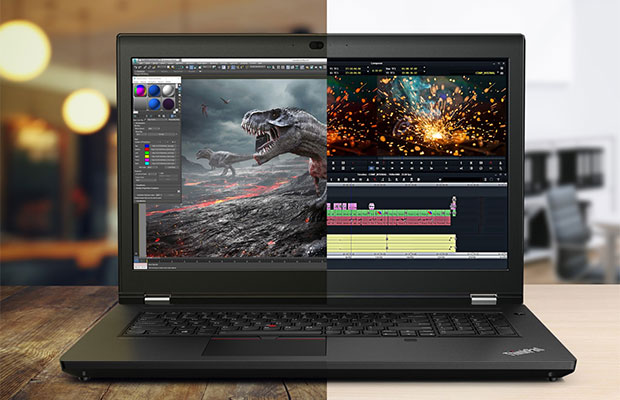
В этом году Lenovo существенно обновила семейство полноразмерных ноутбуков ThinkPad. В новинках улучшены многие характеристики, в том числе система охлаждения. Появилась и новая модель — Lenovo ThinkPad P15v, более компактная и доступная альтернатива ThinkPad P15.
По данным Canalys, в 2019 году впервые за восемь лет мировые поставки настольных компьютеров, ноутбуков и рабочих станций выросли на 2,7%. Lenovo, Dell и HP принадлежит 2/3 этого рынка. По объемам поставок за год лидирует Lenovo с 64,8 млн устройств, что на 8,6% превышает показатели предыдущего года. По информации Gartner, Lenovo обеспечила поставку 62,9 млн ПК, а годовой рост составил 8,1%.
Для поклонников Linux
Разработчики и специалисты по обработке данных все чаще обращаются к Linux. Эта операционная система привлекает своей стабильностью, повышенной безопасностью, более простым управлением и администрированием. Кроме того, она позволяет экономить тысячи долларов на покупке лицензий.

По данным опросов, Linux — предпочтительная для разработчиков платформа
Минувшим летом Lenovo представила сертифицированные ПК с предустановленной операционной системой Canonical Ubuntu LTS. Теперь компания предлагает целую линейку из 27 устройств под управлением ОС Ubuntu. Это 13 рабочих станций ThinkStation и ThinkPad серии P, а также 14 ноутбуков ThinkPad серий T, X, X1 с версиями Ubuntu 20.04 LTS и 18.04.
Ubuntu 20.04 под кодовым названием Focal Fossa
Выпуски Ubuntu для долгосрочной поддержки (LTS) широко распространены и используются на компьютерах разного класса, от домашних настольных ПК до критически важных облачных серверов. Поэтому стабильности, предсказуемости и надежности уделяется особое внимание.
Lenovo было важно предоставить устройства, готовые для Linux прямо из коробки, чтобы такие системы были доступны для всех. Они повышают доступность приложений, библиотек и инструментов с открытым исходным кодом, благодаря чему работа разработчиков становится более продуктивной. Устраняется зачастую трудоемкий процесс загрузки Linux, выдержать который под силу не каждому пользователю. Теперь сообщества программистов, инженеров, специалистов по искусственному интеллекту и других профессионалов получили более широкий выбор устройств.
На рабочие станции с предустановленной OEM-версией Ubuntu Lenovo предоставляет сквозную поддержку через интернет и по телефону. Это поможет решить любые проблемы, связанные с функционированием платформы.
В расширение включены следующие устройства Lenovo ThinkPad и ThinkStation:
- ThinkPad T14 (Intel и AMD)
- ThinkPad T14s (Intel и AMD)
- ThinkPad T15p
- ThinkPad T15
- ThinkPad X13 (Intel и AMD)
- ThinkPad X13 Yoga
- ThinkPad X1 Extreme Gen 3
- ThinkPad X1 Carbon Gen 8
- ThinkPad X1 Yoga Gen 5
- ThinkPad L14
- ThinkPad L15
- ThinkPad P15s
- ThinkPad P15v
- ThinkPad P15
- ThinkPad P17
- ThinkPad P14s
- ThinkPad P1 Gen 3
- ThinkStation P340
- ThinkStation P340 Tiny
- ThinkStation P520c
- ThinkStation P520
- ThinkStation P720
- ThinkStation P920
- ThinkStation P620
Как видно, список довольно обширный. Почему же именно Ubuntu, а не какая-то другая из многочисленных версий Linux?
Выбор Ubuntu
Отраслевые эксперты называют несколько причин, по которым стоит использовать Ubuntu в качестве основной системы. Это едва ли не самый популярный дистрибутив Linux, число пользователей которого превышает 20 миллионов, его отличает обилие документации, высокая стабильность, обширная поддержка оборудования, доступность программ и библиотек, крайне простая установка.
Разработчики Ubuntu изначально ориентировалась на обычных пользователей. Они хотели создать удобный дистрибутив с регулярными обновлениями, и у них это вышло: Ubuntu позволяет управлять системой, не прибегая к командной строке.
Подробная документация, в том числе на русском языке, раскрывает практически все аспекты работы ОС и ускоряет обучение. Благодаря огромному количеству пользователей, в интернете можно легко найти ответ практически на любой вопрос — например, на сайте askubuntu.com или многочисленных русскоязычных форумах.

Специалисты, работающие в сферах разработки ПО, системного администрирования, медиа и развлечений, анализа и обработки данных, ИТ-инженерии, искусственного интеллекта, — все они получают доступ к самому широкому спектру отраслевого программного обеспечения, фреймворков и инструментов, улучшающих рабочие процессы.
LTS-версии Ubuntu с длительным сроком поддержки выходят каждые два года. Драйверы встроены в ядро операционной системы или поставляются в виде отдельных модулей, подключаемых при загрузке. ОС Ubuntu поддерживает как минимальную установку с самыми необходимыми утилитами и браузером, так и полную инсталляцию с дополнительными приложениями и пакетами. С каждой новой версии ОС установка становится все проще и интуитивнее.
Под Linux разработано и бесплатно распространяется огромное количество программ: нужное ПО можно найти под любые запросы пользователя. Причем практически у любого приложения для Linux есть пакет для Ubuntu. Установка выполняется через удобный менеджер Synaptic, а режим LiveCD позволяет загрузиться с CD или флешки. Изначально в систему входит набор необходимых программ для работы с документами и интернетом. Одним словом, Ubuntu — хорошая бесплатная альтернатива Microsoft Windows.
Благодаря модульности пользователь может изменять структуру и компоненты операционной системы. По умолчанию Ubuntu поставляется с окружением Gnome, но можно использовать, например, Kubuntu (KDE), Lubuntu (LXDE), Ubuntu MATE или другие. Версия с длительным сроком поддержки получает обновления безопасности и ядра в течение пяти лет. Система постоянно совершенствуется благодаря разработкам компании Canonical.
Не только Ubuntu
Помимо Ubuntu LTS, все семейство рабочих станций Lenovo будет сертифицировано для Red Hat Enterprise Linux — надежной, удобной и мощной ОС. Она настроена для максимальной производительности в приложениях для создания графики, отрисовки анимации и научных расчетов. Red Hat Enterprise Linux предлагает поддержку корпоративного уровня и высокую стабильность.
Перед тем, как перевести компьютеры на Ubuntu, Lenovo выпустила линейку ноутбуков ThinkPad с предустановленной операционной системой Fedora 32 Workstation Linux. Fedora — это форк дистрибутива Red Hat Enterprise Linux. В эту серию вошли мобильные рабочие станции ThinkPad P53 (июль 2019 года), ThinkPad P1 Gen 2 (сентябрь 2019 года) и ноутбук ThinkPad X1 Gen 8 (январь 2020 года). В настоящее время ведется разработка Fedora 33, но дата ее выхода пока не определена.
Ноутбук Lenovo ThinkPad X1 Carbon Gen 8: теперь с дистрибутивом Fedorа
Многие пользователи предпочитали работать с Linux на оборудовании Lenovo, но раньше им приходилось устанавливать операционную систему самостоятельно. Этот процесс мог быть трудоемким и требовал времени. Предлагая решения с предустановленной ОС Fedora 32, Lenovo улучшает пользовательский опыт. Заказчики могут быть уверены в том, что их устройства под Linux полностью поддерживаются производителем и будут работать без каких-либо дополнительных усилий с их стороны.

Новая мобильная рабочая станция ThinkPad P53 с ОС Fedora
Lenovo будет сотрудничать с разработчиками ядра Linux, чтобы в дальнейшем компьютеры бренда могли работать на всех современных дистрибутивах этой операционной системы.
Источник
Lenovo thinkpad x250 linux
Follow whatever is written here at your own risk. I do not take responsibility for any damage to your device or files caused by following anything on this page.
This repository makes use of submodules. So, to clone this repository, run
Otherwise, you’ll be missing a ton of files.
I do not keep a complete EFI folder here. While it does undeniably make things easier, I don’t want to be distributing old versions of software, and nor do I want the responsibility of keeping this repository up to date with every kext etc. update.
The TL;DR version of this is something along the lines of use the SSDTs from here, grab the config.plist from here, install Clover with the drivers I mention and install the kexts I mention. You’ll then be missing the few QOL tweaks in this guide, however.
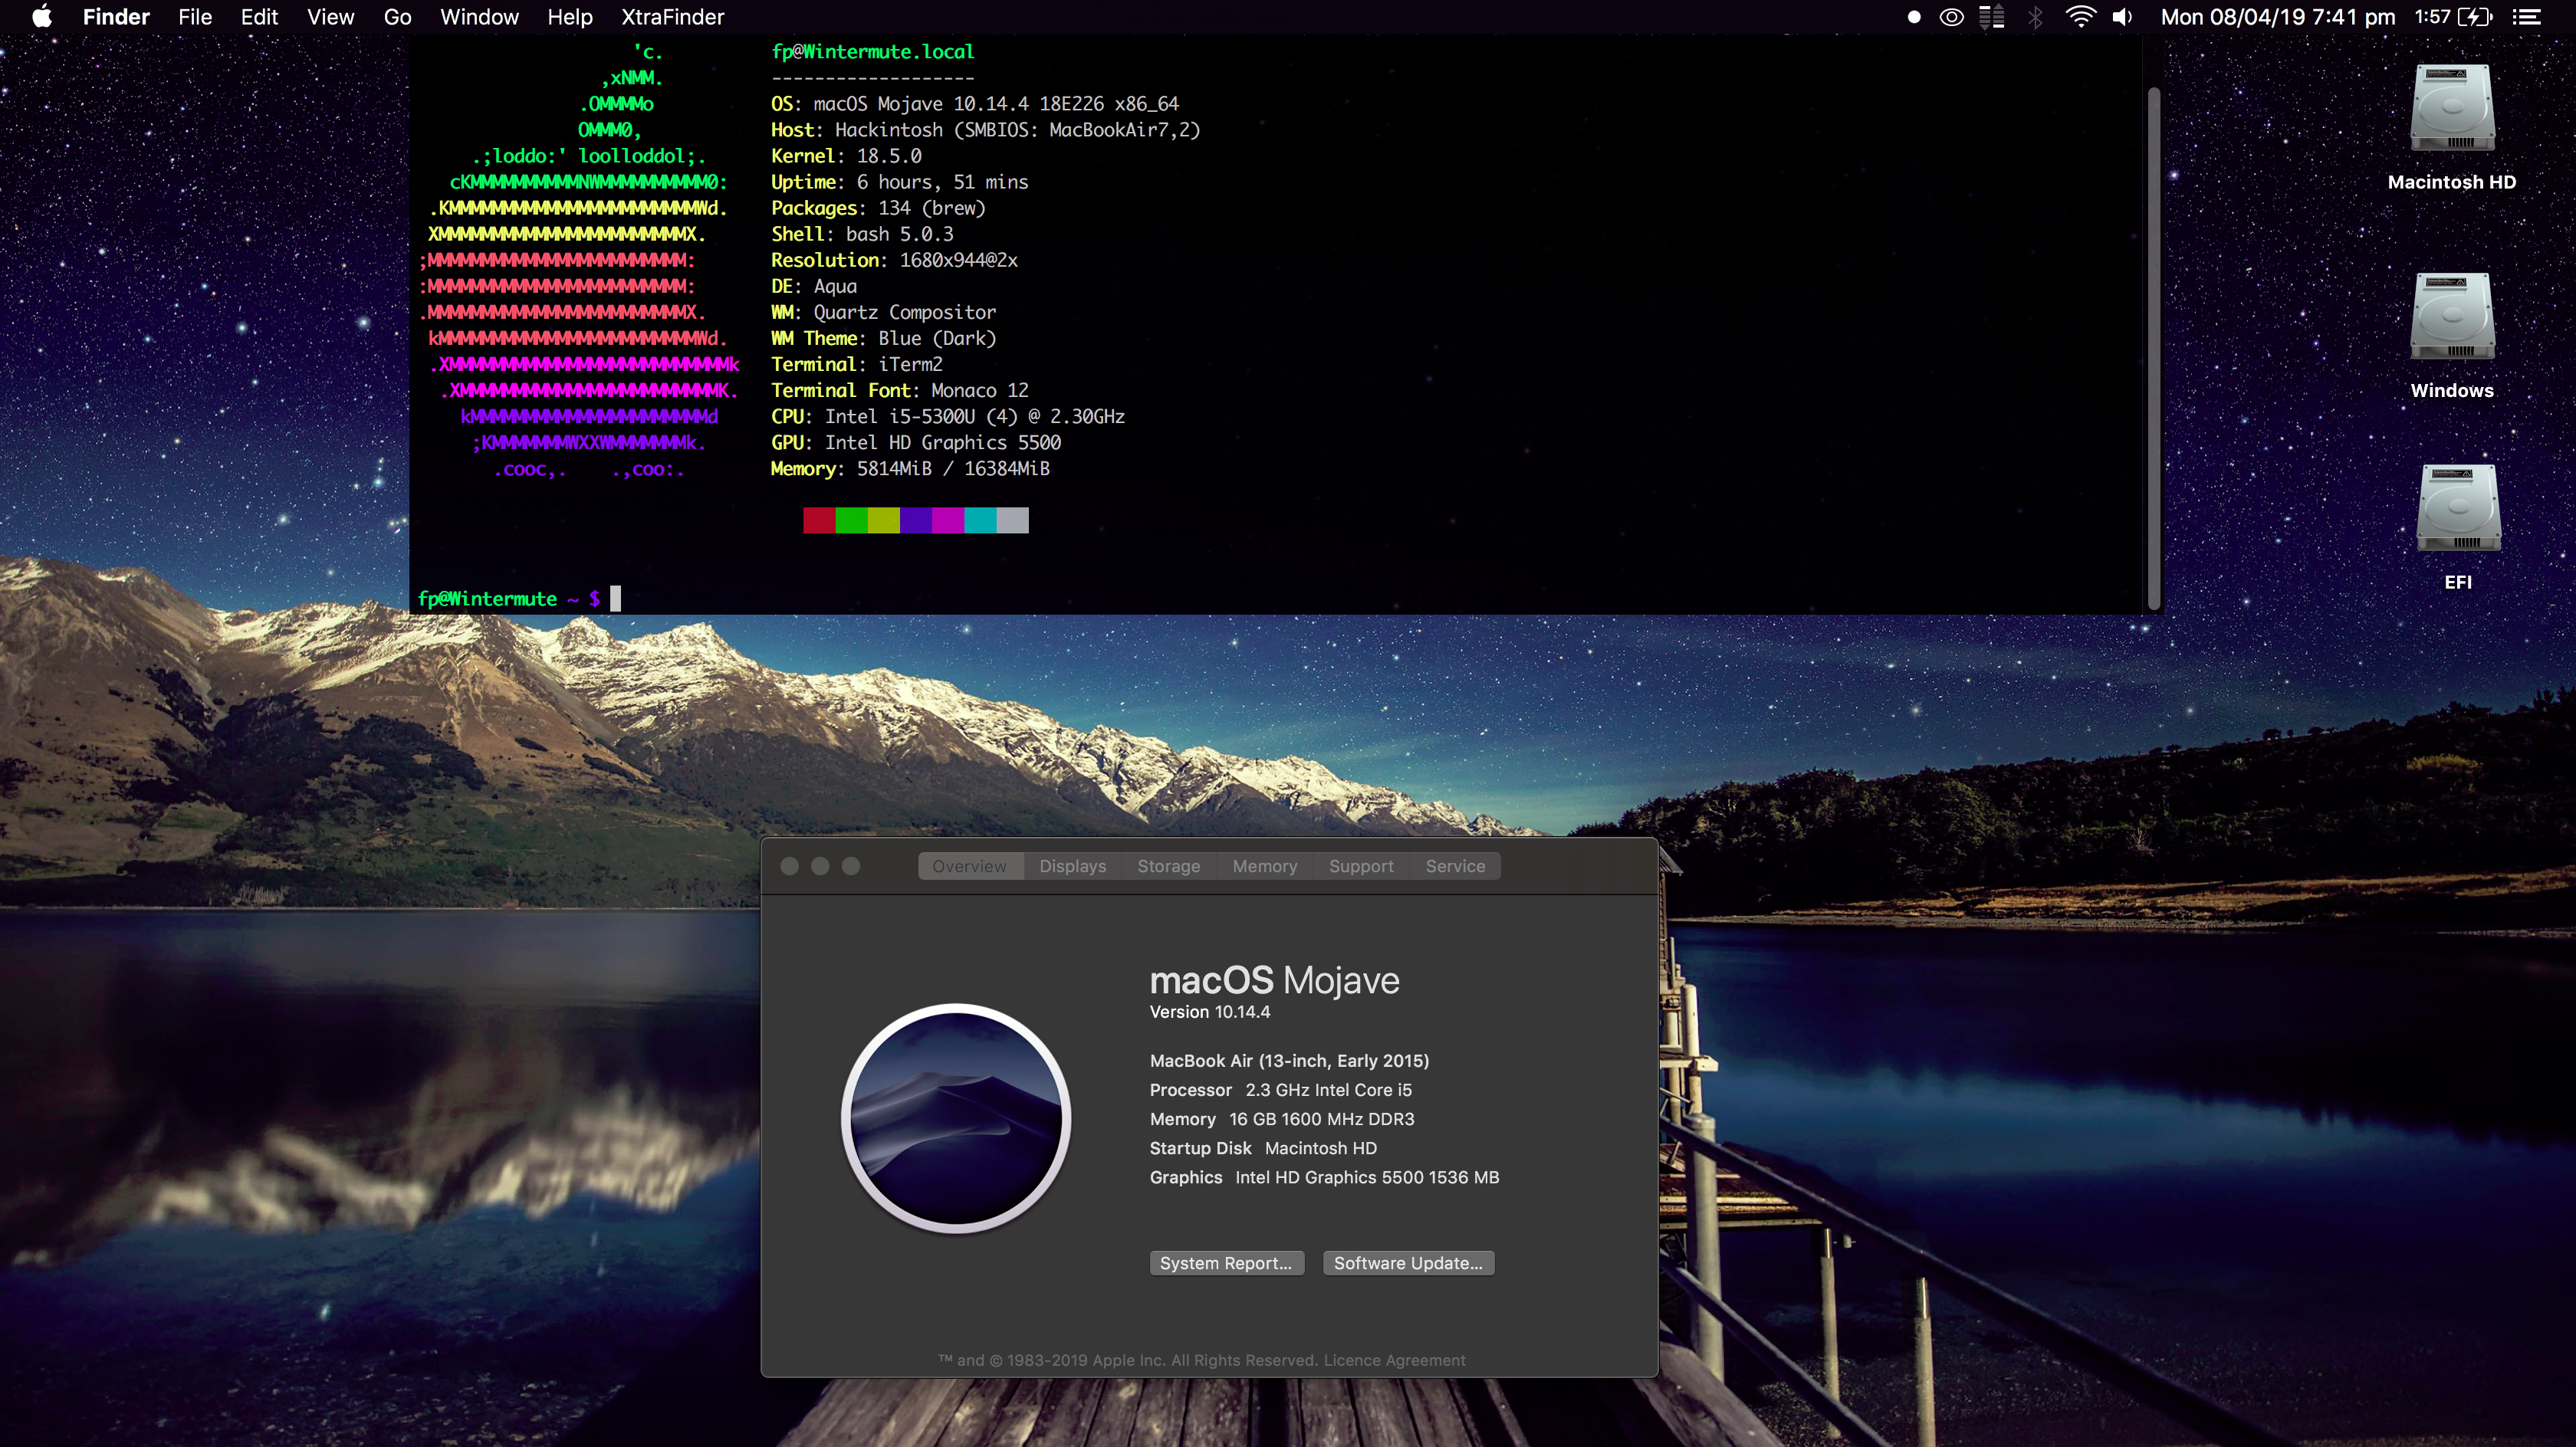
Specs of my X250
| Component | Notes | |
|---|---|---|
| CPU | 2.3 GHz Intel Core i5-5300u (vPro ugh ) | Make sure to read the CPUFriend short note later on in this write-up |
| RAM | Crucial 16 GB 1600 MHz DDR3 | |
| IGPU | Intel HD 5500 | QE/CI works, of course |
| Screen | 1920×1080 LG LP125WF2-SPB2 (00HN899) | Not touchscreen, and brightness control works in Windows |
| Audio | Realtek ALC3232 | Speakers and headphone output works, as long as the modified ALCPlugFix is installed |
| Wi-Fi | Dell DW1830 (Broadcom BCM43602) | The original Intel 7265 (with BT) was replaced, as it’s not supported by macOS |
| Bluetooth | Dell DW1830 (Broadcom BCM20703A1) | AirDropping to and from an iPad 4 works fine |
| Ethernet | Intel I218-LM | No idea if it actually works, but it shows up fine and Mieze’s driver is well tested at this point in time |
| Touchpad | Synaptics PS/2 | The TrackPoint, with VoodooPS2Controller, also works should you feel more inclined to use that instead |
| WWAN | Not present | If your X250 has a WWAN card, then the DW1830 probably isn’t the best choice as the DW1830 has three antenna ports — I use one of the WWAN antennas for the Wi-Fi card |
| SSD | Samsung 860 EVO 512 GB SATA | Works fine. I personally enable TRIM by running sudo trimforce enable , but some schools of thought say it’s not needed when using APFS |
| Card reader | Realtek something | sinetek’s driver (recommended: syscl’s fork) might work somewhat; I have not tested it personally |
Problems and other things you should be aware of
- I have only tested this X250 with 10.14.3, 10.14.4 (updated from .3) and 10.14.5. Dark mode is far too enticing for me to test anything else.
- Something that I was unaware of while updating is that loading kexts from Clover’s EFI folder (as opposed to /Library/Extensions etc.) is only possible because Clover hot patches some component to allow this to happen. When I did the update from .3 to .4, I was getting a kernel panic and I wasn’t able to see why because of irrelevant information being dumped to the screen. Long story short, it was because WhateverGreen wasn’t being loaded as my Clover version was too old. Newer versions of Clover had already had updated the patch targets for .4 to support kext loading from outside of the standard locations.
So, yeah, update your Clover before macOS!
- Something that I was unaware of while updating is that loading kexts from Clover’s EFI folder (as opposed to /Library/Extensions etc.) is only possible because Clover hot patches some component to allow this to happen. When I did the update from .3 to .4, I was getting a kernel panic and I wasn’t able to see why because of irrelevant information being dumped to the screen. Long story short, it was because WhateverGreen wasn’t being loaded as my Clover version was too old. Newer versions of Clover had already had updated the patch targets for .4 to support kext loading from outside of the standard locations.
- The batteries drain quite fast. I’m hoping that this is because of me running my laptop at 1680×944 (3360×1888 «Retina»/HiDPI), setting battery thresholds on already-old batteries and not allowing the audio chip to go into power saving mode when headphones are plugged in
- I don’t believe Mojave supports VGA out, and I’ve never tested the MiniDP. If you do get either working, and changes to the files in this repo were needed in order to do so, please consider creating a PR.
- This write-up uses VirtualSMC instead of the venerable FakeSMC as the former is more resilient if the CMOS checksum gets invalidated. Even the Lenovo UEFI won’t reset your settings, but with FakeSMC (or perhaps Clover’s SMCHelper-64.efi driver) a hang would occur at the point before Clover could hand over booting to the macOS kernel. FakeSMC does however have the advantage that it can display the fan speed with ACPISensors (if the right part in SSDT-BATT.dsl is uncommented and the DSDT rebuilt).
- Whilst Lenovo finally got rid of their/IBM’s terrible Wi-Fi card whitelist, meaning that one can now switch out the Intel Wi-Fi card (which I do think is better than the DW1830), the UEFI remains locked nevertheless. While it’s not really a huge issue, we will forever be at the mercy of the developers behind the following software:
- Clover to update their built in «KernelPm» patch. MSR 0xE2 is locked by the Lenovo UEFI and a KP happens when macOS attempts to set it: The Clover patch nullifies such attempts
- WhateverGreen to patch the FB kexts to work with 32 MB DVMT-prealloc. The Lenovo UEFI only allocates 32 MB, and the EFI variable that controls it is locked. As explained by RehabMan, the Apple framebuffer kexts expect at least 64 MB and will KP when it can’t get this. The UEFI 256/512 MB GPU memory setting has no relation to this ☹️
- Fn+F10, Fn+F11 and Fn+F12 are all configured to send previous track, play/pause and next track respectively. I mean, you can’t have surely been expecting anything different from the person who wrote this. You can edit Goldfish64/Hackintosh/Lenovo-ThinkPad-T450/SSDTs/SSDT-FNKEY.dsl for key bindings more appropriate for the labels should you wish.
- I use the MacBookAir7,2 SMBIOS profile. While MacBookPro12,1 also works, it has terrible things like «TCP Keep Alive when sleeping» enabled — which, without IGBE’s _PRW being hooked (the DSDT here does that), causes instant wakeup from sleep
- You may get a faster sleep time if you add darkwake=0 as a bootarg to Clover’s config.plist
RehabMan — his guides on preparing a macOS installer USB, hot patching the DSDT with Clover and SSDTs etc. are superb. The config.plist used here is based on his config_HD5300_5500_6000.plist and many of his SSDT hot patches are used here
Goldfish64 — I’m thankful that a developer with such low-level ACPI, UEFI etc. experience worked on Hackintoshing his T450 (same era as the X250, which means they share similar/the same chipsets and ACPI code). His Clover ACPI hot patches to fix the dual battery reporting, EC reads and writes etc. work great on the X250
Sniki — a computer without sound is a terrible thing for most people. That thankfully is not the case here thanks to Sniki’s modified AppleHDA kext, and his modified version of goodwin’s ALCPlugFix, which ensures sound works over headphones too
wheatleyisamoron — Wheatley is awesome, and he took the time to confirm that the microphone and camera actually works. He also told me about the Ethernet driver being a likely cause of the laptop crashing when resuming
Also thanks to the Clover developers, Mieze for her Intel Ethernet driver, the acidanthera collective (most of the third-party kexts I have installed are theirs!), goodwin for ALCPlugFix, Dolnor/TimeWalker75a for CodecCommander and nguyenlc1993 for his ASUS K501L guide showing how to tune AppleGraphicsPowerManagement.kext and X86PlatformPlugin.kext to have the CPU idle at 800MHz and the GPU minimum speed one floor lower.
As it’s 2019, I assume you are booting your current OS in UEFI mode. This write-up has never been tested — and never will be — with Clover in legacy mode.
You can update the BIOS too. This write-up was written on a laptop running 1.35. Use the latest UEFI version available. As this write-up utilises Clover ACPI hot patching, there is no dependency on a pre-patched DSDT specific to a certain UEFI version and configuration.
Assuming the default settings are applied, make the following changes to the UEFI configuration:
| Setting | Value | Notes |
|---|---|---|
| Wake on LAN | Off | Whether it actually works in macOS I don’t know, but by leaving it off, you might eliminate one cause of early wakeup from sleep |
| Always on USB | Off | This might be safe to leave on, I have no idea, but all my USB testing has been done with it off |
| USB 3.0 Mode | Enabled | Must be done. The SSDT, thanks to RehabMan, will turn off the EHCI controller, leaving only the XHCI controller present. Externally, this laptop only has USB 3.0 ports anyway. The only reason this would need to be disabled is if you’re running a very old OS that has no USB 3.0 support. |
| Total Graphics Memory | 512 MB | Optional if you’re using the standard 1366×768 screen; however, if you’re using the 1920×1080 screen, then you will (anecdotally) see better performance with higher resolutions with this bumped up. |
| Intel Rapid Start Technology | Off | The OS needs to support this, which macOS doesn’t, and according to fraisdos125, having it on may cause macOS not to boot. |
| Security Chip | Disabled | I don’t know if macOS even supports a TPM, but according to fraisdos125, waking up from sleep may fail with it enabled. |
| Intel VT-d Feature | Disabled | You can keep this on if you use VT-d in other OSes, as the bootarg dart=0 and the dropping of the DMAR table will disable VT-d in macOS anyway |
| Secure Boot | Disabled | Unsurprisingly, Clover isn’t signed. |
| CSM Support | Yes | You might be able to keep this off if you set a screen resolution in Clover lower than your standard one, but with this off and Clover and macOS set to use the native/same resolution of your screen, you’ll see a very distorted logon screen that can only be fixed if you put your laptop to sleep and quickly cancel it. Clover can set the screen resolution to 1920×1080 in CSM mode, so it’s not too big a loss. |
| Ethernet Adapter | Enabled | Even if you don’t use the Ethernet card, MacBookPro SMBIOS profiles expect it as en0, not the Wi-Fi adapter |
Preparing your USB stick
I’ll mention this now in the hopes it will be remembered when the time comes: If you do manage to boot into macOS, DO NOT SIGN INTO ICLOUD. The config.plist provided here does not have a Mac serial number etc. Should you try to use iMessage etc. without a proper SMBIOS definition, your account may be barred from signing in on a non-iOS device and you’ll need to ring up Apple support.
I won’t rehash how to create a USB stick with Clover and the Mojave installer on it; RehabMan’s comprehensive guide covers everything. dosdude1’s patcher can download Mojave from the App Store on a Mac already running Mojave. Make sure to install the mentioned mount_efi script mentioned in that thread at the first available opportunity. This write-up does make the assumption you have your EFI partition already mounted when necessary.
There are tools and guides out there for Windows allowing the creation of an Apple recovery USB, from which you can install macOS proper. I did not test this method.
However, contrary to the guide, you should use a newer Clover version (not RehabMan’s Clover), the config.plist from this repository, and the recommended kexts and UEFI drivers mentioned in this write-up. As RehabMan’s guide explains, you’ll need to install Clover again after managing to boot into an installed macOS copy on your disk drive using your Clover USB. The config.plist, kexts etc. needed will still be the same.
Install Clover from here. I am currently running 4988 but use the latest version where possible. RehabMan’s guide linked above goes into more detail on installing Clover. After viewing the Important Information and clicking Continue, make sure to click Customise. I would recommend selecting the following options in the Clover installer:
- Clover for UEFI booting only ☑️
- Install Clover in the ESP ☑️
- UEFI Drivers (assume you should de-select any listed driver not explicitly mentioned in this list)
- Recommended drivers
- De-select ⬛️ AudioDxe-64 (unless you really want to hear the Mac startup chime)
- De-select ⬛️ DataHubDxe-64 (it’s seemingly not needed on the X250)
- Select ☑️ FSInject-64
- De-select ⬛️ SMCHelper-64 (we’re using VirtualSMC which comes with its own UEFI driver)
- File System drivers
- Select ☑️ ApfsDriverLoader-64 (also available here, just in case it gets removed from the Clover installer)
- Recommended drivers
- Themes (optional — if you can spare the space on the EFI partition):
- Black Green Moody (just in case: it’s used by stock RehabMan configs) ☑️
- Clovy (a vast improvement on the default embedded theme) ☑️
Making sure the EFI partition is mounted (search for mount_efi on this page), copy X250-Hackintosh/DSDT_src/srcs/RehabMan/OS-X-Clover-Laptop-Config/config_HD5300_5500_6000.plist into /Volumes/EFI/EFI/CLOVER/ and rename it to config.plist
The following separate UEFI drivers must also be installed into /Volumes/EFI/EFI/CLOVER/drivers/UEFI/ : * VirtualSmc.efi, which comes with the VirtualSMC zip file, find it linked in the kexts list below * AptioMemoryFix.efi from the RELEASE zip here. Despite its name, Lenovo’s Phoenix UEFI requires it * HFSPlus.efi from the res folder of this repository
Regarding the APFS and HFS drivers: you’ll almost certainly need HFSPlus for booting the macOS installer. The Mojave installer forces the use of APFS on an SSD, so you’ll need ApfsDriverLoader to boot the resulting installation. You can get rid of one driver if you’re using HFS or APFS everywhere, but keeping both around is the safest option. I haven’t had any bad experiences with APFS personally in the short time I have been using a Hackintosh. APFS, unlike HFS+, supports sparse files. Something to bear in mind if you use NZBGet.
You might want to edit config.plist for the following:
Removing NoEarlyProgress if you want to see the Clover text on bootup before the main Clover screen shows
Removing TextOnly . While I prefer the simplicity of having no theme, Clovy is a great looking theme
Actually changing the theme
Changing the language from English
Removing -v from the Boot Arguments. While I recommend keeping this on for the first few days or so so that you may find out what’s going wrong during boot, having the Apple logo and macOS loading bar display on boot makes for a nicer startup experience
Removing amfi_get_out_of_my_way=1 from the boot arguments. This argument is there to allow mySIMBL to work. While it’s not really an issue on a laptop where SIP has to be realistically disabled and unsigned kexts allowed to load, remove it if you feel the security benefits of AMFI are worth having.
Removing BooterCfg — with this set to log=0 , the text displayed by Clover when a macOS install is selected but before macOS is actually booting will not be displayed (though AptioMemoryFix will still write away). This might be better set in the NVRAM?
Place the following kexts into /Volumes/EFI/EFI/CLOVER/kexts/Other (in brackets are the versions I have installed at the time of writing this write-up, but install the latest versions):
You can optionally install the modified LiluFriend (dependencies added for the Lilu-dependent kexts recommended in this write-up) kext included in this repository inside the res folder. It’s not needed when using Clover to load Lilu and Lilu plugin kexts, but should you wish to move everything to /Library/Extensions, you’ll find it a huge help
RTCMemoryFixup — needed for more reliable sleep and wake. The config.plist here has an appropriate rtcfx_exclude set with offsets I found that stop the laptop from saying that the CMOS checksum is wrong on the next reboot after resuming from sleep. The Clover RTC patches do not do anything for this laptop and have been disabled. (1.0.3)
- SMCBatteryManager.kext too for working battery status
- SMCProcessor.kext for CPU temperature etc.
Copy DSDT_src/patched/SSDT-IALL.aml into /Volumes/EFI/EFI/CLOVER/ACPI/patched.
If you want to create your own version of SSDT-IALL from the dsl files, you can run DSDT_src/produceSSDTs.sh . You will need the XCode Command Line Tools (for patch and make at least) and RehabMan’s iasl fork installed.
SSDT-IALL.aml comes from the SSDTs listed in DSDT_src/srcs/RehabMan/OS-X-Clover-Laptop-Config/hotpatch/SSDT-IALL.dsl. You can add your own SSDTs there and/or edit the SSDTs mentioned with your own changes and then run DSDT_src/produceSSDTs.sh to place a new SSDT-IALL.aml into the patched folder which you can then copy into Clover.
DSDT_src/srcs/RehabMan/OS-X-Voodoo-PS2-Controller/SSDT-Thinkpad_Clickpad.dsl has a (disabled) hack to set battery charging thresholds on both batteries. It’s not the best place to put it, but I needed something that I know would execute at least once on startup without being triggered by a kext I wrote. It’s there should you wish to enable it by uncommenting QTHR , and changing the thresholds set inside said function.
Injection of the audio layout number is done from the SSDT, see RehabMan’s SSDT-HDEF and SSDT-HDEF. For the SSDTs where I made many changes, the repositories containing them originally are included — run git diff HEAD^ in each folder. This was done so that my changes can easily be separated from those of the original repositories, should you try to use parts of this write-up to run a version of macOS other than one this write-up targets. When you have time, I recommend looking at the patches applied in the config.plist, produceSSDTs.sh and SSDT-IALL.dsl to understand what is injected. You’ll have a far better understanding of what is going on and what to possibly disable in case of problems.
Kext Updater is a handy tool for keeping many of the kexts mentioned above up to date. You may find Hackintool useful too.
Even if you don’t plan on using the Ethernet card, it helps with iCloud etc. if the Ethernet card corresponds to the en0 device on the system instead of the Wi-Fi card.
Unless this is newer, install IntelMausiEthernet 2.5.0d0. 2.5.0 has an Intel AMT-related fix (isn’t having a vPro laptop great?) which, for me at least, stops any Ethernet-related KPs during sleep. Thanks to Wheatley who noticed that IntelMausiEthernet 2.4.0 was causing his X250 to kernel panic while sleeping and let me know.
There is also another fork of Mieze’s driver with her potential fix incorporated: IntelMausi. I am currently using this and have not experienced any KPs during sleep.
Wheatley informs me that using AppleIntelE1000e.kext instead [of IntelMausiEthernet 2.4.0] stopped the KPs for him; however, the Ethernet connection fails after a longer sleep. Rebuilding SSDT-IALL without SSDT-LANCPRW.dsl, and removing/disabling the corresponding «change IGBE._PRW to XPRW» patch inside config.plist, might help with this. It is an older driver, however, and by all accounts Mieze’s driver supports more features: I would try using IntelMausiEthernet 2.5.0 first.
Getting working audio
While AppleALC is probably generally considered the way forward when it comes to audio (layout 28 works with the ALC3232), I have had better experiences with Sniki’s patched AppleHDA kext (and CodecCommander & ALCPlugFix). Because of that, this write-up will aid you in installing the latter.
I keep the card reader, webcam and microphone disabled in the UEFI. Wheatley has kindly confirmed that the microphone and webcam work. My X250 does not have a touchscreen; you may need to add whatever port it shows up into OS-X-USB-Inject-All/SSDT-UIAC-ALL.dsl. To get USBInjectAll to attempt its magic with all the USB ports found, you will need to remove its section from the DSDT temporarily / rebuild SSDT-IALL without SSDT-UIAC-ALL.dsl
Place CodecCommander (2.7.1) into /Library/Extensions.
Copy DSDT_src/Snikii/Lenovo-ThinkPad-X240/kexts/ALC3232.kext into /Library/Extensions
(These can’t be loaded from Clover’s kext folder: ALC3232 has a symlink to the AppleHDA binary in /System/Library/Extensions [which I don’t think works well when stored on a FAT32 filesystem but I could be wrong] and CodecCommander is more reliable if it loads after AppleHDA — if CodecCommander is in the Clover folder, it’s more likely that the sound won’t be working after booting up.)
After copying everything, run the following in Terminal to ensure sufficient permissions are set on the kext and to rebuild the kext cache:
Also install ALCPlugFix for working audio over headphones:
For some reason, and I’m hoping that it’s something I messed up on this install, when headphones are plugged in and you play something with IINA/mpv/VLC and then pause it for a bit, there will be no sound when resuming playback, unless you put the laptop to sleep and wake it up again.
I don’t have a fix, just a mere workaround to prevent power saving when headphones are plugged in:
Install Mac Audio Keepalive to Applications. Install Hammerspoon. Use the init.lua from this repository.
A lighter alternative to Mac Audio Keepalive is antipopd.
- Install setsid for macOS: brew install tzvetkoff/homebrew-extras/setsid (or replace the setsid line in init.lua with os.execute(«nohup /usr/local/bin/antipopd >/dev/null 2>&1 &») [untested])
- Take (or compile yourself) the antipopd binary from its repository and place it into /usr/local/bin. Make sure it’s chmod ded 755.
- Inside init.lua, remove the startStopApp(start, «com.milgra.oapka») line and uncomment the antipopd section just directly below where said line used to be.
With Hammerspoon running, plugging in headphones will start Mac Audio Keepalive/antipopd and then stop it when unplugging them. As already alluded to, for some reason this problem doesn’t occur when the speakers are active.
Getting the DW1830 working for Wi-Fi and Bluetooth
Again, the Intel 7265 that comes with the X250 is a good card, but it doesn’t work with macOS. There have been various attempts over the years to port the Linux or BSD drivers to macOS but none seem to have really panned out. One alternative is to use a USB dongle, but these do not integrate with macOS’s native Wi-Fi solution AirPort and require the use of their unwieldy software to operate the dongle. Not ideal.
The Broadcom-based Dell DW1830 works in Windows 10 (not any earlier versions AFAICT) with a driver you can find on the Dell website, and natively in macOS.
Before I go on, I will point out the following:
- The 7265 wants only two antennas, but the DW1830 expects three. Some say that plugging one into J2 is optional, some say it’s needed to help the card balance the load and not overheat. I have no idea what is true.
- My «solution» was to use one of the additional antenna cables designed for the WWAN card, since my X250 doesn’t have a WWAN card. It might be placebo, but WiFriedX seems to have increased the reliabilty of my connection (if you can live with disabling WiFried whenever you want to use AirDrop).
FakePCIID kexts etc. are not needed.
The one kext I do recommend you install for Wi-Fi (to the same place where Lilu.kext resides) is AirportBrcmFixup (2.0.0). brcmfx-country=#a has already been set in the config.plist boot arguments. Before installing this kext and setting this specific country code, my download speeds was a fraction of what it should have been (and what I was getting from Windows).
Bluetooth, Bluetooth, Bluetooth.
Note: sometimes, turning it off means you can’t turn it back on again. I have no idea why.
Anyway, for Bluetooth to somewhat work using a DW1830, you need this. Download BrcmPatchRAM_Catalina_All.zip from the releases page. Read the instructions there carefully. Anyway, here’s my summary: to load the kext at boot, you need to do one of the following:
Install BrcmPatchRAM2.kext and BrcmFirmwareData.kext to EFI/Clover/kexts/Other.
The preferred option is to install BrcmPatchRAM2.kext and BrcmFirmwareRepo.kext to /Library/Extensions
However, I personally do not have the kext load at boot. Even with BRCM kext delays set very high — higher than those specified in the README of the original project — it still wasn’t enough to avoid the 3 minute delays (!) I’d sometimes get on boot because the system would wait for the Bluetooth chip to be ready. And it seems like BrcmPatchRAM actually managed to upload the firmware successfully in many of these cases. I don’t actually use Bluetooth myself, so the delay was unacceptable to me, but I’d still like to have the choice of being able to use Bluetooth.
So I have the kext load when I log in, instead. This is not a great idea if you rely on external Bluetooth peripherals like a mouse or keyboard being available at the login screen.
Take BrcmPatchRAM2.kext from the res folder of this repository. This is a version of OS-X-BrcmPatchRAM built from master with GridH’s HCI_RESET fix and ESProcessing’s upgrade delay introduction patches applied. These patches are essential for a reliable Bluetooth experience after resuming.
When (if) the patches are applied upstream, I will delete the copy here. OS-X-BrcmPatchRAM.tar.xz contains the modified source, but without the .git and firmware folders from RehabMan/OS-X-BrcmPatchRAM to save lots of space. BrcmFirmwareRepo.kext can be taken from the latest release of the original project.
If it exists, BrcmBluetoothInjector.kext needs to be placed into EFI/Clover/kexts/Other.
Place BrcmFirmwareRepo.kext into /Library/Extensions. Place BrcmPatchRAM2.kext into /kexts, a folder you’ll need to create yourself. As demonstrated in the AppleHDA section, appropriate permissions must be set correctly ( chmod 755, chown root:wheel) on the /kexts folder, BrcmFirmwareRepo.kext and BrcmPatchRAM2.kext.
Run EDITOR=nano sudo visudo and add the following rule at the end:
Copy res/com.q12.brcmpatchloader.plist from your clone of this repository into
Run launchctl load -w
/Library/LaunchAgents/com.q12.brcmpatchloader.plist to ensure it’s set to load on login.
Restart or load the kexts yourself now. After doing so, open the Bluetooth Preference Pane and tick the option to show the Bluetooth icon in the status bar if you want. If you have too many status bar icons, try the freeware Dozer program.
Getting iCloud and iMessage to work
I can’t explain this better than P1LGRIM’s An iDiot’s Guide To iMessage can. I’ve had a successful experience with it twice. Follow the given instructions to the letter and you’ll be OK.
However, when you use Clover Configurator:
- don’t load your current config into it
- choose MacBookAir7,2 as the model
Save the generated config.plist anywhere but on the EFI partition. You can then manually copy and paste the SMBIOS section from the generated config.plist into your current config.plist on the EFI partition using a text editor.
Getting the CPU to idle at 800 MHz instead of 1.3 GHz
(Note: this is just simply installing CPUFriend, but without the SSDT for one certain model of SMBIOS only. stevezhengshiqi’s script is also far more futureproof than my method of copying the plist from the running system and then running patch on it. If SSDT-CPUF.aml from a previous version of this write-up works for you, then there is no harm in continuing to use it. Otherwise, if you wish to switch to using this method for consistency’s sake, then delete SSDT-CPUF.aml from EFI/. /patched and make sure SSDT/Generate/PluginType is set to true inside config.plist)
My CPU is capable of idling at a lower speed than the macOS default. CPUFriend can override the platform power profile to allow for the use of a lower idle speed. Read the instructions at https://github.com/stevezhengshiqi/one-key-cpufriend for information on how to run the script.
Once the script has done its job, make sure the EFI partition is mounted ( mount_efi ) and run mv
/Desktop/CPUFriend*.kext /Volumes/EFI/EFI/CLOVER/kexts/Other (or just drag the kexts onto the EFI partition with Finder).
Getting the iGPU to idle one step lower
AppleGraphicsPowerManagement_Broadwell.kext has been removed from this repository. If you have it installed, I would recommend removing it. In my case, it was responsible for sporadic resets when resuming from sleep, and for hard system lockups when opening more than a few tabs in Chrome.
Undervolting the CPU and GPU
Entirely, entirely, optional but the option is there.
VoltageShift works fine on my X250.
I won’t mention the settings I use, because all processors are different: you might be able to undervolt more than I can or you may have to undervolt less if you’re running into system freezes or spontaneous resets. (I realised I was undervolting the CPU too much when attempting to update Xcode from the App Store and watching something with IINA at the same time would cause the laptop to reset every single time. Worked fine otherwise, just apparently not under heavy load.)
Using «Retina» resolutions with the 1080p screen
If you have a 1080p panel in your X250 (attempting this with a 1366×768 screen is a waste of time), you might find that the screen is too physically small to really be able to see things clearly at 1920×1080 all the time. What I do is this: run in 1680×944 in Retina/HiDPI mode — 3360×1888 downscaled — but switch to 1920×1080 when watching something with IINA.
To enable Retina mode, I recommend using one-key-hidpi. It’s very easy to use, and will enable the Retina-style Display Preference Panel (even if the resolutions don’t exactly match up with the description).
If you wish to do it somewhat more manually, use usr-sse2’s fork of RDM. Use its edit function and add the following resolutions:
| Horizontal | Vertical | HiDPI |
|---|---|---|
| 1920 | 1080 | |
| 3360 | 1888 | ☑️ |
| 1680 | 944 | ☑️ |
Reboot. If you don’t see the new resolutions in the Display Preference Panel when holding the Option key, set it with RDM. You may have to do this on every startup. Again, one-key-hidpi works great.
See this for more information.
A better colour profile for the 1080p LP125WF2-SPB2
Источник


