- Как мне создать и использовать мой диск восстановления Lenovo
- Часть 1. Как создать диск восстановления Lenovo для Windows 7/8/10
- Создать Lenovo Recovery Disk для Windows 7
- Создать Lenovo Recovery Disk для Windows 8
- Создать Lenovo Recovery Disk для Windows 10
- Часть 2. Как восстановить Lenovo с помощью Recovery Disk
- Рекомендации: Восстановите все удаленные / утерянные файлы Lenovo с легкостью
- Lenovo Recovery Disk – Guide for Windows XP, Vista, 7, 8, and 10
- Download alternative recovery disk for Lenovo
- Create a recovery disk for Lenovo
- Create the recovery disk for Windows XP
- Create the recovery disk for Windows Vista
- Create the recovery disk for Windows 7
- Create the recovery disk for Windows 8
- Recover a Lenovo using the recovery partition or disk
- Recover Windows XP
- Recover Windows Vista
- Recover Windows 7
- Recover Windows 8
- More Information
- Support Links
- Applicable Systems
- Applicable Models
Как мне создать и использовать мой диск восстановления Lenovo
Компьютер Lenovo моего друга неожиданно сломался, поэтому он попытался запустить восстановление системы. Теперь его ноутбук загружается, отображает заставку Lenovo, показывает состояние восстановления системы как 64%, а затем вылетает. Затем он перезагружается и повторяет этот цикл . Ноутбук Lenovo застрял при восстановлении системы .
Если у вас проблемы с восстановлением Lenovo, то вы просто попали в нужное место. Эта статья — полное руководство по созданию диска восстановления Lenovo в разных операционных системах Windows. Таким образом, вы можете прочитать и выбрать конкретное решение для раздела восстановления Lenovo здесь.
- Часть 1. Как создать диск восстановления Lenovo для Windows 7/8/10
- Часть 2. Как восстановить Lenovo с помощью Recovery Disk
- Рекомендации: Восстановите все удаленные / утерянные файлы Lenovo с легкостью
Часть 1. Как создать диск восстановления Lenovo для Windows 7/8/10
После того, как ваш компьютер Lenovo поврежден или поврежден, вы можете восстановить и загрузить программу восстановления Lenovo для решения проблемы. На самом деле для моделей серии Lenovo Idea есть скрытый раздел: ноутбуки, настольные компьютеры (IdeaPad и IdeaCentre) и другие. Поэтому в этом разделе Windows 7/8/10 используется в качестве примера для создания дисков или разделов восстановления Lenovo. Просто читай и следуй.
Создать Lenovo Recovery Disk для Windows 7
Шаг 1 Голова к восстановлению фабрики Lenovo на Windows 7
Выберите «Пуск», чтобы получить его меню. Найдите строку поиска и введите «восстановление фабрики» в пустом поле. Нажмите клавишу «Ввод», чтобы получить результат. Позже вы можете выбрать опцию «Lenovo — Factory Recovery Disks».
Шаг 2 Запрос на создание диска восстановления Lenovo
Когда появится диалоговое окно «Контроль учетных записей», нажмите «Да», чтобы выйти из окна. Затем выберите «ОК», когда вы получите уведомление «Носитель восстановления, который вы собираетесь создать, может использоваться только в этой системе. Вы хотите продолжить?».
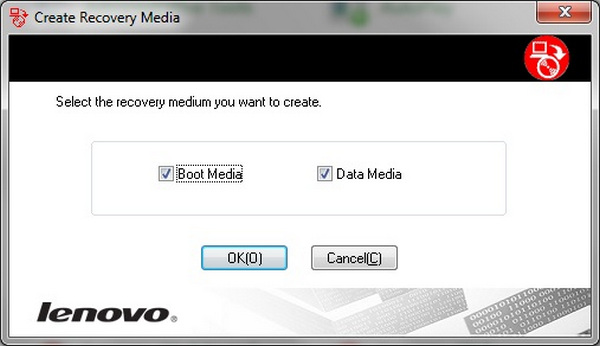
Шаг 3 Создайте диск восстановления Lenovo
Отметьте перед опциями «Boot Media» и «Data Media», затем выберите «OK», чтобы продолжить. В это время вставьте пустой DVD в компьютер Lenovo. Установите оптический привод и затем выберите «ОК». Подождите некоторое время, чтобы завершить создание диска восстановления Lenovo.
Создать Lenovo Recovery Disk для Windows 8
Шаг 1 Подготовьтесь к созданию диска восстановления в Windows 8
Подготовьте USB-накопитель не менее 16 ГБ. Затем вставьте этот USB-накопитель в USB-порт Lenovo. Удерживайте и одновременно нажмите клавиши «Windows» и «X». Позже, выберите «Панель управления», «Восстановление», «Дополнительные инструменты восстановления» и «Создать диск восстановления» в порядке всплывающего списка.
Шаг 2 Создать диск восстановления Lenovo Windows 8
Выберите «Да», когда вы увидите окно «Контроль учетных записей». Затем установите флажок перед «Копировать раздел восстановления с ПК на диск восстановления». Выберите свой USB-накопитель из списка. После этого подождите около часа, чтобы завершить процесс. Извлеките USB-накопитель после создания диска восстановления Lenovo.
Создать Lenovo Recovery Disk для Windows 10
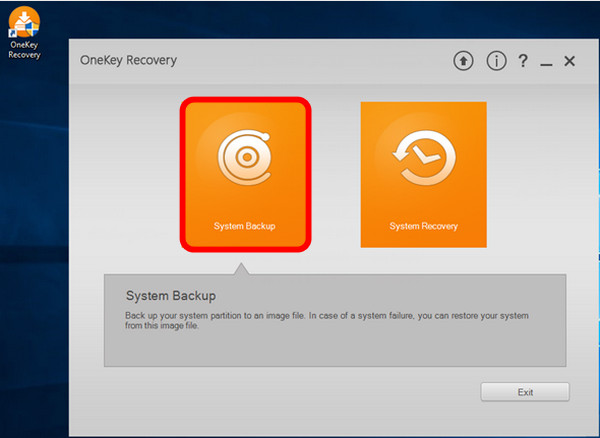
Шаг 1 Запустите Lenovo OneKey Recovery
Найдите программное обеспечение OneKey Recovery на своем компьютере Lenovo. Итак, вы можете перейти в «Пуск» и затем выбрать «Все программы» для доступа к этой программе. Выберите «Создать диск восстановления». Затем нажмите «Заводской диск восстановления по умолчанию».
Шаг 2 Создать Lenovo диск восстановления Windows 10
Подготовьте до 3 DVD или 17 CD для резервного копирования всех файлов, хранящихся на вашем компьютере Lenovo. Выберите определенное местоположение диска. Затем вставьте DVD или CD, который вы используете. Когда процесс записи первого диска будет завершен, вам будет предложено вставить второй диск. Просто делай, как говоришь. Наконец, храните все эти DVD или CD в безопасности.
Часть 2. Как восстановить Lenovo с помощью Recovery Disk
Шаг 1 Вставьте диск восстановления Lenovo
Положите компакт-диск или DVD-диск в лоток на компьютере Lenovo. Затем загрузите свой компьютер. Во время процесса несколько раз нажмите «F12», пока не появится экран «Boot Manager». Позже выберите «ODD» и нажмите клавишу «Enter», чтобы двигаться дальше.
Шаг 2 Восстановите компьютер Lenovo
Когда вы получаете уведомление «Нажмите любую клавишу для загрузки с CD или DVD», вы можете нажать любую клавишу на клавиатуре, чтобы получить загрузочную загрузку Lenovo. Отметьте перед «Я принимаю условия лицензионного соглашения». Затем нажмите «Далее». Вам будет предложено несколько сообщений, просто нажмите «ОК» несколько раз. Итак, последний шаг — дождаться окончания процесса восстановления Lenovo.
Если вместо этого вы используете раздел восстановления Lenovo, вы можете восстановить операционную систему Windows с помощью экрана «Boot Menu». Просто выберите «Полное восстановление», «Восстановление заводских настроек» и «Восстановление», чтобы восстановить Lenovo из заводских настроек.
Рекомендации: Восстановите все удаленные / утерянные файлы Lenovo с легкостью
Несмотря на загрузку носителя для восстановления Lenovo с хлопотами, вы можете использовать Aiseesoft Data Recovery чтобы получить более простое решение. Более того, это мощное программное обеспечение для восстановления данных позволяет пользователям восстанавливать удаленные или потерянные файлы с различных цифровых устройств, включая компьютеры, жесткие диски, карты памяти, видеокамеры и т. Д.
- Поддержка различных восстанавливаемых типов файлов, включая изображения, документы, аудио, видео, электронные письма и многое другое.
- Получите 4 простых режима восстановления данных. (Вы можете получить лучший режим восстановления Lenovo здесь.)
- Сканируйте и просматривайте все удаленные файлы на вашем цифровом устройстве быстро и выборочно.
- Получите данные об импорте обратно в различных ситуациях, таких как ошибочное удаление, отформатированный раздел, проблемы сбоев и т. Д.
Таким образом, вы можете выполнять резервное копирование и восстановление с помощью диска восстановления Lenovo или раздела полностью. Кроме того, также поддерживается восстановление выбранных файлов с вашего компьютера без потери данных.
Наконец, но не в последнюю очередь, у вас было лучше резервное копирование важных файлов заблаговременно. Если нет, то вы можете бесплатно скачать программное обеспечение Aiseesoft Data Recovery, чтобы восстановить конкретный файл индивидуально и быстро. Не стесняйтесь обращаться к нам, если у вас все еще есть проблемы с резервным копированием и восстановлением Lenovo здесь. Мы рады помочь вам решить любую проблему, когда вам нужно.
Что вы думаете об этом посте.
Рейтинг: 4.6 / 5 (на основе рейтингов 64)

25 июня 2018 04:14 / Автор: Аманда Браун в File Recovery
Когда вам нужно управлять файлами и папками на Android SD-карте, вы можете узнать больше о лучших 5 менеджерах SD-карт.
Что такое папка LOST.DIR на Android? Как восстановить файлы LOST.DIR? На этой странице представлено полное руководство с информацией о LOST.DIR и решениях для восстановления LOST.DIR.
Конвертировать AVCHD-видео в SD — руководство о том, как конвертировать AVCHD-видео в SD-видео, например AVI, MP4, MOV, 3GP и т. Д. Бесплатно скачайте AVCHD Video Converter, чтобы конвертировать AVCHD в SD-видео.
Lenovo Recovery Disk – Guide for Windows XP, Vista, 7, 8, and 10
This is a guide about Lenovo recovery disks for the following versions of Windows: Windows XP, Windows Vista, Windows 7, Windows 8, and Windows 10.
A recovery disk is also known as a restore disc, repair disc, boot disc or rescue disk.
Download alternative recovery disk for Lenovo
If the recovery partition of your computer is corrupt or damaged or you no longer have your recovery DVDs, download Easy Recovery Essentials.
Easy Recovery Essentials works with any Lenovo computer model and it’s compatible with the following Windows versions:

Screenshot of Easy Recovery Essentials
You can burn Easy Recovery Essentials directly to a CD, DVD or a USB flash drive and use the Automated Repair function to automatically find and fix boot errors.
Note: Easy Recovery Essentials can not be used to install or reinstall Windows.
Create a recovery disk for Lenovo
Lenovo computers have a hidden partition that can be used for recovery and restore. Some computer models also have a recovery DVD (or recovery USB, in case of Windows 8 users) that can be used for the same process.
Depending on the computer series model and what type of Windows you are using, you can have one of the several recovery software programs installed by Lenovo:
- Lenovo OneKey Recovery for Idea series models, including laptops and desktops (IdeaPad and IdeaCentre)
- Lenovo ThinkVantage Rescue and Recovery for Think series models: ThinkPad, ThinkStation, ThinkCentre and Lenovo 3000 models
- Computers with Windows 8 don’t have the Lenovo ThinkVantage Rescue and Recovery software. Instead it uses a different process for creating a recovery media (USB only) – go to Create the recovery disk for Windows 8 or Restore Windows 8 using the recovery partition or disk.
Create the recovery disk for Windows XP
The instructions for creating the disk with Lenovo OneKey Recovery on Windows XP are below. If you are not sure if your computer uses this software, go to Create a recovery disk for Lenovo.
- Start Windows XP
- Find the OneKey Recovery icon on your desktop or go to Start > All Programs and find it there
The OneKey Recovery Software icon
The instructions for creating the disk with Lenovo ThinkVantage Rescue and Recovery on Windows XP are below. If you are not sure you’re using the ThinkVantage software, go to Create a recovery disk for Lenovo.
- Boot Windows XP
- Go to Start
- Select All Programs
- Find the ThinkVantage folder. If you have a Lenovo 3000 the folder name would be “Lenovo Care”
- Click Create Rescue and Recovery Media
- At the Recovery Discs tab, select the Create a set of Product Recovery discs now option and click OK
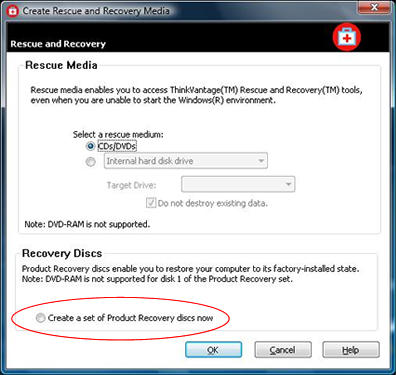
Create a set of Product Recovery discs in ThinkVantage
Create the recovery disk for Windows Vista
The instructions for creating the disk using Lenovo ThinkVantage Rescue and Recovery on Windows Vista are below. If your computer has the OneKey software instead (IdeaPad and IdeaCentre series models), follow the instructions for this software, according to the steps below.
- Go to Start and then All Programs
- Find the ThinkVantage folder from the list. If you have a Lenovo 3000, the folder name can be “Lenovo Care” instead
- Click on Create Product Recovery Media
- Check the The Product Recovery discs you are going to create are for use on this computer only. Do you want to proceed? option and click OK
- Select your optical drive to use with blank CDs or DVDs
- Insert the blank DVD and click OK
- Follow the next instructions on the screen to complete the process
- When the DVDs are created successfully, label them and keep them safe!
The instructions for using OneKey Recovery on Windows Vista are below. If you are not sure if your computer is using this software, go to Create a recovery disk for Lenovo.
- Open OneKey Recovery
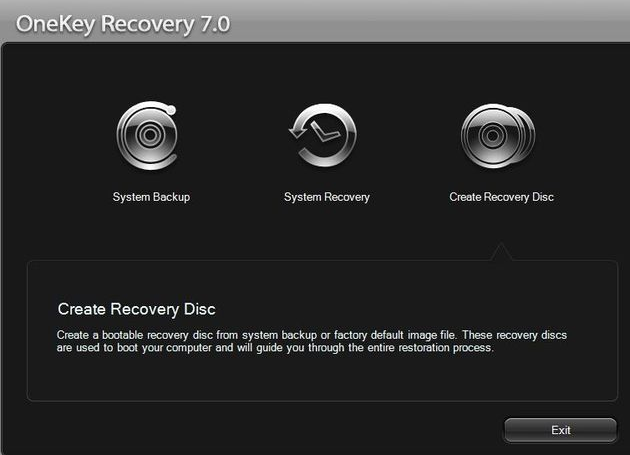
Lenovo OneKey Recovery 7.0 on Windows Vista
Create the recovery disk for Windows 7
Computers with Windows 7 from Lenovo have the ThinkVantage Rescue and Recovery software installed (ThinkPad, ThinkStation etc.), but if your computer series model is an IdeaPad or an IdeaCentre and it has the OneKey software instead, follow the next set of instructions.
The instructions for creating the disk using Lenovo ThinkVantage Rescue and Recovery on Windows 7 are:
- Click Start
- Start typing factory recovery in the search bar
- Find the Lenovo – Factory Recovery Disks item
- If the User Account Control window shows up, click Yes
- Check the “The recovery media you are going to create can only be used on this system. Do you want to continue?” option and then click OK
- Select both Boot Media and Data Media options and click OK
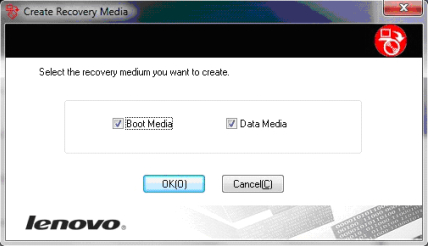
Boot Media and Data Media options on Lenovo ThinkVantage software
The instructions for creating the disk using Lenovo OneKey Recovery on Windows 7 are:
- Open the OneKey Recovery software either by finding the icon on your desktop or go to Start and then All Programs.
- Click Create Recovery Disc and then select Factory default recovery disc
- Select the drive location to use and insert the first blank CDs or DVDs. You will need up to 3 DVDs or 17 CDs
- The process will now start. Insert the second blank CD or DVD when asked
- When the process is complete, label the CDs/DVDs and keep them safe!
Create the recovery disk for Windows 8
If you are using Windows 8, you can only use a USB flash drive to create the recovery media. A minimum 16 GB flash drive is required.
Lenovo doesn’t provide a specific software to create the recovery disk in Windows 8, but you can create it using the Advanced recovery tools option from Windows 8’s Control Panel.
-
- Insert the USB flash drive
- Press the Windows key and X
- Select Control Panel from the list
- Select Recovery from the list
- Select Advanced recovery tools
- Select Create a recovery drive

Windows 8: Create a recovery drive option
- If the User Account Control (UAC) screen appears, click Yes
- Check the “Copy the recovery partition from the PC to the recovery drive” checkbox
- Select the USB flash drive from the list
- Continue the process and wait for it to finish. It may take up to an hour.

Wait for the process to finish
Personal files stored on the USB flash drive will be deleted! Backup your files before you continue.
Recover a Lenovo using the recovery partition or disk
A Lenovo computer can be recovered and restored using the hidden recovery partition or the recovery disks that you created (or already had).
CDs or DVDs are used for Windows XP, Vista and 7. USB flash drives are used for computers with Windows 8 installed.
Not all series models will have the hidden partition. If you don’t have the recovery partition and neither the recovery disk already at hand, go to Download alternative recovery disk for Lenovo.
Recover Windows XP
IdeaPad and IdeaCentre computers with the OneKey Recovery software installed can follow these instructions to recover and restore Windows XP:
- Insert the first recovery CD or DVD in the tray
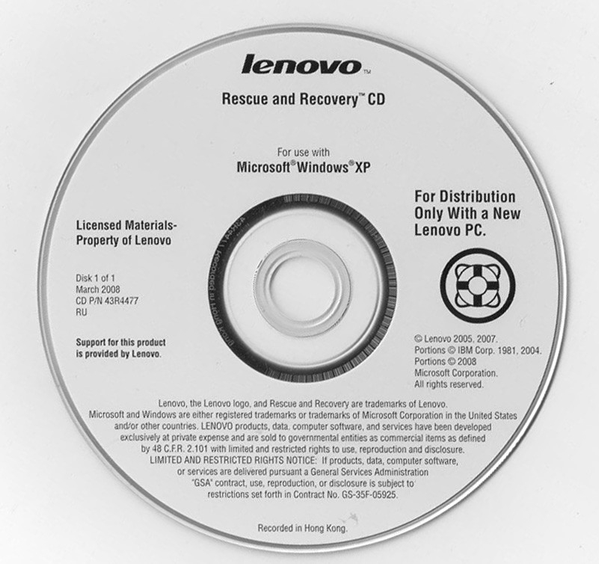
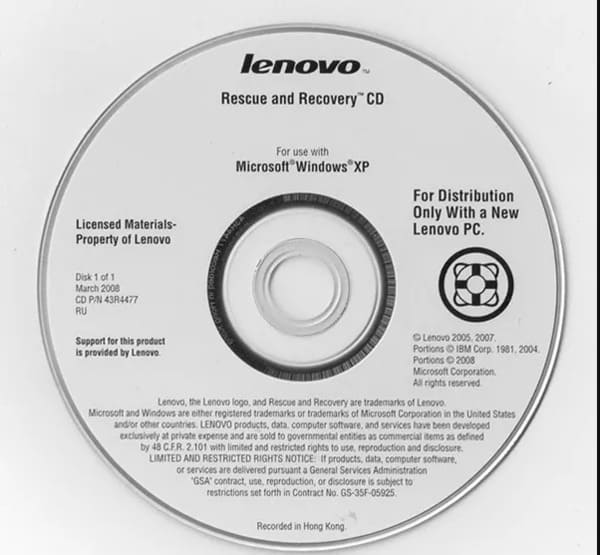
The Lenovo Rescue and Recovery CD for Windows XP
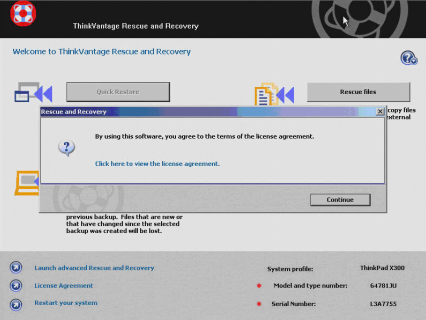
License agreement message in Lenovo ThinkVantage software
Recover Windows Vista
Windows Vista users can restore their system with ThinkVantage software using the recovery disk with these instructions:
- Make sure you have the Rescue & Recovery Startup/Boot Disc CD at hand. Insert it in the tray

The progress bar
Recover Windows 7
The steps to recover a Windows 7 system using the ThinkVantage software are similar to those of Windows Vista:
- Click Next to continue the recover and restore process
- Make sure the checkbox for the Terms and Conditions agremenet is checked
- Click Next
- Click Yes at the warning message about the data loss during this process
- Wait for the process to finish. When prompted to insert the next DVDs in the tray, do so.
- When the process is finished, restart your computer (or click Yes).
- Wait for Windows 7 to begin loading and when the Set Up Windows screen appears, the process is complete
- Continue setting up Windows 7
- Boot your computer
- Press F11
- At the System Recovery Options screen follow the instructions on the screen to reach the Choose a recovery tool screen
- At the Choose a recovery tool screen, click on Lenovo Product Recovery
- Click Next, after you select your language
- Agree to the terms of the license agreement and then click Next
- Click Yes to confirm that you understand the data loss involved during this process
- Wait for the process to finish.
- Insert your first Rescue & Recovery Startup/Boot Disc CD
If you don’t have the recovery CD or DVD, go to Download alternative recovery disk for Lenovo or follow the next set of instructions from below.
Boot the computer and during the booting process, press the F12 key. On Lenovo laptops you may need to click on the ThinkVantage button instead
The ThinkVantage button on your laptop
Your computer will reboot
If you don’t have the DVD, but your computer still has the recovery partition intact, follow these steps:
Recover Windows 8
You can restore a Lenovo computer with Windows 8 installed using the recovery USB created. The instructions are:
- Insert the USB recovery media in the USB port
If you don’t have the recovery USB, go to Download alternative recovery disk for Lenovo or continue with the the next set of instructions.
If you don’t have the recovery USB, but your computer still has the recovery partition intact you can follow these steps:
- Press the Novo button (on some models you can try pressing F12 )
- Click on System Recovery
- Wait for the computer to boot into the recovery mode
- Follow the instructions on the screen to continue with this process
More Information
Support Links
It’s an easy-to-use and automated diagnostics disk. It’s available for Windows 8, Windows 7 and Windows Vista. It’s also available for Windows XP and Windows Server.
Read more at Windows Recovery Disks.
Applicable Systems
This Windows-related knowledgebase article applies to the following operating systems:
- Windows XP (all editions)
- Windows Vista (all editions)
- Windows 7 (all editions)
- Windows 8 (all editions)
- Windows 8.1 (all editions)
- Windows Server 2003 (all editions)
- Windows Server 2008 (all editions)
- Windows Server 2012 (all editions)
Applicable Models
This Lenovo-related knowledge base article applies to the following computer models:
- ThinkPad series, like the ThinkPad Yoga, the ThinkPad Helix or any models from ThinkPad
- ThinkCentre series, like the M32, M73, M73z, M78, M83, M83 Pro, M93p, M93z
- IdeaCentre series, like the IdeaCentre K430 or IdeaCentre B540
- Flex series: Flex 2, Flex 15, Flex 14
- IdeaPad series: 11S, Y510p, Y410p, U430p
- Essentials series: G500, G700
- 11e series: 11e, Yoga 11e
- A series: A540, A730, A740
- B series: B350, B550, B750
- C series: C260, C650
- E series: E440, E540, E545, E93z
- G series: G40, G50-30, G50-70, G410, G500, G510, G710
- H series: H500, H530s
- K series: K450e
- L series: L440, L540
- Q series: Q190
- S series: S210, S215
- T series: T440, T440s, T440p, T540p
- U series: U430p
- W series: W540
- X series: X1, X140e, X240
- Y series: Y40, Y50, Y410p, Y510p
- Z series: Z40, Z50, Z510, Z710


