- Как перейти в полностью темный режим с LibreOffice
- Как включить полностью темный режим в LibreOffice
- Дополнительный совет для пакета LibreOffice flatpak
- Заключение
- Libreoffice dark theme windows
- How to Go Full Dark Mode With LibreOffice
- How to enable complete dark mode in LibreOffice
- Additional tip for LibreOffice flatpak package
- Conclusion
- About Dimitrios
- Компьютерная помощь в Калининграде т. 8 952 051 99 88
- Калининградская компьютерная помощь
- Сделай свой LibreOffice темным
- Change LibreOffice Default Look and Feel
- How to Change LibreOffice Default Look and Feel
- Icon Styles
- How to apply Icon Styles in LibreOffice
- User Interface
- How to Change User Interface in LibreOffice
- Watch Video
- Download
- Summary
- Looking for something else?
Как перейти в полностью темный режим с LibreOffice
LibreOffice это бесплатное кроссплатформенное офисное программное обеспечение с открытым исходным кодом. Если вы не извлекаете из этого максимальную пользу, Советы по LibreOffice статья обязательна к прочтению.
Темная тема становится популярной даже среди непрограммистов. Это снижает нагрузку на глаза, особенно при длительном использовании экрана. Некоторые люди считают, что это делает тексты четкими и ясными и помогает повысить их продуктивность.
Некоторые дистрибутивы Linux, например Ubuntu поставляется с темным режимом в наши дни придают вашим системам более темный оттенок. При включении темного режима некоторые приложения автоматически переходят в темный режим.
LibreOffice также делает это, за исключением основной области, где вы пишете:
Полутемный режим LibreOffice в соответствии с системной темой
Вы можете это изменить. Если вы хотите полностью перейти в темный режим с LibreOffice, вам просто нужно изменить несколько настроек. Позвольте мне показать вам, как это сделать.
Как включить полностью темный режим в LibreOffice
Как я упоминал ранее, вам нужно сначала включить общесистемный темный режим. Это гарантирует, что цвет окна (или строки заголовка) хорошо сочетается с темным цветом в приложении.
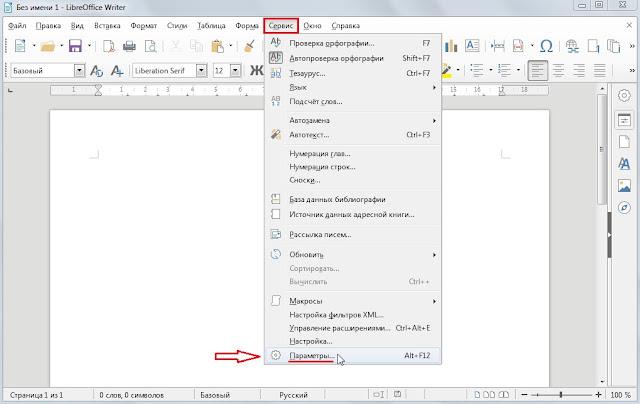
Далее откройте Любой Инструмент LibreOffice из набора, например писатель. Затем в меню щелкните Инструменты -> Параметры -> Цвета приложения и выберите Справочная информация и приложение фон как черный or Автоматически (в зависимости от того, что вам подходит).
Если значки не темного цвета, вы можете изменить их из меню (как показано на изображении ниже), Инструменты -> Параметры -> Просмотр и мой личный выбор на MX Linux, это Яру стиль значков из Ubuntu (выберите его, если у вас темная версия пакета значков).
Конечно, вы также можете попробовать другие темы значков доступно для дистрибутивов Linux.
Конечный результат должен выглядеть следующим образом:
Дополнительный совет для пакета LibreOffice flatpak
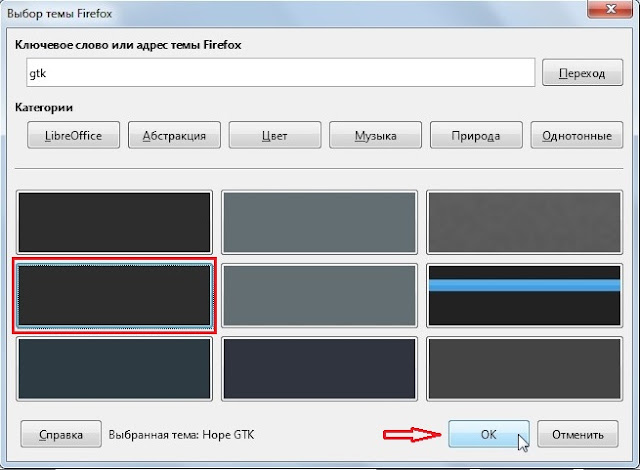
Если вы используете Флэтпак пакет пакета LibreOffice, область заголовка (или область меню) LibreOffice может выглядеть белой. В этом случае вы можете попробовать перейти к Инструменты-> Параметры-> Персонализация а затем выберите «Серая тема», Как показано на скриншоте ниже.
Он не полностью черный, но должен улучшить внешний вид. Надеюсь, это поможет вам переключиться на темную тему LibreOffice!
Заключение
Темные темы постепенно начали доминировать на наших рабочих столах, придавая современный вид и уменьшая нагрузку на глаза, особенно в условиях низкой освещенности.
LibreOffice дает вам возможность переключить рабочую среду на полностью темную тему или сохранить светлые тематические элементы. Фактически, вы получаете приличное количество вариантов настройки, чтобы настроить то, что вам больше нравится. Вы перешли на темную тему в LibreOffice? Какая цветовая комбинация вам больше нравится? Дайте нам знать в комментариях ниже!
Libreoffice dark theme windows
29 мар 2017, 14:12
У меня на 13 компах стоит Linux Mint 18.1 Cinnamon.
LibreOffice 5.3.x и прочие всякие программы типа GIMP 2.9.x, Inkscape 0.91, Scribus 1.4.6 и т.п.
Наиболее оптимальной для работы для нас является тёмная тема оформления Cinnamon и стиль окон Mint-Y-Dark.
Такая тема удобна при работе во всех приложениях, кроме LibreOffice.
В частности, вот в этой теме на этом же форуме уже заявлялась проблема нечитаемости тёмных линеек в LibreOffice. Там же приводился скриншот, поэтому я решил скриншоты не добавлять.
К сожалению, та тема была закрыта, хотя реального ответа на решение проблемы там дано не было.
Вопрос с линейками в тёмном оформлении LibreОffice действительно самый острый, хотя другие элементы интерфейса тоже выглядят весьма неудобно.
Занятно, что в других программах, где тоже используются линейки, таких проблем с читабельностью нет.
В GIMP 2.9.x при использовании системной темы оформления всё прекрасно и чётко видно. Линейка — тёмно-серая, метки на ней белые легко читаемые.
В InkScape 0.91 — аналогично. Фон линейки — тёмно-серый, метки — белые.
В Scribus — все элементы интерфейса соответствуют тёмной теме системы, а линейки сделаны белыми с чёрными метками.
И только в LibreOffice получаются нечитаемые линейки: фон линейки — тёмно серый, метки мелкие и их цвет — светло-серый.
Я пытался менять настройки внешнего вида в LibreOffice, но там нет возможности как-то явно повлиять на цвет линеек.
Если кто-нибудь знает как решить эту проблему, в рамках тёмной темы оформления, буду очень благодарен.
Сменить тёмную тему на светлую, или периодически переключаться между ними — это не вариант. Но если бы можно было при общей тёмной теме системы сделать в одном только LibreOffice светлую тему — это было бы уже приемлемо.
Хотя идеальный вариант — это тёмная тема где все элементы интерфейса читаются нормально.
PS: Я долго бился над этим вопросом и самостоятельно искал варианты решения, но так и не нашёл сам, поэтому решил написать здесь.
How to Go Full Dark Mode With LibreOffice
Last updated November 28, 2020 By Dimitrios 14 Comments
LibreOffice is a free and open-source cross-platform office productivity software. If you’re not making the most of it, the LibreOffice Tips article is a must-read.
Dark theme is getting popular even among non-programmers. It is less stressing on the eyes specially for extended use of the screen. Some people believe that it makes the texts looks crisp and clear and that helps improve their productivity.
Some Linux distributions like Ubuntu come with dark mode these days giving your systems a darker tint. When you turn on the dark mode, some applications will automatically switch to dark mode.
LibreOffice also does that except the main area where you write:
You can change that. If you want to go complete dark mode with LibreOffice, you just have to change a few settings. Let me show you how to do that.
How to enable complete dark mode in LibreOffice
As I mentioned earlier, you need to enable a system-wide dark mode first. This will ensure that the window color (or the title bar) blends well with the in-app dark color.
Next, open any LibreOffice tool from the suite such as Writer. Then from the menu, click Tools -> Options -> Application Colors and select Document background & Application background as Black or Automatic (whichever works for you).

In case the icons are not in dark colour, you can change them from menu (as shown in the image below), Tools -> Options -> View and my personal choice on MX Linux, is the Yaru icon style from Ubuntu (if you have a dark version of the icon pack, select that).
Of course, you can also try some other icon themes available for Linux distros.
The end result should look like this:

Additional tip for LibreOffice flatpak package
If you’re using the Flatpak package of LibreOffice suite, the header area (or the menu area) of LibreOffice may look white. In that case, you can try navigating to Tools-> Options-> Personalization and then select the “Grey theme” as shown in the screenshot below.

It isn’t completely black but it should make things look better. Hope that helps you switch to a dark theme LibreOffice experience!
Conclusion
Dark themes have slowly started to dominate our desktops, giving a modern taste and reducing the eye strain, especially in low light conditions.
LibreOffice gives you the freedom to switch your working environment to a fully dark theme or to keep light themed elements. In fact, you get a decent amount of customization options to tweak what you prefer. Have you switched to a dark theme on LibreOffice? Which color combination is your preferred? Let us know in the comments below!
Like what you read? Please share it with others.
About Dimitrios
Dimitrios is an MSc Mechanical Engineer but a Linux enthusiast in heart. His machines are powered by Arch Linux but curiosity drives him to constantly test other distros. Challenge is part of his personality and his hobby is to compete from 5k to the marathon distance.
Wanted to also mention that although the suggestions by OP are great in principle, they’re virtually useless for a spreadsheet application. It’s one thing if all the cells are black by default, but another if you can barely see which one you’re selecting. There’s no gray (or any color) indicator around the cell that’s active, only a barely-visible black ellipse that blocks out some of the other cells, and I couldn’t find any way to change the ‘active cell’ indicator color in the “application colors” options menu.
I know that freeware like this isn’t an exact science, and never will be, but I just thought you should be aware. Keep up the great work in every other dept.
Hello, I’m having a problem with the preset dark theme in tabbed-view (personalization). When I switch to it, it looks great at first. Totally my style. However, if I close the application (in this case, calc) and then open the same worksheet again later, the theme changes such that the text in the menu, such as the titles of the ribbons themselves, changes to a white/light gray text, and I can’t read anything anymore! Even under the tabs themselves, such as “layout,” everything is blanked-out and I can’t read any option or tool that isn’t actively selected. I have tried manually adjusting this in the “application colors” menu, but there don’t seem to be font color options for the ribbons themselves or the toolbar items.
I’m using 7.0.5.2., 64-bit, for Windows 7 (64) and I just installed it. Are you guys aware of this issue? I’ve experienced it with earlier version, but was only reminded of it tonight. I can provide screenshots if you wish to contact me by e-mail (included in guest registration on your end).
It’s great until you try to print something. This actually changes the font colour for printing too.
Компьютерная помощь в Калининграде т. 8 952 051 99 88
Ремонт компьютеров и ноутбуков. Компьютерная помощь в Калининграде. Выезд. Установка и настройка программ. Настройка WiFi. т. +7 952 051 99 88. Индивидуальный подход плюс кошерная цена — выгодный гешефт!
Калининградская компьютерная помощь
Сделай свой LibreOffice темным
IT советы • Сделай свой LibreOffice тёмным

Как сделать свой LibreOffice тёмным, красным, синим, зеленым.
А очень просто. Берем и заходим параметры LibreOffic’а нажав сочетание ALT+F12 или в меню программы «Сервис» -> пункт «Параметры». Примечание: зайти в параметры можно из любого приложения офисного пакета (Writer, Calc, Draw. )
Теперь идите в «Персонализацию» -> жмякайте «Предустановленная тема (при наличии)» -> кнопка «Выбрать тему»

В появившемся окне в строке поиска «Ключевое слово или адрес темы Firefox» введите буквы «gtk» и жмякните на кнопку «Переход»

Чуть подождите и появятся цвета тем в плитках ниже, выберите плитку, например, как на рисунке, затем нажимайте «OK»
Далее «Выбрать тему» и «OK»

Все панель управления программы уже темная. Теперь нужно затемнить фон приложения. Заходите снова в параметры офиса и делайте все как на скриншоте ниже: «Внешний вид -> щелкайте на выпадающем списке «Фон приложения» -> выбирайте цвет, например, серый -> «OK»
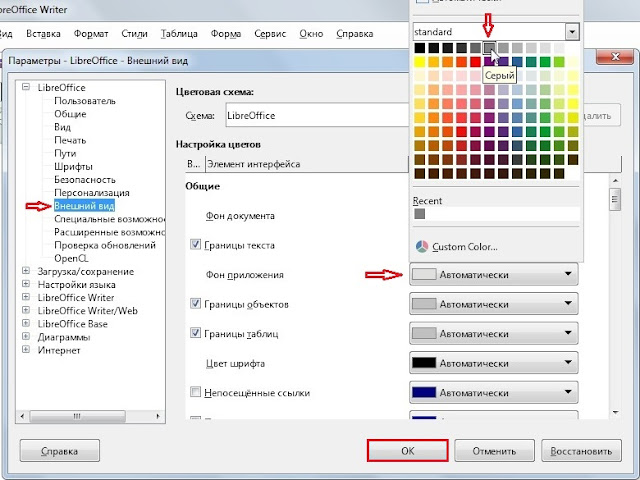
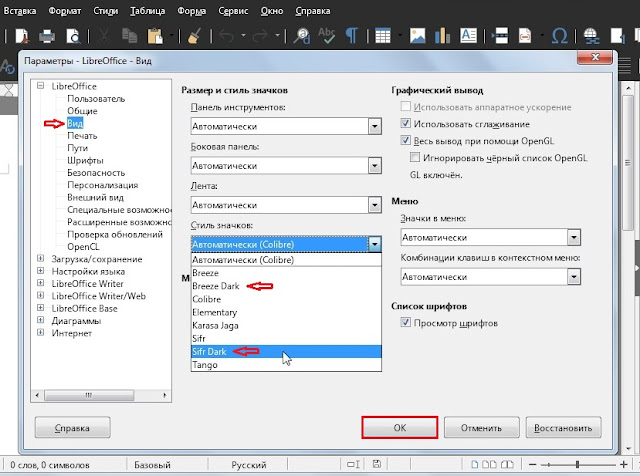
Цвет фона под документом стал темнее. И последний штрих, нужно изменить с тему значков, чтобы они были лучше видны на темной панели инструментов. Снова идите в параметры. Далее «Вид» -> выпадающий список «Стиль значков» -> жмякайте по «Breeze Dark» или «Sifr Dark» (это 2 набора значков для темных тем) -> подтверждайте океем
Вот так выглядит Writer с темой «Hope GTK» и значками «Sifr Dark» (LibreOffice 6.1.2)

По аналогии с этой инструкцией вы можете экспериментировать в настройках внешнего вида программы, выбирая разные темы, значки и цвета, придавая ЛибреОфису новые краски и оттенки.
Change LibreOffice Default Look and Feel
LibreOffice 6.1+ comes with different user interface options and icon styles. Here’s how they look and how to apply them.
LibreOffice 6.1 introduced some major and visible improvements which were long due. Among all, this version comes with options to choose cool icon styles and user interfaces.
How to Change LibreOffice Default Look and Feel
Icon Styles
LibreOffice 6.1 is having below list of cool icon sets:
For Linux, elementary is the default icon set. And for Windows – Colibre. All the icon styles are modern looking and carefuly designed by maintaining a standard to align with other Office products.
How to apply Icon Styles in LibreOffice
- Open LibreOffice.
- Go to Tools > Options.
- Under View section, you can find the Icon Style drop-down . Select the Icon Style you want.
You can also change the other options related to Icons – such as – Toolbar Icon Size etc.
- Press ok. And you can see the new Icon Style applied in toolbar.
User Interface
LibreOffice slowly moving towards developing more modern interface options along with traditional standard toolbar type. Most popular office products have tabbed, grouped icons today. It is an evolution towards that.
LibreOffice 6.1 comes with below types of User interfaces and quick look at them. Do keep in mind that below user interface options are still experimental .
Contextual Group

Contextual Single
Tabbed
Tabbed Compact
Grouped Bar
Grouped Bar Compact
How to Change User Interface in LibreOffice
Follow below steps to change the user interface.
- Open LibreOffice.
- Go to menu Tools > Options . Under Advanced, select Enable Experimental Features .
- Go to menu View > User Interface.
- Select your option.
- You can now see the toolbar is changed with new user interface.
Watch Video
You can have a look at the below video on how to change the default look of LibreOffice.
- If you select Tabbed, Grouped Bar UI option – you can find the Menu option at the extreme right section to go back top UI chooser.
- If you are looking for Dark Mode in LibreOffice in a combination with above icon and toolbar styles, check out the below article.
Download
If you are interested in LibreOffice and want to give it a try, head over to below link for download options and details:
Summary
New styles and UI options definitely gives LibreOffice an edge among other free Office suites and this is step in the right direction for user adoption and user base increase. The UI options are still in development (may not work properly for all components – Impress, Draw etc as they are experimental) – and in coming days it would be available for all components.
Drop a comment below if you have any questions.
Looking for something else?
Read our complete tutorial index of Calc, Writer, Impress and Draw.


