- Windows 10 Home: how do I un-limit bandwidth on network without gpedit ?
- 7 best bandwidth limiter tools for Windows 10 [2021 Guide]
- Reduce bandwidth usage in windows 10.
- Replies (8)
- Снимаем ограничение пропускной способности на Windows 10.
- 1. Открываем редактор локальной групповой политики.
- 2. Переходим по пути.
- 3. Редактируем параметр.
- How to Limit Any Application’s Network Bandwidth on Windows 10
- Limiting Any Application’s Network Bandwidth on Windows 10
- Conclusion
Windows 10 Home: how do I un-limit bandwidth on network without gpedit ?
![]()
This discussion about the QoS Packet Scheduler and Limiting Reservable Bandwidth has been going on since Windows XP was first released in 2001. Here we are 15 years later and it’s still being repeated.
We must prove again and again that it is a fallacy each time a new version of Windows is released.
The first fallacy is that a Home version of Windows cannot use the Group Policy Editor. This is only half true, because the vast majority of the Group Policies are Registry Based and Windows Home versions do have a Registry. Each group policy can be implemented in any Home version of Windows.
You can download the Group Policy Reference for Windows 10 and this Excel Spreadsheet has all of the Group Policies documented as well as their associated Registry information.
Go to the following link.
Download Group Policy Settings Reference for Windows from the Official Microsoft Download Center:
http://www.microsoft.com/en-us/download/details.aspx?=en&id=25250
Click the RED Download button. Select the Windows 10 ADMX spreadsheet.xlsx Click the Next button to download the file.
Open the file in Excel and scroll down to Line 2813 to find the information.
Here are some more links where you will find more information.
Windows XP Quality of Service (QoS) enhancements and behavior:
Configure & Limit Reservable Bandwidth Setting In Windows 8.1:
Scroll down the page and read the NOTE BY ADMIN posted on 09 Jan 2014.
8 people found this reply helpful
Was this reply helpful?
Sorry this didn’t help.
Great! Thanks for your feedback.
How satisfied are you with this reply?
Thanks for your feedback, it helps us improve the site.
7 best bandwidth limiter tools for Windows 10 [2021 Guide]

- Some programs use more bandwidth, limiting access for other, more important applications.
- A bandwidth limiter for Windows 10 helps control upload and download speeds on your network.
- A network limiter will also show exactly what apps are more demanding in terms of network data.
- The best thing about such software is that it doesn’t require specific knowledge for you to use them.

- Download Restoro PC Repair Tool that comes with Patented Technologies (patent available here).
- Click Start Scan to find Windows issues that could be causing PC problems.
- Click Repair All to fix issues affecting your computer’s security and performance
- Restoro has been downloaded by 0 readers this month.
Certain applications can sometimes use more bandwidth than you actually want and that can be a major problem.
For example, some applications can download updates in the background, and that can interfere with your gaming sessions.
To help you with this problem, today we’re going to show you some of the best bandwidth limiter tools for Windows 10.
What is an I nternet limiter for Windows 10?
Keeping track of your bandwidth consumption is possible with bandwidth monitor tools, but sometimes you need to limit your bandwidth.
Certain applications use a lot of your bandwidth, which causes reduced performance while gaming or while watching live streams online.
To fix this issue, you need to find the application that is using your bandwidth and stop it. However, sometimes you need to keep those applications running in the background, and that can be a problem.
To fix this, you need to limit that application’s bandwidth, and to do that you’ll need appropriate software.
Many bandwidth limiters allow you to see which applications are currently running on your PC. This allows you to select the application and set a bandwidth limit for it.
By doing so, you’ll most likely fix any latency issues during online gaming sessions.
Some of these applications even allow you to set bandwidth limits on other PCs in your network. This is extremely useful if you have a roommate that tends to use most of your bandwidth.
One of the best ways to limit bandwidth on a certain PC is to configure your router’s QoS settings. Keep in mind that not all routers support this option, so you might want to check if your router supports QoS.
If you want to set a bandwidth limit for a certain application, you should definitely use a special tool.
This software can be useful, and today we decided to test some of the best bandwidth limiter tools on Windows 10.
Reduce bandwidth usage in windows 10.
I installed windows 10 and I really like it BUT it uses bandwidth too much.
Maybe this doesn’t have meaning for you, but in our country we must pay for each gigabyte of bandwidth we use.
Please help me and suggest me ways to reduce this usage!
Replies (8)
There have been several articles in the press (e.g. ZDNet) which point out that Microsoft added a feature that, if turned on, automatically redistributes updates peer to peer. That is, your home network can get saturated by updates being sent from your machine to other machines. That includes W10 itself. This is the sort of thing that would make sense if we were living in a world of GB connections, but not in a world where ISPs throttle you after a certain point per month, or bandwidth costs money. (If you’ve designated your Wifi or wired network as a metered connection, it is not supposed to be using it, so this is irrelevant to you.) If you want to turn it off, it’s pretty easy:
Start | Settings | Update & Security | Windows Update | Advanced Options |
Choose how updates are delivered |
Then turn «Updates from more than one place» to Off.
This seems to be helping my home network a lot — I was getting dialup speeds for downloads from sites that I normally have great connectivity to, and OneDrive and OneNote had become pretty much unusable due to sync errors. So even if you don’t have a metered connection, if you are seeing a slowdown after updating to W10, I’d suggest trying this out and seeing if it helps.
4 people found this reply helpful
Was this reply helpful?
Sorry this didn’t help.
Great! Thanks for your feedback.
How satisfied are you with this reply?
Thanks for your feedback, it helps us improve the site.
How satisfied are you with this reply?
Thanks for your feedback.
Thanks for your reply.
I’ll check it out.
Was this reply helpful?
Sorry this didn’t help.
Great! Thanks for your feedback.
How satisfied are you with this reply?
Thanks for your feedback, it helps us improve the site.
How satisfied are you with this reply?
Thanks for your feedback.
I noticed that feature too (you can find it under Settings\ Update and Security\Windows Update click «Advanced options» — it is rather tucked away!). As far as I can see there is no way of throttling the amount of bandwidth I’m giving Microsoft permission to use? It would be great if that was something the user could choose, to prevent the feature slowing up their user experience, getting the user ‘throttled’ by their ISP, or costing them extra.
I found myself a bit torn about whether to turn this feature on or off:
- The argument for leaving it ‘on’ — we all want to help each other, don’t we? And sometimes the updates being circulated will be security patches, and so it’s to everyone’s benefit if immunity to the latest exploit gets out into the community as soon as possible.
- The argument for ‘off’ — are Microsoft simply saving money by using the community as unpaid software distributors? Is that an unpaid job I want? «Save The Big Corporation Money!» is not likely to be among my favourite good causes any time soon.
As I say, it would be easier to choose ‘on’ if I could control the amount of bandwidth I am donating, or, perhaps, have a setting allowing me to volunteer my resources for circulating security updates only. My system has it ‘off’ for now. Do other folks feel the same?
Снимаем ограничение пропускной способности на Windows 10.
Всем привет. Сегодня поговорим о такой штуке как «Резервируемая пропускная способность».
Во всеми нами любимой (или нет) операционной системе Windows 10 резервируется 20% пропускной способности нашего интернета, что может снижать скорость интернета, загрузок и прочего.
Сегодня мы заставим систему вернуть нам законные 20% пропускной способности, проделав несколько простых действий в редакторе локальной групповой политики в параметре «Планировщик пакетов QoS» .
- Примечание: редактор локальной групповой политики есть только на версиях Pro и Enterprise.
QoS — способность сети обеспечить необходимый сервис заданному трафику в определенных технологических рамках.
1. Открываем редактор локальной групповой политики.
Для этого нажимаем комбинацию клавиш «WIN + R». В окне прописывает «gpedit.msc». Нажимаем «OK».
2. Переходим по пути.
«Конфигурация компьютера» — «Административный шаблоны» — «Сеть» — «Планировщик пакетов QoS «.
В последней папке нашего пути находится нужный нам параметр под названием «Ограничить резервируемую пропускную способность».
3. Редактируем параметр.
Открываем его и выбираем «Включено».
После этого в поле «Ограничение пропускной способности (%)» вместо «80» ставим значение «0» , тем самым отбирая обратно законные 20% пропускной способности.
How to Limit Any Application’s Network Bandwidth on Windows 10
The bandwidth refers to the upload or the download speed of any artifact to or from the Internet. You can choose how much bandwidth you want to assign to a particular application in Windows 10. In this article, we will tell you a method through which you can limit any application’s bandwidth on Windows 10.
Limiting Any Application’s Network Bandwidth on Windows 10
In this method, we will try to limit the bandwidth given to the updates in Windows 10. For doing this, you will need to perform the following steps:
Type settings in the search section of your taskbar and click on the search result in order to launch the settings window. The newly opened Settings window is shown in the following image:
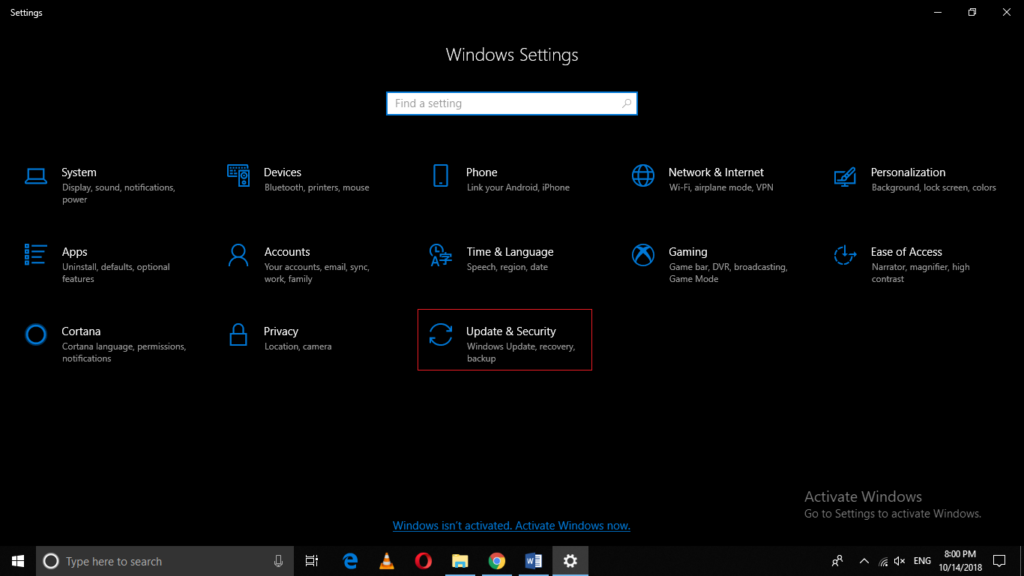
Click on the Update and Security tab as highlighted in the image shown above.
Now click on Windows Update as shown in the image below:
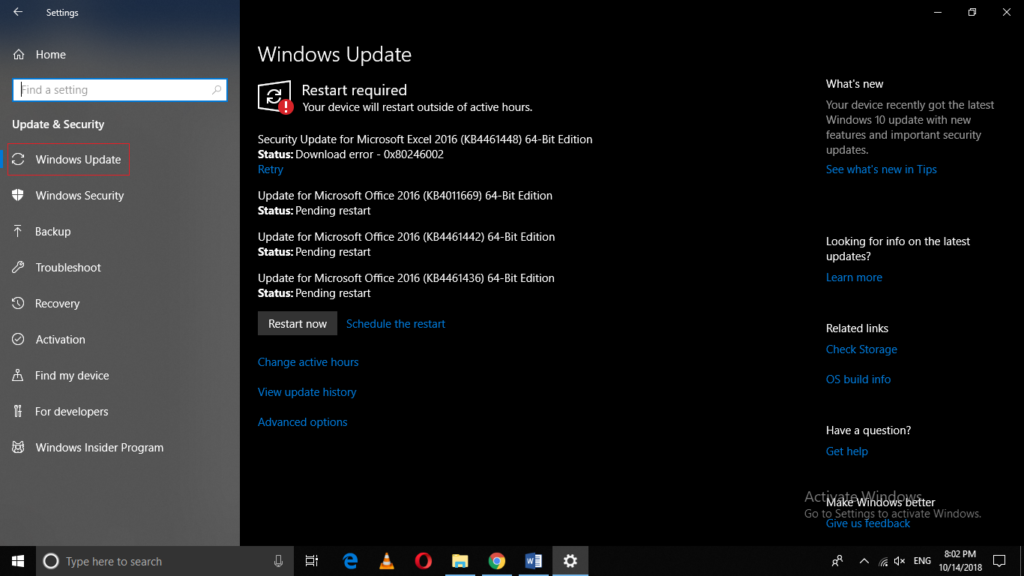
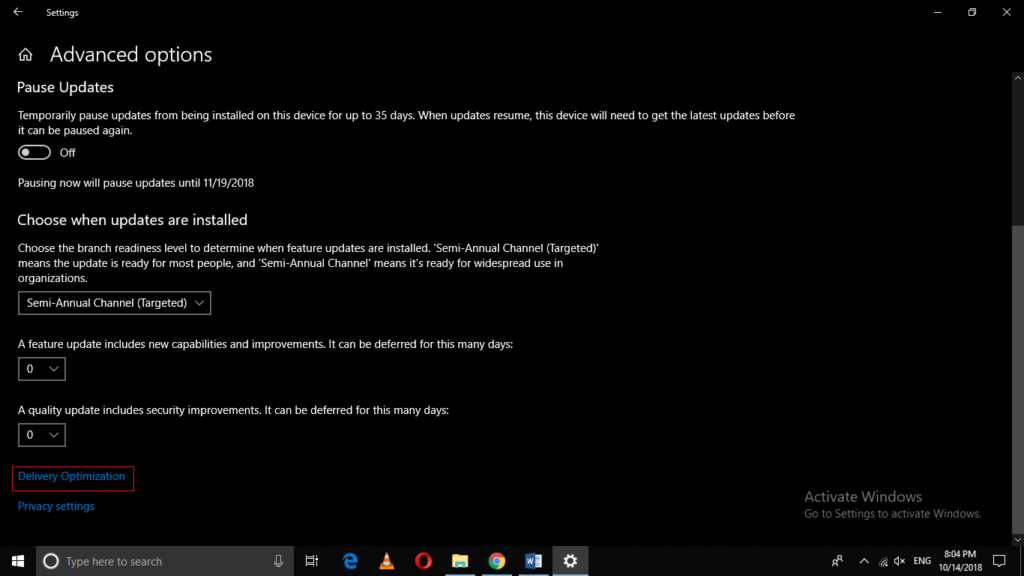
Click on the Advanced Options as highlighted in the following image:
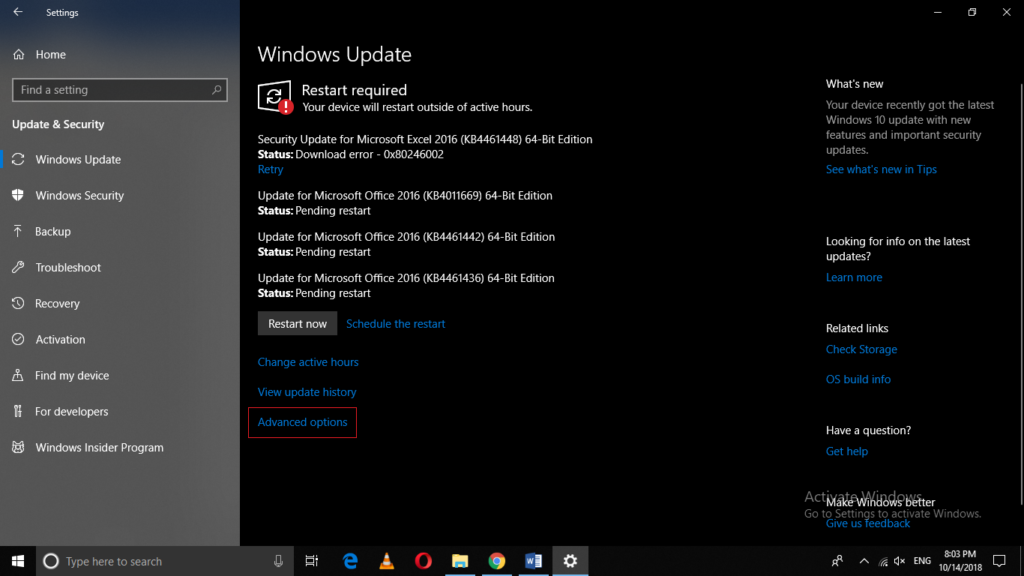
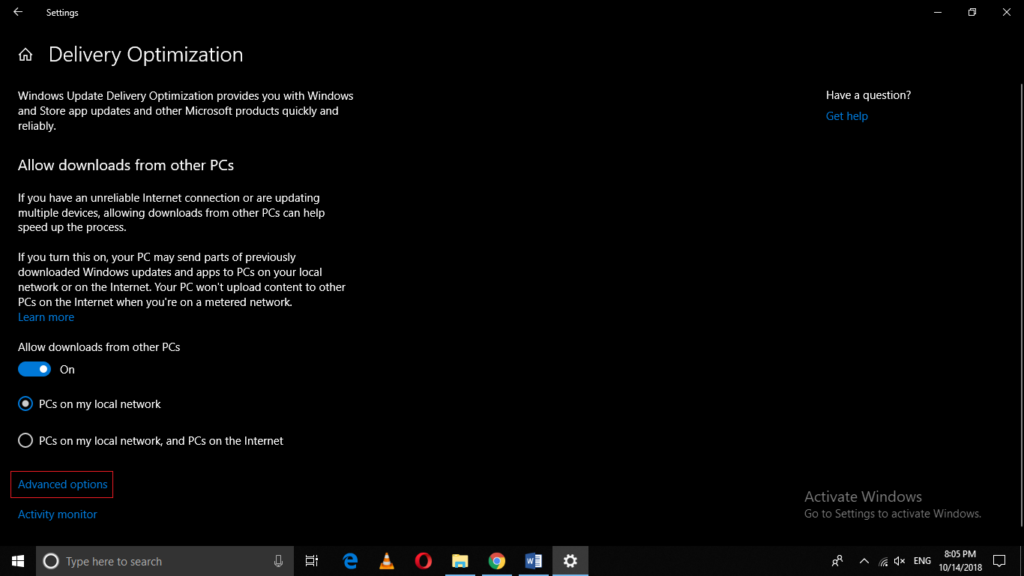
Now click on Delivery Optimization as highlighted in the image shown below:
Click on the Advanced Options.
 Advanced Options» width=»750″ height=»422″ srcset=»https://www.faqforge.com/wp-content/uploads/2018/10/word-image-166-1024×576.png 1024w, https://www.faqforge.com/wp-content/uploads/2018/10/word-image-166-300×169.png 300w, https://www.faqforge.com/wp-content/uploads/2018/10/word-image-166-768×432.png 768w, https://www.faqforge.com/wp-content/uploads/2018/10/word-image-166.png 1366w» sizes=»(max-width: 750px) 100vw, 750px»/>
The Advanced Options window is shown in the following image:
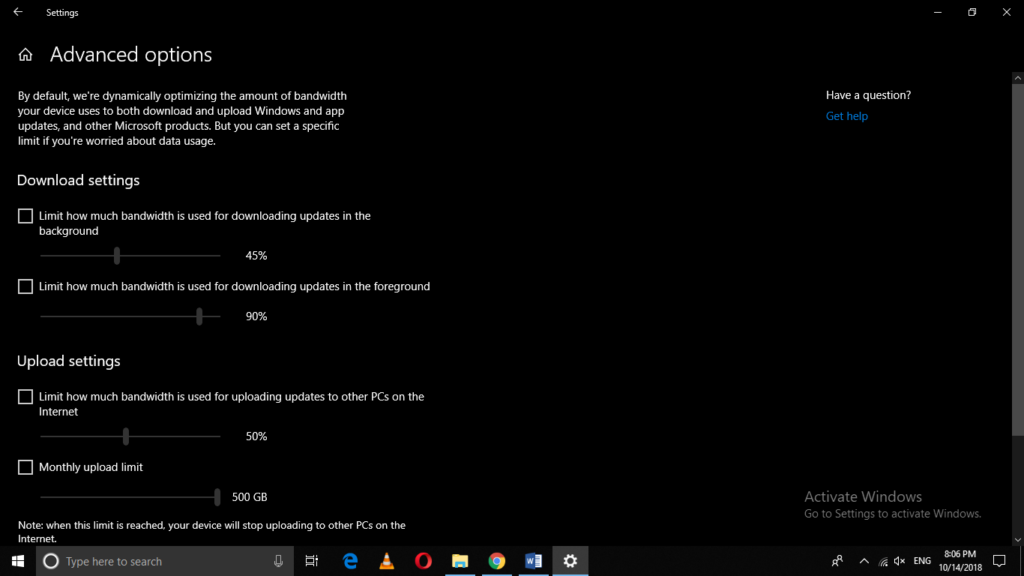
Check the checkboxes corresponding to the fields of Download and Upload Settings as highlighted in the image shown below:

After checking these checkboxes, you can easily modify the updates bandwidth as per your own requirements.
Conclusion
By following the method discussed in this article, you can easily limit the bandwidth of any application in Windows 10. You can customize this setting whenever you want and you can always get back to the default settings simply by unchecking those checkboxes.


