- Настройка лимитных подключений в Windows 10
- Настройка лимитных подключений в Windows 10
- Как не платить оператору за лишние Гб — знакомимся с лимитированным трафиком на Windows
- Что такое лимитное подключение в «десятке» — что даёт его активация
- Как включить лимитный интернет и настроить его
- Как отключить функцию расчёта трафика
- How to limit Windows 10 data use over a metered connection?
- How do I make my laptop use less data?
- Solution 1: Set your connection as metered
- What does metered connection do?
- How do I change the metered connection in Windows 10?
- Should metered connection be on or off?
- Solution 2: Set a data usage limit
- How to configure data usage limit on Windows 10
- How to limit Background Data for Wi-Fi and Ethernet
- Solution 3: Turn off background apps
- Solution 4: Disable OneDrive
- Solution 5: Turn off PC Syncing
- Solution 6: Disable automatic peer-to-peer update sharing
- Solution 7: Turn off notifications
- Solution 8: Prevent automatic app updates
- Solution 9: Turn off live tiles
- Solution 10: Save data on web browsing
- Solution 11: Defer Windows Updates
- In conclusion
- Resolve PC Issues with Auslogics BoostSpeed
Настройка лимитных подключений в Windows 10

Настройка лимитных подключений в Windows 10
Использование лимитного подключения позволяет сохранить долю трафика, не расходуя его на системные и некоторые другие обновления. То есть откладывается скачивание апдейтов самой операционной системы, определенных компонентов Windows, что удобно при использовании помегабайтного подключения (актуально для бюджетных тарифных планов провайдеров Украины, 3G-модемов и использовании мобильных точек доступа — когда смартфон/планшет раздает мобильный интернет подобно роутеру).
Вне зависимости от того, используется Wi-Fi либо проводное соединение, настройка данного параметра осуществляется одинаково.
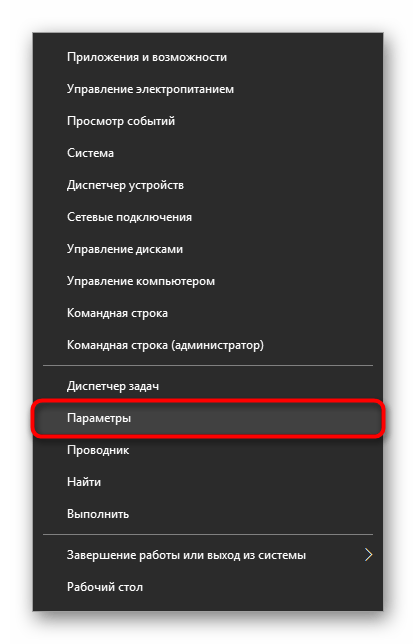
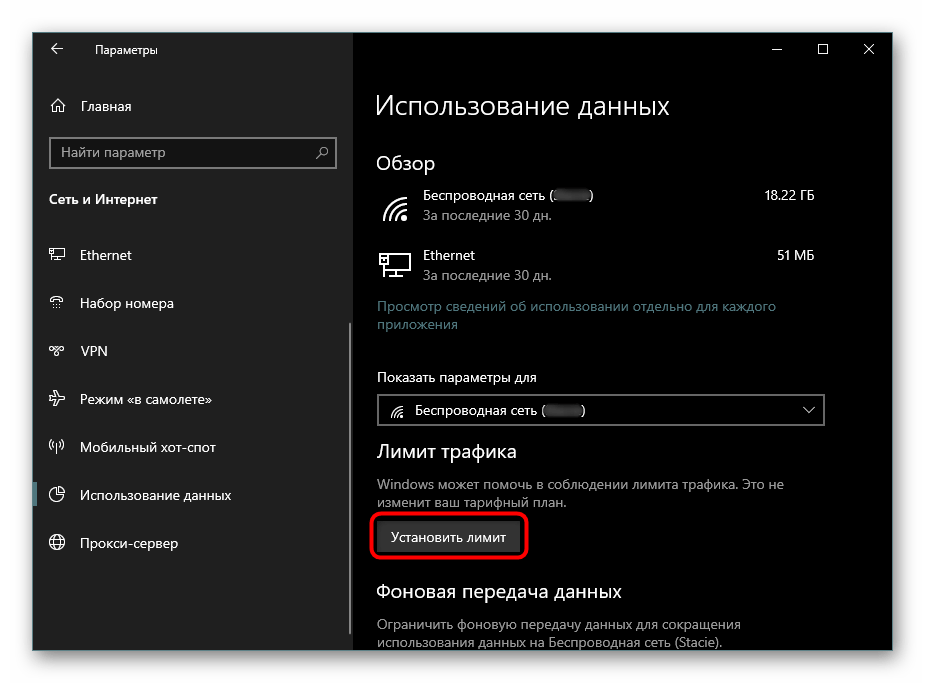
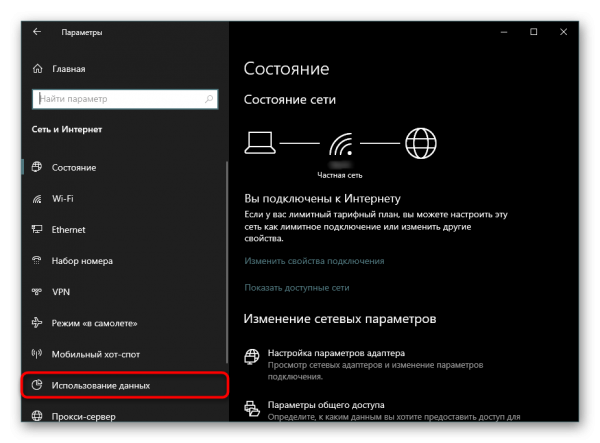
- Переходим в «Параметры», кликнув по «Пуск» правой кнопкой мыши.
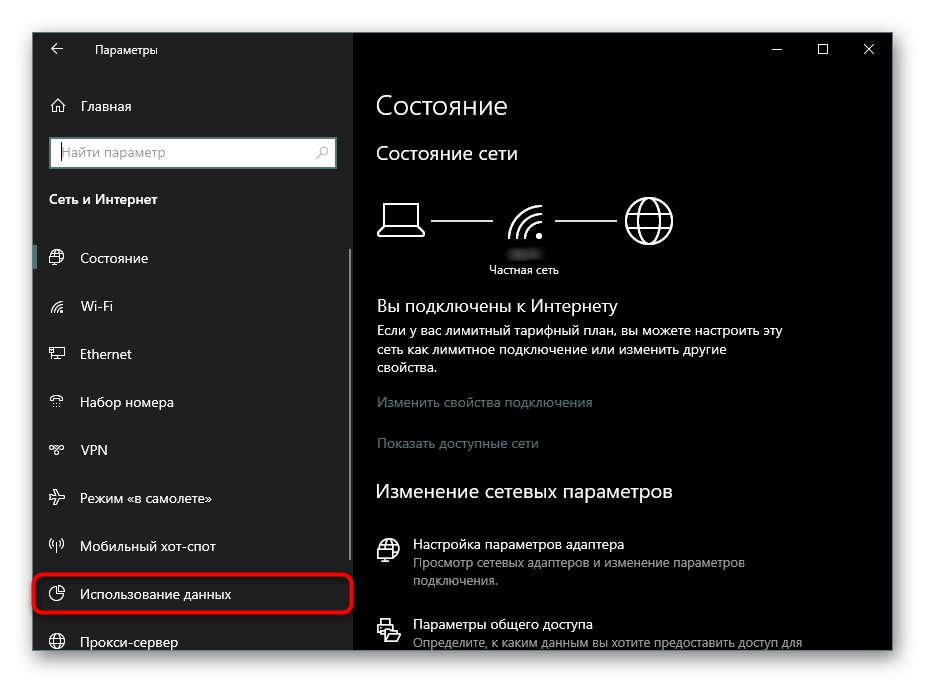
На панели слева переключаемся в «Использование данных».
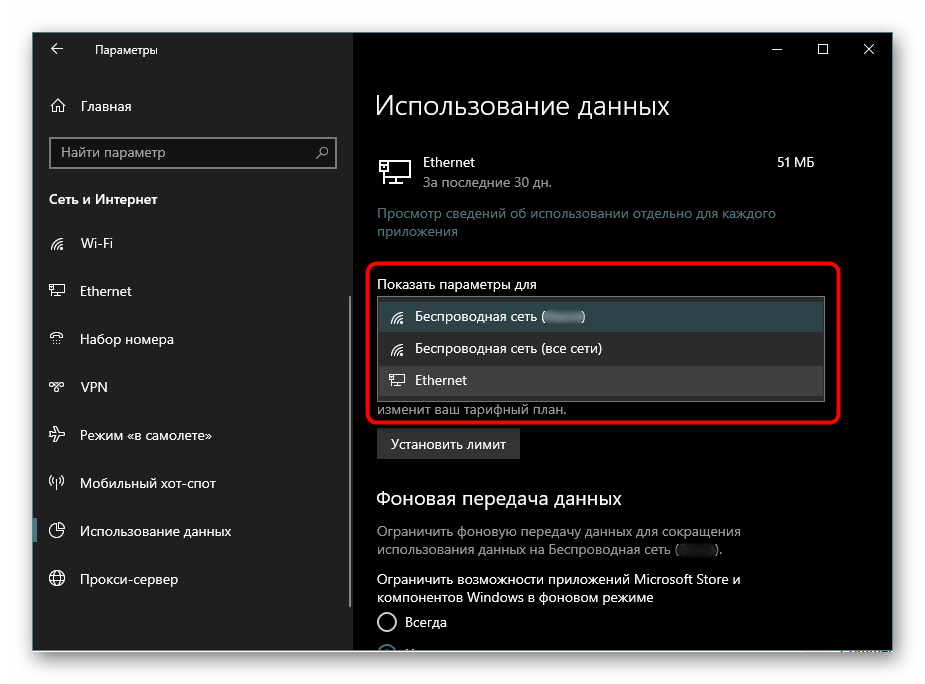
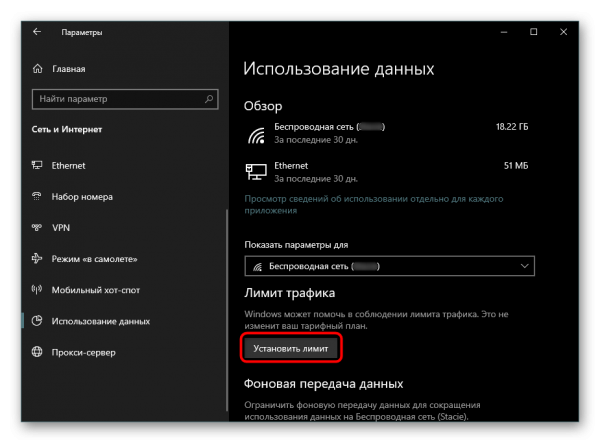
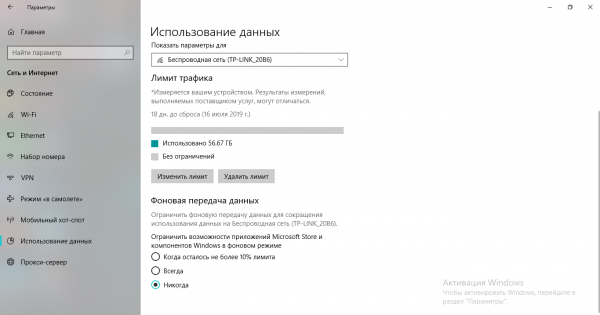
По умолчанию установка лимита происходит для того вида подключения к сети, которой используется на данный момент. Если вам также надо настроить и другой вариант, в блоке «Показать параметры для» выберите из выпадающего списка нужное подключение. Таким образом, вы можете настроить не только Wi-Fi соединение, но и LAN (пункт «Ethernet»).
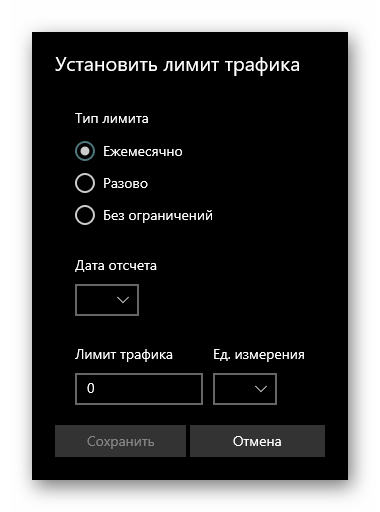
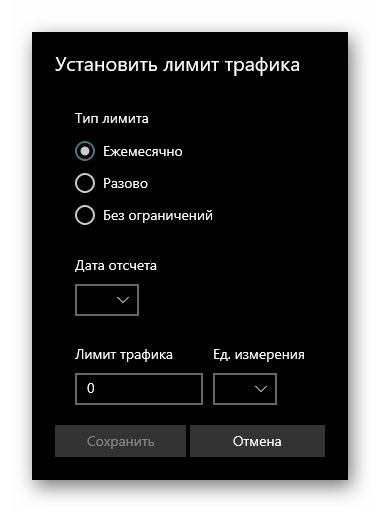
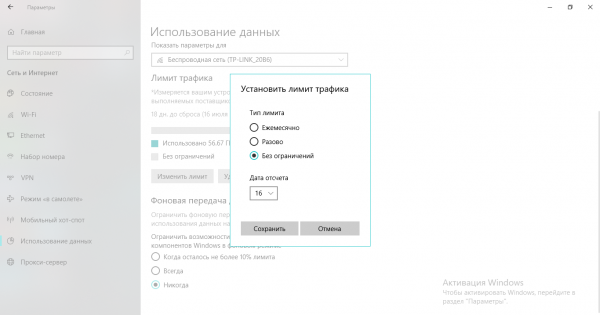
Здесь предлагается настроить параметры лимита. Выберите продолжительность, с которой будет следовать ограничение:
- «Ежемесячно» — на один месяц компьютеру будет выделено определенное количества трафика, и когда он будет израсходован, появится системное уведомление.
«Дата отсчета» означает день текущего месяца, начиная с которого лимит вступит в силу.
«Лимит трафика» и «Ед. измерения» задают объем свободных для использования мегабайт (МБ) или гигабайт (ГБ).
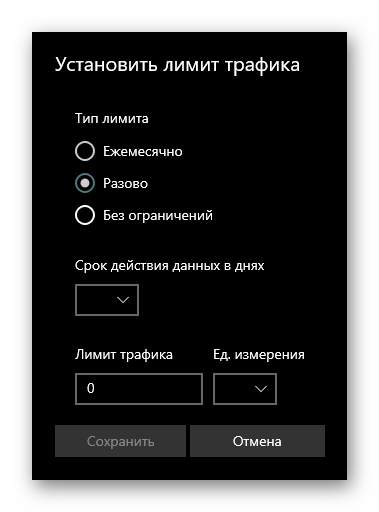
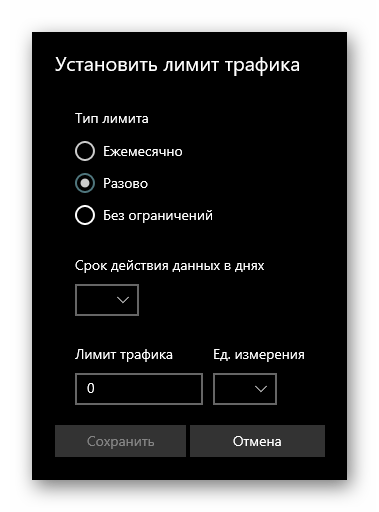
«Разово» — в пределах одной сессии будет выделено определенное количество трафика, и когда он окажется исчерпан, появится оповещение Windows (удобнее всего для мобильного подключения).
«Срок действия данных в днях» — указывает число дней, когда трафик может быть израсходован.
«Лимит трафика» и «Ед. измерения» — то же, что и в типе «Ежемесячно».
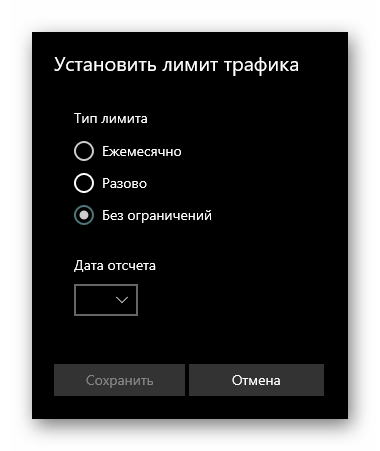
«Без ограничений» — уведомление об исчерпанном лимите не появится, пока не закончится установленный объем трафика.
«Дата отсчета» — день текущего месяца, с которого ограничение начнет действовать.
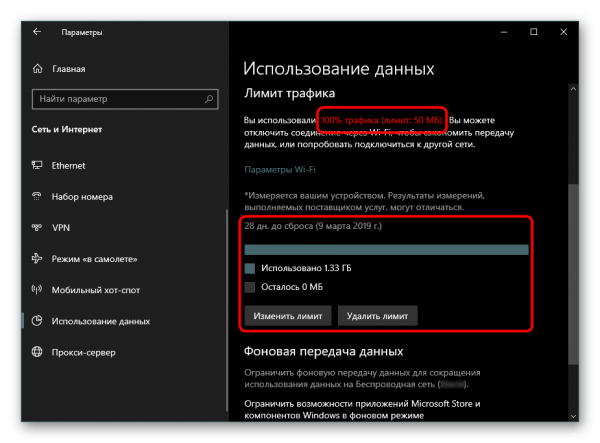
После применения настроек информация в окне «Параметров» немного изменится: вы увидите процент использованного объема от числа заданного. Чуть ниже отобразится другая информация, зависящая от выбранного типа лимита. Например, при «Ежемесячном» появится объем использованного трафика и оставшиеся МБ, а также дата сброса лимита и две кнопки, предлагающие изменить созданный шаблон или удалить его.
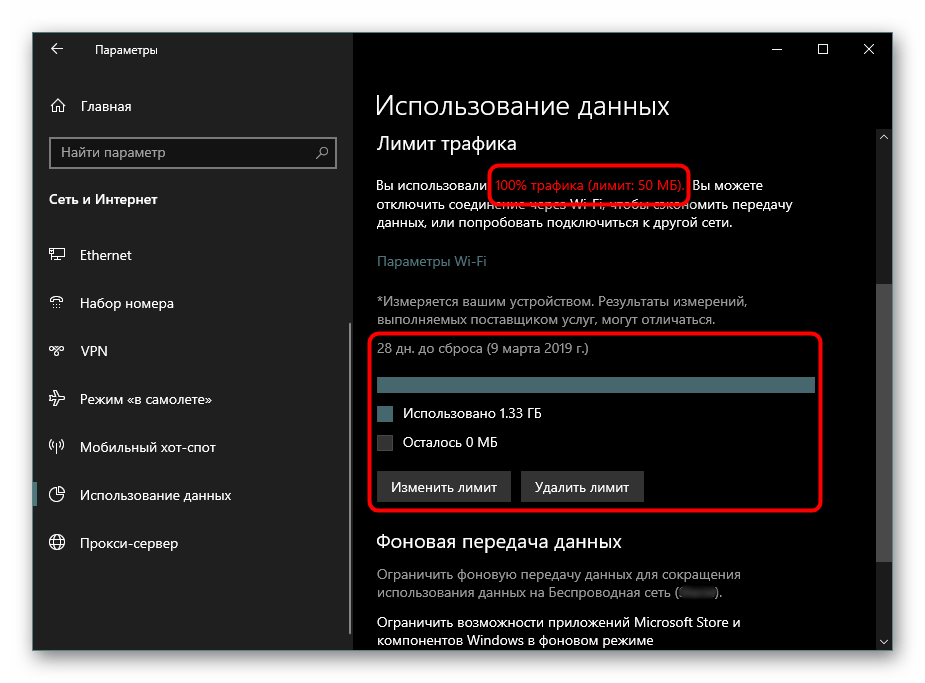
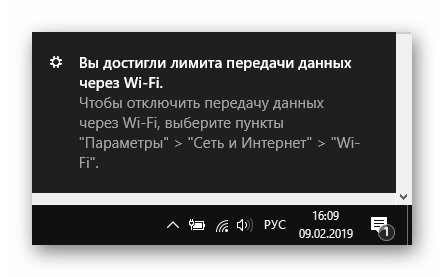
Когда вы достигнете установленного лимита, операционная система уведомит вас об этом соответствующим окном, где также будет содержаться инструкция об отключении передачи данных:
Доступ в сеть при этом заблокирован не будет, но, как уже было сказано ранее, различные системные обновления будут отложены. Однако апдейты программ (например, браузеров), могут продолжить работать, и здесь пользователю нужно вручную выключать автоматические проверку и скачивание новых версий, если требуется жесткая экономия трафика.
Тут же важно заметить, что приложения, установленные из Microsoft Store, распознают лимитные подключения и ограничивают передачу данных. Поэтому в некоторых случаях правильнее будет сделать выбор в пользу приложения из Магазина, а не полноценной версии, скачанной с официального сайта разработчика.
Будьте внимательны, функция установки лимита в первую очередь предназначена в информационных целях, она не влияет на подключение к сети и не выключает интернет после достижения ограничения. Лимит распространяется лишь на некоторые современные программы, обновления системы и определенные ее компоненты типа Microsoft Store, но, к примеру, тот же OneDrive по-прежнему будет синхронизироваться в штатном режиме.
Как не платить оператору за лишние Гб — знакомимся с лимитированным трафиком на Windows
В «Виндовс» 10 есть масса полезных и удобных функций, которых нет в предыдущих версиях ОС. Одна из них — активация лимита на трафик для текущего подключения к интернету. Как ей воспользоваться, если у вас лимитный интернет и вам нужно следить постоянно за трафиком?
Что такое лимитное подключение в «десятке» — что даёт его активация
Лимитное подключение в «Виндовс» 10 — функция, которая следит за объёмом трафика, используемого на текущем компьютере. Если юзер достигает лимита, система отправляет ему сообщение на «Рабочий стол» с рекомендацией отключить соединение, чтобы не платить за трафик сверх вашего лимитного пакета.
Эта функция будет полезна вам, если вы пользуетесь лимитным интернетом через модем USB, мобильный роутер 3G или 4G либо если работаете с мобильным интернетом от телефона (когда смартфон выступает в качестве точки доступа или того же модема).

На USB-модемах обычно устанавливается лимитный трафик
Кроме этого, при лимитном подключении экономится сам трафик: система не тратит на свои нужды ваши ценные гигабайты без вашего спроса — она отключает системные обновления, которые обычно проводятся в автоматическом режиме.
Апдейт многих программ однако при этом не отключится, например, обновление браузеров. Его нужно будет отключать уже вручную в настройках каждой программы, если вы стремитесь к экономии трафика. One Drive, кстати говоря, тоже будет автоматически синхронизироваться — если нужно, отключите его синхронизацию тоже вручную.
Учтите, что функция носит только информационный характер. Она не отключит за вас интернет, если вы достигнете лимита. Поэтому здесь важно не проморгать сообщение о том, что лимит исчерпан. Либо советуем почаще заходить в настройки лимитного подключения и смотреть, сколько трафика у вас осталось.
Как включить лимитный интернет и настроить его
Нет разницы, «Вай-Фай» у вас или проводное подключение, настройка будет в любом случае по одной инструкции:
- Запустите меню «Параметры». Для этого кликните на панели «Пуск» по шестерне либо зажмите сразу две кнопки «Вин» и I.
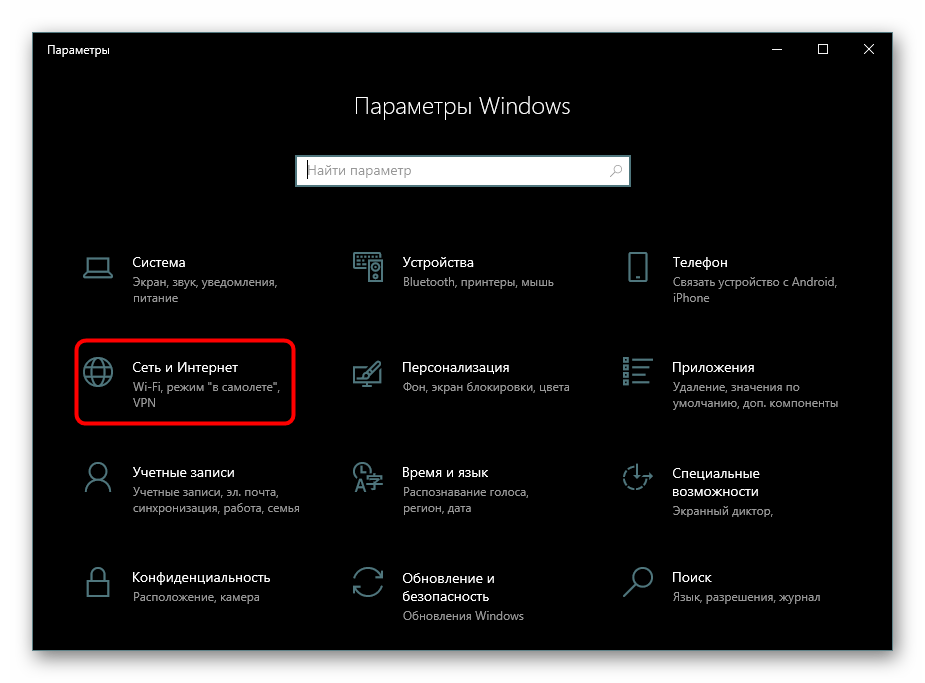
- Перейдите в плитку для интернета и сети в целом.
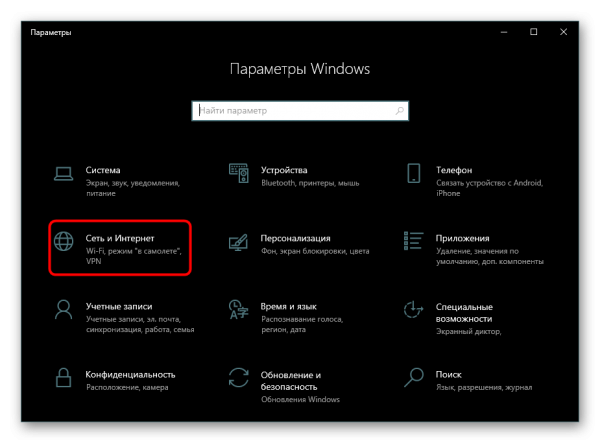
Кликните по плитке «Сеть и интернет»
Нажмите на строчку «Использование данных»

Укажите свою сеть в списке
Нажмите на «Установить лимит»
Выберите тип лимита в списке
Укажите срок действия данных в днях
В параметрах будет отображаться использованный трафик
Вы можете при необходимости изменить значения лимита
Как отключить функцию расчёта трафика
Чтобы «десятка» больше не считала ваш трафик и не отправляла вам сообщения, когда трафик заканчивается, сделайте следующее:
- Зайдите в раздел «Использование данных» в параметрах «Виндовс» для сети и интернета.
- Кликните по кнопке «Удалить лимит».
Щёлкните по «Удалить»
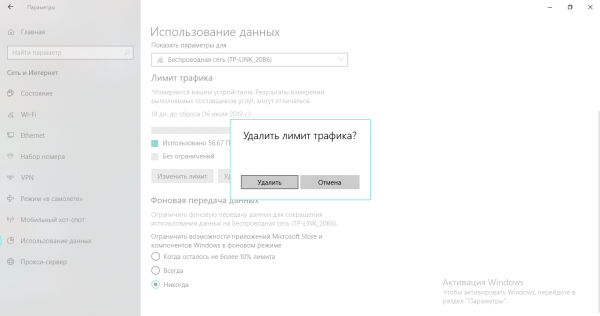
Кликните по «Удалить» в диалоговом окне
Настроить лимитный интернет на «Виндовс» 10 можно в системном окне «Параметры», в разделе для использования данных в плитке «Сеть и интернет». Функция носит информационный характер — она не отключает самостоятельно интернет, чтобы вы не тратили мегабайты поверх лимита. Система лишь пришлёт вам сообщение о том, что лимит исчерпан. Ваша задача — его не пропустить.
How to limit Windows 10 data use over a metered connection?
If you are running a Windows 10 operating system on your PC, you might have noticed that it quickly consumes your internet data bundle. This is noticeable when you are on limited bandwidth.
Windows 10 is undoubtedly the most data-hungry version of Windows. To ensure the best user experience and safety, Microsoft designed it to automatically download updates on a regular basis, often without your permission, once you are connected to the internet.
Luckily, there are a handful of things you can do to keep the OS from using up so much data. You will discover them in this article. If that’s what you are after, keep reading.
How do I make my laptop use less data?
- Set your connection as metered
- Set a data usage limit
- Turn off background apps
- Disable OneDrive
- Turn off PC Syncing
- Disable automatic peer-to-peer update sharing
- Turn off notifications
- Prevent automatic app updates
- Turn live tiles off
- Save data on web browsing
- Defer Windows Updates
Let’s take them one at a time.
Solution 1: Set your connection as metered
Windows 10 uses as much of your upload and download bandwidth as it requires, without permission. This is fine if you have unlimited internet connections. But if that’s not the case, you can take control and prevent Windows from gobbling up your bandwidth by setting your connection as metered.
What does metered connection do?
- Disables automatic update of apps
- Tiles may not update
- Disables automatic downloading of most Windows updates
- Disables peer-to-peer uploading of updates
How do I change the metered connection in Windows 10?
Follow these easy steps to set a Wi-Fi connection as metered:
- Click on Start > Settings> Network & Internet > Wi-Fi > Advanced Options.
Note: To locate Metered connection in the Windows 10 Anniversary Update, go to Start > Settings > Network & Internet > Wi-Fi. Click your connection name.
- Enable the ‘Set as metered connection’ toggle.
Previously, you could only enable metered connection for Wi-Fi. But now, with the release of Windows 10 Creators Update, it’s possible to set an Ethernet connection as metered too. Here’s how to do it:
- Click on Start > Settings > Network & Internet > Ethernet.
- Click the name of your Ethernet connection.
- Enable the option that says, “Set as metered connection”.
Should metered connection be on or off?
You can set your connection as metered and save bandwidth when on:
- Mobile data connections: if your Windows 10 device has an integrated mobile data connection, the OS will automatically set it as metered for you.
- Home internet connections with bandwidth limits: if your internet service provider implements bandwidth limits.
- Mobile data hotspots: When you are tethering with your smartphone over Wi-Fi or using a dedicated mobile hotspot device.
- Slow internet connections: When using a dial-up or satellite connection, you can prevent Windows from downloading updates and hogging your connection.
You may also enable it if you want to schedule the download and installation of Windows updates.
When your connection is metered, some apps like Outlook won’t be able to connect automatically and will show a connection warning. If this is disrupting your work, you may consider turning it off. Follow the procedure presented above and disable the “Set as metered connection” toggle.
Solution 2: Set a data usage limit
You can stay under your data plan limit by adjusting your data usage to suit your needs. You can also apply background data restrictions.
How to configure data usage limit on Windows 10
- Click on the Start button.
- Go to Settings> Network & Internet > Data usage.
- Select the network you want to set a data limit for. You’ll find it under Show settings for.
- Under Data limit, click the ‘Set limit’ button and choose the Limit type. Set other limit options.
- Save the settings.
After setting a data limit, Windows will let you know when you are approaching it.
How to limit Background Data for Wi-Fi and Ethernet
- Click on the Start button.
- Go to Settings > Network and Internet.
- Click on Data usage.
- Under Background data, set the “Set the limit” to “Always”.
Solution 3: Turn off background apps
Applications on your computer may be contributing to the depletion of your data plan.
By default, Windows 10 keeps some apps running in the background, and they consume a considerable amount of your data. If you are not using them, consider turning them off. Here’s how:
- Click on the Start button.
- Go to Settings > Privacy > Background apps.
- Disable the toggle for apps you don’t need.
Note that after a Windows update or the installation of a new version of Windows, the settings might reset. You can check periodically to make sure that the apps are still disabled.
Solution 4: Disable OneDrive
Although OneDrive offers a simple way to sync, store, and share your files with other devices on the internet, it can consume data in the background. To disable it, follow these steps:
- Press Ctrl + Shift + esc on your keyboard to open Task Manager.
- Click on the Startup tab and disable Microsoft OneDrive.
You may also want to disable other syncing clients, such as Google Drive and Dropbox, if you have them.
Solution 5: Turn off PC Syncing
You don’t need the feature running all the time. You can disable it and turn it back on when you need to sync.
- Click on the Start button.
- Go to Settings > Accounts > Sync your settings.
- Turn Sync settings off.
You might not want to turn off syncing completely. In that case, enable the settings you want to sync under the “Individual sync settings” option.
Keep in mind that the Sync settings option will be grayed out if you are not logged into Windows with a Microsoft account.
Solution 6: Disable automatic peer-to-peer update sharing
By default, Windows 10 uses your internet data to upload Windows and app updates to other Windows 10 PCs on your local network, and even those on the internet. This is referred to as Windows Update Delivery Optimization (WUDO).
If you set your connection as metered, the feature will be disabled. However, you can also choose to do it directly. Follow these easy steps:
- Click on the Start button.
- Go to Settings > Update and Security > Windows Update.
- Click Advanced Options > Choose how updates are delivered.
- You can either disable the option entirely or set it to PCs on my Local Network.
Solution 7: Turn off notifications
You can save data by turning off Action Centre Notifications.
- Right-click on the Acton Centre icon in the system tray.
- Turn on Quiet hours.
Solution 8: Prevent automatic app updates
Windows won’t automatically update apps in the background when you set your network connection as metered. You can also make this happen on all networks.
- Launch the Windows Store app.
- Click your profile picture.
- Select Settings.
- Unmark the “Update apps automatically” checkbox.
You can now choose the apps you want and update them manually when you need to.
Solution 9: Turn off live tiles
The live tiles in your Start menu do consume data. If you don’t really need them, you can turn them off and save your data.
To prevent feed-based apps, such as News, Travel, and a host of others from automatically downloading and displaying new data, here’s what you have to do:
- Go to the Start menu.
- Right-click on the live tile and select “Turn live tile off”.
Solution 10: Save data on web browsing
Your web browser might be using up a considerable portion of your data. To check the amount of data it uses, here’s what you should do:
- Click on the Start button.
- Go to Settings > Network and Internet.
- Click on Data Usage. You’ll see a circular graph that shows data used by your PC over different connections such as Ethernet and Wi-Fi in the last 30 days.
- Click on the Usage details link to see how much data each app on your PC is using.
If your web browser’s data usage is high, consider using a browser that includes a built-in compression proxy feature. Such a browser will route data through other servers to compress it before it is sent to you.
There’s also an official Data Saver extension you can get if you are using Google Chrome. Opera also has Turbo mode.
Solution 11: Defer Windows Updates
There’s an option in Windows Update settings you can use to defer the download of new features. This can last for several months.
However, this option is only available for Windows 10 Enterprise and Pro users. If you are a Home user but have the Windows 10 May 2019 Update, you can also access the option.
To defer upgrades, follow these easy steps:
- Go to Settings.
- Click on Update and Security > Windows Update > Advanced Options.
- Scroll down. You’ll see the Defer Upgrades checkbox. Enable it.
Note: When you defer upgrades, you won’t get the latest Windows features as soon as they are available. Also keep in mind that Microsoft Office updates will be affected.
However, the Defer Windows Upgrades option does not affect the download and installation of security updates. It also does not prevent the download of feature updates indefinitely. You can only block the updates completely for up to 35 days.
In conclusion
You don’t have to apply all the solutions presented in this article. Depending on the data plan you subscribed to implement those that seem best to you to cut down the data usage on your Windows 10 PC.
As a final note, while trying to reduce your computer’s data usage, it’s also important to keep your security features up to date. Windows Defender requires regular updates to keep up with the latest threats.
However, you can install Auslogics Anti-Malware if you don’t want to keep updating Windows Defender. The tool is very user-friendly and can detect malicious items your antivirus may not be able to detect. You can schedule automated scans and protect yourself against data safety threats.
While you are at it, consider getting Auslogics BoostSpeed to ensure your computer functions at its best. The tool runs a complete system check to locate junk files, speed-reducing issues, and other issues that cause system and application glitches or crashes. It also protects your privacy by eliminating traces of your sensitive information like passwords and credit card details on your PC.
Resolve PC Issues with Auslogics BoostSpeed
Besides cleaning and optimizing your PC, BoostSpeed protects privacy, diagnoses hardware issues, offers tips for boosting speed and provides 20+ tools to cover most PC maintenance and service needs.
Feel free to leave a comment.
If you have further suggestions on how to reduce data Usage on Windows 10, don’t hesitate to share.


