- www.makeuseof.com
- Follow MUO
- How to Limit Data Usage and Internet Bandwidth in Windows
- How to Limit Data Usage in Windows 10
- Enable a Metered Connection in Windows 10
- Set a Data Usage Limit in Windows 10
- How to Limit Data Usage Using Third-Party Tools
- 1. NetBalancer
- 2. NetLimiter
- 3. Net-Peeker
- 4. SoftPerfect Bandwidth Manager
- Monitor Your Network Usage
- Subscribe To Our Newsletter
- One More Step…!
- How to increase bandwidth on Windows 10 [Quick Guide]
- How can I increase bandwidth on Windows 10?
- 1. Switch off Updates Delivery
- 2. Measure your bandwidth usage with PRTG Network Monitor
- PRTG Network Monitor
- 3. Edit the setting called Limit reservable bandwidth settings
- 4. Flush DNS and clear temporary files
- 7 best bandwidth limiter tools for Windows 10 [2021 Guide]
www.makeuseof.com
Follow MUO
How to Limit Data Usage and Internet Bandwidth in Windows
Want to maximize speed without crossing internet data limits? Learn how to manage your bandwidth on Windows 10.
Limiting bandwidth on your computer will stop you from wasting data. It’s very helpful to manage this setting if you have a specific data limit as it can stop you from being overcharged.
We’re going to show you how to control your bandwidth usage with built-in Windows 10 facilities, then offer some additional third-party tools that offer more features to help you limit your bandwidth.
How to Limit Data Usage in Windows 10
First, let’s look at how to control your network usage and apply a bandwidth limit using the tools that come with Windows 10.
Enable a Metered Connection in Windows 10
One way to limit bandwidth in Windows 10 is to enable a metered connection.
Enabling this feature will mean that some updates for Windows won’t be installed automatically (except critical updates) and some Microsoft Store apps might lose some functionality or not work properly. It will also disable peer-to-peer updates that are designed to help with Microsoft’s server load.
To enable a metered connection, press Windows key + I to open Settings and click Network & Internet. Choose either Wi-Fi or Ethernet, depending on what method you use to connect to the internet.
If you selected Wi-Fi, click Manage known networks, select your network from the list, click Properties, and slide Set as metered connection to On.
If you selected Ethernet, click your connection from the list and slide Set as metered connection to On.
Set a Data Usage Limit in Windows 10
Alternatively, you can set a custom data usage limit. This will automatically enable the metered connection feature. This won’t disconnect your internet when you hit the limit, but you will receive warning notifications as you near it.
To begin, press Windows key + I to open Settings and go to Network & Internet > Data usage.
In the Overview section, you will see your different internet connections and how much data each has used in the last 30 days. Click one if you want to see that breakdown per app.
Choose which connection you want to limit using the Show settings for dropdown. Once selected, click Set limit.
Here you can choose a time period for the data limit and what the MB or GB limit should be. Click Save when done.
You will now see a bar graph that shows how much data has been used and how much is remaining. Click Edit limit to change the settings or Remove limit to scrap it.
Below this is the Background data section. Here you can limit what Store apps and Windows features can do in the background. This can be enabled all the time or when you’re close to reaching your data limit (if you have one set).
How to Limit Data Usage Using Third-Party Tools
Windows 10 has some helpful features to help you set a bandwidth limit and use less data, but you might need something more advanced. If so, these third-party tools are great choices.
1. NetBalancer
NetBalancer will show you a list of all the active processes on your system and any associated network usage. Beneath this is a live graph so you can see at a glance where any bandwidth spikes occur. Hover your mouse over the graph and you’ll be able to see which processes were sapping your bandwidth at that moment.
To limit a program’s bandwidth, find it on the list and double-click it. You can use the Download Priority and Upload Priority dropdowns to adjust its usage based on preset filters. This is handy if, for example, you still want a program to be unrestricted, but want other programs to use the bandwidth first if they need it. Alternatively, choose Custom from the dropdown to define your own limits.
You can also do the same thing back on the main window, using the green and red arrow icons at the top of the window. One handy feature here is clicking the red arrow pointing right with a vertical line, which will block all network traffic. More advanced users can make use of the filters and rules.
NetBalancer gives you a free trial of 15 days, after which you’ll need to pay a one-time fee of $49.95 to keep using the program. Alternatively, you can keep using it outside the trial as a network monitor only.
2. NetLimiter
When you launch NetLimiter you’ll see a list of all your open applications, along with their current bandwidth usage. Of course, some applications will naturally use more bandwidth than others, but it’s handy to identify those which are consuming more than they need to.
The default limit is set to 5 KB/s for download and upload, which you can quickly enable by checking the box for a particular row. To edit those defaults, right-click the limit figure to open the rule editor. On the Rule tab, you can change the bandwidth boundaries.
Switch to the Scheduler tab and you can set rule start and stop time conditions. To begin, click Add and then create your required rules. For example, you could have your web browser stop consuming any bandwidth between particular hours.
NetLimiter comes with a 28-day trial period. A single user license for the Lite version costs $19.95, while the Pro version costs $29.95.
3. Net-Peeker
Net-Peeker has a very simple user interface. At the top, you can see the active upload and download usage, along with access to a brief Settings screen and some other features the program offers as a system guard. We’ll just be focusing on its bandwidth limiting ability.
The table below lists out all active processes on your system, along with its bandwidth consumption. You can double-click a process to get extremely detailed information on the Network Sessions and Loaded Modules tabs.
On either an entire process from the main window or on a specific network session, you can right-click to manage the connection. You can Limit speed to specify set bandwidth boundaries and Abort connection to disconnect it all together (until you open it again).
Net-Peeker gives you a 30-day trial to experience all of its features. After that time, you can continue to use the program for $25. If you want the ability to control multiple systems, you’ll need to purchase a group license which starts at $125 for five computers.
4. SoftPerfect Bandwidth Manager
SoftPerfect Bandwidth Manager is a good program, but it is tricky to get to grips with. When you first launch you’ll need to enter your network address and password before you can start monitoring the traffic.
If you’re comfortable with that, it’s a program worth checking out thanks to its decent rule customization. Press Ctrl + N to begin creating your rule. Move between each tab to see all the options, but be sure to name your rule and set your desired Rate limits. When done, click OK to activate your rule.
Use the Tools dropdown to set quotas and schedules for your bandwidth. It’s also worth checking out the Usage Report, which will give you an overview of all your traffic and help you identify any particular problems that need addressing.
SoftPerfect Bandwidth Manager has a 30-day trial period. After this, you can continue using the Lite version for free, with the limit of only being able to set five rules. Alternatively, you can pay $49 to upgrade to the Standard version. See their license comparison list for full details.
Monitor Your Network Usage
These are all great methods to control your bandwidth when using Windows 10. Start with the default Windows 10 tools, then move to a third-party program if they don’t prove sufficient.
If you aren’t sure what’s eating up your bandwidth, find out how to monitor and troubleshoot your home network usage.
The internet is brimming with malicious websites. Here’s what you need to know and how you can stay safe.

Joe was born with a keyboard in his hands and immediately started writing about technology. He has a BA (Hons) in Business and is now a full-time freelance writer who enjoys making tech simple for everyone.
Subscribe To Our Newsletter
Join our newsletter for tech tips, reviews, free ebooks, and exclusive deals!
One More Step…!
Please confirm your email address in the email we just sent you.
How to increase bandwidth on Windows 10 [Quick Guide]

- The automatic update function of Windows 10 makes your Internet slower because Microsoft uses the computers of its users to provide other users with updates.
- You can temporarily increase the bandwidth by following some simple steps from this article.
- For helpful tech tutorials, as well as various tips and tricks, take a look at our How-To section.
- Check out our Network Hub for more great guides and other networking tools.

- Download Restoro PC Repair Tool that comes with Patented Technologies (patent available here).
- Click Start Scan to find Windows issues that could be causing PC problems.
- Click Repair All to fix issues affecting your computer’s security and performance
- Restoro has been downloaded by 0 readers this month.
All users have been victims of the slow Internet speed on Windows 10, and despite troubleshooting the router, the problem failed to be resolved.
Windows 10 used a bit of data across network computers since it used a peer-to-peer system, in order to deliver the updates in a much faster way.
This means that a part of the bandwidth is consummated by the P2P update system. Therefore, in order to increase the Internet speed on Windows 10, users need to make some changes in the settings.
The following methods will work on both Windows 10 Home and Windows 10 Pro.
How can I increase bandwidth on Windows 10?
1. Switch off Updates Delivery

- Head over to Settings.
- Go to Update &Security.
- Select Advanced Options.
- Choose Updates Delivery.
- Turn off the toggle.
Your laptop will use your bandwidth to deliver Windows 10 updates to other users on the network. The updates delivery option is switched on by default in all versions of Windows 10.
2. Measure your bandwidth usage with PRTG Network Monitor
Before you begin to increase your download speed, you should first check your connection for available bandwidth. This will give you an idea of what your Internet provider is promising you and what will reach your home.
With the versatile and powerful software PRTG Network Monitor from Paessler you can for example monitor the availability of devices, measure your bandwidth usage or analyze the data stream.
This great tool allows you to monitor where in the network there is a bottleneck so you could solve the issues and free up the bandwidth . It also reads the traffic data from your router and displays the results to an intuitive web interface.
PRTG Network Monitor
3. Edit the setting called Limit reservable bandwidth settings
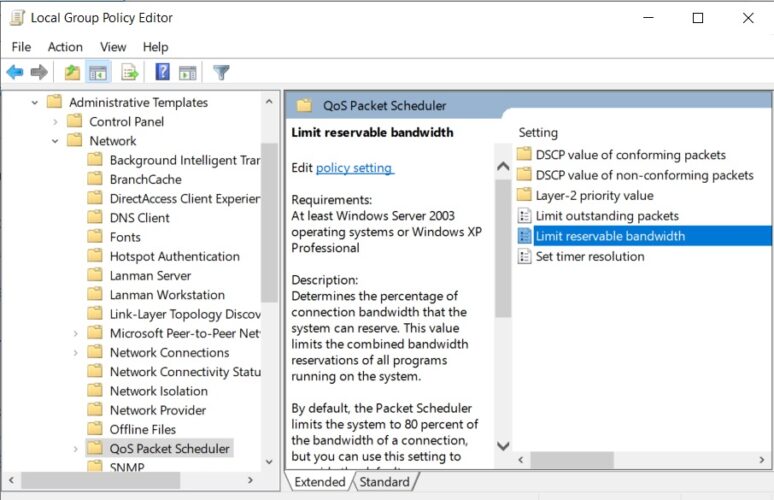
- Press the Windows Key + R.
- Type gpedit.msc in the Run command box.
- Open the Local Group Policy Editor.
- Head over to Computer Configuration.
- Go to Administrative Templates.
- Double-click on Network.
- Select QoSPacket Scheduler.
- Choose Limit reservable bandwidth and open the settings.
- Click on the Enabled button and set the bandwidth to a lower percentage.
Windows reserve a certain amount of bandwidth for its Quality of Service which includes Windows update and other programs that constantly send feedbacks.
However, be forewarned that allocating zero bandwidth to the QoS is expected to interfere with the update process and eventually compromise on the safety front.
4. Flush DNS and clear temporary files

- Press the Win key + X to open Command Prompt.
- Select Command Prompt (Admin).
- Type IPCONFIG/FLUSHDNS and press Enter.
- Close Command Prompt and return to the desktop.
- Press Windows+R and open Run.
- Type %TEMP% and press Enter.
- Select all the content and use right click to delete the temporary files.
For any more questions or suggestions, don’t hesitate to reach for the comments section below.
7 best bandwidth limiter tools for Windows 10 [2021 Guide]

- Some programs use more bandwidth, limiting access for other, more important applications.
- A bandwidth limiter for Windows 10 helps control upload and download speeds on your network.
- A network limiter will also show exactly what apps are more demanding in terms of network data.
- The best thing about such software is that it doesn’t require specific knowledge for you to use them.

- Download Restoro PC Repair Tool that comes with Patented Technologies (patent available here).
- Click Start Scan to find Windows issues that could be causing PC problems.
- Click Repair All to fix issues affecting your computer’s security and performance
- Restoro has been downloaded by 0 readers this month.
Certain applications can sometimes use more bandwidth than you actually want and that can be a major problem.
For example, some applications can download updates in the background, and that can interfere with your gaming sessions.
To help you with this problem, today we’re going to show you some of the best bandwidth limiter tools for Windows 10.
What is an I nternet limiter for Windows 10?
Keeping track of your bandwidth consumption is possible with bandwidth monitor tools, but sometimes you need to limit your bandwidth.
Certain applications use a lot of your bandwidth, which causes reduced performance while gaming or while watching live streams online.
To fix this issue, you need to find the application that is using your bandwidth and stop it. However, sometimes you need to keep those applications running in the background, and that can be a problem.
To fix this, you need to limit that application’s bandwidth, and to do that you’ll need appropriate software.
Many bandwidth limiters allow you to see which applications are currently running on your PC. This allows you to select the application and set a bandwidth limit for it.
By doing so, you’ll most likely fix any latency issues during online gaming sessions.
Some of these applications even allow you to set bandwidth limits on other PCs in your network. This is extremely useful if you have a roommate that tends to use most of your bandwidth.
One of the best ways to limit bandwidth on a certain PC is to configure your router’s QoS settings. Keep in mind that not all routers support this option, so you might want to check if your router supports QoS.
If you want to set a bandwidth limit for a certain application, you should definitely use a special tool.
This software can be useful, and today we decided to test some of the best bandwidth limiter tools on Windows 10.


