- How To Fix WiFi Limited Access Problem In Windows 10
- Method 1 : By Changing Wireless Adapter Power Settings
- Method 2 – By Resetting the IP Address Using CMD
- Method 3 – By the Reinstallation of WiFi Driver
- Method 4 – By Updating Driver
- Method 5 – By Changing Power Management Option
- Internet connection is limited in Windows 10 [Full Guide]
- How do I fix problems with limited connection in Windows 10?
- 1. Update your drivers
- DriverFix
- 2. Restart your modem or WiFi adapter
- 3. Check your antivirus settings
- Bitdefender Antivirus Plus
- 4. Reset the TCP connection
- 5. Run the Windows Networking Troubleshooter
- Run a System Scan to discover potential errors
- 6. Assign a manual IP address
- 7. Change your DNS
- 8. Reset your router
- 9. Reset BIOS to default
- 10. Rollback your network driver
How To Fix WiFi Limited Access Problem In Windows 10
How To Fix WiFi Limited Access Problem In Windows 10:- One of the most frustrating problems regarding Internet is the Limited Access to WiFi Network problem. Why wait for it to solve by itself when we have got the top three solutions stacked up right here for you? Read on, to solve the Limited Access to WiFi Network problem using any one of these three simple methods.
Method 1 : By Changing Wireless Adapter Power Settings
The first method using which you can solve the limited access to WiFi network problem is by changing the wireless adapter power settings. Follow the steps given below to achieve the same.
STEP 1 – Click on the Windows icon to expand it and then click on the Settings app.
STEP 2 – When the Settings window opens up, click on the System option.
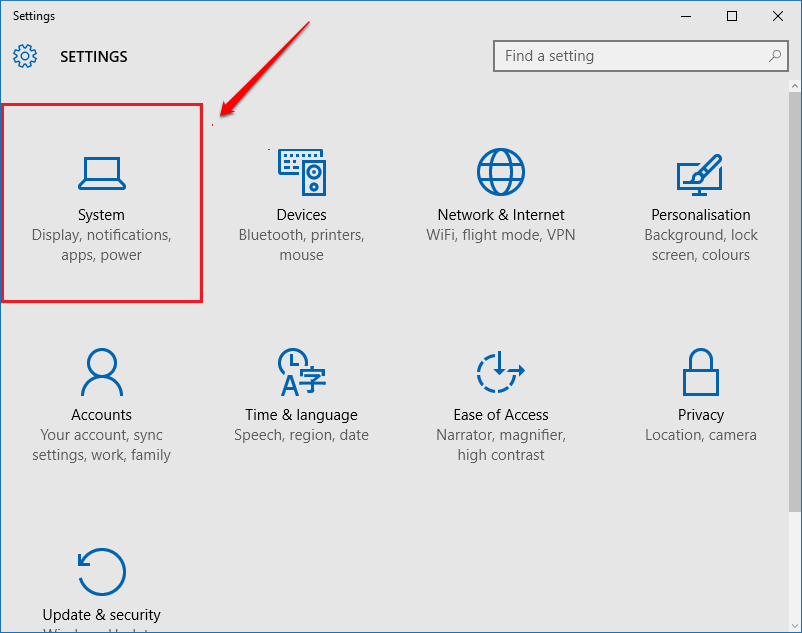
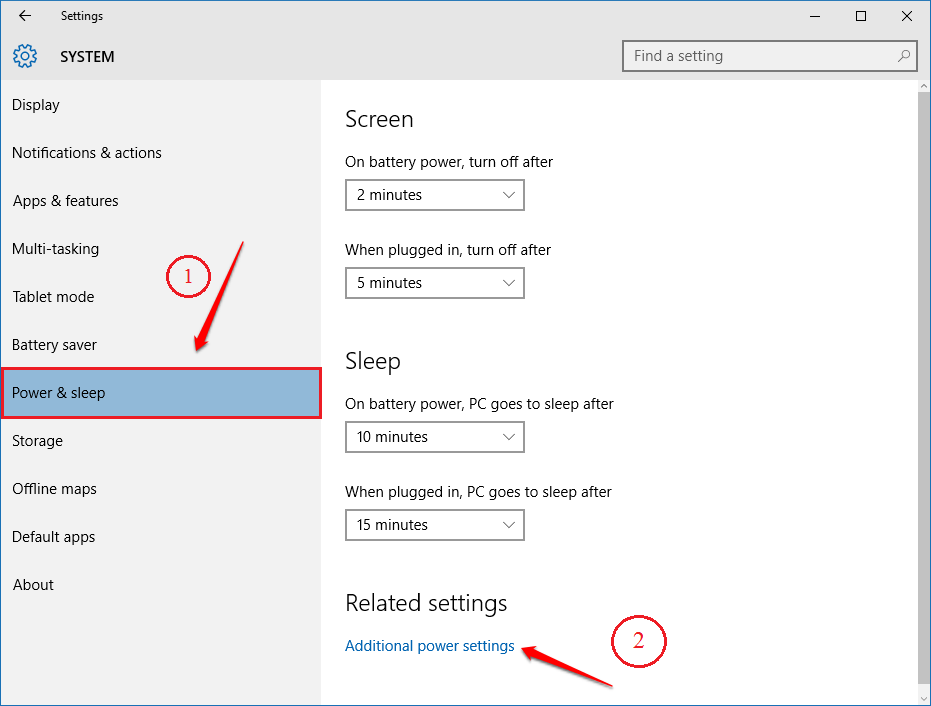
STEP 3
- Now from the left pane of the SYSTEM window, find and click on the option that says Power & sleep. Look for the Additional power settings link under Related settings in the right window pane to click on it.
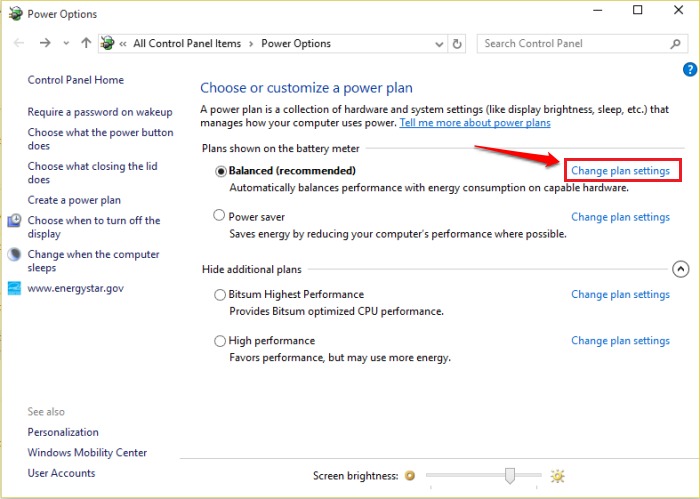
STEP 4
- A separate window for Power Options opens up. Click on the link that says Change plan settings as shown in the screenshot given below.
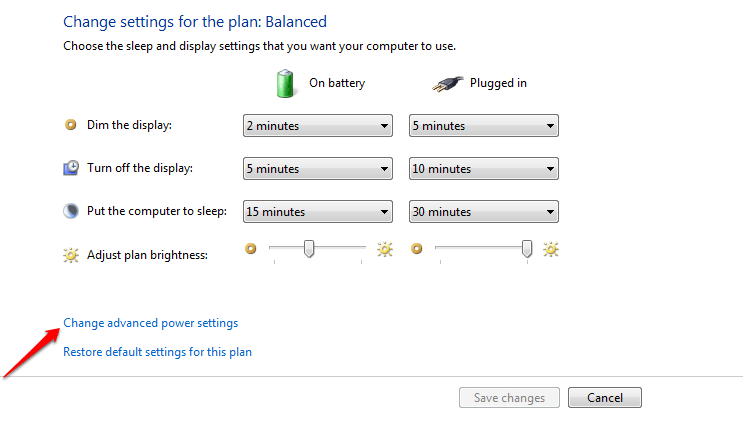
STEP 5
- As next, click on Change advanced power settings link as shown below.
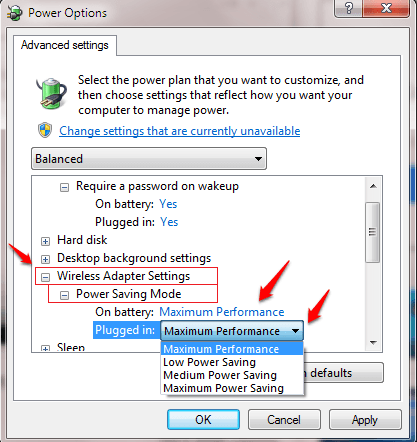
STEP 6
- Now you get to see the advanced power options. Scroll down and find the entry named Wireless Adapter Settings to expand it. As next, expand the Power Saving Mode entry.
- For both On battery and Pluggedin options, choose the option Maximum Performance from the drop down One By One .
Method 2 – By Resetting the IP Address Using CMD
If both the above listed solutions could not solve your problem, let’s get to the next one. In this one, we are going to change the IP address using the Command prompt.
STEP 1
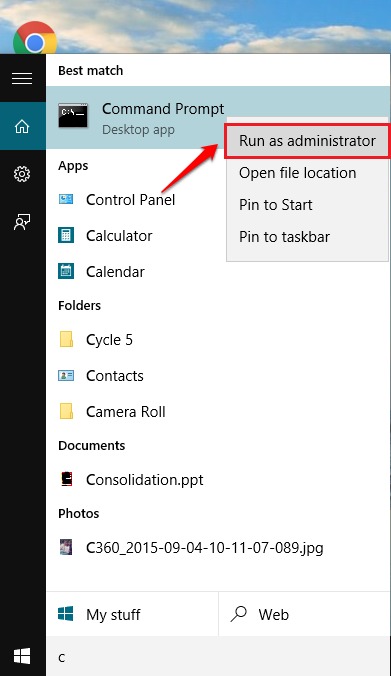
- First of all, open Command Prompt in the administrator mode. For that, start typing cmd into the search box and when the Command Prompt appears in the search results, right click on it and then click on the Run as administrator option.
STEP 2
- When the Command Prompt with admin rights , when it opens up, type in or copy paste the following command and then hit Enter. That’s it.
If it does not work then type the command given below
Then reboot the PC.
If still it does not work then type the 4 commands given below
One of these solutions is sure to solve your problem of limited access to WiFi network. In case you find none of these solutions as working, let us know by leaving comments. We would be happy to help.
Method 3 – By the Reinstallation of WiFi Driver
The first method should solve your problem. If it doesn’t, we always have other options. Go through the following steps to try a different method.
STEP 1
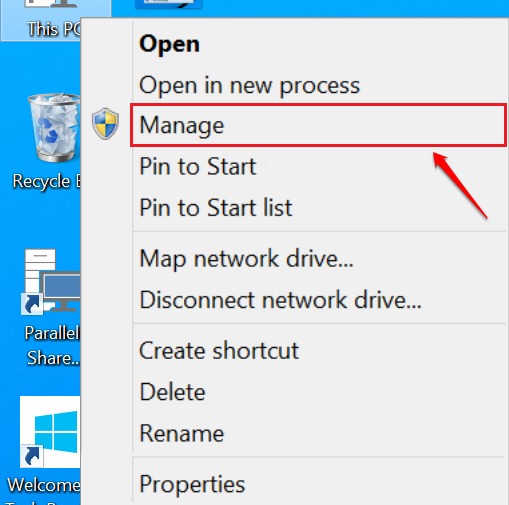
- Find the This PC icon from your Desktop and right click on it. From the context menu that appears, find and click on Manage option.
STEP 2
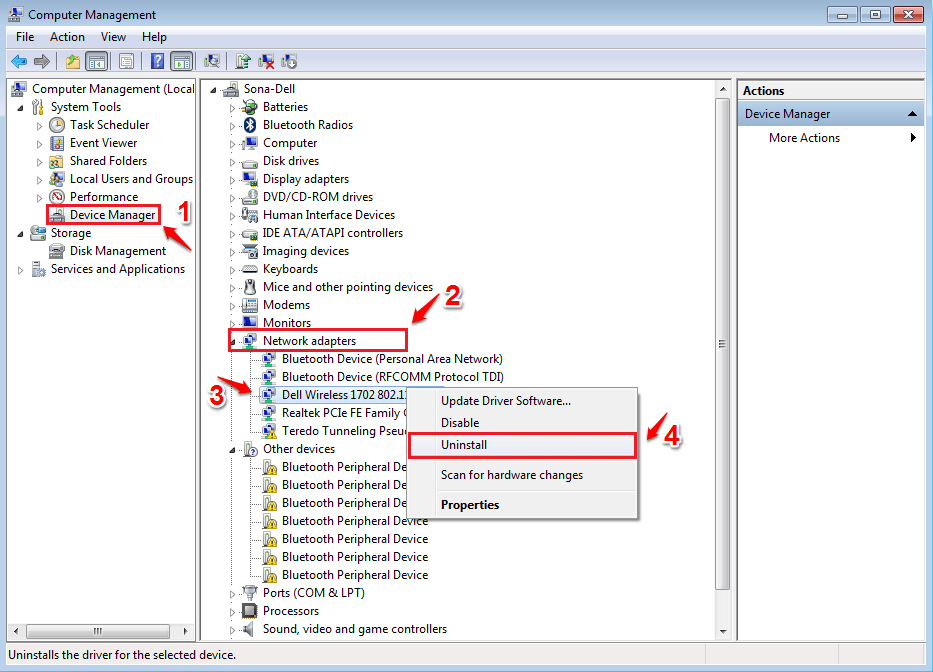
- A new window named Computer Management opens up. From the left window pane, find and click on Device Manager. Find the option named Network adapters in the right window pane and click on it. Now find your network driver and uninstall it by selecting Uninstall option from the right-click context menu.
STEP 3
- As next, From top menu click on Action and then Scan for hardware changes.
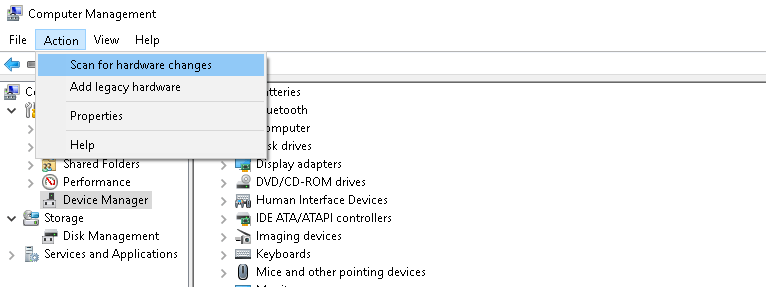
Your driver will get automatically reinstalled.
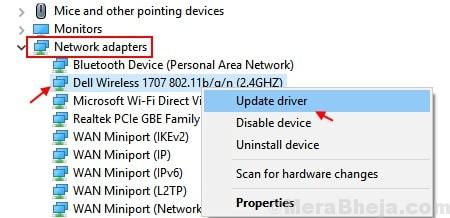
Method 4 – By Updating Driver
1. Search Device Manager in Windows 10 Taskbar Search.
2. Click on the Device manager to Open Device manager.
3. Now, Click on Network Adpter to expand the list.
4. Right Click on the WiFi Driver which you are using and Choose update.
Method 5 – By Changing Power Management Option
1. Search Device Manager in Windows 10 Taskbar Search.
2. Click on the Device manager to Open Device manager.
3. Now, Click on Network Adpter to expand the list.
4. Double Click on the WiFi Driver which you are using.
5. Click on Power Management Tab.
6. Now, Uncheck The option saying “Allow the computer to turn off this device to save power”.
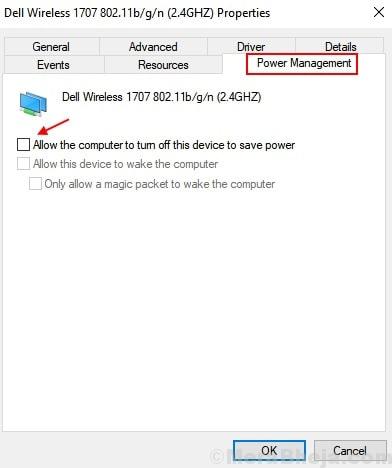
7. Choose OK and Exit.

Someone who is in love with writing and technical tricks & tips.
Internet connection is limited in Windows 10 [Full Guide]

- Network problems are notoriously unpleasant and the limited internet connection in Windows 10 doesn’t deliver any information on the problem.
- If you follow this step by step guide you will learn how to solve this problem easily.
- Our Tech Troubleshooting section will provide solutions for any other problems with your PC.
- For any online solutions or information visit our Web & Cloud Hub.

- Download Restoro PC Repair Tool that comes with Patented Technologies (patent available here).
- Click Start Scan to find Windows issues that could be causing PC problems.
- Click Repair All to fix issues affecting your computer’s security and performance
- Restoro has been downloaded by 0 readers this month.
Network problems are common in Windows 10, and in this article, we’re going to show you how to solve one strange network problem, a problem with limited internet connection in Windows 10.
So, if you’re facing this issue, I hope these solutions will help you.
How do I fix problems with limited connection in Windows 10?
Limited Internet connection message can cause problems and prevent you from accessing certain websites. Speaking of this message, users reported the following problems as well:
- Limited access WiFi Windows 10 – This message can occur if you’re using a wireless connection. If that happens, make sure that your drivers are up to date.
- Limited internet connection on laptop, WiFi, unidentified network, getting disconnected frequently, keeps dropping – There are various problems that can occur due to this message, and if you’re having any of them, be sure to try some of our solutions.
- Limited internet access Ethernet, VPN – Sometimes this problem can occur while using an Ethernet connection or VPN. If this happens, be sure to check your network settings.
- Limited internet access yellow triangle, LAN – This is a relatively common problem on many PCs, but in order to fix it, you just need to run a network troubleshooter.
1. Update your drivers

If you’re getting Limited Internet connection message on your PC, the problem might be your drivers. Outdated drivers can cause this problem to appear, and in order to fix it, it’s advised to update your drivers.
There are several ways to do it, but the easiest possible way is to use a dedicated professional solution like DriverFix.
It’s so easy to update your drivers automatically using this awesome solution that it only takes 3 steps:
- Download and install DriverFix.
- As soon as you start the software it will start scanning your computer for bad or old drivers.

- It will only take a little while but after that, you only need to select the drivers that you want to install.
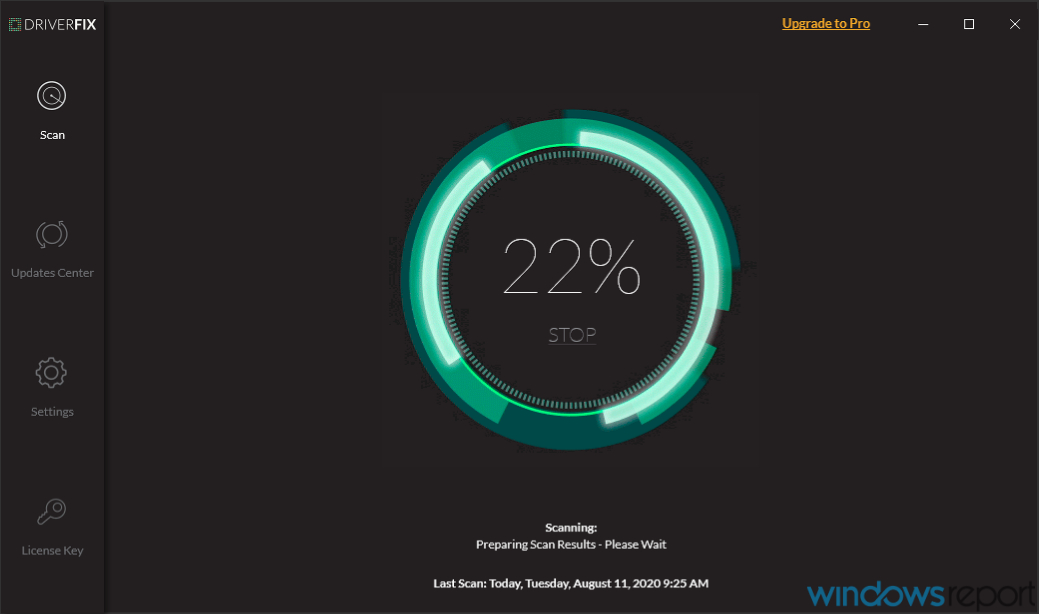
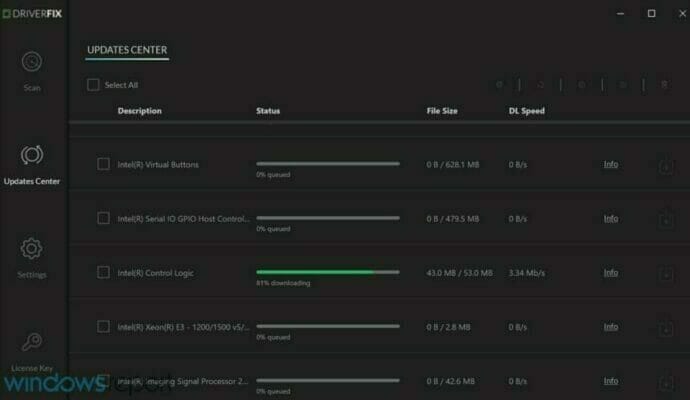

DriverFix
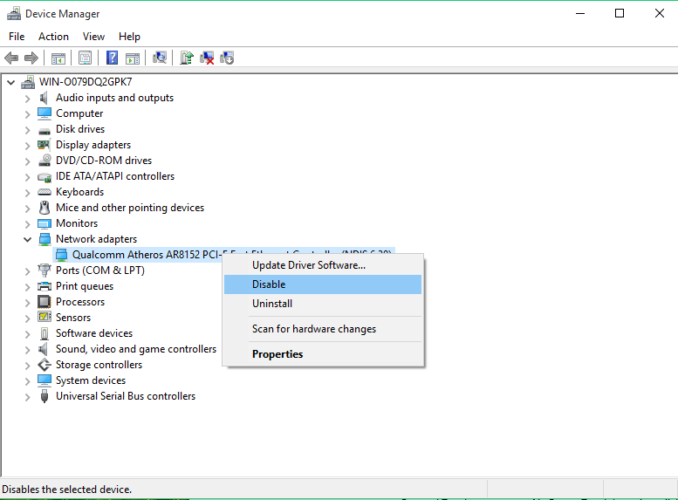
2. Restart your modem or WiFi adapter
- Press Windows Key + X and select Device Manager from the list.
- Find your networking device, right-click on it, and click Disable.
- Restart your computer
- Go to Device Manager again, and enable the networking device the same way you disabled it
Many network issues are caused by malware, various scripts, and bots. Enhance your security by installing Private Internet Access (77% flash sale), a leader in the VPN market. It protects your PC from attacks while browsing, masks, and manages your IP address and blocks all unwanted access.
3. Check your antivirus settings
Having an antivirus is important, but sometimes certain issues can occur due to your antivirus. Many users reported that the Limited Internet connection message can be caused by your antivirus and in order to fix that you need to change your settings.
Several users reported that their antivirus was the cause, and after adjusting a couple of settings the issue was resolved. If you can’t find the settings that are causing this issue, we advise you to temporarily disable your antivirus and check if that helps.
If the issue still persists, you’ll need to uninstall your antivirus completely and check if that solves the issue. If removing the antivirus solves the problem, you should consider switching to a different antivirus solution.

Before starting to tweak your old antivirus, we recommend switching to the best security solution, Bitdefender Antivirus Plus.
We recommend it for your particular problem because it doesn’t interfere with your system and it has a very low impact on its resources.
Even so, if you ever need to stop it for any reason, it’s not a complicated task like you see on other antiviruses, you can do that easily by clicking a button on its dashboard.
You will not want to stop it because Bitdefender Antivirus Plus protects you against all possible threats including Trojans, exploits, and even ransomware that unfortunately happens so often nowadays.
The only problem will be the unusual peace and quiet because this awesome security platform counters attacks even before they happen thanks to its award-winning built its cyber threat intelligence technologies.
You will be happy to know that the package from the link below includes the Bitdefender Computer Tune-up utility, another great solution that will turn your PC into an extremely efficient machine.
Bitdefender Antivirus Plus
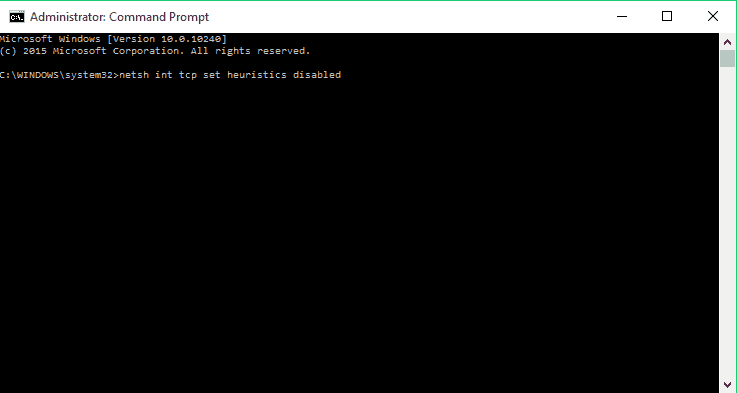
4. Reset the TCP connection
- Right-click on the Start Menu button and open Command Prompt (Admin)
- Enter the following lines and press Enter after entering each one:
- netsh int tcp set heuristics disabled
- netsh int tcp set global autotuninglevel=disabled
- netsh int tcp set global rss=enabled
- netsh int tcp set heuristics disabled
- Now enter this command to verify that the previous functions were disabled:
- netsh int tcp show global
- Close the Command Prompt window.

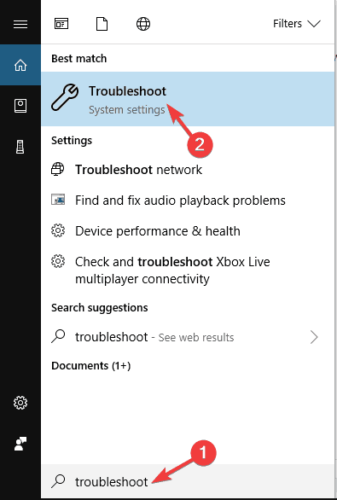
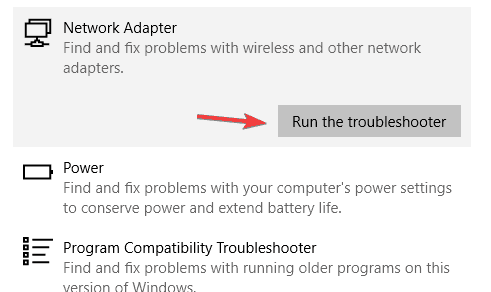
5. Run the Windows Networking Troubleshooter
- Go to Search and type troubleshoot.
- Choose Troubleshoot from the menu.
- Select Network Adapter and click Run the troubleshooter.
- Follow the on-screen instructions.
Run a System Scan to discover potential errors


If your troubleshooter doesn’t load or you encounter an error, check out this useful guide that will help you solve the problem.
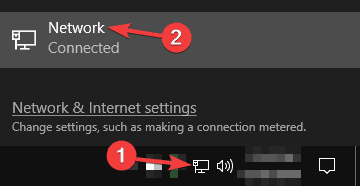
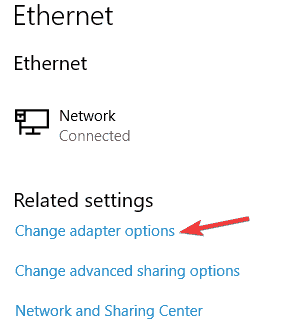
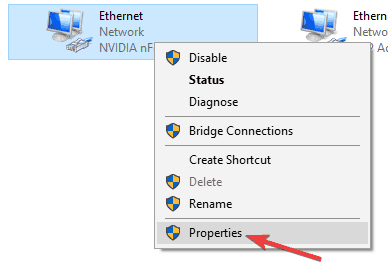
6. Assign a manual IP address
- Click the network icon in your Taskbarand choose your network from the menu.
- Now click on Change adapter options.
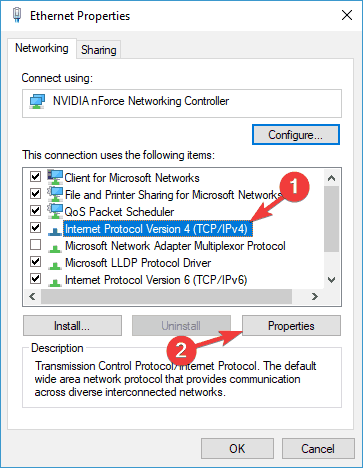
- Locate your network connection, right-click it and choose Properties from the menu.
- Select Internet Protocol Version 4 (TCP/IPv4) and click on Properties.
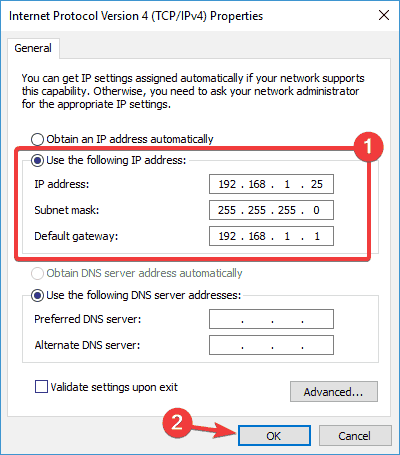
- Select Use the following IP address and set the following data:
- IP address: 192.168.1.25
- Subnet mask: 255.255.255.0
- Default gateway: 192.168.1.1
Click OK to save changes.
Note: Keep in mind that these numbers might not work for you, so you’ll need to change your IP address according to the format of your Default gateway.
To find out what is the Default gateway on your PC, just check the network properties on your PC or on any other device that has Internet access.
If your IP address is set manually, select the Obtain IP address automatically option and check if that solves your problem.
7. Change your DNS
- Follow steps 1-4 from the previous solution.
- Select Use the following DNS server addresses and set these values:

- Preferred DNS server:8.8.8.8
- Alternate DNS server:8.8.4.4
Note: If you prefer OpenDNS you can use it instead of Google DNS. After switching your DNS, check if the problem is resolved. Keep in mind that this solution might slow down your network connection a bit.
If you are already using a custom DNS, select Obtain DNS server automatically option and save changes.
8. Reset your router
 According to some users, sometimes, the Limited Internet connection message can appear due to your router’s configuration.
Several users reported that they fixed this problem simply by resetting their router to default, so you might want to try that.
To reset your router, you need to access your router’s configuration page and choose the reset options from there. However, you can also reset your router by pressing the hidden reset button on your router.
For detailed instructions on how to reset your router, we advise you to check your router’s instruction manual. Keep in mind that by resetting your router, your Wi-Fi network will become disabled, so you’ll have to set it up again.
9. Reset BIOS to default
 Few users claim that they fixed this problem simply by resetting their BIOS to default. If you have a built-in network adapter, you might be able to configure it from BIOS.
Sometimes your BIOS settings might interfere with your network configuration, and in order to fix the problem, you need to reset your BIOS to default.
This is rather simple, and to see how to do it properly on your PC, we advise you to check your motherboard manual for detailed instructions. This is an unlikely solution, but few users claim that it works, so be sure to try it out.
If you don’t know how to access your BIOS, here’s an excellent guide to help you with that.
10. Rollback your network driver
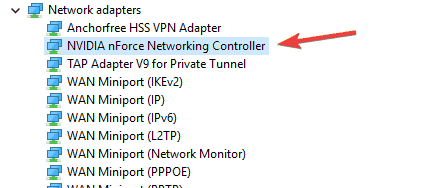
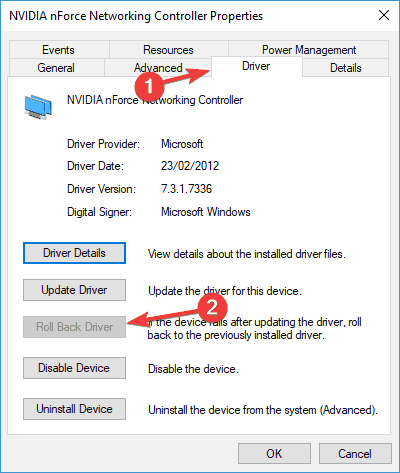
- Open Device Manager, locate your network adapter, and double click it to open its properties.
- Go to the Driver tab and click the Roll Back Driver button. If this button isn’t available, click on Uninstall Device to remove the driver.
Once you uninstall the network driver, restart your PC and the Windows will install the missing driver automatically.
If you successfully rolled back your driver and want to avoid similar issues in the future, you can block Windows 10 from auto-updating a certain driver with the help of this step-by-step guide.
That would be all, I hope at least some of these solutions helped you with the limited internet connection problem. If you have any comments, suggestions, or maybe some other solutions for this problem, reach for the comment section below.


