- How to Create Symbolic Links (Symlink) in Windows 10
- What Are Symbolic Links?
- Create Symbolic Link Using Link Shell Extension
- Create Symbolic Link Using Mklink
- Как создать символьную ссылку в Windows 10, 8.1, 8, 7
- NTFS Links, Directory Junctions, and Windows Shortcuts
- NTFS Hard Links
- Programming Considerations
- Creating A Hard Link
- Deleting A Hard Link
- Enumerating Hard Links
- NTFS Symbolic Links
- Programming Considerations
- Reparse Points and Directory Junctions
- Programming Considerations
- Helper Functions
- Creating Directory Junction
- Deleting Directory Junction
- Querying Directory Junction
- Windows Shortcuts
- Programming Considerations
- Creating New Shortcut
- Modifying Existing Shortcut
- Deleting Shortcut
- Desktop? Where Is It?
- Notifying the Explorer
- Downloads
How to Create Symbolic Links (Symlink) in Windows 10

Symlinks or Symbolic Links is one of the lesser known, yet useful, features in Windows. You can think of symbolic links as the shortcuts you create in Windows. However, symbolic links are much more powerful and helpful than regular shortcuts. Let’s discuss what symbolic links are and how you can easily create them in Windows 10.
What Are Symbolic Links?
When you create a shortcut for a file or folder, all you are doing is pointing it to that specific file or folder, nothing more. Symbolic links are much more than a simple shortcut. They act as a virtual file or folder that links to the actual file or folder.
When you create a symlink for a file, it appears as if it is the actual file when in reality it is redirecting you toward the real file in the background. Besides files, you can also create symlinks for folders. Simply put, a symlink is nothing more than a build of the text string which lets the operating system know that it is just a path for another file or folder.
For instance, most cloud service apps you install will only sync files and folders located in their own folder. But there will be times when you might have a folder in some other drive you want to sync with the cloud storage service.
However, you don’t want to move the folder from its actual location or don’t want to create a copy of the folder. In those situations you can simply create a symlink in the cloud service folder so that you can sync the contents of the target folder without actually moving or copying the real folder.
Since a symlink is just a virtual folder that just acts as a path to the real folder, you don’t have to worry about the symlink consuming your disk space.
Create Symbolic Link Using Link Shell Extension

If you don’t want to faff around in the Command Prompt and are prepared to faff around a little bit by installing a tool that lets you create symlinks to an existing file or directory using the right-click context menu, then try the following. Link Shell Extension is a tool that lets you create hardlinks and symbolic links by right-clicking whatever folder you want to create a link to.
There are a few hoops with the installation. You’ll get a warning that it can’t be downloaded securely, and Windows Defender may warn you that it’s “unsigned.”
We can assure you that the tool is safe. Go ahead and install it. During installation, explorer.exe will restart, so make sure you have important stuff backed up.
Once LSE is installed, right-click the target file or folder you want to create a symlink to, then click “Pick Link Source.”

Next, go to the folder where you want the symlink to appear, right-click it, then select “Drop As -> Symbolic Link.”

Create Symbolic Link Using Mklink
Note: though I’m showing this in Windows 10, the commands shown here are applicable to Windows Vista and up.
Creating symlinks in Windows is pretty easy with the mklink command. To start, press Win + X , then select the option “Command Prompt (Admin)” to open the Command Prompt with admin rights.

Once the command prompt has been opened, use the below command format to create a symlink for a file.
In my case, I want to create a symlink in the E drive for a text file located on the F drive, so the command looks something like this:

The first path you see in the above command is where you will create your symlink. This path is called a “Link.” The second path belongs to the actual file on your disk and is called “Target.”
Once the symlink has been created, this is how it looks in the File Explorer. Though the icon looks like a regular shortcut, it is a symlink.

Along with individual files, you can create symlinks for entire directories. To do that, use the below command. The switch /D allows you to do this.

As soon as you execute the command, the symlink will be created for the target directory. You can use it to access all the files and folders inside the real folder. If you ever want to, you can delete the symbolic link like any other file or folder. Just select the symlink, press the delete key on your keyboard, and you are good to go.

And you’re done! If you want to do more under-the-hood tweaking in Windows 10, see our list of the best registry hacks. Also, check out our guide on how to get Mac-style hot corners in Windows 10.
Как создать символьную ссылку в Windows 10, 8.1, 8, 7
Товарищи, добрый день. Хотя эта тема и не самая популярная, но она мне очень много раз выручала, поэтому я не могу о ней не написать. Итак, что значит термин «символьная ссылка» я возьму из энциклопедии Wikipedia:
Символьная ссылка (также симлинк от англ. Symbolic link, символическая ссылка) — специальный файл в файловой системе, для которого не формируются никакие данные, кроме одной текстовой строки с указателем. Эта строка трактуется как путь к файлу, который должен быть открыт при попытке обратиться к данной ссылке (файлу). Символьная ссылка занимает ровно столько места в файловой системе, сколько требуется для записи её содержимого (нормальный файл занимает как минимум один блок раздела).
По своей сути же, симлинк — это ярлык, который позволяет системе думать, что это не ярлык, а настоящий файл (или папка). К примеру, частое применение символьной ссылок для папок — это установка игры на SSD, с последующем переносом файлов графики на жесткий диск, с целью экономия места на SSD и создание символьной ссылки до исходного места. Игра будет думать, что все файлы находятся в исходной папке. Так же символьные ссылки можно применять когда используются одинаковые файлы в нескольких каталогах, чтобы не вносить правки во все файлы, можно создать с одного файла символьные ссылки и вносить изменения один раз.
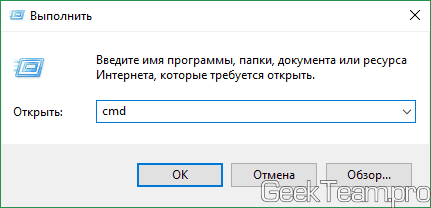
Создать символьную ссылку очень просто и сейчас я вам это докажу. Открываем командную строку, нажимаем Win+R, вводим cmd и жмём ОК. Хотя если вы собираетесь работать с системными файлами, может понадобиться командная строка с правами администратора.
Дальше нам нужно ввести команду для создания символьной ссылки, выглядит она следующем образом:
где /j — атрибут создания соединения для каталога. Если вы создаете ссылку на файл, атрибут ставить не надо.
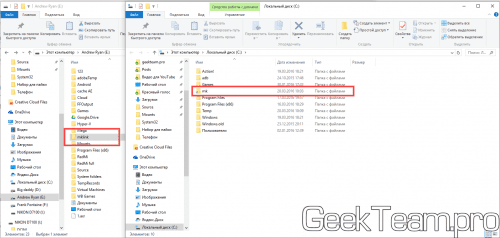
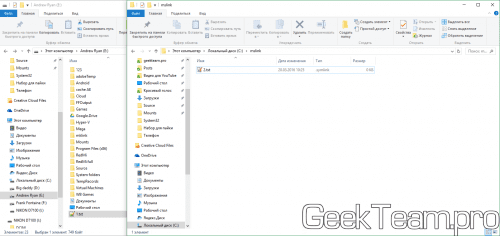
К примеру, если я хочу создать символьную ссылку на папку mklink на локальном диске E, как папку mk на диске С, мне нужно ввести следующую команду (и да, символьная ссылка может называться не так, как исходный файл (папка):
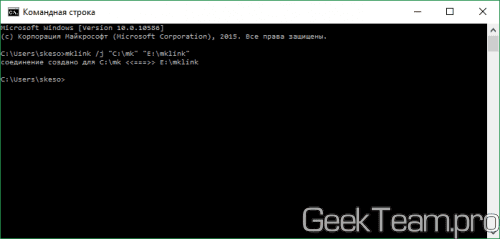
В результате мы получим вот это.
Если же мы хотим создать символьную ссылку на файл, например на файл 1.txt, хранящийся в корне диска E. для использования в виде файла 2.txt. скажем в папке mslink на диске C, команда будет выглядеть вот так:
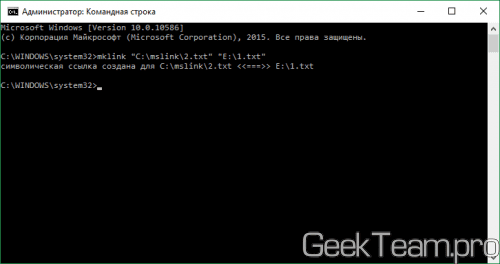
А на выходе получим вот это.
Резюмируя скажу, что знание возможностей данной функции, открывает большие возможности. С помощью неё я выходил из нескольких ситуаций, когда не хватало свободного пространства, на моем старом SSD, позволяя быстро перенести игру из папки origin на другой диск. Но вариантов использования её гораздо больше, к примеру перенос кэша браузеров, о котором мы поговорим в одной из будущих статей.
Вроде всё. Надеюсь эта статья оказалась вам полезной, обязательно нажмите одну из кнопок ниже, чтобы рассказать о ней друзьям. Также подпишитесь на обновления сайта, введя свой e-mail в поле справа или подписавшись на группу во Вконтакте и канал YouTube.
Спасибо за внимание 
NTFS Links, Directory Junctions, and Windows Shortcuts
A link is basically an alternate name for a file or a directory. In many cases creating a link is preferable to making several copies of the file. Links save disk space, and what is more important, if the file changes afterwards, you will not have to edit a bunch of copies – all the links point to the same file.
If you are familiar with Unix-family operating systems, you must have known what the ln command is. Any BSD or Linux disk contains a lot of links, and the ln command is one of the most commonly used. Windows also supports both hard and soft links, but surprisingly, it provided no command line tool for creating links until Windows 7 .
Windows 7 and later systems include a command-line utility mklink for creating hard links, symbolic links, and directory junctions.
In this article we will show how to create all kinds of links programmatically. If you are not interested in programming and just want to get the utility, skip directly to the download section.
NTFS Hard Links
Hard link uses the same MFT entry as the original file. Adding a hard link creates a new name attribute and increases the hard link count (for a newly created file this count equals to one). Deleting a hard link removes the appropriate name and decreases the hard link count. When the count goes to zero, the system deletes the file, freeing up its allocated disk space and releasing its MFT record. All the name attributes are independent, so deleting, moving, or renaming the file don’t affect other hard links.
In order to get the value of the hard link count, open the file in the FlexHEX editor and select the File Properties page in the Streams pane (the lower left one). If there is any hard link to the file, the Hard Links value will be greater than one (the normal directory record is also counted, so one means no hard links).
Because all the links must refer to the same MFT entry, you cannot create a hard link on a different drive. Another limitation is that only files can be hard-linked, not directories (however soft links to directories are allowed).
Programming Considerations
To get the number of links use the Win32 API function GetFileInformationByHandle. The nNumberOfLinks member of the returned BY_HANDLE_FILE_INFORMATION structure contains the total number of links (a value of 1 means there are no hard links).
Creating A Hard Link
Creating a hard link is simple — just call the Win32 API function CreateHardLink (this function is available in Windows 2000 and later systems).
While the first two arguments are fairly obvious, the third one may be somewhat misleading. Security descriptors belong to files, not to hard links, so if you specify a security attributes in a CreateHardLink call, this will change security settings for the file itself (and for all the file links). You should also keep in mind that calling CreateHardLink with a non-NULL lpSecurityAttributes argument most likely will fail if the user is not the owner of the file or a system administrator. It is not clear what reasons did Microsoft have for adding that argument — modifying file security the usual way, using the SetSecurityInfo function, would be a better practice.
Deleting A Hard Link
In order to delete a hard link, call the Windows API function DeleteFile, specifying the link path. The DeleteFile function removes the link and decreases the link count in the file’s MFT record. If the link count becomes zero, the system deletes the file, that is frees its MFT entry and disk space.
Note that there is no difference between the original file name and an additional hard link. Both are just pointers to the file’s MFT entry.
Enumerating Hard Links
Until Windows Vista the only documented way to find all the file’s links was scanning all the drive’s directories and opening every file. Calling GetFileInformationByHandle returned the unique file’s index in MFT. Files with the same index are hard links. Note also that there is no such thing as the ‘primary link’ – it is not possible to distinguish the ‘first’ file’s name without directly analyzing the file’s MFT entry.
Windows Vista introduced functions for locating all the file’s hard links – FindFirstFileNameW / FindFirstFileNameTransactedW and FindNextFileNameW (note that only UNICODE versions are available). The code example below prints all the hard links of a given file (which may be specified by any of its links).
The path returned by the functions FindFirstFileNameW and FindNextFileNameW does not contain a drive letter and always starts with the backslash character. The drive is assumed to be the same as the drive specified in the first FindFirstFileNameW argument (as it was noted earlier, hard link always points to the same drive).
NTFS Symbolic Links
Starting with Windows Vista, Microsoft added support for symbolic links to files and directories. Symbolic links are very similar to NTFS directory junctions, and unlike hard links, symbolic links can refer to non-existing objects and objects, residing on different (or even remote) drives.
Programming Considerations
There is only one API function for symbolic links – CreateSymbolicLink
The first argument is the path to the symbolic link object. The second one is an absolute or a relative path to the object the link points to. The last argument is a flag indicating if the target object is a file or if it is a directory. This flag is necessary because the target path argument may point to a non-existent object.
A symbolic link object may be deleted with the DeleteFile (or RemoveDirectory) function. It is not possible to copy a symbolic link – the copy operation will copy the referred file, not the link itself. You can find more information in the corresponding WinAPI article.
Microsoft wouldn’t be itself it it didn’t make a new cool feature pretty useless. CreateSymbolicLink function demands privilege elevation, i.e. the program must be Run as Administrator (this fact is however not mentioned in the Windows API documentation). Although this requirement has been removed in Windows 10, there still is a huge number of systems running older Windows versions.
Reparse Points and Directory Junctions
Reparse points provide another way of creating links. If a file or a directory has a reparse point attached, the system calls a file system filter, indicated by the reparse point tag. The filter may implement any method of accessing the actual data, including quite complicated ones. HSM (Hierarchical Storage Management) is a good example how useful reparse points can be.
Unfortunately, although we can link to directories using the reparse points mechanism (such links are called junctions), there is no way of linking to files short of writing a custom file system filter driver. Even if using reparse points is a natural way of implementing soft links, the gain is hardly worth the pain.
However reparse points are not all that useless for our purpose: junctions can supplement NTFS file-only hard links. Just keep in mind that they are, in fact, soft links, and if you move or delete the referred directory, the junction will point to nowhere. On the other hand, being a soft link, a junction is not limited to objects residing on the same drive; it can point to a directory on a different drive, or even to the drive itself (although a junction is not allowed to point to a mapped network object).
Programming Considerations
In order to improve readability, the code examples below don’t include any error processing. You should add some error checks if you want to use this code in your program. See the sources in the download section for an example of error handling.
Aside from a couple of overview articles, reparse points are very scantily documented, and the Platform SDK does not include the required definitions:
The header file WinNT.h included in the VC++ 6.0 distributive contains another definition (Microsoft removed it in the later versions of the Platform SDK):
We will use the former structure as defined in the Junctions example on the Systems Internals Web site.
Helper Functions
We will need a couple of helper functions. First one opens a directory and returns its handle:
The second helper function checks if the directory has an associated junction point:
Creating Directory Junction
The first step is creating a directory if it does not exists. If the directory exists, it must be empty — you cannot associate a reparse point with a non-empty directory.
The next step is obtaining the directory handle:
And the last step is the black magic:
Note that szTarget string must contain the path prefixed with the «non-parsed» prefix «\??\», and terminated with the backslash character, for example «\??\C:\Some Dir\».
You can save some effort by using the CreateJunction function you can find in the download section.
Deleting Directory Junction
If the directory is empty, you can use the RemoveDirectory function to remove both the directory and the associated junction point. Another way is to use DeviceIoControl, which does not require the directory to be empty and removes the junction only, leaving the directory and its content intact.
Querying Directory Junction
The following code returns the path the junction point is linked to:
Windows Shortcuts
A more advanced version of Windows symbolic link is shortcut. In addition to the basic link-to-file relationship a shortcut can also contain a description, an icon, and so on. In addition, shortcuts can point to non-file objects like printers.
A shortcut is actually a file, usually with the .lnk extension (any other extension can also be registered as a shortcut). Like any other file it can be copied, renamed, or deleted; file operations on a shortcut don’t affect the object being pointed to.
Programming Considerations
In order to improve readability, the code examples below don’t include any error processing. You should add some error checks if you want to use this code in your program. See the sources in the download section for an example of error handling.
Creating New Shortcut
In order to set up a Windows shortcut programmatically first create it using the IShellLink interface (don’t forget to call CoInitialize before calling any COM function).
If you want to create a shortcut for a non-file object, use the SetIDList function instead of SetPath. In this case you should use a pointer to the object’s ITEMIDLIST structure, or PIDL. PIDL is a more universal way of object addressing so you can use the SetIDList function for both file and non-file objects. You can obtain PIDLes for the standard shell objects by calling the SHGetFolderLocation or SHGetSpecialFolderLocation function. To convert a PIDL to the corresponding file path use the shell function SHGetPathFromIDList.
To set additional parameters like a description or an icon location use the appropriate IShellLink functions:
When the shortcut is set up completely, save it using the IPersistFile interface:
Please note that unlike IShellLink::SetPath, and like most COM/OLE functions, IPersistFile::Save requires a UNICODE path string.
As a final stroke, commit I/O by releasing the interface pointers, and the newly created shortcut is here!
Modifying Existing Shortcut
An existing shortcut can be modified using the same code; the only difference is that you should first read the shortcut using the IPersistFile::Load call. For example, a function for changing the path to the shortcut target would look as follows:
Deleting Shortcut
Simply delete the shortcut file using the standard DeleteFile API function.
Desktop? Where Is It?
You will probably want to place your shiny new shortcut on the desktop or in the Start menu. However the directories associated with the standard locations may vary for different Windows versions and localizations. If you want your code to work on different computers, you should never assume that the Desktop directory is C:\Document and Settings\All Users\Desktop or the Programs directory is C:\Program Files.
The Windows Shell API function SHGetSpecialFolderPath and the newer SHGetFolderPath retrieve the path of a special folder. However if a compatibility with older Windows versions is important, use the older function SHGetSpecialFolderLocation, which is supported by all Windows versions and does not require a redistributable.
Remember to free the PIDL when it is no more needed:
Notifying the Explorer
After you created or deleted a shortcut, you may need to use the SHChangeNotify function to notify the Windows Explorer about the change in the shortcut directory and to ensure the directory view is properly updated.
Downloads
All the content is provided on the «as is» basis and without any warranty, express or implied. You can use the supplied tools and examples for any commercial or non-commercial purpose without charge. You can copy and redistribute these tools and examples freely, provided that you distribute the original umodified archives.


