- How To Create Symlinks On Your Mac
- Creating a Symlink Using The Terminal
- Use An App To Create a Symlink
- Create Symlinks Using An Automator Service
- Deleting a Symlink On Mac
- Conclusion
- Установка ST-LINK V2 в MAC OS X для разработки под STM32
- Подготовка
- Установка менеджера пакетов
- Установка ST-LINK V2
- Установка ARM Toolchain
- Заключение
- How to Create Symbolic Links at Command Line of Mac OS X
- How to Make a Symbolic Link
- Example Syntax for Making Soft Links at the Terminal
- How to Remove a Symbolic Link
How To Create Symlinks On Your Mac
Works differently than a regular shortcut
A symbolic link, often shortened to symlink, is a type of link that is stored at one location on your machine and it points to another location on the same machine. You can think of it as a shortcut of an app. Even though the actual app file is located deep inside your folders, you can simply double-click on the app shortcut on your desktop to launch the app.
A symlink is a type of shortcut, but it works differently than regular shortcuts. It’s less of a shortcut and more of the actual file it’s pointing to. Any app that you provide with your symlinks will think of these links as the actual files rather than normal shortcut files.

These are extremely useful as you don’t have to be stuck to a particular folder for an app to work. You can have your data stored in other folders and you can create a symlink in the original folder pointing to the new folder you’ve created. Your system and your apps will think you haven’t really made any changes and they’ll work normally, although things are otherwise.
Creating a Symlink Using The Terminal
Making a symlink on a Mac is extremely easy. The built-in Terminal app has a command that lets you easily create as many symlinks as you want on your Mac.
All that you need to know is the location where you want to create the symlink and the path where the symlink should point to. Once you have this information, here’s how you create a symlink in Terminal.
Launch the Terminal app using your preferred way on your Mac.
Type in the following command into the Terminal window and hit Enter. Make sure to replace destination with the folder you want the link to point to and location with the path where you want to save the link.
ln -s destination location

To create a symlink on your desktop that points to your Documents folder, you’d use the following command:
ln -s /Users/Mahesh/Documents /Users/Mahesh/Desktop

A symlink will be created and saved on your desktop. Double-click on it and it’ll open the Documents folder (if that’s what you specified above) in the Finder.
If the directory you want to create a symlink for has spaces in its names, make sure to enclose the path names with double quotes so as to avoid any errors.
You can now use this symlink in any of your commands and apps and it’ll be considered as the actual version of your folder or file.
Use An App To Create a Symlink
Terminal isn’t the only way to create symlinks on your Mac. If you don’t happen to be a Terminal guy, you have an app available to let you create symlinks on your machine.
What this app does is it adds an option to your context menu so you can create symlinks by just right-clicking on your files and folders.
Head over to the SymbolicLinker page on GitHub and download and open the package on your Mac.
Copy the SymbolicLinker.service.app file from the package, hold down the Option key, click on the Go menu in the Finder, select Library, open the Services folder, and paste the file you copied.
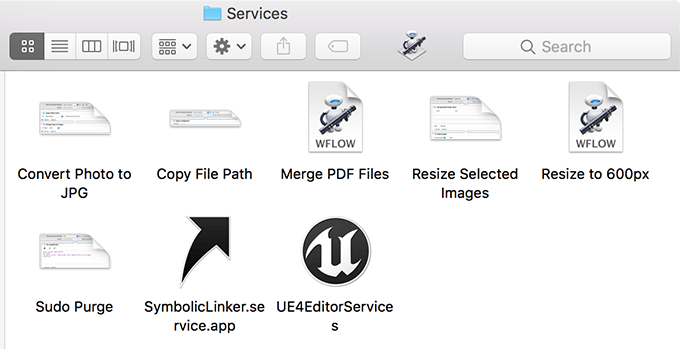
Double-click on the app to open it. It won’t show anything but it has secretly added an option to your context menu.
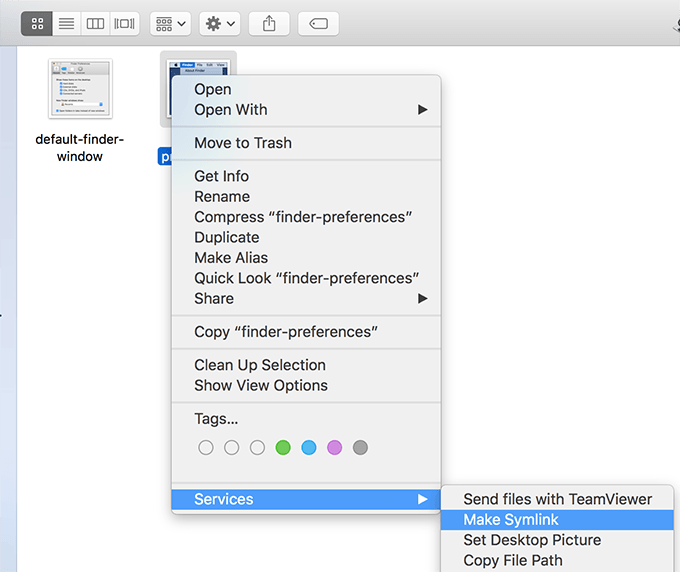
Find the file or folder you want to create a symlink for, right-click on it, and select Services followed by Make Symbolic Link.
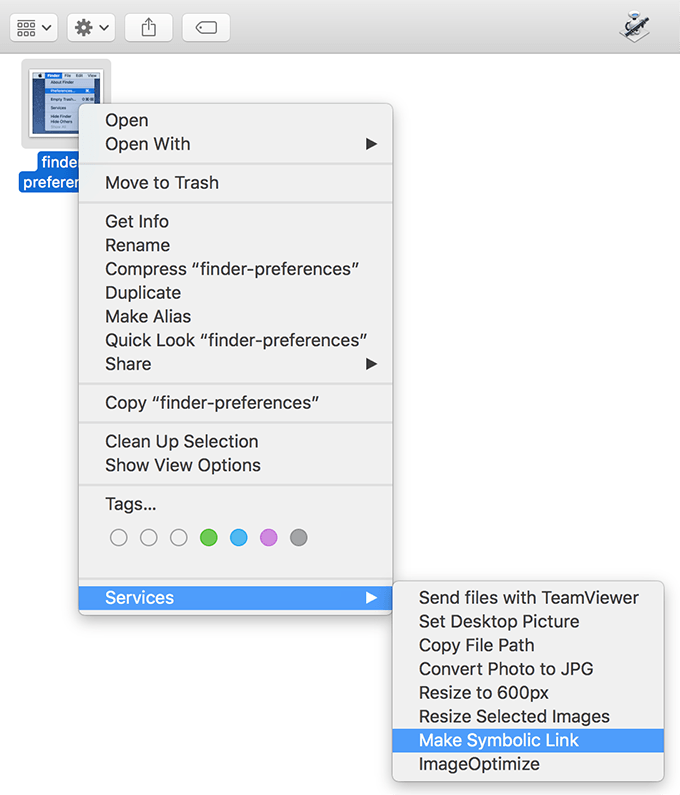
It’ll create the symlink in the same folder as the original file/folder. You can move it around though if you want.
Create Symlinks Using An Automator Service
The Automator method to create symlinks works pretty much the same way as the above method. But this one will suit those of you who don’t trust any random apps on the Internet, and you’d rather create something by yourself so you know exactly what it contains.
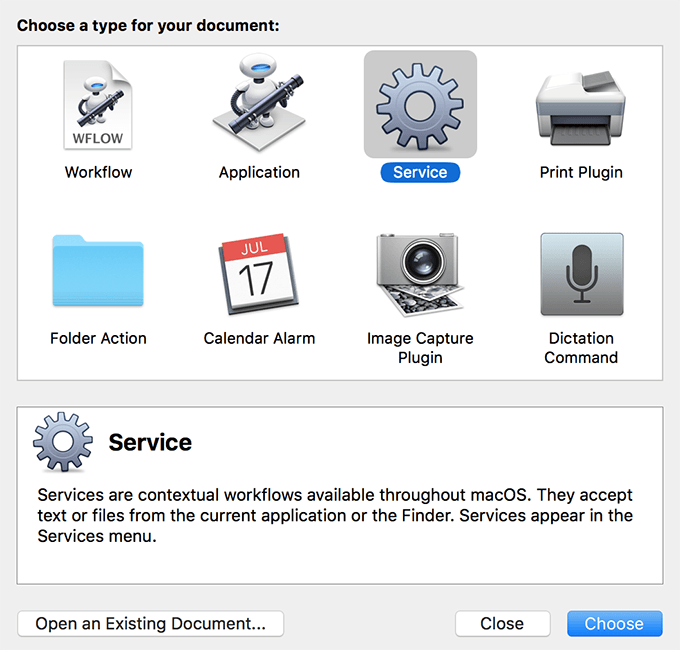
Launch the Automator app on your Mac.
Select Service followed by Choose to create a new Automator service on your Mac.
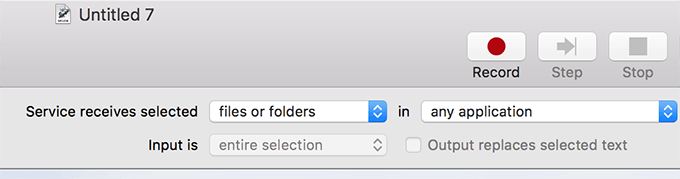
Set the options at the top as the following:
Service receives selected – files or folders
in – any application
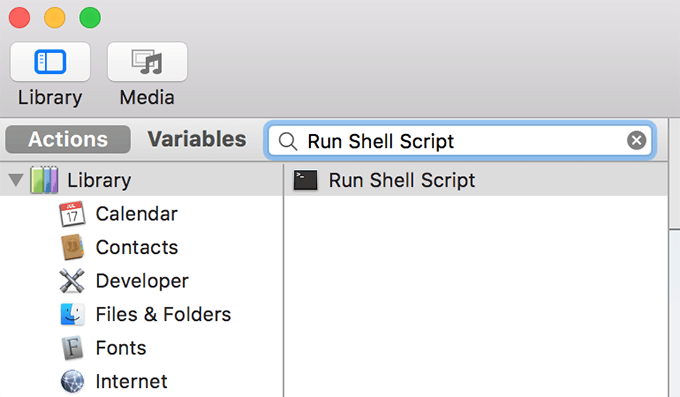
In the actions list, search for the action named Run Shell Script and drag it over to the right panel.
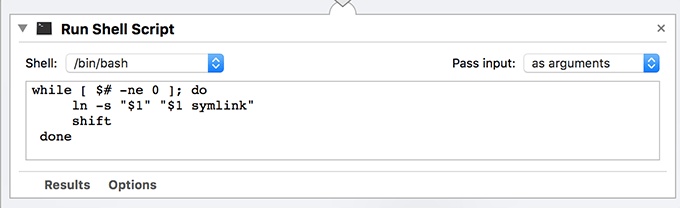
Configure the action and the commands as the following:
Shell – /bin/bash
Pass input – as arguments
while [ $# -ne 0 ]; do
ln -s “$1” “$1 symlink”
shift
done
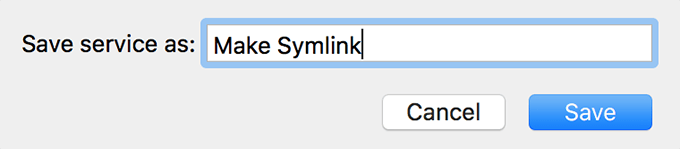
Save the service by clicking on the File menu at the top and selecting Save. Enter a meaningful name for the service and hit Save.
To create a symlink with the newly created Automator service, right-click on your file or folder and select Services followed by your service name.
You can also create a keyboard shortcut for the service to make creating symlinks even easier on your machine.
Deleting a Symlink On Mac
Symlinks don’t occupy much memory space as they’re just shortcuts to the files and folders on your machine. However, if you want to remove one or a few of these from your machine, you have two ways to do it.
Launch the Terminal app, type in the following command, and hit Enter. Make sure to replace symlink with the path of the symlink on your Mac.
rm symlink

Another way to delete a symlink is to use the context menu option. Right-click on your symlink and select Move to Trash. It’ll remove the symlink from your Mac.
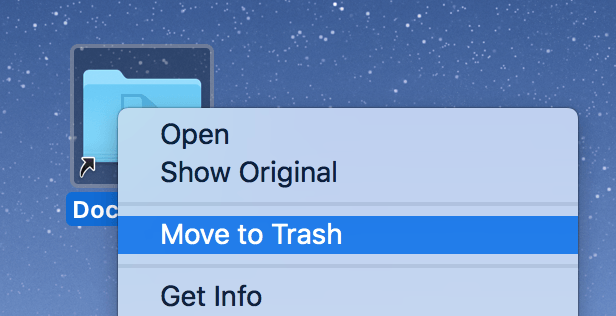
Make sure to empty the Trash after you’re removed the symlink to ensure it’s gone for good from your Mac.
Conclusion
Symlinks are much more powerful than regular aliases as these work in all the apps and commands as if these were the real files.
Mahesh has been obsessed with technology since he got his first gadget a decade or so ago. Over the last few years, he’s written a number of tech articles on various online publications including but not limited to MakeTechEasier and Android AppStorm. Read Mahesh’s Full Bio
Источник
Установка ST-LINK V2 в MAC OS X для разработки под STM32
Недавно наткнулся на замечательную статью, о том, как собрать все инструменты для разработки в среде linux под контроллеры stm32 и я решил вновь вернуться к задаче, которую уже пытался решить, а именно заставить работать все тоже самое по Mac OS X (В моем случае версии 10.9.1 Mavericks), так как работать в CooCox (а он основан именно на Eclipse) в виртуальной машине уже изрядно надоело. В данной статье я опишу пошаговый алгоритм как все тоже самое заставить работать в OS X.

Итак, вы хотите разрабатывать на STM32 в среде Mac OS X, у вас есть ST-LINK V2 отдельно или на макетной плате, тогда добро пожаловать под кат.
Если брать в целом, то за исключением Microchip с их кросс-платформенной MPLAB X для разработки под Pic (по крайней мере мне известна только она), особо никто из производителей не заботится о разработчиках на платформах отличных от Windows, что создает определенный порог вхождения и отпугивает достаточно много разработчиков, если вы, конечно, не пользователь Arduino Development Tools.
Почему же нельзя просто взять и использовать весь алгоритм который описал futurelink в OS X и быть счастливым? Потому что apple заботится о нас, и посему они выпилили из систему все компоненты, которые требуются для установки и сборки пакетов из репозиториев. Отсутствует и сам менеджер пакетов, основная парадигма направлена на то, что все нужно ставить через AppStore или на крайний случай скачивать программу на свой страх и риск из «не установленных источников» =). Однако не все так плохо как может показаться, все эти фатальные недостатки можно успешно устранить, а заодно и познакомиться с мощным инструментом который нам в этом поможет — менеджером пакетов.
Подготовка
Обычно, в этот момент все пишут что нужно установить Xcode из AppStore, а затем установить Command Line Tools (а именно они нам и нужны) и такой способ тоже может быть использован, однако если вы не собираетесь ничего разрабатывать в Xcode (а может вам жалко место на ssd), то можно поставить Command Line Tools отдельно. Все команды которые будут выделены далее нужно исполнять в терминале.
Способ 1:
Просто набрать в терминале:
В Maverick сразу вываливается окно вида: 
Нажимает Установить и получаем все необходимые утилиты без самого Xcode.
Способ 2:
Скачать и установить образы в ручную:
Образ для Mountain Lion
Образ для Mavericks
После всех этих операций в системе будут установлены такие утилиты как make, gcc, git и другие.
Установка менеджера пакетов
К счастью, мировое open source сообщество не оставило пользователей Mac в беде и выкатило несколько решений на этот счет.
На текущий момент есть два достойных проекта, которые можно использовать для этих целей Macports и Brew. Если у вас стоит какой либо из этих менеджеров, то ставить больше ничего не надо, однако если вы задумываетесь что вам поставить, то лично я рекомендую именно Brew.
Установка Brew проста и незатейлива, копируем строчку в терминал и следуем инструкциям
Все! Теперь у вас есть возможность устанавливать пакеты из репозиториев!
Например можно поставить себе Midnight Commander:
Или wget (рекомендую поставить, он понадобится позже):
Если у вас уже был установлен Brew, то рекомендую вам обновить его командой:
А затем запустить:
Но не будем отвлекаться от нашей основной задачи, а именно подружить наш программатор с системой.
Установка ST-LINK V2
Теперь мы можем установить все необходимые нам пакеты, благо сделать это уже очень просто:
После установки этих пакетов у нас есть все необходимое для сборки проекта от Texane.
Я буду руководстоваться тем, что мы создадим папку в своей домашней директории и назовем ее Embed Tools, но вы можете делать в любой удобной папке.
Подключаем нашу плату и запускаем комманду:
В случае если все хорошо, то должен быть возвращен ответ вида:
Для сохранение совместимости и исходный тутором, я буду делать теже самые ссылки, но опять же, вы можете делать в удобные для вас места, можно даже не делать никакие ссылки, а в самом эклипсе ссылаться непосредственно на пути установки утилит.
С большой долей вероятности, в вашей системе каталога opt не будет, а значит его нужно создать, а заодно и каталог bin в нем:
Теперь создаем ссылку на st-util в каталог /opt/bin/:
Установка ARM Toolchain
Качаем GCC ARM TOOLCHAIN 4.8, распаковываем и кладем все в нашу папку Embed Tools. Я качал последний мажорный релиз на сегодняшний день, а именно 4.8-2013-q4-major и моя папка, соответственно, называется gcc-arm-none-eabi-4_8-2013q4. Вы можете скачать несколько разных релизов и вообще разные тулчейны и все их скопировать в нашу Embed Tools, а затем менять ссылку на них в каталоге opt, как это предлагает делать futurelink (очень удобно кстати, не придется менять каждый раз в проектах ссылку в случае замены тулчейна).
Создаем ссылку на тулчейн в каталог /opt/arm-toolchain:
А для тех кто ранее установил себе wget, можно использовать вот такую команду:
Она скачивает тулчейн, распаковывает в папку Embed Tools и создает ссылку в /opt/arm-toolchain на него.
Заключение
На текущем этапе большинство пользователей может приступить в пункту Среда разработки в оригинальном туторе. Но возможно не все так подробно знакомы c эклипсом, что способны расшифровать фразу про установку плагинов «Для обоих есть апдейт-сайты, ставятся плагины стандартным для клипсы способом из менюшки.», поэтому я решил их описать более подробно.
GNU Arm Eclipse
В списке плагинов репозитория выбираем 2 отмеченных чекбоксами:
Так как J-Link’а у меня нет, то я себе экспериментальный плагин не ставил, но может кто-то попробует и его.
Zylin Embedded CDT
В данном случае вариант чекбокса единственный, так что отмечаем его.
В процессе установки плагинов, будет выдаваться предупреждение безопасности, на которое отвечаем утвердительно.
Теперь вам осталось создать свой C или C++ проект, и выполнить его настройки как описано в туторе.
На этом все, я надеюсь у вас все получилось. Желаю удачных разработок.
Источник
How to Create Symbolic Links at Command Line of Mac OS X
 A symbolic link created at the command line allows a linked object in the file system to point to an original object in a different location. In this way, symbolic links behave much like an alias does in the Mac OS X GUI, except that the linking and reference between files or folders is done at a lower level, and thus can be pointed directly to by various applications or user purposes. This can be useful in many situations for advanced Mac users, from providing easier access to a particular location, to offloading an application folder to another hard drive, and much more.
To make and set a symbolic link at the command line in Mac OS X, you’ll want to use the ln command with the -s flag, without the -s flag a hard link is set, which is not what we’re looking to do here. Launch the Terminal to get started.
How to Make a Symbolic Link
The basic syntax for creating a symbolic link (or soft link) is as follows:
ln -s /path/to/original/ /path/to/link
That will point /path/to/link to the original location, in this case /path/to/original/
Example Syntax for Making Soft Links at the Terminal
For example, to create a symbolic link for the user Downloads folder which links it to a directory on a separate mounted drive, syntax may look like the following:
ln -s /Volumes/Storage/Downloads/
That will link the active users
/Downloads/ folder to a directory named “Downloads” on the mounted drive called “Storage”. If such a directory and drive existed, this would basically allow all files that would typically appear in the user downloads folder to go to the other mounted volume instead, essentially offloading the storage burden to that separate drive, while still preserving the appearance of a
/Downloads/ folder for the user. As mentioned before, this behaves much like an alias.
Another example would be to offer easier access to an otherwise buried binary by linking the command to /usr/sbin/
sudo ln -s /A/Deeply/Buried/Path/ToApp.framework/Resources/command /usr/sbin/commmand
This would allow the user to type ‘command’ and access the binary, without having to prefix the command execution with the entire path.
Soft links have tons of potential uses, and if you’ve been a longtime reader of OSXDaily you’ve undoubtedly come across them before in other articles, from gaining easier access to the powerful airport command, placing mounted NTFS volumes onto the desktop, to moving local iTunes iPhone backup folders to external drives, to adding a Trash can icon to the user desktop like retro Mac OS versions, or even placing an application cache folder onto a RAM disk for ultra-fast data access and caching. The practical uses are countless, and making symbolic links will work in any unix OS, so beyond Mac OS X you could apply the same idea to linux or FreeBSD.
How to Remove a Symbolic Link
Of course, created symbolic links sometime need to be undone. This is easy with rm, or by using the ‘unlink’ command as follows:
Essentially this is removing the tiny file (again, like an alias) that references the symbolic link to the original item.
Unlinking a symbolic link will not delete any files or folders other than that defined link, it simply removes the reference from the linked item to the original item.
Know of any particularly great uses or tricks with symbolic links? Let us know in the comments!
Источник


