- blog.vmpress.org
- Страницы
- понедельник, 11 января 2016 г.
- Установка и настройка VMware Horizon Client for Linux для Ubuntu 14.04
- Установка клиента
- Настройка аутентификации по смарт-картам
- Смарт-карты Aladdin eToken
- Смарт-карты Aladdin JaCarta
- Docs
- Supported Linux Versions for Horizon Agent
- Required Platform and Horizon 7 Software Versions
- TCP/UDP Ports Used by Linux Virtual Machines
- Verify the Linux Account Used by Linux Virtual Machines
- Desktop Environment
- Network Requirements
- VHCI Driver for USB Redirection
blog.vmpress.org
Страницы
понедельник, 11 января 2016 г.
Установка и настройка VMware Horizon Client for Linux для Ubuntu 14.04

Из функций, которые на текущий момент не поддерживаются в клиенте для Linux: MMR (Multimedia Redirection), проброс сканеров и serial портов, подключенных к клиентским устройствам.
В качестве примера рассмотрим установку клиента под 32-битной версией ОС Ubuntu 14.04.3 (64-битная версия Ubuntu 14.04 на текущий момент официально не поддерживается).
Установка клиента
Перед установкой клиента загрузите последние актуальные обновления для ОС:
Создайте символическую ссылку на библиотеку libudev (требуется для работы USB Redirection и RTAV):
В Ubuntu Software Center доступна устаревшая версия клиента VMware View Client 2.2, поэтому загрузите с сайта VMware последнюю версию VMware Horizon Client 3.5 и запустите процедуру установки:
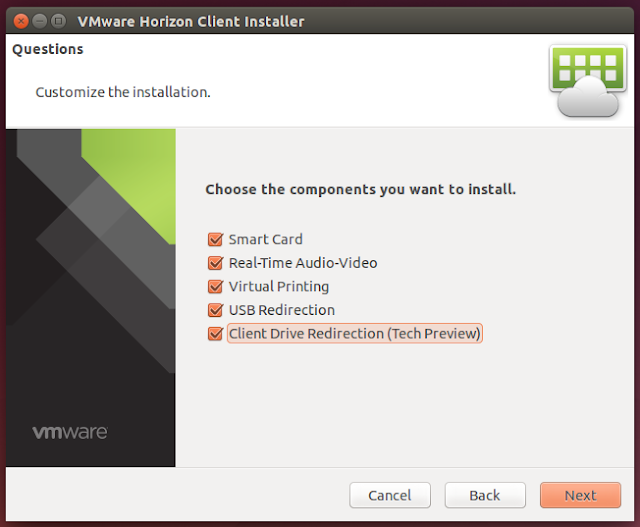
Примите лицензионное соглашение и выберите компоненты, которые требуется установить.
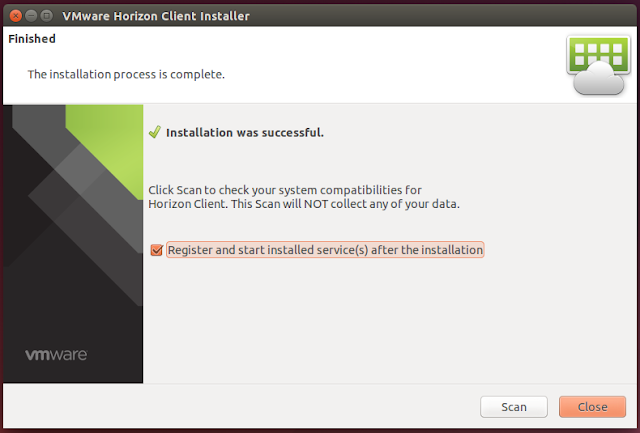
Клиент готов к работе и может быть запущен из консоли с помощью команды vmware-view, что довольно неудобно. В качестве альтернативного варианта можно создать ярлык и добавить его на панель Unity Launcher. Для этого создайте файл-описание:
Добавьте в него следующее содержимое:
Зарегистритуйте приложение, используя файл-описание:
Теперь приложение появится в списке доступных для запуска, и его можно будет вынести на панель launcher’а.

Настройка аутентификации по смарт-картам
Для аутентификации через клиент Horizon Client по смарт-картам требуется дополнительная настройка. В качестве примера приведено описание настройки для CCID карт-ридера и смарт-карт Aladdin eToken.
Для начала установите необходимые записимости:
Если вы используете CCID карт-ридер с драйвером libccid, то он автоматически определится ОС, для других моделей может потребоваться установка дополнительных драйверов (например, Athena ASEDrive IIIe). Список карт-ридеров и драйверов можно посмотреть на сайте wiki.debian.org/Smartcards.
Проверьте, что карт-ридер корректно работает, используя команду:

Смарт-карты Aladdin eToken
Для аутентификации с использованием eToken смарт-карт потребуется установить ПО SafeNet Authentication Client.
Перед установкой SAC загрузите и установите две библиотеки (libhal1 и libha1-storage1):
Загрузите дистрибутив SAC с сайта (для примера используется версия SAC 8.3). Установите ПО:
Запустите SafeNet Authentication Client Tools и проверьте, что ОС видит сертификаты на смарт-карте.

Создайте каталог и символическую ссылку на библиотеку eToken:
Теперь аутентификация по смарт-картам должна заработать.

Смарт-карты Aladdin JaCarta
Для работы со смарт-картами Aladdin JaCarta вам потребуется загрузить ПО JaCarta PKI for Linux (http://www.aladdin-rd.ru/support/downloads/39875/).
После загрузки распакуйте архив и установите клиент JaCarta PKI:
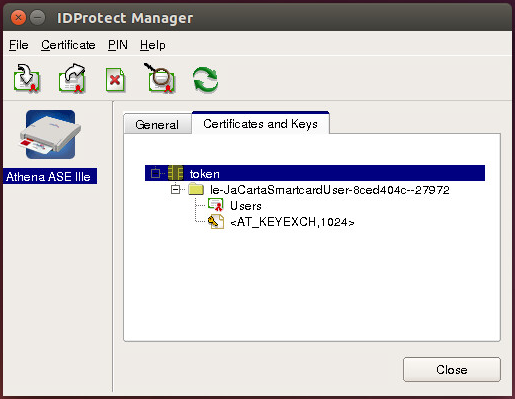
При помощи утилиты IDProtect Manager проверьте, что смарт-карта видна в ОС.
Создайте каталог и символическую ссылку на библиотеку JaCarta:
Теперь аутентификация по смарт-картам должна заработать.
Источник
Docs
—> share-line
—> —> —> —> plus
To install Horizon 7 for Linux, your Linux system must meet certain requirements for the operating system, Horizon 7 , and vSphere platform.
Supported Linux Versions for Horizon Agent
The following table lists the Linux operating systems that are supported for Horizon Agent.
| Linux Distribution | Architecture |
|---|---|
| Ubuntu 16.04, 18.04, and 20.04 Red Hat Enterprise Linux (RHEL) Workstation 6.6, 6.7, 6.8, 6.9, 6.10, 7.2, 7.3, 7.4, 7.5, 7.6, 7.7, 7.8, 7.9, 8.0, 8.1, 8.2, 8.3, and 8.4 CentOS 6.6, 6.7, 6.8, 6.9, 6.10, 7.2, 7.3, 7.4, 7.5, 7.6, 7.7, 7.8, 7.9, 8.0, 8.1, 8.2, 8.3, and 8.4 | x64 |
| NeoKylin 6 Update 1 | x64 |
| SLED 12.x SP1/SP2/SP3 | x64 |
| SLES 12.x SP1/SP2/SP3/SP5 | x64 |
Required Platform and Horizon 7 Software Versions
To install and use Horizon 7 for Linux, your deployment must meet certain requirements for the vSphere platform, Horizon 7 , and the Horizon Client software.
| Platform and Software | Supported Versions |
|---|---|
| vSphere platform version |
|
| Horizon environment |
|
| Horizon Client software |
|
TCP/UDP Ports Used by Linux Virtual Machines
Horizon Agent and Horizon Clients use TCP or UDP ports for network access between each other and various Horizon server components.
| Source | Port | Target | Port | Protocol | Description |
|---|---|---|---|---|---|
| Horizon Client | * | Linux Agent | 22443 | TCP/UDP | Blast if Blast Security Gateway is not used |
| Security Server, Horizon Connection Server, or Access Point appliance | * | Linux Agent | 22443 | TCP/UDP | Blast if Blast Security Gateway is used |
| Horizon Agent | * | Horizon Connection Server | 4001, 4002 | TCP | JMS SSL traffic. |
To allow users to connect to their Linux desktops, the desktops must be able to accept incoming TCP connections from Horizon Client devices, security server, and Horizon Connection Server .
On Ubuntu and Kylin distributions, the iptables firewall is configured by default with an input policy of ACCEPT.
On RHEL and CentOS distributions, where possible, the Horizon Agent installer script configures the iptables firewall with an input policy of ACCEPT.
Make sure that iptables on an RHEL or CentOS guest operating system has an input policy of ACCEPT for new connections from the Blast port, 22443.
When the BSG is enabled, client connections are directed from a Horizon Client device through the BSG on a security server or Horizon Connection Server to the Linux desktop. When the BSG is not enabled, connections are made directly from the Horizon Client device to the Linux desktop.
Verify the Linux Account Used by Linux Virtual Machines
Account Name and Account Type lists the account name and account type used by Linux virtual machines.
| Account Name | Account Type | Used By |
|---|---|---|
| root | Linux OS built-in | Java Standalone Agent, mksvchanserver , shell scripts |
| vmwblast | Created by Linux Agent installer | VMwareBlastServer |
| Linux OS built-in or AD user or LDAP user | Python script |
Desktop Environment
Horizon 7 for Linux supports multiple desktop environments on different Linux distributions. Supported Desktop Environments lists the default desktop environments for each Linux distribution and the additional desktop environments supported by Horizon 7 for Linux.
| Linux Distribution | Default Desktop Environment | Desktop Environments Supported by Horizon 7 for Linux Desktops |
|---|---|---|
| Ubuntu 18.04/20.04 | Gnome | Gnome Ubuntu, K Desktop Environment (KDE), MATE |
| Ubuntu 16.04 | Unity | Gnome Flashback (Metacity), KDE, MATE |
| RHEL/CentOS 6.x | Gnome | Gnome, KDE |
| RHEL/CentOS 7.x | Gnome | Gnome, KDE |
| RHEL/CentOS 8.x | Gnome | Gnome |
| SLED 12 SP1/SP2/SP3 | Gnome | Gnome |
| SLES 12 SP1/SP2/SP3/SP5 | Gnome | Gnome |
| NeoKylin 6 Update 1 | Mate | Mate |
When using RHEL/CentOS 7.x and Ubuntu 20.04/18.04/16.04 distributions, SSO fails to unlock a locked KDE session. You must manually enter your password to unlock the locked session.
- Install the supported Linux distribution’s operating system with the default desktop environment setting.
- Run the appropriate commands in Commands to Install Desktop Environments for your specific Linux distribution.
Table 6. Commands to Install Desktop Environments
Linux Distribution New Default Desktop Environment Commands to Change the Default Desktop Environment RHEL/CentOS 6.x KDE RHEL/CentOS 7.x KDE Ubuntu 20.04/18.04/16.04 KDE Ubuntu 20.04/18.04 MATE Ubuntu 16.04 MATE Ubuntu 16.04 Gnome Flashback (Metacity) - To begin using the new default desktop environment, restart the desktop.
If you enabled SSO on a Linux desktop that has multiple desktop environments installed, use the following information to select the desktop environment to use in an SSO session.
- For Ubuntu 20.04/18.04/16.04 and RHEL/CentOS 7.x, use the information in SSODesktopType Option to set the SSODesktopType option in the /etc/vmware/viewagent-custom.conf file to specify the desktop environment to use with SSO.
Table 7. SSODesktopType Option
Desktop Type SSODesktopType Option Setting MATE SSODesktopType=UseMATE GnomeUbuntu SSODesktopType=UseGnomeUbuntu GnomeFlashback SSODesktopType=UseGnomeFlashback KDE SSODesktopType=UseKdePlasma GnomeClassic SSODEsktopType=UseGnomeClassic - For RHEL/CentOS 6.x, for the SSO login session to use KDE, remove all the desktop startup files, except for the KDE startup file, from the /usr/share/xsession directory. Use the following set of commands as an example. After the initial setup, the end user must log out or reboot their Linux desktop to use KDE as the default desktop in their next SSO session.
- For RHEL/CentOS 8.x, for the SSO login session to use Gnome Classic, remove all the desktop startup files, except for the Gnome Classic startup file, from the /usr/share/xsession directory. Use the following set of commands as an example. After the initial setup, the end user must log out or reboot their Linux desktop to use Gnome Classic as the default desktop in their next SSO session.
If you disabled SSO on a Linux desktop that has multiple desktop environments installed, you do not need to perform any of the previously described steps. The end users have to select their desired desktop environment when they log in to that Linux desktop.
Network Requirements
VHCI Driver for USB Redirection
The USB redirection feature has a dependency on the USB Virtual Host Controller Interface (VHCI) kernel driver. To support USB 3.0 and the USB redirection feature, you must perform the following steps:
- Download the USB VHCI source code from https://sourceforge.net/projects/usb-vhci/files/linux%20kernel%20module/.
- To compile the VHCI driver source code and install the resulting binary on your Linux system, use the commands in the table that follows these steps.
| Linux Distribution | Steps to Compile and Install USB VHCI Driver |
|---|---|
| Ubuntu 20.04/18.04 |
|
| Compile and install the VHCI drivers. | |
| |
| SLED/SLES 12 SP2 The output is the name of the kernel package currently installed. If, for example, the package name is kernel-default-3.0.101-63.1 , then the current kernel package version is 3.0.101-63.1. Install the kernel-devel , kernel-default-devel , kernel-macros , and the patch packages. |
In addition, observe the following guidelines:
Источник


