- How To Set up SSH Keys on a Linux / Unix System
- What is a public key authentication?
- How to set up SSH keys
- How do I set up public key authentication?
- 1: Create the key pair
- Optional syntax for advance users
- Как создать ключ для авторизации по SSH и добавить его на сервер?
- Создание SSH-ключей в Linux на примере CentOS
- Создание SSH-ключей на Windows с PuTTYgen
- Отключение аутентификации по паролю
- Создание пользователя и SSH ключей
- Команды для создания пользователя в linux:
- Команды для работы с SSH ключами в linux:
- How to Add SSH Public Key to Server
- Method 1: Automatically copy the ssh key to server
- Method 2: Manually copy the public ssh key to the server
- Step 1: Get the public key
- Step 2: Create ssh directory in the user’s home directory (as a sysadmin)
- Step 3: Set appropriate permission to the file
How To Set up SSH Keys on a Linux / Unix System
I recently read that SSH keys provide a secure way of logging into a Linux and Unix-based server. How do I set up SSH keys on a Linux or Unix based systems? In SSH for Linux/Unix, how do I set up public key authentication?
| Tutorial details | |
|---|---|
| Difficulty level | Easy |
| Root privileges | No |
| Requirements | OpenSSH client and server |
| Est. reading time | 8 mintues |
This page explains a public key and shows you how to set up SSH keys on a Linux or Unix-like server. I am assuming that you are using Linux or Unix-like server and client with the following software:
- OpenSSH SSHD server
- OpenSSH ssh client and friends on Linux (Ubuntu, Debian,
What is a public key authentication?
OpenSSH server supports various authentication schema. The two most popular are as follows:
- Passwords based authentication
- Public key based authentication. It is an alternative security method to using passwords. This method is recommended on a VPS, cloud, dedicated or even home based server.
How to set up SSH keys
Steps to setup secure ssh keys:
- Create the ssh key pair using ssh-keygen command.
- Copy and install the public ssh key using ssh-copy-id command on a Linux or Unix server.
- Add yourself to sudo or wheel group admin account.
- Disable the password login for root account.
- Test your password less ssh keys login using ssh user@server-name command.
Let us see all steps in details.
How do I set up public key authentication?
You must generate both a public and a private key pair. For example:
Fig.01: Our sample setup
In public key based method you can log into remote hosts and server, and transfer files to them, without using your account passwords. Feel free to replace server1.cyberciti.biz and client1.cyberciti.biz names with your actual setup. Enough talk, let’s set up public key authentication. Open the Terminal and type following commands if .ssh directory does not exists:
1: Create the key pair
On the computer (such as client1.cyberciti.biz), generate a key pair for the protocol.
You need to set the Key Pair location and name. I recommend you use the default location if you do not yet have another key there, for example: $HOME/.ssh/id_rsa. You will be prompted to supply a passphrase (password) for your private key. I suggest that you setup a passphrase when prompted. You should see two new files in $HOME/.ssh/ directory:
- $HOME/.ssh/id_rsa – contains your private key.
- $HOME/.ssh/id_rsa.pub – contain your public key.
Optional syntax for advance users
The following syntax specifies the 4096 of bits in the RSA key to creation (default 2048):
$ ssh-keygen -t rsa -b 4096 -f
/.ssh/vps-cloud.web-server.key -C «My web-server key»
Where,
- -t rsa : Specifies the type of key to create. The possible values are “rsa1” for protocol version 1 and “dsa”, “ecdsa”, “ed25519”, or “rsa” for protocol version 2.
- -b 4096 : Specifies the number of bits in the key to create
- -f
Источник
Как создать ключ для авторизации по SSH и добавить его на сервер?
SSH-ключи используются для идентификации клиента при подключении к серверу по SSH-протоколу . Используйте этот способ вместо аутентификации по паролю.
SSH-ключи представляют собой пару — закрытый и открытый ключ. Закрытый должен храниться в закрытом доступе у клиента, открытый отправляется на сервер и размещается в файле authorized_keys.
Создание SSH-ключей в Linux на примере CentOS
На клиентской стороне должен быть установлен пакет ssh (openssh). На серверах FirstVDS с шаблонами по умолчанию необходимое ПО уже установлено.
На клиентском компьютере в командной строке выполните команду генерации ключей:

Введите путь файла, в который будут помещены ключи. Каталог по умолчанию указан в скобках, в примере /домашний_каталог/.ssh/id_rsa . Если хотите оставить расположение по умолчанию, нажмите Enter .
Пароль (passphrase) используется для ограничения доступа к закрытому ключу. Пароль усложнит использование ключа третьими лицами в случае утраты. Если не хотите использовать секретную фразу, нажмите Enter без заполнения строки.
Успешно сгенерировав пару ключей, вы увидите уведомление:
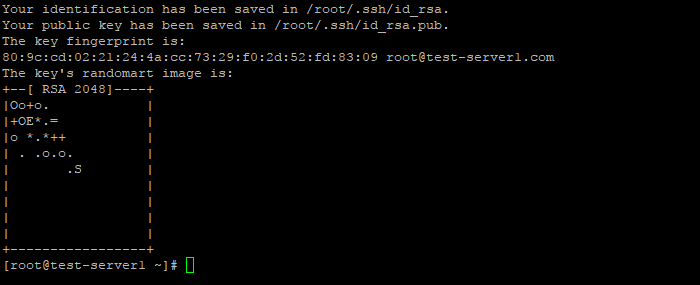
Открытый ключ хранится в файле /домашний_каталог/.ssh/id_rsa.pub , закрытый — /домашний_каталог/.ssh/id_rsa .
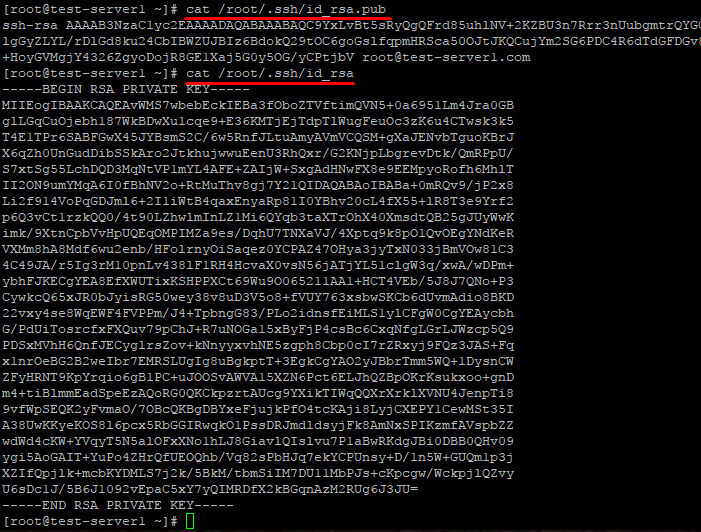
Скопируйте открытый ключ на сервер в файл /домашний_каталог/.ssh/authorized_keys . Одной строкой:
Или откройте этот файл на сервере редактором vi и вставьте строку с открытым ключом после ssh-rsa .

Ещё один способ скопировать ключ в authorized_keys — команда echo , которая помещает строку в конец файла.

Теперь можно отключить на сервере аутентификацию по паролю и использовать только SSH-ключи.
Создание SSH-ключей на Windows с PuTTYgen
Если вы используете ОС Windows, то подключиться по SSH к вашему (Linux) серверу можно через PuTTY или OpenSSH . Генерация ключей в этом случае выполняется также при помощи этих программ. В примере мы используем клиент PuTTY.
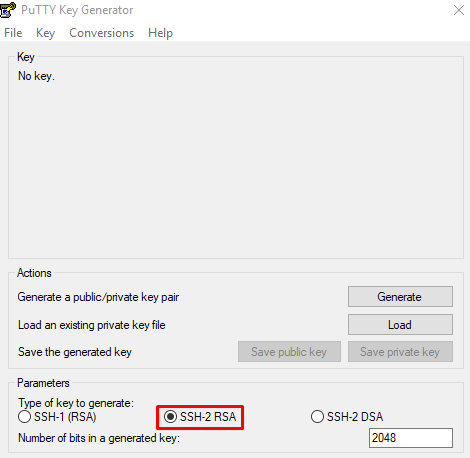
Запустите приложение PuTTYgen , которое устанавливается вместе с PuTTY.

Выберите тип ключа SSH2-RSA и нажмите Generate .
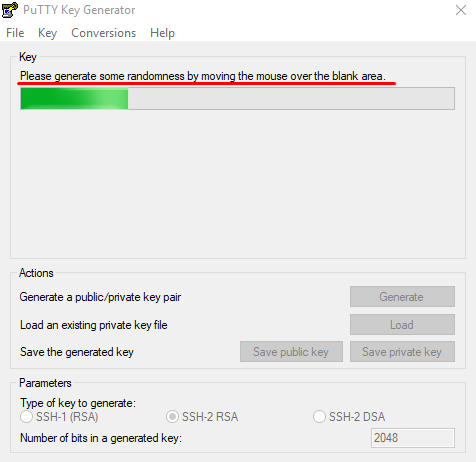
В процессе генерации ключей несколько раз произвольно проведите мышкой по экрану приложения для создания случайных величин, используемых для ключей.
После завершения создания ключей открытый ключ выводится на экран, закрытый хранится в памяти приложения. Чтобы сохранить эти ключи нажмите Save public key и Save private key . Укажите расположение файлов с ключами.
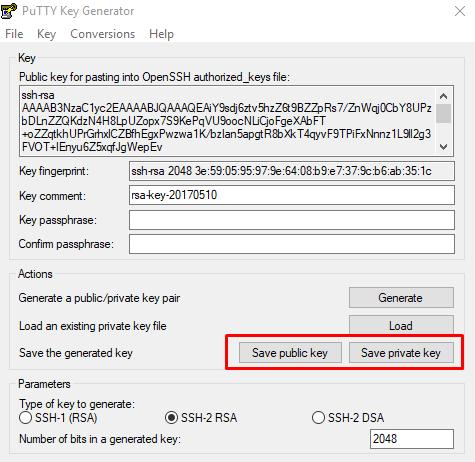
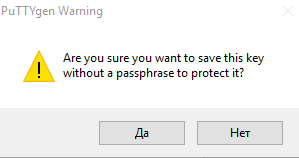
При сохранении закрытого ключа, если не заполнено поле Key passphrase , появится запрос «Хотите ли вы сохранить ключ без секретной фразы?»
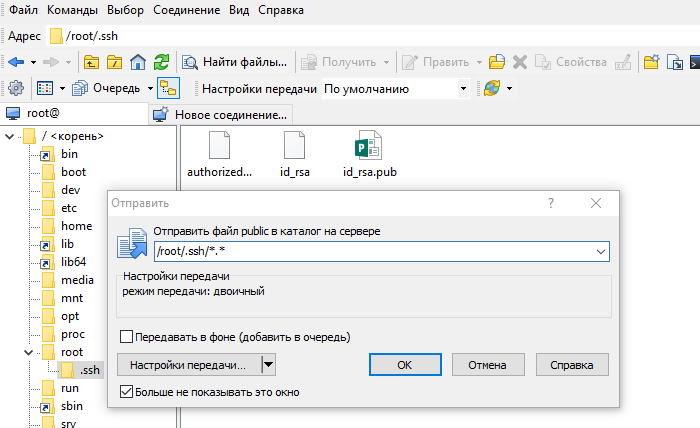
Теперь открытый ключ необходимо скопировать на сервер в файл authorized_keys . Используйте WinSCP или другой клиент для работы с файлами на удалённом Linux-сервере. Вы можете скопировать файл с открытым ключом целиком на сервер, чтоб его копия хранилась в папке .ssh
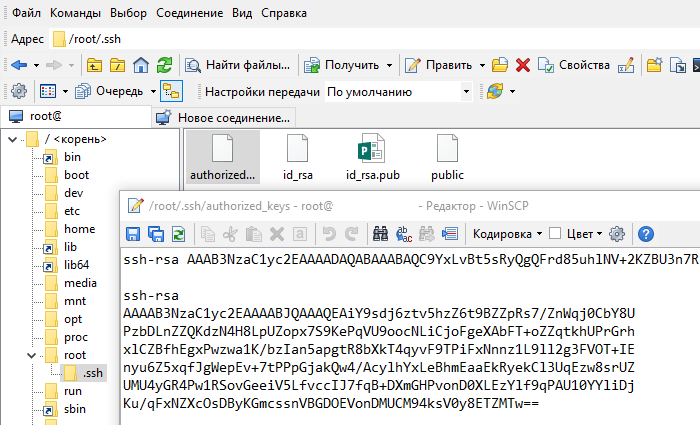
Откройте файл authorized_keys через WinSCP и файл, в который вы сохранили открытый ключ (public), на локальном компьютере текстовым редактором. Скопируйте значение ключа, сохраните и закройте файл в WinSCP.
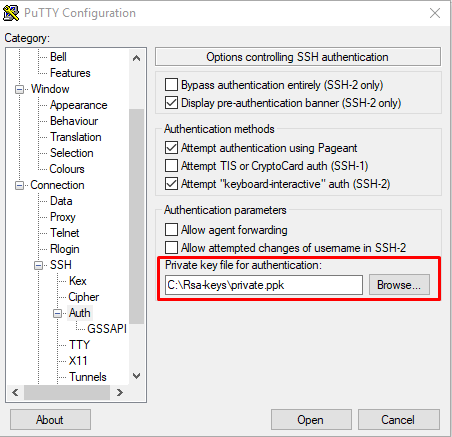
При запуске PuTTY укажите путь к закрытому ключу на локальном компьютере. Для этого во вкладке Connections → Auth выберите необходимый путь.
Теперь можно отключить на сервере аутентификацию по паролю и использовать только SSH-ключи.
Отключение аутентификации по паролю
Подключитесь к серверу по SSH, используя пароль, и откройте файл sshd_config для редактирования.
Убедитесь, что указан правильный путь к открытым ключам SSH, поставьте значение параметра PasswordAuthentication no .
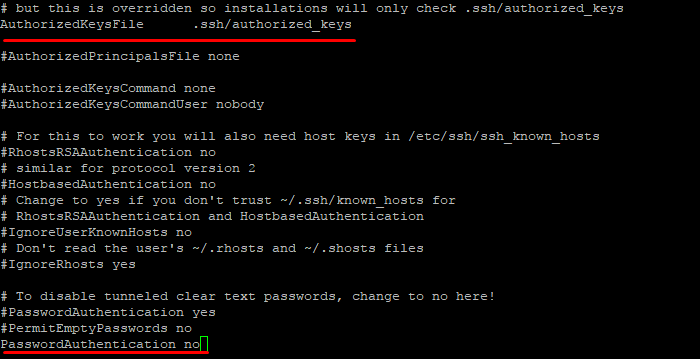
Перезапустите службу sshd.

Подключитесь к серверу по SSH без использования пароля. Например, запустите PuTTY, проверьте, что во вкладке Connections -> Auth содержится путь к закрытому ключу и откройте подключение.

В случае успешной аутентификации по SSH-ключу вы получите доступ к командной строке сервера и сообщение вида Authenticating with public key «rsa-key-20170510» , где rsa-key-20170510 — имя применённого закрытого ключа, указанное вами в файле authorized_keys .
Источник
Создание пользователя и SSH ключей
Команды для создания пользователя в linux:
Посмотреть список групп в системе:
vi /etc/group
Посмотреть список груп конкретного пользователя:
id -Gn vasyapupkin
Создать пользователя:
sudo useradd vasya
Создать пользователя + скелетные директории:
sudo adduser vasya
Или создать пользователя сразу добавив в дополнительную группу newGroup:
sudo useradd -G newGroup vasyapupkin
Добавить пользователя vasyapupkin в группу newGroup:
sudo usermod -a -G newGroup vasyapupkin
добавить пользователю права sudo:
sudo usermod -a -G sudo vasya
//relogin after it
Или
sudo visudo
vasya ALL=(ALL:ALL) NOPASSWD:ALL
Удалить пользователя и его домашнюю директорию с файлами:
userdel -r vasya
Команды для работы с SSH ключами в linux:
Создать SSH пару ключей закрытый и открытый:
ssh-keygen -t rsa -b 4096 -C «user@11.1.2.3»
Скопировать ssh ключи от одного пользователя другому
sudo cp -r /home/USER1/.ssh /home/USER2/.ssh
sudo chown -R USER2:USER2 /home/USER2/.ssh
sudo chmod -R 700 /home/ddudin/.ssh
Сменить пароль на ключ можно с помощью команды
ssh-keygen -p
Если вы знаете пароль пользователя, то процесс можно упростить.
Команда
ssh-copy-id user@server
позволяет скопировать ключ не редактируя файлы вручную.
ssh-copy-id -i id_rsa.pub user@11.1.2.3
МОМЕНТЫ:
Все права на /home/USER/.ssh должны быть 700 и только пользователя владельца
Команды для этого:
sudo chown -R USER2:USER2 /home/USER2/.ssh
sudo chmod -R 700 /home/USER2/
Источник
How to Add SSH Public Key to Server
Public key authentication allows you to access a server via SSH without password. Here are two methods to copy the public ssh key to the server.
I believe you understand the basic SSH concept. Your Linux server has ssh enabled. You have generated ssh keys on your personal computer. Now you want to upload your public key to the authorized keys of the server so that you can access it without typing your account password all the time.
This quick tutorial shows you two methods to add a public SSH key to the server.
Requirements
Before you see that, let’s be clear about what you should already have:
- Your destination server should have ssh enabled
- You should have generated public and private ssh keys (just use the command ssh-keygen -t rsa)
- You should have a user account and password on the server. Even root account will do.
- You should know the IP address of the server
Now that you have made sure of the above four requirements, let’s see how to use public key authentication.
The authentication is per user base so the public key goes in the intended user’s home.
Method 1: Automatically copy the ssh key to server
The first method is where the end user copies its personal computer’s public key to the list of the authorized keys on the remote server.
Here, I assume that you were able to log in to the remote server using ssh [email protected]_of_server. It asks for your account’s password and you enter the server.
If you add your public key to the server, you should be able to log in without typing the password all the time.
OpenSSH provides a handy tool call called ssh-copy-id for copying ssh public keys to remote systems. It even creates required directories and files.
As I mentioned earlier, you should know the username and password to the server you want to access via public key authentication.
When prompted, enter the password for your user account at the remote server. Your public key should be copied at the appropriate folder on the remote server automatically.
/.ssh/id_rsa.pub because that is the default location for the public ssh key. If you have it at some other location, you should use that in the above command.

Method 2: Manually copy the public ssh key to the server
The first method had the action on the user side. Let’s say that you are the sysadmin and your server doesn’t allow SSH login via password. The only way to access the server is using SSH public key authentication.
In such a case, you can ask the end user to provide her/his public key. Now what you can do is to create .ssh/authorized_keys directory and then copy the public key here.
Let me show the steps.
Step 1: Get the public key
Ask the end user to provide the public key by typing the following command:
It will show a long random string starting with ssh-rsa:
You can get this text via email or messaging tools. Normally, it shouldn’t be a problem.
Step 2: Create ssh directory in the user’s home directory (as a sysadmin)
Keep in mind that you have to create these new directories and files in the end user’s home directory, not your own (root/sysadmin).
Now open this /home/user_name/.ssh/authorized_keys file with a text editor like Vim and add the public key of the user here:
Save and close the file. It’s almost ready.
Step 3: Set appropriate permission to the file
Having appropriate file permission on the ssh file is very important otherwise you’ll see errors like Permission denied (publickey).
First, make sure to set the correct file permissions:
You created those file with either root or your own admin accounts for some other user. You need to change the ownership to the user:
Now that it’s done, you can ask the end user to log in to the server.
Do let me know if you face any issues or if you have any suggestion on this topic.
Источник


