- Создание пользователя в Linux. Команды adduser и useradd
- В чем отличия adduser и useradd?
- Команда adduser
- Создание пользователя командой adduser
- Команда useradd
- Синтаксис команды useradd
- Создание нового пользователя
- Создание нового пользователя с домашней директорией в /home
- Создание нового пользователя с произвольной домашней директорией
- Создание нового пользователя с произвольными UID, GID
- Создание пользователя с указанием оболочки (shell)
- Создать пользователя и добавить его в группы
- Заключение
- How to Create Users Using Useradd Command in Linux
- Useradd Command and Syntax
- 1) How to Create a new user in Linux
- 2) Create a user with specific home directory
- 3) Creating a User with Specific User ID
- 4) Create User with Specific Login Shell
- 5) Create Specific Base Home Directory
- 6) Create a user with an expiry date
- 7) Creating a user and adding to multiple groups
- 8) Create Duplicate User ID
- 9) Create a User as System Account
- 10) Create a User without Home directory
- 11) Create a User with Password
- 12) Changing the default options
- 13) Create a User with custom comment
- Conclusion
- The Complete Guide to “useradd” Command in Linux – 15 Practical Examples
- Useradd Command Syntax
- 1. How to Add a New User in Linux
- 2. Create a User with Different Home Directory
- 3. Create a User with a Specific User ID
- 4. Create a User with a Specific Group ID
- 5. Add a User to Multiple Groups
- 6. Add a User without Home Directory
- 7. Create a User with Account Expiry Date
- 8. Create a User with Password Expiry Date
- 9. Add a User with Custom Comments
- 10. Create User Login Shell in Linux
- 11. Add a User with Specific Home Directory, Default Shell, and Custom Comment
- 12. Add a User with Home Directory, Custom Shell, Custom Comment, and UID/GID
- 13. Add a User with Home Directory, No Shell, Custom Comment, and User ID
- 14. Add a User with Home Directory, Shell, Custom Skell/Comment, and User ID
- 15. Add a User without Home Directory, No Shell, No Group, and Custom Comment
- If You Appreciate What We Do Here On TecMint, You Should Consider:
Создание пользователя в Linux. Команды adduser и useradd

Для создания пользователей в Linux можно использовать графические утилиты, предоставляемые дистрибутивом, или воспользоваться командной строкой.
Для создания пользователей из командной строки обычно используют утилиты adduser или useradd. Рассмотрим, использование данных утилит.
В чем отличия adduser и useradd?
useradd — это низкоуровневая утилита для создания пользователей в Linux.
adduser — представляет собой более простое решение для создания пользователей и по факту является надстройкой над useradd, groupadd и usermod.
Утилита adduser доступна не во всех дистрибутивах Linux. Реализация adduser также может отличаться. Если в дистрибутиве присутствует утилита adduser, то для создания пользователей рекомендуется использовать именно ее.
Команда adduser
Создание пользователя командой adduser
Рассмотрим, как создать обычного пользователя командой adduser
Чтобы создать нового пользователя, выполняем команду adduser и указываем имя пользователя (вместо pupkin укажите имя пользователя, которого вы создаете):
После запуска данной команды, вы должны ввести пароль для нового пользователя. Затем будет предложено ввести дополнительную информацию о пользователе: имя, номер комнаты (кабинета), телефоны и комментарий. Вводить эту информацию необязательно. Просто нажимайте Enter , чтобы пропустить ввод данных.
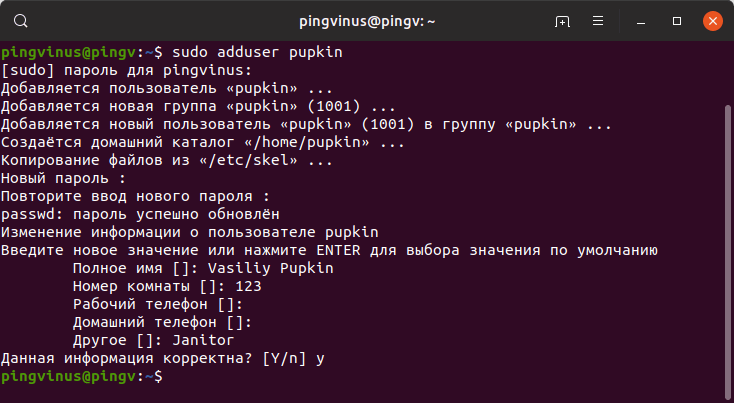
В результате выполнения команды adduser будут выполнены следующие действия:
- Создается новый пользователь с именем, которое вы указали при выполнении команды.
- Создается группа с тем же именем.
- Создается домашний каталог пользователя в директории /home/имяпользователя
- В домашний каталог копируются файлы из директории /etc/skel
В данной директории хранятся файлы, которые копируются в домашний каталог всех новых пользователей.
Команда useradd
Синтаксис команды useradd
Команда useradd принимает в качестве аргумента имя пользователя, а также различные опции.
Синтаксис команды следующий:
Создание нового пользователя
Чтобы просто создать пользователя используется команда useradd без каких-либо опций. Указывается только имя пользователя.
Данная команда создает нового пользователя с системными параметрами по умолчанию, которые прописаны в файле /etc/default/useradd
Чтобы пользователь мог войти в систему, необходимо задать для него пароль. Для этого используем команду:
Создание нового пользователя с домашней директорией в /home
Создадим пользователя и его домашнюю директорию.
Домашняя директория создается по умолчанию в каталоге /home . Имя директории совпадает с именем пользователя.
Создание нового пользователя с произвольной домашней директорией
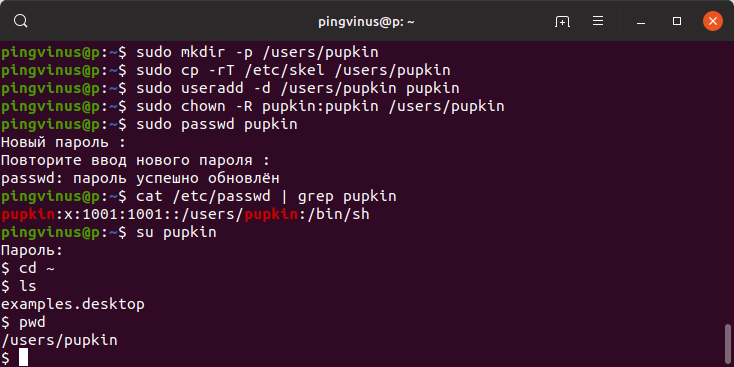
Чтобы создать пользователя с домашней директорией, расположенной в произвольном месте, используется опция -d , после которой указывается путь до директории. Директорию необходимо создать заранее.
Создаем домашнюю директорию для будущего пользователя:
Копируем файлы и директории, которые по умолчанию создаются в домашней директории пользователя в данной системе. Данные файлы находятся в директории /etc/skel
Создаем пользователя и указываем домашнюю директорию:
Меняем права доступа у домашней директории:
Задаем пароль для пользователя:
Можно просмотреть информацию о пользователе, которая сохранена в файле /etc/passwd
Создание нового пользователя с произвольными UID, GID
Каждый пользователь в Linux имеет свой числовой идентификатор — UID, а также идентификатор основной группы пользователя — GID.
При создании пользователя можно задать произвольные номера UID и/или GID. При указании номера группы, группа с этим номером должна быть создана заранее.
Создание пользователя с указанием оболочки (shell)
По умолчанию новые пользователи создаются с оболочкой /bin/sh Чтобы задать другую оболочку, используется опция -s /путь/до/оболочки
Создать пользователя и добавить его в группы
Обычно пользователи в Linux принадлежат нескольким группам. Чтобы при создании нового пользователя задать группы, к которым он будет принадлежать, используется опция -G список,групп
Заключение
Мы рассмотрели примеры создания нового пользователя в Linux с использованием команд adduser и useradd . Команда adduser более простая и в большинстве случаев рекомендуется использовать именно ее.
Источник
How to Create Users Using Useradd Command in Linux

In Linux and Unix-like operating systems, the most common command to create users is ‘useradd’ or ‘adduser’. As a system administrator, it often requires to add users, remove users, creating groups, and assign users.
There’s no difference between above mentioned two commands in feature-wise. The adduser command is friendlier and some Debian/Ubuntu administrators love using it. Useradd is binary compiled with the Linux system and work as a backend for adduser.
In this tutorial, we learn how to create users in Linux from the terminal using useradd command.
Useradd Command and Syntax
The following line shows the syntax for useradd command:
A user can be added simply by giving the username followed by the command. You should run useradd command either with root or sudo user privilege.
Let’s learn more about useradd command and its options.
1) How to Create a new user in Linux
As mentioned above, to create a new user we use useradd command.
The following command creates a new user named ‘bill’ and the second command sets the user (‘bill’) a new password.

This creates the user with Home directory as /home/bill and copies files from ‘/etc/skel’ directory to the user’s home directory.
This command adds an entry to the /etc/passwd, /etc/shadow, /etc/group and /etc/gshadow files.
Note: On Ubuntu and Debian related distribution useradd won’t create a default home directory unless you have to specify with options. Instead, Debian recommends using adduser command.
2) Create a user with specific home directory
To create a user with a specific home directory as the value for the user login use -d option. Make sure to create the base home directory using mkdir command before running command.
Let’s create the base home directory called ‘devops’:
Now the following command creates the user ‘bill’ and sets his home directory as ‘/devops/billhome’.
You may use a combination of both -m (create a home directory if doesn’t exist) and -d (set given path as the user’s login directory name) to create a user.
3) Creating a User with Specific User ID
By default when you create a user, it assigns next available UID defined in the login.defs file. But using -u option you can create a user with specific UID.
In the following example user bill is created with specific UID (3210).
The UID can be seen in the ‘/etc/passwd’ file as shown in the above output.
4) Create User with Specific Login Shell
Sometimes we need to create a user with a specific login shell (like ksh, tcsh, zsh, etc) or with no shell login (‘/sbin/nologin’).
We can specify login shell associated with user’s account with -s option as shown below:
You can verify login shell by grepping user name from /etc/passwd file:
5) Create Specific Base Home Directory
By default users home directories are located in ‘/home’ (variable in /etc/default/useradd )directory. By using -b option you can have a different base home directory for the new user.
The following command set ‘/mnt’ directory as the base directory and create a home directory of the user ‘bill’ as ‘/mnt/bill’.
6) Create a user with an expiry date
While creating a new user can you set an expiry date for the user account using -e option.
The following example set expiry date (format of the date is YYYY-MM-DD ) for the user ‘bill’.
This can be verified by checking in the last field of ‘/etc/shadow’ file. The last field (15879) shows the expiration date in terms of the number of days since Jan 1, 1970 the account is disabled.
More easy way to verify user expiry date is using chage command as shown below:
The -f option provides the number of days after a password expires until the account is permanently disabled. The value of 0 disables the account as soon as the password has expired.
As shown in the shadow file, the number of days is set to 20 (in the second last column).
7) Creating a user and adding to multiple groups
Each user in Linux should stay in one primary group and zero or more secondary groups (supplementary group).
A user’s primary group to which he belongs can be set with -g option. The group provided with this option must exist already.
The group can be checked with id command. The -G option is used to add a user to additional groups.
Let’s check how to create a user and assign to multiple groups. The command will create a new user named ‘bill’ with primary group ‘teams’ and secondary groups ‘admin’ and ‘apache’.
8) Create Duplicate User ID
The -o option allows to create a user account with a duplicate user (non-unique) ID. You must provide a UID number with -u option.
Check the following example:
Here we can see that there exist two accounts with 503 ID.
9) Create a User as System Account
Normally, the UIDs till 500 or 1000 are reserved for system accounts and are not allocated to normal users. With -r option, an account with ID in the range of system users is given to the user being created.
Here, the home directory for the user is not created. It must be created manually or provided with -m option.
10) Create a User without Home directory
If you wish not to create a home directory by itself, -M option can be given.
In the output of ls command, it can be seen that the home directory for bill user does not exist.
11) Create a User with Password
The user’s password is disabled by default. You can manually set the password using passwd command. But if you want to provide the password at the time of user creation, you can use -p option.
But the password provided here must be encrypted, as returned by crypt(3).
12) Changing the default options
When a user is added on a system, some values are taken as default, for example shell, base directory etc. The base directory is the directory where the users’ home directories reside. On most of the Linux systems, home directories of users reside in /home directory.
For example, user tom’s home directory will be ‘/home/tom’ by default. So /home will be his base directory. These default options are defined in ‘/etc/defaults/useradd’ file. These defaults can be viewed with -D option to useradd command:
The above command can be run by normal users (non root users) as well. The -D option is used not only for viewing defaults, but for changing the defaults as well.
13) Create a User with custom comment
We can provide full name or a short description about the user (a comment) while creating a user. You have to use -c option to add custom comments.
Let me show you an example:
This comment can be seen in the user’s entry in ‘/etc/passwd’ file.
Conclusion
In this tutorial, we learned how to create users in Linux and different options of useradd command. I hope you enjoyed reading and please leave your suggestions in the below comment section.
Источник
The Complete Guide to “useradd” Command in Linux – 15 Practical Examples
We all are aware of the most popular command called ‘useradd‘ or ‘adduser‘ in Linux. There are times when a Linux System Administrator is asked to create user accounts on Linux with some specific properties, limitations, or comments.
In Linux, a ‘useradd‘ command is a low-level utility that is used for adding/creating user accounts in Linux and other Unix-like operating systems. The ‘adduser‘ is much similar to the useradd command because it is just a symbolic link to it.
![]() useradd command examples
useradd command examples
In some other Linux distributions, the useradd command may come with a slightly different version. I suggest you read your documentation, before using our instructions to create new user accounts in Linux.
When we run the ‘useradd‘ command in the Linux terminal, it performs the following major things:
- It edits /etc/passwd, /etc/shadow, /etc/group and /etc/gshadow files for the newly created user accounts.
- Creates and populates a home directory for the new user.
- Sets permissions and ownerships to the home directory.
Useradd Command Syntax
The Basic syntax of the useradd command is:
In this article, we will show you the most used 15 useradd commands with their practical examples in Linux. We have divided the section into two parts from Basic to Advance usage of the command.
- Part I: Basic Useradd Commands with 10 examples
- Part II: Advance Useradd Commands with 5 examples
1. How to Add a New User in Linux
To add/create a new user, you’ve to follow the command ‘useradd‘ or ‘adduser‘ with ‘username‘. The ‘username‘ is a user login name, that is used by a user to login into the system.
Only one user can be added and that username must be unique (different from other usernames already exists on the system).
For example, to add a new user called ‘tecmint‘, use the following command.
When we add a new user in Linux with the ‘useradd‘ command it gets created in a locked state and to unlock that user account, we need to set a password for that account with the ‘passwd‘ command.
![]() Create User in Linux
Create User in Linux
Once a new user is created, its entry is automatically added to the ‘/etc/passwd‘ file. The file is used to store the user’s information and the entry should be.
![]() View User Info in Linux
View User Info in Linux
The above entry contains a set of seven colon-separated fields, each field has its own meaning. Let’s see what are these fields:
- Username: User login name used to login into the system. It should be between 1 to 32 characters long.
- Password: User password (or x character) stored in /etc/shadow file in encrypted format.
- User ID (UID): Every user must have a User ID (UID) User Identification Number. By default, UID 0 is reserved for the root user and UID’s ranging from 1-99 are reserved for other predefined accounts. Further UID’s ranging from 100-999 are reserved for system accounts and groups.
- Group ID (GID): The primary Group ID (GID) Group Identification Number stored in the /etc/group file.
- User Info: This field is optional and allows you to define extra information about the user. For example, user full name. This field is filled by the ‘finger’ command.
- Home Directory: The absolute location of the user’s home directory.
- Shell: The absolute location of a user’s shell i.e. /bin/bash.
2. Create a User with Different Home Directory
By default ‘useradd‘ command creates a user’s home directory under /home directory with a username. Thus, for example, we’ve seen above the default home directory for the user ‘tecmint‘ is ‘/home/tecmint‘.
However, this action can be changed by using the ‘-d‘ option along with the location of the new home directory (i.e. /data/projects). For example, the following command will create a user ‘anusha‘ with a home directory ‘/data/projects‘.
You can see the user home directory and other user-related information like user id, group id, shell, and comments.
![]() Create User with Home Directory in Linux
Create User with Home Directory in Linux
3. Create a User with a Specific User ID
In Linux, every user has its own UID (Unique Identification Number). By default, whenever we create a new user account in Linux, it assigns userid 500, 501, 502, and so on…
But, we can create users with custom userid with the ‘-u‘ option. For example, the following command will create a user ‘navin‘ with custom userid ‘1002‘.
Now, let’s verify that the user created with a defined userid (1002) using the following command.
![]() Create User with the User ID in Linux
Create User with the User ID in Linux
NOTE: Make sure the value of a user ID must be unique from any other already created users on the system.
4. Create a User with a Specific Group ID
Similarly, every user has their own GID (Group Identifier). We can create users with specific group IDs as well with the -g option.
Here in this example, we will add a user ‘tarunika‘ with a specific UID and GID simultaneously with the help of ‘-u‘ and ‘-g‘ options.
Now, see the assigned user id and group id in ‘/etc/passwd‘ file.
To verify the user’s GID, use the id command:
![]() Create User with Group ID in Linux
Create User with Group ID in Linux
5. Add a User to Multiple Groups
The ‘-G‘ option is used to add a user to additional groups. Each group name is separated by a comma, with no intervening spaces.
Here in this example, we are adding a user ‘tecmint‘ into multiple groups like admins, webadmin, and developer.
Next, verify that the multiple groups are assigned to the user with the id command.
![]() Add User to Group in Linux
Add User to Group in Linux
6. Add a User without Home Directory
In some situations, where we don’t want to assign home directories for a user, due to some security reasons. In such a situation, when a user logs into a system that has just restarted, its home directory will be root. When such a user uses the su command, its login directory will be the previous user’s home directory.
To create users without their home directories, ‘-M‘ is used. For example, the following command will create a user ‘shilpi‘ without a home directory.
Now, let’s verify that the user is created without a home directory, using the ls command.
![]() Create User Without Home Directory in Linux
Create User Without Home Directory in Linux
7. Create a User with Account Expiry Date
By default, when we add user’s with the ‘useradd‘ command user account never get expires i.e their expiry date is set to 0 (means never expired).
However, we can set the expiry date using the ‘-e‘ option, which sets the date in YYYY-MM-DD format. This is helpful for creating temporary accounts for a specific period of time.
Here in this example, we create a user ‘aparna‘ with account expiry date i.e. 27th August 2021 in YYYY-MM-DD format.
Next, verify the age of the account and password with the ‘chage‘ command for user ‘aparna‘ after setting the account expiry date.
![]() Create User With Account Expiry Date
Create User With Account Expiry Date
8. Create a User with Password Expiry Date
The ‘-f‘ argument is used to define the number of days after a password expires. A value of 0 inactive the user account as soon as the password has expired. By default, the password expiry value set to -1 means never expire.
Here in this example, we will set an account password expiry date i.e. 45 days on a user ‘mansi‘ using ‘-e‘ and ‘-f‘ options.
![]() Create User With Password Expiry Date
Create User With Password Expiry Date
9. Add a User with Custom Comments
The ‘-c‘ option allows you to add custom comments, such as the user’s full name, phone number, etc to /etc/passwd file. The comment can be added as a single line without any spaces.
For example, the following command will add a user ‘mansi‘ and would insert that user’s full name, Manis Khurana, into the comment field.
You can see your comments in the ‘/etc/passwd‘ file in the comments section.
![]() Create User with Full Name
Create User with Full Name
10. Create User Login Shell in Linux
Sometimes, we add users who have nothing to do with the login shell or sometimes we require to assign different shells to our users. We can assign different login shells to each user with the ‘-s‘ option.
Here in this example, will add a user ‘tecmint‘ without login shell i.e. ‘/sbin/nologin‘ shell.
You can check the assigned shell to the user in the ‘/etc/passwd‘ file.
![]() Create User with Login Shell
Create User with Login Shell
11. Add a User with Specific Home Directory, Default Shell, and Custom Comment
The following command will create a user ‘ravi‘ with home directory ‘/var/www/tecmint‘, default shell /bin/bash and adds extra information about the user.
![]() Create User with Home Directory and Login Shell
Create User with Home Directory and Login Shell
In the above command ‘-m -d‘ option creates a user with a specified home directory and the ‘-s‘ option sets the user’s default shell i.e. /bin/bash. The ‘-c‘ option adds the extra information about the user and the ‘-U‘ argument creates/adds a group with the same name as the user.
12. Add a User with Home Directory, Custom Shell, Custom Comment, and UID/GID
The command is very similar to above, but here we defining shell as ‘/bin/zsh‘ and custom UID and GID to a user ‘tarunika‘. Where ‘-u‘ defines the new user’s UID (i.e. 100) and whereas ‘-g‘ defines GID (i.e. 1000).
![]() Create User with UID and GID
Create User with UID and GID
13. Add a User with Home Directory, No Shell, Custom Comment, and User ID
The following command is very much similar to the above two commands, the only difference is here, that we disabling the login shell to a user called ‘avishek‘ with a custom User ID (i.e. 1019).
Here ‘-s‘ option adds the default shell /bin/bash, but in this case we set login to ‘/usr/sbin/nologin‘. That means user ‘avishek‘ will not able to login into the system.
![]() Create User with UID and Nologin
Create User with UID and Nologin
14. Add a User with Home Directory, Shell, Custom Skell/Comment, and User ID
The only change in this command is, we used ‘-k‘ option to set the custom skeleton directory i.e. /etc/custom.skell, not the default one /etc/skel. We also used ‘-s‘ option to define different shell i.e. /bin/tcsh to user ‘navin‘.
![]() Create User with Shell and UID
Create User with Shell and UID
15. Add a User without Home Directory, No Shell, No Group, and Custom Comment
The following command is very different than the other commands explained above. Here we used the ‘-M‘ option to create a user without the user’s home directory and the ‘-N‘ argument is used that tells the system to only create a username (without group). The ‘-r‘ argument is for creating a system user.
![]() Create User with NoLogin and Group
Create User with NoLogin and Group
For more information and options about useradd, run the ‘useradd‘ command on the terminal to see available options.
If You Appreciate What We Do Here On TecMint, You Should Consider:
TecMint is the fastest growing and most trusted community site for any kind of Linux Articles, Guides and Books on the web. Millions of people visit TecMint! to search or browse the thousands of published articles available FREELY to all.
If you like what you are reading, please consider buying us a coffee ( or 2 ) as a token of appreciation.

We are thankful for your never ending support.
Источник


