- Expert Users
- Заставить sudo спрашивать пароль каждый раз
- Полностью отключить запоминание пароля
- Никогда не спрашивать пароль sudo
- Разрешить только определенные команды sudo
- Еще один способ получения прав на запуск sudo
- Как добавить пользователя в Sudoers в Ubuntu
- Добавление пользователя в группу sudo
- Добавление пользователя в файл sudoers
- Выводы
- How to Add User to Sudoers list
- Adding a New User to Sudoers list
- New Sudoer user added to group with root access
- How to Add User to Sudoers in Linux
- What is the sudoers file and how sudo command works?
- Add user for sudo access in /etc/sudoers file
- a. Allow a user to use sudo
- b. Allow users in a specific group to run any command
- c. Allow running commands without authenticating
- d. Allow running specifics commands as specific user
- Sudo command usage
- a. Operate on some services
- b. Execute a command as another user
- c. Execute the previously entered command in sudo
- d. Substitute user on the current shell
- Conclusion
- How To Add User To Sudoers & Add User To Sudo Group on Ubuntu
- Steps to Add Sudo User on Ubuntu
- Step 1: Create New User
- Step 2: Add User to Sudo Group
- Step 3: Verify User Belongs to Sudo Group
- Step 4: Verify Sudo Access
Expert Users
Одним из самых важных моментов при изучении любой системы является то, как получить права суперпользователя. Как делать то, что не могут обычные смертные? Как раз для этого и существует команда sudo. С помощью нее вы можете делать в системе все что угодно – запускать любые приложения, читать любые файлы и т.д. Но для этого у вас должны быть права на пользование этой командой.
Существует два способа добавления пользователя в sudoers. Рассмотрим первый, наиболее популярный. А именно, с помощью sudoers файла, который находится по адресу /etc/sudoers.
1. Войдите под рутом. Введите команду su и пароль рута:
2. Откройте на редактирование sudoers файл (я использую vi, вы можете любой другой редактор):
3. Добавьте строчку, которая выделена жирным, заменив sergey на имя вашего пользователя:
4. Сохрание sudoers файл, выйдите из-под рута.
Теперь вы можете использовать команду sudo, например:
Далее введя пароль своего пользователя, вы открываете файл как бы из под рута, т.е. на выполнение этой команды вам дают супер привилегии.
Теперь давайте рассмотрим различные полезные функции команды sudo.
Заставить sudo спрашивать пароль каждый раз
По умолчанию, при запуске sudo ваш пароль запоминается на 15 минут. И если в течение этого времени вы вводите sudo еще раз, то пароль не спрашивается. Но иногда бывает полезно отключать эту функцию. Например, вы запускаете какую-то команду для друга и хотите чтобы сразу после этого sudo забыл введенный пароль. Для этого используйте параметр -k:
Полностью отключить запоминание пароля
Для этого вы можете открыть /etc/sudoers и добавить туда параметр timestamp_timeout=0:
Также вы можете менять время запоминания пароля sudo, указывая timestamp_timeout, например timestamp_timeout=5, что соответствует 5 минутам.
Никогда не спрашивать пароль sudo
Для этого откройте файл /etc/sudoers и измените строчку для нужного пользователя, добавив параметр NOPASSWD:
Теперь при вводе команды sudo пользователем sergey пароль не будет спрашиваться никогда.
Разрешить только определенные команды sudo
Для этого откройте sudoers файл и измените строчку для конкретного пользователя, перечисляя через запятую команды, которые он может запускать:
Еще один способ получения прав на запуск sudo
В начале статьи я написал, что существует два способа добавления пользователя в sudoers. Первый мы уже рассмотрели – это редактирование sudoers файла и добавления туда строчек для разных пользователей. Второй способ – вы можете просто добавить вашего пользователя в группу sudo, для этого вам понадобятся права рута:
Однако, “групповые” изменения вступят в силу только после перезагрузки, либо после повторного входа в систему.
В заключение, для закрепления материала предлагаю посмотреть данное видео.
Источник
Как добавить пользователя в Sudoers в Ubuntu
sudo — это программа командной строки, которая позволяет доверенным пользователям выполнять команды от имени пользователя root или другого пользователя.
В этой статье мы покажем вам два способа предоставить пользователю права sudo. Первый — добавить пользователя в файл sudoers . Этот файл содержит информацию, которая контролирует, каким пользователям и группам предоставлены привилегии sudo, а также уровень этих привилегий.
Второй вариант — добавить пользователя в группу sudo, указанную в файле sudoers . По умолчанию в дистрибутивах на основе Debian, таких как Ubuntu и Linux Mint, членам группы «sudo» предоставляется доступ sudo.
Добавление пользователя в группу sudo
В Ubuntu самый простой способ предоставить пользователю права sudo — это добавить пользователя в группу «sudo». Члены этой группы могут выполнять любую команду как root через sudo и sudo запрос на аутентификацию с помощью своего пароля при использовании sudo .
Мы предполагаем, что пользователь уже существует. Если вы хотите создать нового пользователя, ознакомьтесь с этим руководством.
Чтобы добавить пользователя в группу, выполните команду ниже от имени пользователя root или другого пользователя sudo. Убедитесь, что вы заменили «username» на имя пользователя, которому вы хотите предоставить разрешения.
Предоставления доступа sudo с помощью этого метода достаточно для большинства случаев использования.
Чтобы убедиться, что у пользователя есть привилегии sudo, выполните команду whoami :
Вам будет предложено ввести пароль. Если у пользователя есть доступ к sudo, команда выведет «root»:
Если вы получаете сообщение об ошибке «пользователя нет в файле sudoers», это означает, что у пользователя нет прав sudo.
Добавление пользователя в файл sudoers
/etc/sudoers доступа sudo пользователей и групп определены в /etc/sudoers . Добавление пользователя в этот файл позволяет вам предоставить индивидуальный доступ к командам и настроить собственные политики безопасности.
Вы можете настроить доступ пользователя sudo, изменив файл sudoers или создав новый файл конфигурации в каталоге /etc/sudoers.d . Файлы внутри этого каталога включены в файл sudoers.
Всегда используйте visudo для редактирования файла /etc/sudoers . Эта команда проверяет файл на наличие синтаксических ошибок при его сохранении. Если есть ошибки, файл не сохраняется. Если вы откроете файл в текстовом редакторе, синтаксическая ошибка может привести к потере доступа sudo.
Обычно visudo использует vim для открытия /etc/sudoers . Если у вас нет опыта работы с vim и вы хотите отредактировать файл с помощью nano , измените редактор по умолчанию, запустив:
Допустим, вы хотите разрешить пользователю запускать команды sudo без запроса пароля. Для этого откройте файл /etc/sudoers :
Прокрутите вниз до конца файла и добавьте следующую строку:
Сохраните файл и выйдите из редактора . Не забудьте изменить «имя пользователя» на имя пользователя, которому вы хотите предоставить доступ.
Другой типичный пример — разрешить пользователю запускать только определенные команды через sudo . Например, чтобы разрешить только команды mkdir и rmdir , вы должны использовать:
Вместо редактирования файла sudoers вы можете сделать то же самое, создав новый файл с правилами авторизации в каталоге /etc/sudoers.d . Добавьте то же правило, что и в файл sudoers:
Такой подход делает управление привилегиями sudo более удобным в обслуживании. Имя файла не имеет значения. Обычно имя файла совпадает с именем пользователя.
Выводы
Предоставление доступа sudo пользователю в Ubuntu — простая задача; все, что вам нужно сделать, это добавить пользователя в группу «sudo».
Если у вас есть вопросы, не стесняйтесь оставлять комментарии.
Источник
How to Add User to Sudoers list
Last updated: August 18, 2021
How to add user to sudoers list, file, or group so that you can give a new user root access or privilege. Believe it or not, this is a fairly common question and in all reality the answer is quite simple. Adding a user to the sudoers file on a fully installed Linux system such as Ubuntu or Debian is possible via the visudo command. Users in the sudoers group are allowed privileges to run commands and open files as root or administrator. The following segment covers the simple process of adding a new root user to Ubuntu.
Adding a New User to Sudoers list
Add user to sudoers list to give a new user root access and sudo privileges.
- Open a Terminal Ctrl + Alt +T
- Type sudo su and then press enter.
- Next, type visudo and press enter (to access and edit the list).
- Using the up/down arrows, navigate to the bottom of the sudoers file that is now displayed in the terminal.
- Just under the line that looks like the following:
New Sudoer user added to group with root access
If all went well, your sudoers file should look similar to the one shown below. And the newly added user can now also run those sudo commands as root. Add user to sudoers list
That’s really all there is to granting root access to a new user or to add user to sudoers list. You can repeat this process for as many users as you would like to add. Visudo might also come in handy for those times when you need to remove existing root users from the sudoers file.
Источник
How to Add User to Sudoers in Linux

Sudo access allows a user to execute all permitted commands as root or as any other user. Once the sudo access is given to a specific user in sudoers file, that user can execute the commands as root by executing it using the prefix sudo. This user has full system access and should be used only for administrative tasks. There are basically no restrictions on what you can do to your system.
What is the sudoers file and how sudo command works?
The /etc/sudoers file controls who can run what commands as what users on what machines and can also control special things such as whether you need a password for particular commands. When you have a new user on your system, you need to decide if this user should be able to perform administrative tasks with sudo. If the new user will be a primary user on the system, you usually want to enable sudo privileges so that you can do routine configuration and maintenance.
That is, if sudo access is provided to the user sam, he can list the files under the protected folder /root as follows.
It will ask for the password to enter (user sam’s password and not root password). Once you are authenticated, a timestamp will be set and you can execute sudo command without password for a short period of time (5 minutes by default) after which the timestamp get reset.
Add user for sudo access in /etc/sudoers file
To give users access to the sudo command, we need to use the visudo command to edit /etc/sudoers file. You should never edit this file with a normal text editor but always use the visudo command instead. If you have not assigned additional privileges to any user yet, you will need to be logged in as root to access this command
This will lock the sudoers file to prevent simultaneous modification and will not save the changes in the file in case of any syntax errors. You will be taken into a text editor session with the file that defines sudo privileges pre-loaded. We will have to add your user to this file to grant our desired access rights.
On Centos, find the line «Allow root to run any commands anywhere»

On the Debian system, find the line with «User privilege specification»

The syntax for providing sudo access is as follows.
- username : This corresponds to the user to which sudo access need to be provided
- host_list: This defines the hosts on which the user is allowed sudo access
- users: This defines the users as which ‘username’ can execute the commands
- command : This defines the commands that the user is allowed to execute as root/another user.
We can go through some example configurations of sudoers file to get a clear idea on this. Depending on what you want to allow on your system (Debian or Centos), just respect the syntax of the lines which appear on the screenshot above. On the following cases, we will consider only Centos system
a. Allow a user to use sudo
If you want to allow a specific user to run any commands as any user in any hosts, insert the line below. Our user example is sam
b. Allow users in a specific group to run any command
Here, all users in the group admins are allowed to run any commands as any user in any hosts.
c. Allow running commands without authenticating
Here, the user sam is allowed to run the commands /bin/kill , /bin/ls and /usr/bin/lprm on localhost without authenticating himself.
d. Allow running specifics commands as specific user
Here, sam is allowed to run /bin/ls as jack and /bin/kill and /usr/bin/lprm as only root on any host.
Here, sam is allowed to run any commands under the folder /usr/bin as root on any host. Note that a forward slash (/) will not be matched by wildcards used in the pathname. That is sam is not allowed to run binaries under /usr/bin/subfolder/*
Here, sam is allowed to run any commands under the folder /usr/bin as root other than /usr/bin/passwd on any host
Sudo command usage
Once the sudo access is provided using sudoers file, you can execute the permitted commands as root or as another user using sudo command. We can go through some example usages of sudo command.
a. Operate on some services
When you want to operate some service like web server, network service or database server, you need to have privileges. For example, if you want to restart your web server, you should use the command below
If you want to restart your firewall, the procedure is the same
b. Execute a command as another user
With the sudo command, it is possible to execute a command as if we are another user of the system.
Here -u option will allow the user to execute the command as jack.
c. Execute the previously entered command in sudo
You can execute a command and it fails because you forgot to preface it with sudo . It is possible to re-execute the last command with a bash function which, coupled with sudo makes to directly run that command as root
The double exclamation point will repeat the last command. We preceded it with sudo to quickly change the unprivileged command to a privileged command.
d. Substitute user on the current shell
When you create a user, the sudo command permits you to switch to another user directly on the shell. It allows you to enter the user you would like to change to
You can see that on the second line it is the user paul who is connected
Conclusion
Using sudo, a regular user can execute root command, provided they are allowed to execute the command by a sysadmin. Apart from executing the command as root, a user can also execute a command as any other user, if they have the permission to do it. It is essential that you understand what each command does that you execute with root privileges.
Источник
How To Add User To Sudoers & Add User To Sudo Group on Ubuntu
Home » SysAdmin » How To Add User To Sudoers & Add User To Sudo Group on Ubuntu
The sudo command is the preferred means to handle elevated permissions. In supported versions of Ubuntu, using the sudo command will grant elevated permissions for 15 minutes.
Standard user accounts are restricted from performing sensitive tasks, such as viewing the contents of the /root directory. This prevents the accidental use of commands with massive consequences. It also makes it more difficult for intruders to compromise a system. However, sometimes you need to run an administrative command. Sudo – or Super User Do – grants you privileges to run sensitive tasks.
This simple tutorial will show you how to add a new user on Ubuntu and provide sudo access.

- A system running a supported version of Ubuntu
- Access to a root user account or another account with sudo privileges
- Access to a terminal window/command line (Ctrl–Alt–T)
Note: Linux Sudo Command tutorials also available for CentOS and Debian.
Steps to Add Sudo User on Ubuntu
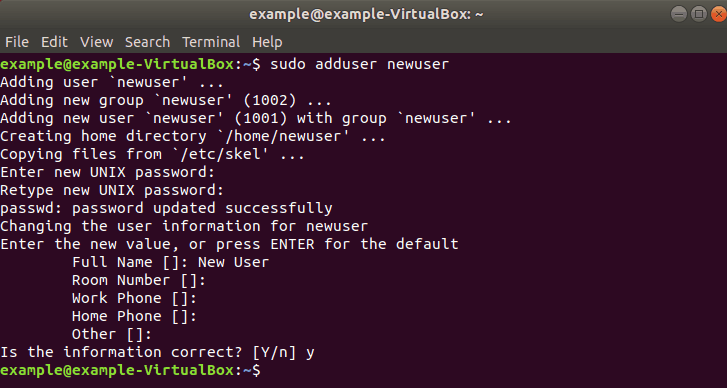
Step 1: Create New User
1. Log into the system with a root user or an account with sudo privileges.
2. Open a terminal window and add a new user with the command:
The adduser command creates a new user, plus a group and home directory for that user.
You may get an error message that you have insufficient privileges. (This typically only happens for non-root users.) Get around it by entering:
3. You can replace newuser with any username you wish. The system will add the new user; then prompt you to enter a password. Enter a great secure password, then retype it to confirm.
4. The system will prompt you to enter additional information about the user. This includes a name, phone numbers, etc. – these fields are optional, and can be skipped by pressing Enter.
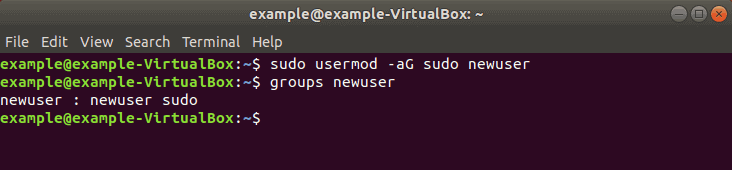
Step 2: Add User to Sudo Group
Most Linux systems, including Ubuntu, have a user group for sudo users. To grant the new user elevated privileges, add them to the sudo group.
In a terminal, enter the command:
Replace newuser with the username that you entered in Step 1.
Again, if you get an error, run the command with sudo as follows:
The -aG option tells the system to append the user to the specified group. (The -a option is only used with G .)
Note: Usermod command is a useful tool for user management. To learn more about its options, refer to our guide How To Use The Usermod Command In Linux.
Step 3: Verify User Belongs to Sudo Group
Enter the following to view the groups a user belongs to:
The system will respond by listing the username and all groups it belongs to, for example: newuser : newuser sudo
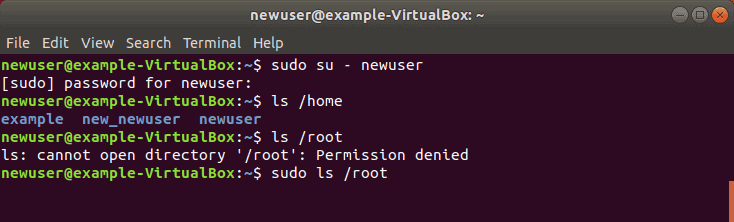
Step 4: Verify Sudo Access
Switch users by entering:
Replace newuser with the username you entered in Step 1. Enter your password when prompted. You can run commands as normal, just by typing them.
However, some commands or locations require elevated privileges. If you try to list the contents of the /root directory, you’ll get an access denied error: ls /root
The command can be executed with:
The system will prompt for your password. Use the same password you set in Step 1. You should now see the contents of the /root directory.
Now you know how to add and create a user with sudo privileges on Ubuntu.
Before sudo, users would log in to their systems with full permissions over the entire system with the su command. This was risky as users could be exploited by tricking them into entering malicious commands. These vulnerabilities were solved by limiting account privileges. However, administrators still had to log out of their account and into an admin account to perform routine tasks.
The sudo command in Ubuntu strikes a balance – protecting user accounts from malicious or inadvertent damage while allowing a privileged user to run administrative tasks. To learn more about the difference between these commands, check out Sudo vs. Su.
Источник


