- How To Format USB Drive in Linux Command Line
- Step 1 – Attach USB to System
- Step 2 – Format USB Drive in Linux
- Conclusion
- Форматирование флешки в Linux
- Форматирование флешки в Linux с помощью терминала
- Шаг 1. Определить имя флешки
- Шаг 2. Размонтирование флешки
- Шаг 3. Форматирование
- Форматирование флешки в Gparted
- Шаг 1. Установка Gparted
- Шаг 2. Поиск флешки
- Шаг 3. Размонтирование флешки
- Шаг 4. Полная очистка флешки
- Шаг 5. Форматирование флешки
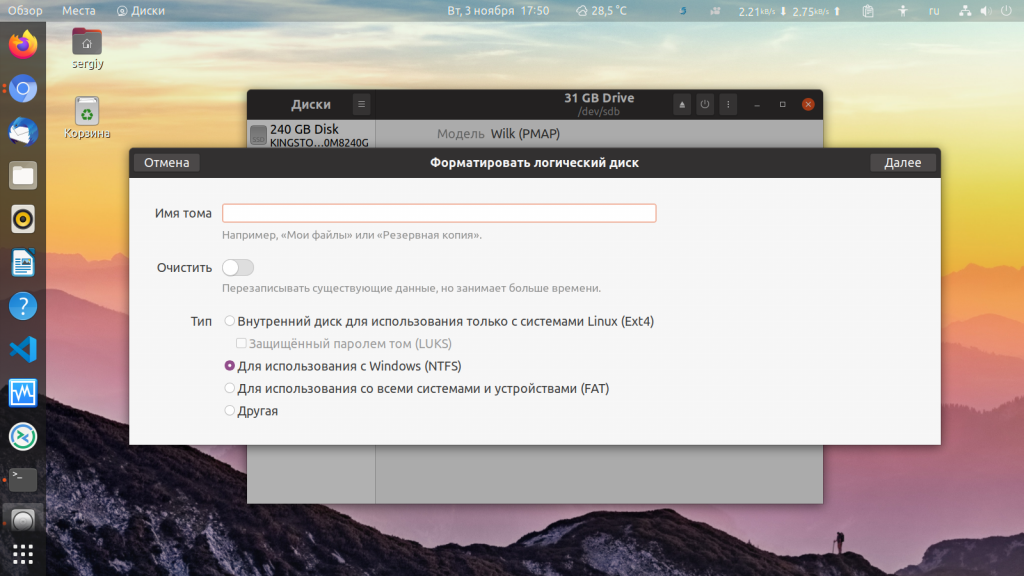
- Как форматировать флешку с помощью Disks
- Шаг 1. Запуск Disk Utility
- Шаг 2. Поиск флешки
- Шаг 3. Форматирование
- Форматирование флешки в Nautilus
- Выводы
- how to easily format USB drives (flash drive) from linux command line
- Using fdisk and mkfs commands
- Using dd
- Using parted
- Using gparted
How To Format USB Drive in Linux Command Line
USB formatting is the process of erasing all data from the disk and prepare it for use. Sometimes we are required to change the filesystem on our USB drive, In that case, we have to format the USB drive with the new filesystem type. Formatting a USB drive in Ubuntu using Terminal commands is much easier than formatting it in Windows systems.
This tutorial will help Ubuntu (Linux) users with the simple steps for format a USB flash drive using the command line.
Step 1 – Attach USB to System
Insert a USB drive into your system and identify your USB drive correctly. This is the step you need to take care, because you may format the wrong disk if not correctly identify your disk.
Now, You can see that the USD drive is attached as /dev/sdc1 device. Which is mounted on /media/tecadmin.
Step 2 – Format USB Drive in Linux
Whenever we attach a USB drive in Ubuntu, it is automatically mounted to the system. We can not format any disk on Linux systems that are already mounted. So first un-mount /dev/sdc1 USB drive on your system.
Now, Use one of the following commands as per the file system you want. To format a USB drive, most of the users prefer VFAT and NTFS file systems because they can be easily used on the Windows operating system.
- Format with vFat File System
- Format with NTFS File System
- Format with EXT4 File System
Similarly, you can format a USB Flash drive with any required file system.
Conclusion
In this tutorial, you have learned to format a USB drive on a Linux system via the command-line interface.
Источник
Форматирование флешки в Linux
Форматирование флешки — это довольно простая задача, с которой часто сталкивается каждый пользователь. В операционной системе Windows всё делается интуитивно понятно и буквально в пару кликов. Но в Linux всё не так однозначно. Может даже показаться, что форматировать флешку в Linux очень сложно. На самом деле это не так.
Для решения такой простой задачи в Linux есть несколько способов, и сегодня мы рассмотрим самые интересные из них. А именно форматирование флешки с помощью Gparted, терминала и утилиты Disks в Ubuntu или любом другом дистрибутиве, использующем Gnome. Сначала рассмотрим приём, который будет работать во всех дистрибутивах — с помощью терминала и утилиты mkfs.
Форматирование флешки в Linux с помощью терминала
Форматировать флешку в терминале не очень сложно, но сначала вам нужно знать, как идентифицировать эту флешку в системе. Все устройства в Linux определяются в виде файлов в каталоге /dev и ваша флешка тоже.
Но если вы просто зайдете в этот каталог, вам будет сложно определить, какой из файлов отвечает за флешку, потому что все файлы для дисков выглядят похоже. Обычно имя начинается на sd, затем идёт ещё одна буква: a,b,c,d и далее, в зависимости от порядка подключения диска к системе. Дальше следует цифра номера раздела на флешке, обычно это 1, потому что на флешке, как правило, содержится только один раздел. Например /dev/sdb1 или /dev/sdc1.
Шаг 1. Определить имя флешки
Самый простой способ определить имя флешки в системе — это использовать утилиту fdisk, но такой вариант подойдет, только если вы знаете размер или метку флешки. Просто выполните команду:
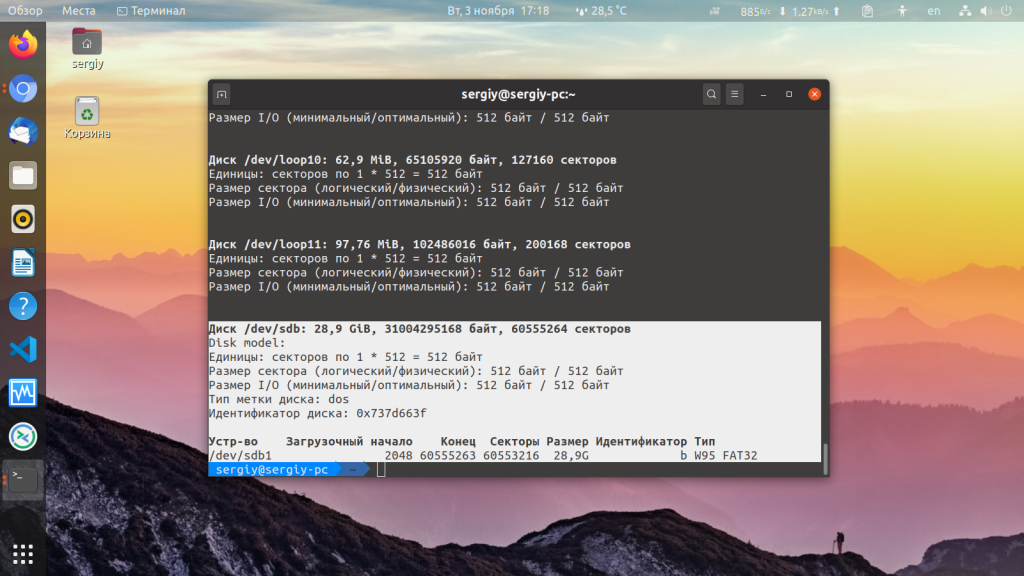
Она выведет в терминал все подключённые устройства, в том числе и вашу флешку. Вам останется только найти её по размеру, который написан в колонке Размер или Size. В нашем примере флешка представлена файлом /dev/sdb1.
Также вы можете узнать имя файла флешки с помощью утилиты df, только для этого она должна быть смонтирована в файловую систему. Обычно графические окружения автоматически монтируют флешку при подключении, так что это не будет проблемой. Чтобы посмотреть, какие устройства подключены к каким папкам, выполните:
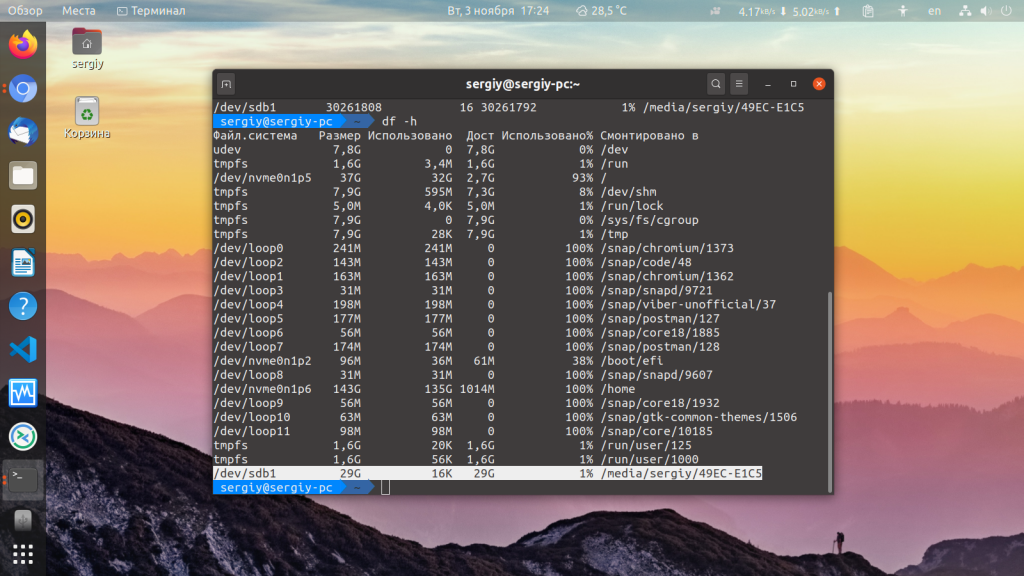
Теперь вы можете понять, что к папкам /mnt, /media, /run/media смонтирована именно флешка, также здесь указан размер в колонке доступно. Обычно этого вполне достаточно.
Шаг 2. Размонтирование флешки
Если флешка смонтирована в файловую систему, то форматировать её у вас не получится. Поэтому сначала нужно её размонтировать, для этого выполните:
sudo umount /dev/sdb1
Здесь /dev/sdb1 — имя флешки в файловой системе, которое мы узнали в предыдущем шаге.
Шаг 3. Форматирование
Дальше отформатировать флешку очень просто. Для этого используется утилита mkfs. Синтаксис команды очень прост:
$ sudo mkfs -t файловая_система устройство
В качестве файловой системы может использоваться любая поддерживаемая системой, например, ext4, ntfs, xfs, btrfs, vfat. Но для нормальной работы флешки в Windows рекомендуется использовать файловую систему vfat. С помощью опции -L можно задать метку раздела. Тогда команда будет выглядеть вот так:
sudo mkfs -t ext4 -L FLASH /dev/sdb1
Для файловой системы vfat опция -L не поддерживается, вместо неё нужно использовать -n:
sudo mkfs -t vfat -n FLASH /dev/sdb1

После того, как форматирование флешки в Linux завершится, флешка будет готова к использованию.
Форматирование флешки в Gparted
Ещё одним универсальным методом форматировать флешку в Linux является использование утилиты для управления дисками Gparted.
Шаг 1. Установка Gparted
Обычно она уже установлена в системе, если же нет, вы можете установить эту прорамму из официальных репозиториев. Для этого наберите в Ubuntu:
sudo apt install gparted
А в Red Hat и основанных на нём дистрибутивах:
sudo yum install gparted
Дальше вы можете вызвать программу из главного меню системы или c помощью команды:
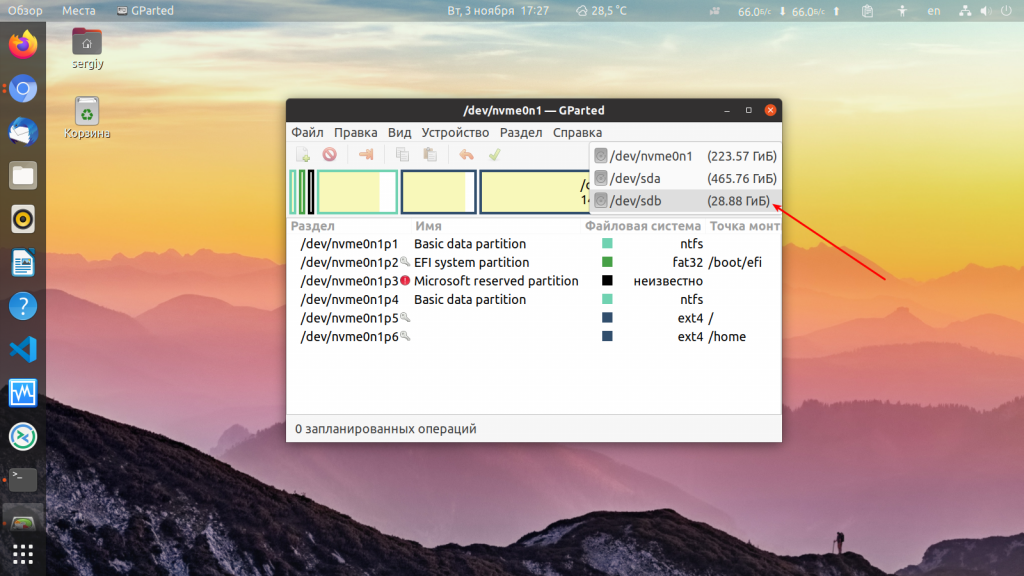
Шаг 2. Поиск флешки
Найти флешку в этой программе у вас не составит труда. Переключаться между устройствами можно в верхнем правом углу. Свою флешку вы можете найти по метке, размеру, файловой системе — тут отображается вся информация, поэтому с поиском у вас не должно возникнуть проблем.
Шаг 3. Размонтирование флешки
Также, как и в предыдущем случае, вам нужно размонтировать флешку, чтобы её отформатировать. Для этого щёлкните правой кнопкой по разделу флешки и выберите Размонтировать или Umount:
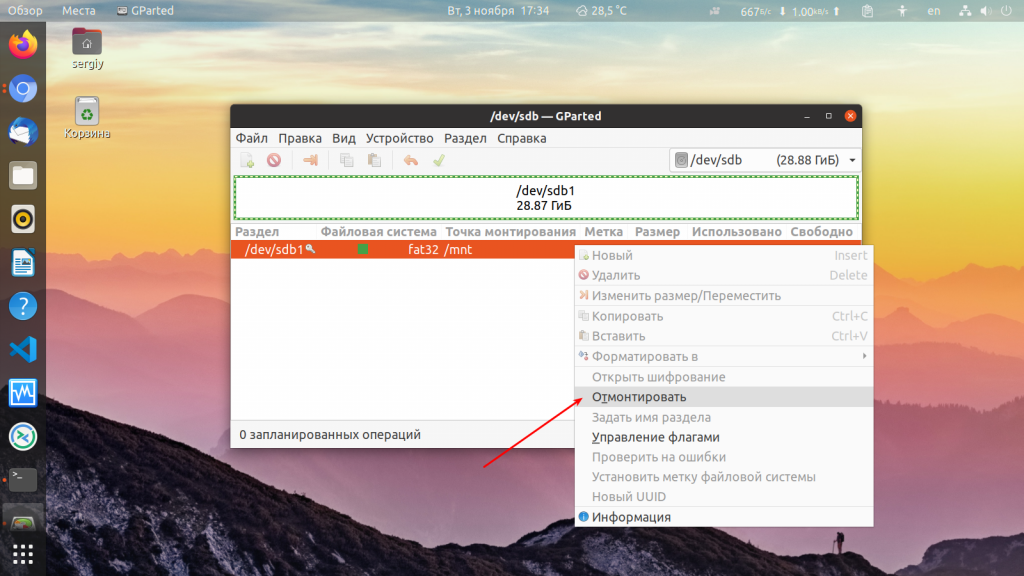
Я предполагаю, что на флешке только один раздел. Поэтому выполнять все действия нужно будет только для него. Если разделов несколько, размонтируйте их все.
Шаг 4. Полная очистка флешки
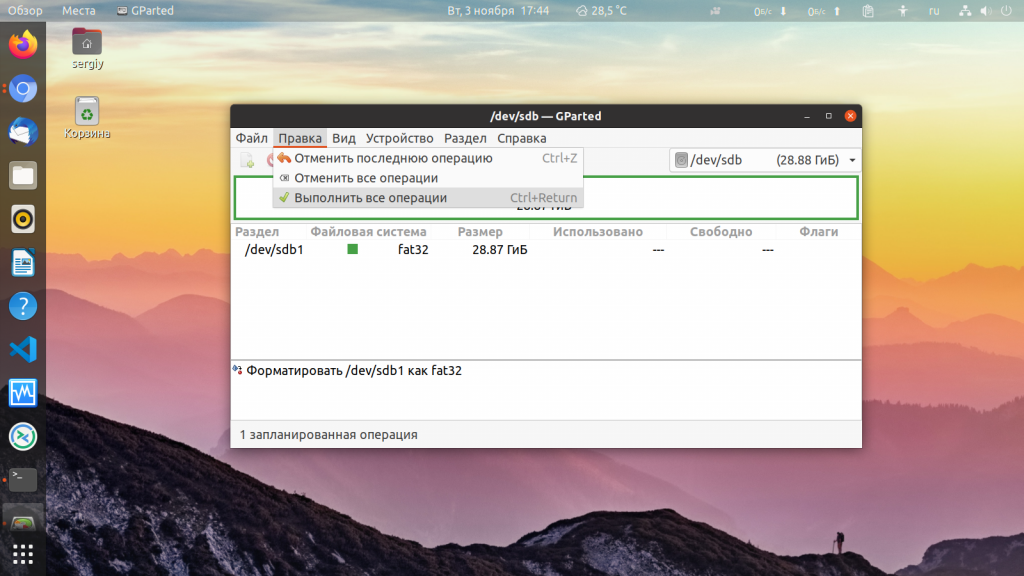
Если раньше на флешке был установлен Linux или другая операционная система, её нужно полностью очистить, включая таблицу разделов. Только так вы можете выполнить низкоуровневое форматирование флешки Linux. Если же нет, ничего подобного делать не нужно, переходите к следующему шагу. Откройте пункт меню Правка/Edit и нажмите Новая таблица разделов / New Partition Table:

Выберите тип таблицы MBR и подтвердите, что согласны с тем, что все данные на флешке будут утеряны. Затем с помощью кнопки со знаком «+» создайте новый раздел на все свободное место. Также здесь нужно выбрать файловую систему.
Затем опять откройте пункт Правка / Edit и нажмите Выполнить все операции / Apply, чтобы применить изменения. Готово, ваша флешка отформатирована, пятый шаг можете пропустить.
Шаг 5. Форматирование флешки
Если вы воспользовались предыдущим способом, то уже ничего делать не нужно. Флешка готова к использованию. Если же нет, вам будет достаточно только отформатировать один раздел. Для этого кликните по этому разделу и выберите Отформатировать в / Format to в контекстном меню:

Затем выберите файловую систему, опять же, чтобы флешка работала в Windows, нужно использовать Fat32.
Дальше вам останется только открыть меню Правка / Edit и нажать Выполнить все операции / Apply или зелёную галочку,чтобы применить изменения.
Вот и всё, теперь флешка готова к использованию, и вы можете её подключать к системе и записывать туда файлы. Но рассмотрим ещё один способ, который подходит только для Gnome.
Как форматировать флешку с помощью Disks
Программа Диски — это стандартная утилита управления дисками в дистрибутивах Linux, использующих окружение рабочего стола Gnome.
Шаг 1. Запуск Disk Utility
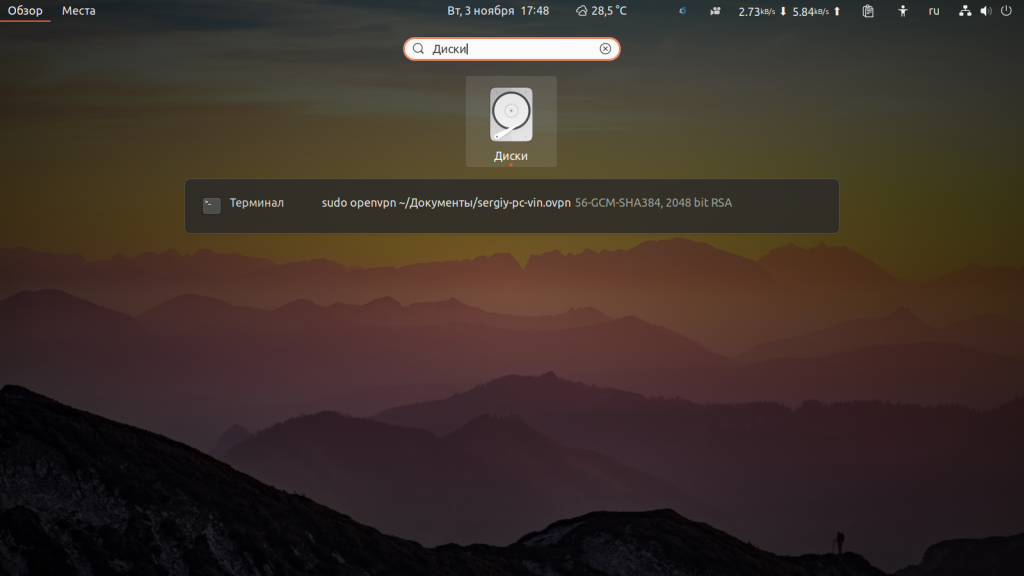
Вы можете запустить программу из главного меню Dash, просто набрав в поиске Disk, обычно утилита поставляется вместе с системой по умолчанию:
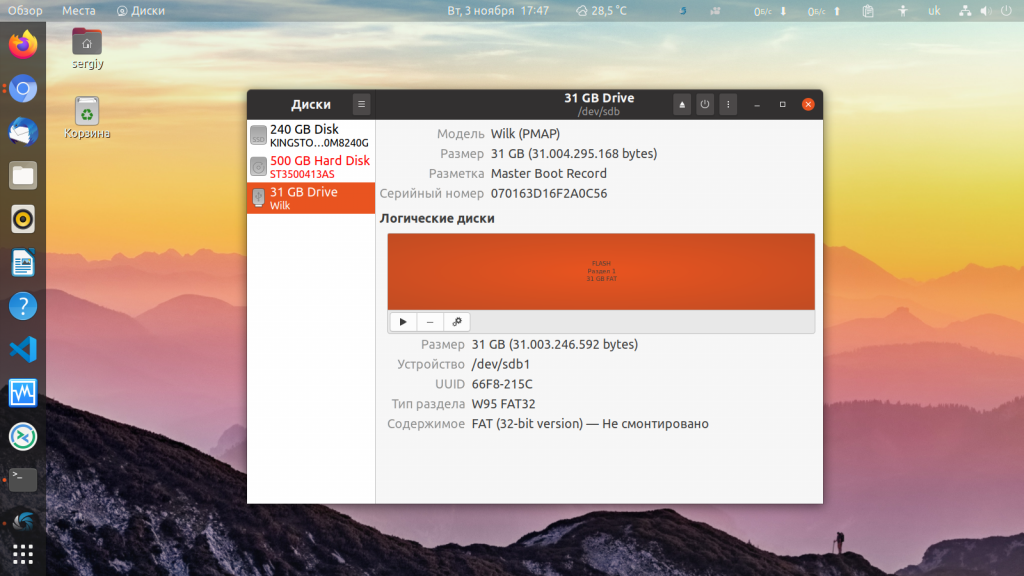
Шаг 2. Поиск флешки
Вы очень просто найдете флешку в главном окне программы: во-первых, она на последнем месте, во-вторых, здесь отображается метка диска, размер и другие параметры:
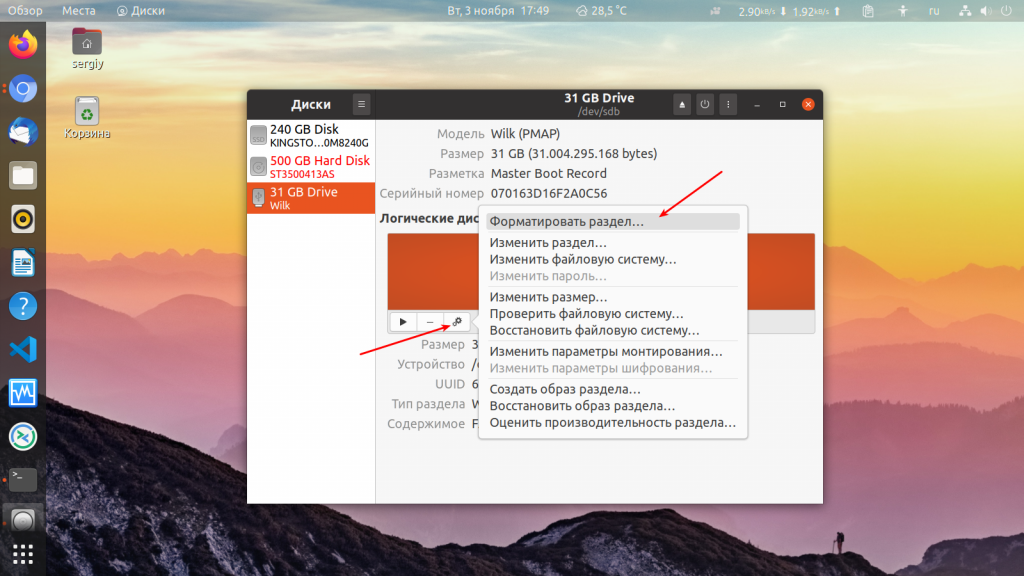
Шаг 3. Форматирование
Форматирование здесь выполняется очень легко, для этого просто нажмите кликните по значку с рисунком шестерёнки и выберите Форматировать раздел:
Затем выберите введите метку для флешки, а также выберите файловую систему. По умолчанию утилита предлагает Ntfs чтобы с флешкой можно было работать в Windows:
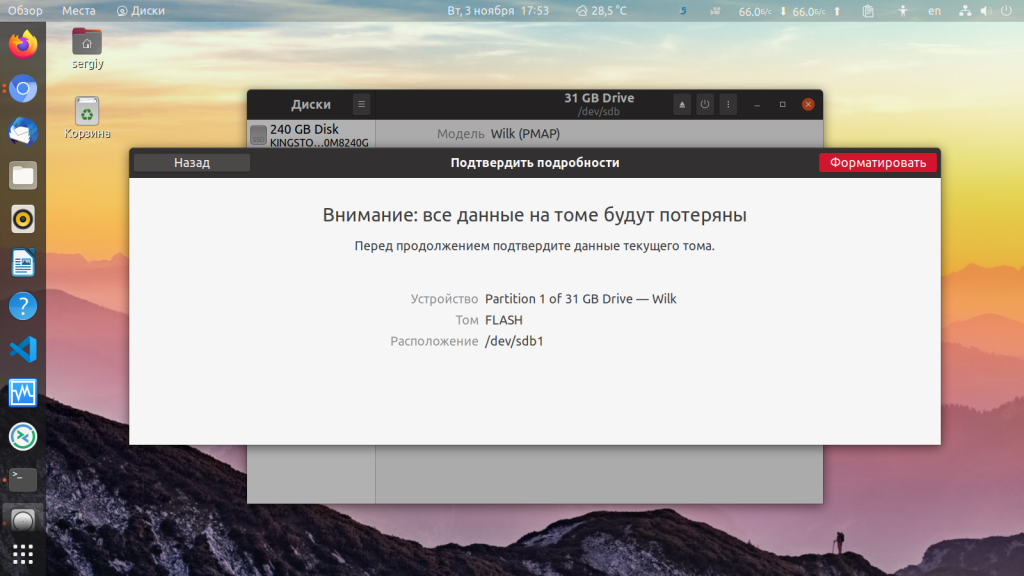
Останется только подтвердить действие, чтобы форматировать флешку Linux:
Форматирование флешки в Nautilus
Ещё один способ именно для этой операционной системы. Здесь вообще форматирование флешки Linux выполняется очень просто. Найдите ваше устройство в менеджере файлов Nautilus, кликните по нему правой кнопкой и выберите Форматировать. :
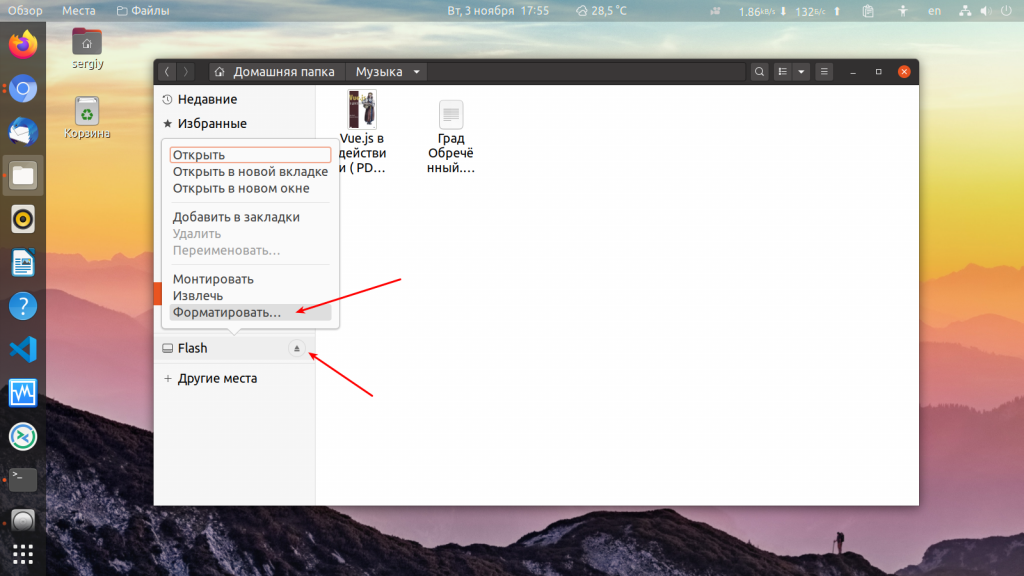
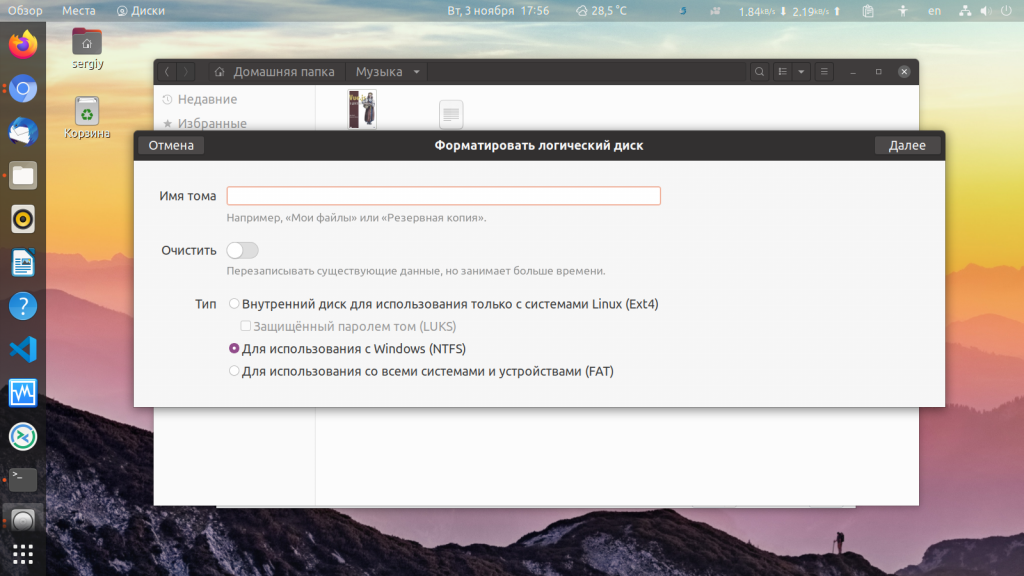
Возникнет такое же окно, как и в утилите Диски. Выберите файловую систему, метку флешки и нажмите Далее, а затем Форматировать:
Готово. Когда процесс завершится, ваша флешка будет полностью чиста и готова к использованию.
Выводы
Вот и всё. Теперь вы знаете, что форматирование флешки в Linux это не такая сложная задача. Достаточно выполнить несколько команд или пару кликов мышью. А в Ubuntu вообще всё делается элементарно. Если у вас остались вопросы, спрашивайте в комментариях!
На завершение видео о том, как делают флешки и микросхемы памяти:
Источник
how to easily format USB drives (flash drive) from linux command line
USB Drives or Flash drives are mostly just like any other drive like a hard drive. Occasionally you will want to format USB drives just as any other drive. Most commercially available USB drives are PC and Mac compliant, in that it is easy enough to reformat them on those operating systems, usually with a graphical interface with interactivity.
There are several reasons why you may want to re-format or format USB drives. Sometimes, a previous outdated formatting may require you to reformat the disk. If you had used the flash drive as a boot-able drive before, then the drive may be improperly formatted for normal usage. Also, if you used dd command to copy a smaller size image into the drive then you will need to reformat so as to restore the original size of the drive.
Theoretically, you can format USB drives using any of the file systems. But, it may not be a wise decision, unless you plan to use the drive exclusively on supported machines. Most systems (thinking Windows and Mac) will identify only FAT, vfat or FAT32 file systems. Fortunately, almost all Linux systems does have the ability to read FAT file systems, so you can use FAT or FAT32 file systems while formatting as well.
There are two main concepts that you should be aware of when you format USB drives: partition table and file system. A typical store bought flash drive will typically have the msdos partition table with the vfat file system on it. Unfortunately it is still a MS world and it is the most commonly used flash disk format which is supported by most operating systems and devices.
Note: All the following commands will need to be executed as the super user or root. You can either use sudo with each of these commands or login as root before executing them.
Using fdisk and mkfs commands
Once you have inserted the drive, you need to first identify the file system or device that you want to format. You can do that by using either the fdisk or mount commands.
Once you have identified the device, unmount it before formatting.
bash$ umount /dev/sdc1
The above command will unmount the file system mounted on /dev/sdc1. Now, you can use the mkfs command to create a new file system on the drive. You will specify the desired file system type as a command line argument to the mkfs command using -t.
The following command will create a ext3 file system in the USB drive. You can format usb drives using any of the supported file systems such as ext3, ext4, vfat etc.
bash$ mkfs -t ext3 /dev/sdc1
If you plan to use the USB drive, on all different operating systems, then you will need to format it using the FAT32 file system. The following command will re-format the drive using FAT32.
bash$ mkfs -t vfat -L «My USB» /dev/sdc1
The -L command line argument is optional. You can use it to set a label for the drive.
Using dd
Sometimes, just reformatting will not suffice. You might want to recreate the partition table as well. You can use dd command to wipe it clean and start over. The dd command will wipe out the partition table, which will allow you to start afresh.
bash$ dd if=/dev/zero of=/dev/sdc bs=1024
Once you have successfully rewrote everything on the disk, you can start out by creating a new partition table. To create a new partition table, use the fdisk command.
The fdisk command will walk you through the process of creating the new partition table. You can press m for help anytime to see all the available options.
bash$ fdisk /dev/sdc
You can run the fdisk command by specifying the device with no other argument as shown above. Then follow the steps shown below.
The following is a step by step process to create the partition table.
- press n to create a new table
- press p for partition table
- press 1 to select the first partition
- press to select the default first sector (which is usually 2048)
- press to select the default last sector
- press t
- press 6
- press w to write and commit the changes to disk
Once you have created the partition table, you can then format the USB drive by creating a file system using the mkfs command as described in the previous section.
Using parted
parted is a command line utility that is used to partition drives and disks. It is a partition editor which helps you with the exact partitions that you need. You can use this instead of the fdisk command.
bash$ parted -l
or
bash$ parted /dev/sdc print
So, you can use parted to create a new partition table, format and clean your USB drive just as with the mkfs, dd and fdisk commands. In order to start parted on the device, use the following command which brings you to a parted prompt…
bash$ parted /dev/sdc
Let’s first see how the utility identifies the drive, which is always a good idea…
The next step is to create a new partition table. You can also skip this step, if you just want to continue to use the current table. You can use the gpt table if you plan to use the drive only on Linux machines. You can also specify the msdos if you plan to use it elsewhere…
(parted) mklabel msdos
Now, we want to create a new partition on the disk. Almost always, you will use a single partition for data unless you have specific requirements.
Choose primary partition for the partition type….
Partition type? primary/extended? primary
Choose the msdos as the file system type. (You can use other file systems such as ext3 or ext4 if you prefer). Now, choose the start as 2048 and the end as -1 which corresponds to a reasonable value for the start and end. You can also use 1 and -1 as start and end.
Now, you can use the mkfs command to format USB drives and the new partition as described in the previous section.
bash$ mkfs -t vfat -L «My USB» /dev/sdc1
There are three different parted commands that you will commonly use that you need to familiar with.
mklabel: This creates a new disk label or partition table on the disk with out creating any partitions itself.
mkpart: This creates a new partition on the disk with out a file system on that partition.
mkpartfs: This creates a new partition with the specified file system, such as fat32 or ext4.
mkfs: This makes a “new” file system on the specified partition by destroying all the data on that partition.
Using gparted
gparted is a user interface built on top of the parted command. This software makes it easy to partition and format USB drives. If you have access to an X interface, then using gparted is a good idea. parted command is still the best option from the command line.
I am not going to go into the details of how to use gparted here, as it is beyond the scope of this post. It is pretty intuitive in how you would use it, once you know how to use parted and how formatting works.
Источник


