- Dual Boot Windows 10 and Linux Ubuntu on Separate Hard Drives [duplicate]
- 3 Answers 3
- Подключение OneDrive в Linux
- Подключение OneDrive в Linux
- Установка OneDrive-D
- Настройка OneDrive-D
- Синхронизация с OneDrive-D
- Выводы
- Frequently Asked Questions about Windows Subsystem for Linux
- General
- What is Windows Subsystem for Linux (WSL)?
- Who is WSL for?
- What can I do with WSL?
- Could you describe a typical development workflow that incorporates WSL?
- What is Bash?
- How does this work?
- Why would I use WSL rather than Linux in a VM?
- Why would I use, for example, Ruby on Linux instead of on Windows?
- What does this mean for PowerShell?
- What processors does WSL support?
- How do I access my C: drive?
- How do I set up Git Credential Manager? (How do I use my Windows Git permissions in WSL?)
- How do I use a Windows file with a Linux app?
- Are files in the Linux drive different from the mounted Windows drive?
- How do I uninstall a WSL Distribution?
- How do I run an OpenSSH server?
- How do I change the display language of WSL?
- Why do I not have internet access from WSL?
- How do I access a port from WSL in Windows?
- How can I back up my WSL distributions, or move them from one drive to another?
- WSL 2
- Does WSL 2 use Hyper-V? Will it be available on Windows 10 Home?
- What will happen to WSL 1? Will it be abandoned?
- Will I be able to run WSL 2 and other 3rd party virtualization tools such as VMware, or VirtualBox?
- Can I access the GPU in WSL 2? Are there plans to increase hardware support?
- Will WSL 2 be able to use networking applications?
- Can I run WSL 2 in a virtual machine?
- Can I use wsl.conf in WSL 2?
- Where can I provide feedback?
Dual Boot Windows 10 and Linux Ubuntu on Separate Hard Drives [duplicate]
How would I go about dual booting Windows 10 and Ubuntu, the windows drive is on an ssd as my c drive and my s drive is a hdd that I want to use for Linux. I have no idea what I need to download it or anything.

3 Answers 3
This should work for most systems that use UEFI and which have two HDD.
Specification used for the tutorial below:
Dell Inspiron E5440:
Main HDD — 256GB Samsung SSD (Windows 10 installed)
Secondary HDD — 64GB Transcend mSATA SSD (Mint 18 was installed to this drive)
A) UEFI/BIOS
Set to «UEFI mode only» (no legacy/CSM).
Disable «secure boot«
Disable «Intel Rapid Start» (if equipped)
Disable «fast boot» in UEFI (note this is different than the «fastboot» setting in Windows 8/10). The options in your UEFI/BIOS might say something like Full/Minimal/Automatic for boot mode. Select Full (or thorough, or complete, etc whatever your UEFI vendor has chosen to call it).
B) Advanced Power Options (Fastboot)
Disable fastboot in Windows 8/10 under «advanced power options«. Restart computer to ensure that this subsequent boot and the next reboot/shutdown will be in «normal» mode.
Install Macrium Reflect (free) and create a backup image and reinstallation media should something go wrong with Windows 10.
C) Rufus / Bootable USB stick
Use Rufus to create a bootable USB stick with your choice of Ubuntu based distro. Make sure in Rufus that you CHOOSE the option UEFI/GPT only. This ensures the Linux environment boots only into UEFI mode during your install.
D) Boot Menu
Reboot your computer and press key for one time boot menu (Dell is typically F12). Select your USB stick from the boot options.
Make sure it says UEFI in front of the USB stick in the boot menu.
If not, return to Windows and recreate your USB stick with Rufus ensuring you choose the UEFI/GPT (only) option.
E) Boot into USB Stick
Boot into Linux live environment and begin install.
F) Installation type
When you get to the installation option, choose «Something else» at the bottom of the Ubiquity installer.
G) Create partitions
Find your secondary HDD that you will be installing Linux to.
In my case it was listed as /dev/sdc (with /dev/sda being the windows drive and /dev/sdb the USB drive [which was invisible in the installer]).
1st Partition / EFI
Select your target drive (in my case /dev/sdc)
Select «Make New Partition Table«
Partition the target drive as follows:
Size: 650 MB
Type for the new partition: Primary
Location for the new partition: Beginning of this space
Use as: EFI (this will be listed as /dev/sdc1 efi in the partitioning tool once you create it)
2nd Partition / Root
Select «free space» under your target drive (in my case /dev/sdc)
Partition the target drive as follows:
Size: min. 10 GB (20+GB better)
Type for the new partition: Primary
Location for the new partition: Beginning of this space
Use as: ext4
Mount point: Choose «/»
3rd Partition / Swap
Select «free space» under your target drive (in my case /dev/sdc)
Partition the target drive as follows:
Size: min. 2 GB (20+GB better)
Type for the new partition: Primary
Location for the new partition: Beginning of this space
Use as: swap (if you wish to use hibernation, the swap needs to be just slightly larger than your total amount of RAM — example I have 8 GB so the size of this parition was set at 9000 MB)
4th Partition / Home
Select «free space» under your target drive (in my case /dev/sdc)
Partition the target drive as follows:
Size: remainder of space on drive
Type for the new partition: Primary
Location for the new partition: Beginning of this space
Use as: ext4
Mount point: Choose «/home»
H) Boot loader Device
- BEFORE clicking «Install Now», from the «device for boot loader installation» option button, select the 650MB EFI partition you just created as the target for the bootloader. (example /dev/sdc1 in my case).
- Click «Install Now«.
I) Installation & Reboot
- Finish installation process and reboot (removing the USB stick when your UEFI/BIOS screen logo appears).
J) Upon reboot
After UEFI/BIOS reads the new bootloader entry that Linux has added to it, you will be presented with the grub menu with a listing of your Linux distro as well as a listing to boot Windows 10.
Boot into Linux
Install any updates and then reboot and attempt to enter Windows 10 from the grub menu to make sure that grub correctly handles the hand-off to the Windows 10 bootloader.
What you have done:
You have installed the Linux EFI bootloader to the newly created EFI partition. In the process of this, Linux has added an entry to your UEFI listings in your systems UEFI/BIOS. Linux has also automatically detected your Windows 10 install and added a grub menu item to boot it. Your computer at this point will now automatically boot to Linux unless you choose to boot to Windows (from the Grub menu).
What you have not done:
You have not in any way altered your Windows 10 install or its bootloader or even so much as touched the Windows 10 EFI partition. Everything is reversible simply by removing the Linux UEFI listing from your UEFI/BIOS settings. How to do so varies from each vendor.
Источник
Подключение OneDrive в Linux
Вы когда-нибудь хотели получить доступ к вашему Microsoft OneDrive на Linux? Если вы ожидаете, что Microsoft сделает отдельный клиент для платформы Linux,onedrive-pref не думайте про это. Их не интересует платформа Linux. Вместо этого вам нужно взять дело в свои руки.
Лучший способ получить доступ к Microsoft OneDrive на Linux — это программа под названием OneDrive-D. Это стороннее приложение, которое работает с API OneDrive, чтобы принести достойный опыт синхронизации на рабочий стол Linux. Вы можете получить доступ ко всем своим файлам в OneDrive на своем Linux-ПК с помощью этого приложения.
Подключение OneDrive в Linux
Пользователи Microsoft OneDrive могут синхронизировать свои файлы с Linux с помощью OneDrive-d. Получение программы, работающей в Linux, не займет много времени. Он начинается с установки пакета git в дистрибутив Linux. Без этой программы получение кода из Github непросто. Откройте терминал и введите следующее:
Ubuntu
Arch Linux
Fedora
Debian
OpenSUSE
Git доступен во всех основных дистрибутивах Linux из-за того, что такие сайты, как Github, настолько популярны. Чтобы программа Git работала на вашем дистрибутиве Linux, просто возьмите обычный способ установки программ и выполните поиск «Git». Затем установите его в систему. После этого будет открытие терминала и использование диспетчера пакетов дистрибутива Linux или даже магазина приложений, такого как «Программное обеспечение Gnome».
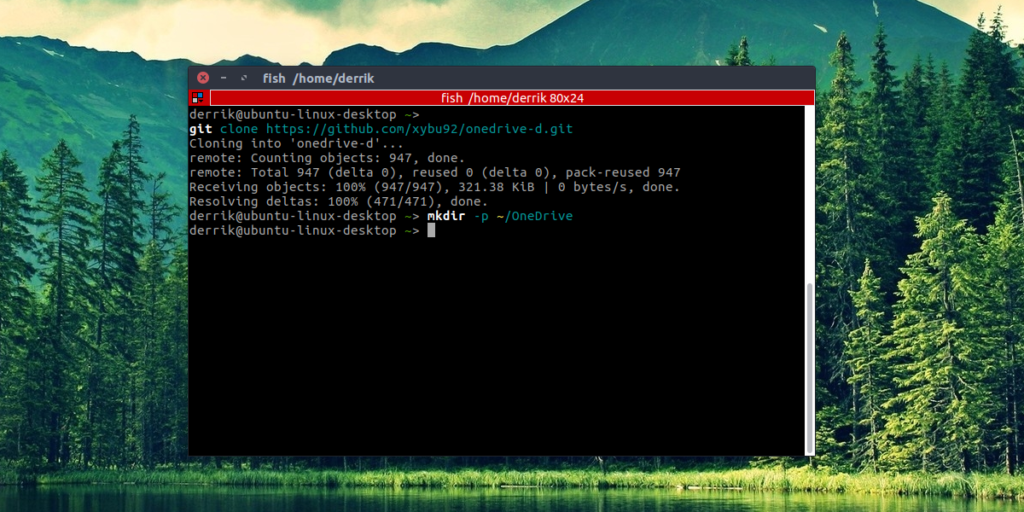
С установленным инструментом Git мы можем использовать его для клонирования кода OneDrive-d непосредственно в командной строке. Сделайте это с помощью:
git clone https://github.com/xybu92/onedrive-d.git
Затем введите каталог кода, чтобы начать процесс установки.
Установка OneDrive-D
Подключение OneDrive в Linux начинается с установки специального клиента программы.
Код OneDrive-D, загруженный с Git, содержит много разных вещей; двоичные файлы, библиотеки и разные сценарии и т. д. К счастью, разработчики сделали установку этого программного обеспечения очень прямолинейной. Они написали сценарий Bash, который полностью сконфигурирует программу и заработает все. Чтобы запустить процесс установки, просто запустите скрипт. Это делается путем запуска его как программы.
./install.sh
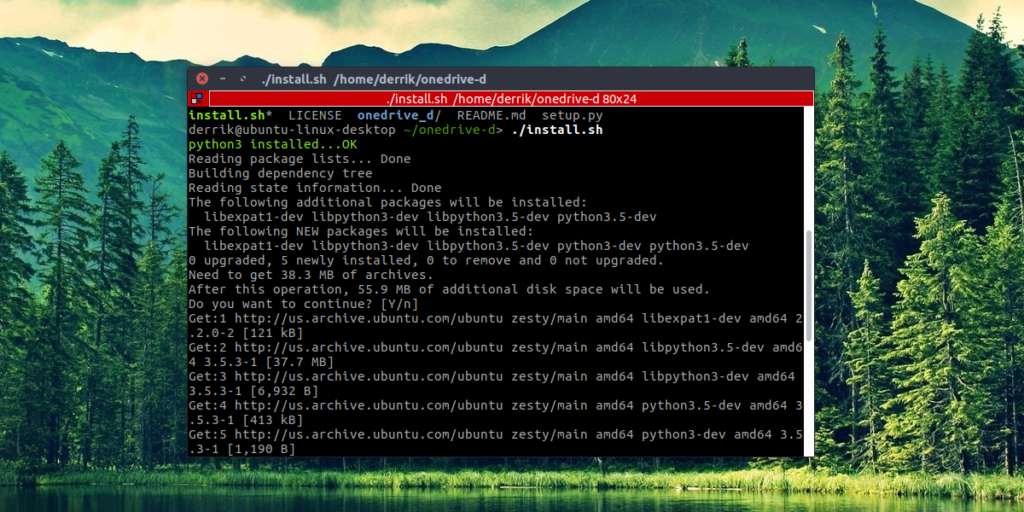
Запуск скрипта позволит ему начать установку всех мелочей, которые OneDrive-D должен выполнить правильно. В частности, будут установлены библиотеки и другие важные инструменты, с которыми будет работать программа. Обязательно введите свой пароль (если задано) и разрешите программе продолжать установку необходимых компонентов для корректной работы.
Настройка OneDrive-D
Если говорить про подключение OneDrive в Linux то, следующим пунктом после установки, является правильная настройка программы.
Далее в процессе происходит настройка OneDrive-D. Это нужно, так как программе необходимо подключиться к серверам Microsoft и начать первоначальную синхронизацию. Поскольку OneDrive-D — это программа на основе терминалов, исходная программа не будет создавать значок рабочего стола или что-то в этом роде. Вместо этого требуется команда для запуска процесса настройки. Запустите его в терминале с помощью команды:
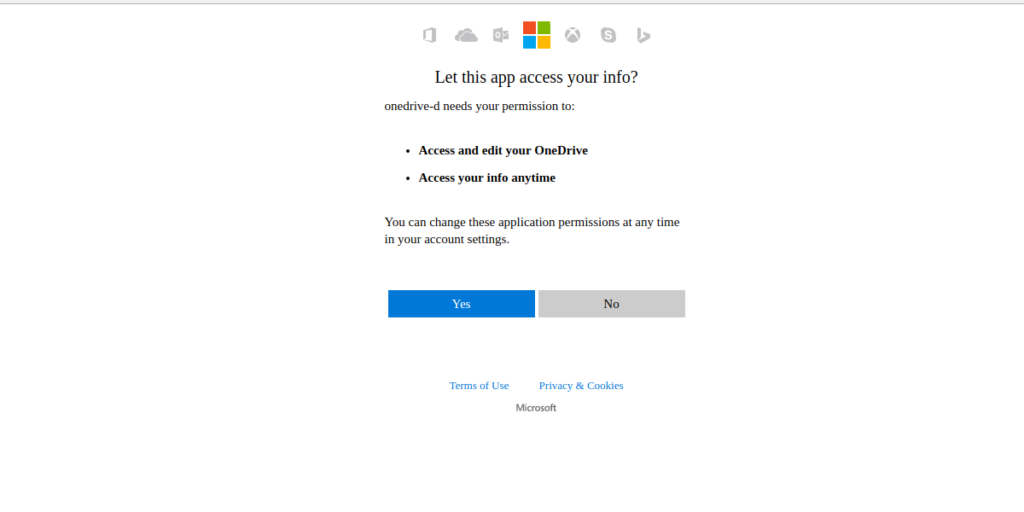
Для этого процесса конфигурации есть 4 простых шага. Первым шагом является подключение клиента синхронизации к вашей учетной записи Microsoft. В терминале onedrive-pref распечатает одноразовую ссылку. Вставьте эту ссылку в свой браузер по умолчанию и авторизуйте доступ OneDrive-D к своей учетной записи Microsoft, чтобы перейти к шагу 2 процесса.
После нажатия «да» в окне подключения вам нужно вставить обратный вызов обратно в терминал. Не знаете, что это? Это URL-адрес, к которому перенаправляется окно подключения. Вы узнаете, что получаете правильный URL, потому что освежающие останавливаются. Хорошая распродажа — искать «code =» в URL-адресе.
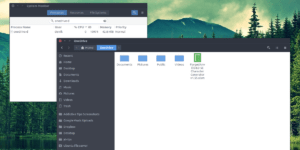
Второй шаг в этом процессе — сообщить OneDrive-D, что синхронизировать и место хранения. Если у вас еще нет папки синхронизации OneDrive на вашем ПК, настало время ее создать. Откройте новое окно терминала и введите следующую команду:
Затем, на шаге 2, сообщите программе, где находится папка, чтобы ее можно было использовать в качестве места синхронизации. Обязательно используйте полный путь: /home/username/OneDrive/
Шаг 1 и 2 являются наиболее важными частями процесса настройки. Шаги 3 и 4 включают настройки, которые необходимо выполнять как с числовыми настройками, так и с файлом игнорирования. Большинство пользователей Microsoft OneDrive не должны ничего делать с шагами 3 и 4. Введите «n», чтобы не пройти оба этих шага. Если по какой-то причине вы чувствуете, что хотите изменить эти параметры, вместо этого выберите Y.
Примечание. Обязательно измените «Username» на имя пользователя вашего компьютера в команде.
Синхронизация с OneDrive-D
Когда процесс настройки завершится, начнется синхронизация. Подобно конфигурации, это необходимо сделать в терминале. OneDrive-D работает в фоновом режиме как процесс. Все, что пользователь должен сделать, это запустить его. Это делается с помощью:
onedrive-d start
Отсюда терминал можно закрыть в любое время. OneDrive-D будет продолжать работать в качестве фоновой программы, загружать и загружать все, что находится в папке синхронизации OneDrive. Чтобы отключить фоновый режим, используйте следующую команду:
Надеемся, что подключение OneDrive в Linux было для Вас быстрым. Есть свой вариант? — напишите нам об этом в комментариях.
Выводы
Microsoft OneDrive — один из лучших инструментов облачного хранилища. Он имеет большую интеграцию на рабочем столе Windows, а также опрятные функции, такие как интеграция Microsoft Office, быстрая загрузка / выгрузка файлов и многое другое. Неудивительно, что некоторые пользователи Linux просят Microsoft принести эту услугу и ее функции в свою любимую операционную систему. К сожалению, Microsoft не планирует этого делать. Думаю, по понятным причинам.
Как пользователи Linux, мы никогда не сможем понять, каково это, чтобы этот сервис работал в нашей операционной системе, как у пользователей Windows. К счастью, для тех, кому нужен доступ к OneDrive, и они готовы пойти на такую установку, эта программа легко устанавливается. Если OneDrive не является предпочтительным облачным хранилищем, вы можете установить Google Drive. Достаточно легко получить доступ к Google Диску в Linux.
Источник
Frequently Asked Questions about Windows Subsystem for Linux
General
What is Windows Subsystem for Linux (WSL)?
The Windows Subsystem for Linux (WSL) is a feature of the Windows operating system that enables you to run a Linux file system, along with Linux command-line tools and GUI apps, directly on Windows, alongside your traditional Windows desktop and apps.
See the about page for more details.
Who is WSL for?
This is primarily a tool for developers, especially web developers, those working on open source projects, or deploying to Linux server environments. WSL is for anyone who likes using Bash, common Linux tools ( sed , awk , etc.) and Linux-first frameworks (Ruby, Python, etc.) but also enjoys using Windows productivity tools
What can I do with WSL?
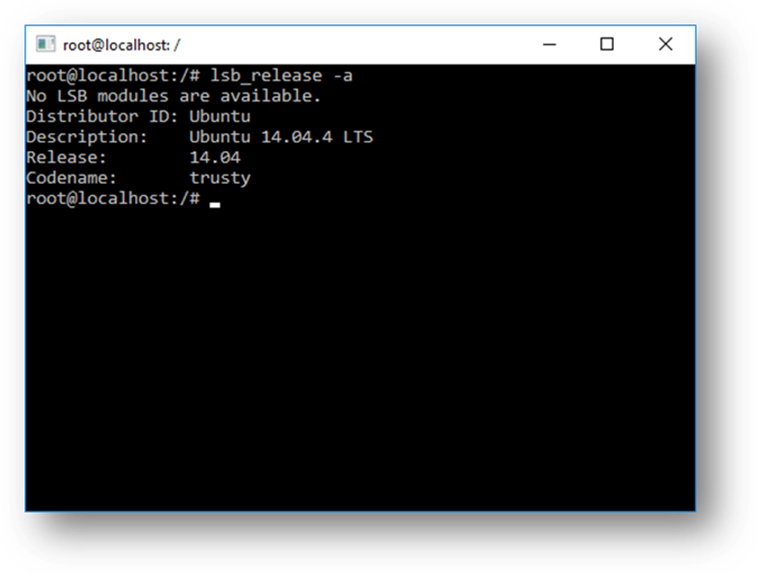
WSL enables you to run Linux in a Bash shell with your choice of distribution (Ubuntu, Debian, OpenSUSE, Kali, Alpine, etc). Using Bash, you can run command-line Linux tools and apps. For example, type lsb_release -a and hit enter; you’ll see details of the Linux distro currently running:
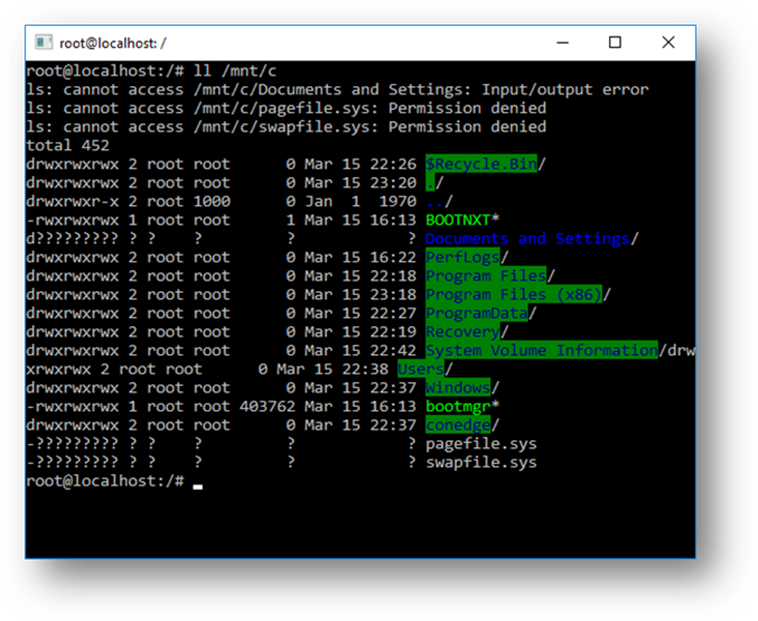
You can also access your local machine’s file system from within the Linux Bash shell – you’ll find your local drives mounted under the /mnt folder. For example, your C: drive is mounted under /mnt/c :
Could you describe a typical development workflow that incorporates WSL?
WSL targets a developer audience with the intent to be used as part of an inner development loop. Let’s say that Sam is creating a CI/CD pipeline (Continuous Integration & Continuous Delivery) and wants to test it first on a local machine (laptop) before deploying it to the cloud. Sam can enable WSL (& WSL 2 to improve speed and performance), and then use a genuine Linux Ubuntu instance locally (on the laptop) with whatever Bash commands and tools they prefer. Once the development pipeline is verified locally, Sam can then push that CI/CD pipeline up to the cloud (ie Azure) by making it into a Docker container and pushing the container to a cloud instance where it runs on a production-ready Ubuntu VM.
What is Bash?
Bash is a popular text-based shell and command-language. It is the default shell included within Ubuntu and other Linux distros, and in macOS. Users type commands into a shell to execute scripts and/or run commands and tools to accomplish many tasks.
How does this work?
Check out this article on the Windows Command Line blog: A Deep Dive Into How WSL Allows Windows to Access Linux Files which goes into detail about the underlying technology.
Why would I use WSL rather than Linux in a VM?
WSL requires fewer resources (CPU, memory, and storage) than a full virtual machine. WSL also allows you to run Linux command-line tools and apps alongside your Windows command-line, desktop and store apps, and to access your Windows files from within Linux. This enables you to use Windows apps and Linux command-line tools on the same set of files if you wish.
Why would I use, for example, Ruby on Linux instead of on Windows?
Some cross-platform tools were built assuming that the environment in which they run behaves like Linux. For example, some tools assume that they are able to access very long file paths or that specific files/folders exist. This often causes problems on Windows which often behaves differently from Linux.
Many languages like Ruby and Node.js are often ported to, and run great, on Windows. However, not all of the Ruby Gem or node/NPM library owners port their libraries to support Windows, and many have Linux-specific dependencies. This can often result in systems built using such tools and libraries suffering from build and sometimes runtime errors or unwanted behaviors on Windows.
These are just some of issues that caused many people to ask Microsoft to improve Windows’ command-line tools and what drove us to partner with Canonical to enable native Bash and Linux command-line tools to run on Windows.
What does this mean for PowerShell?
While working with OSS projects, there are numerous scenarios where it’s immensely useful to drop into Bash from a PowerShell prompt. Bash support is complementary and strengthens the value of the command-line on Windows, allowing PowerShell and the PowerShell community to leverage other popular technologies.
What processors does WSL support?
WSL supports x64 and ARM CPUs.
How do I access my C: drive?
Mount points for hard drives on the local machine are automatically created and provide easy access to the Windows file system.
/mnt/ /
Example usage would be cd /mnt/c to access c:\
How do I set up Git Credential Manager? (How do I use my Windows Git permissions in WSL?)
See the tutorial Get started using Git on Windows Subsystem for Linux, which features a section on setting up Git Credential Manager and storing authentication tokens in Windows Credential Manager.
How do I use a Windows file with a Linux app?
One of the benefits of WSL is being able to access your files via both Windows and Linux apps or tools.
WSL mounts your machine’s fixed drives under the /mnt/ folder in your Linux distros. For example, your C: drive is mounted under /mnt/c/
Using your mounted drives, you can edit code in, for example, C:\dev\myproj\ using Visual Studio / or VS Code, and build/test that code in Linux by accessing the same files via /mnt/c/dev/myproj .
Are files in the Linux drive different from the mounted Windows drive?
Files under the Linux root (i.e. / ) are controlled by WSL which aligns with Linux behavior, including but not limited to:
- Files which contain invalid Windows filename characters
- Symlinks created for non-admin users
- Changing file attributes through chmod and chown
- File/folder case sensitivity
Files in mounted drives are controlled by Windows and have the following behaviors:
- Support case sensitivity
- All permissions are set to best reflect the Windows permissions
How do I uninstall a WSL Distribution?
To remove a distribution from WSL and delete all of the data associated with that Linux distribution, run wsl —unregister where is the name of your Linux distro, which can be seen from the list in the wsl -l command.
Additionally, you can then uninstall the Linux distro app on your machine just like any other store application.
To learn more about wsl commands, see the article, Basic commands for WSL.
How do I run an OpenSSH server?
OpenSSH ships with Windows as an optional feature. See the Install OpenSSH doc. Administrator privileges in Windows are required to run OpenSSH in WSL. To run an OpenSSH server, run your WSL distribution (ie Ubuntu) or Windows Terminal as an administrator. There are several resources out there covering SSH scenarios with WSL. Check out Scott Hanselman’s blog articles: How to SSH into a Windows 10 Machine from Linux OR Windows OR anywhere, How to SSH into WSL2 on Windows 10 from an external machine, THE EASY WAY how to SSH into Bash and WSL2 on Windows 10 from an external machine, and How to use Windows 10’s built-in OpenSSH to automatically SSH into a remote Linux machine.
How do I change the display language of WSL?
WSL install will try to automatically change the Ubuntu locale to match the locale of your Windows install. If you do not want this behavior you can run this command to change the Ubuntu locale after install completes. You will have to relaunch your WSL distribution for this change to take effect.
The below example changes to locale to en-US:
Why do I not have internet access from WSL?
Some users have reported issues with specific firewall applications blocking internet access in WSL. The firewalls reported are:
- Kaspersky
- AVG
- Avast
- Symantec Endpoint Protection
- F-Secure
In some cases turning off the firewall allows for access. In some cases simply having the firewall installed looks to block access.
How do I access a port from WSL in Windows?
WSL shares the IP address of Windows, as it is running on Windows. As such you can access any ports on localhost e.g. if you had web content on port 1234 you could https://localhost:1234 into your Windows browser. For more information, see Accessing network applications.
How can I back up my WSL distributions, or move them from one drive to another?
The best way to backup or move your distributions is via the export/import commands available in Windows Version 1809 and later. You can export your entire distribution to a tarball using the wsl —export command. You can then import this distribution back into WSL using the wsl —import command, which can name a new drive location for the import, allowing you to backup and save states of (or move) your WSL distributions.
Please note that traditional backup services that backup files in your AppData folders (like Windows Backup) will not corrupt your Linux files.
WSL 2
Does WSL 2 use Hyper-V? Will it be available on Windows 10 Home?
WSL 2 is available on all Desktop SKUs where WSL is available, including Windows 10 Home.
The newest version of WSL uses Hyper-V architecture to enable its virtualization. This architecture will be available in the ‘Virtual Machine Platform’ optional component. This optional component will be available on all SKUs. You can expect to see more details about this experience soon as we get closer to the WSL 2 release.
What will happen to WSL 1? Will it be abandoned?
We currently have no plans to deprecate WSL 1. You can run WSL 1 and WSL 2 distros side by side, and can upgrade and downgrade any distro at any time. Adding WSL 2 as a new architecture presents a better platform for the WSL team to deliver features that make WSL an amazing way to run a Linux environment in Windows.
Will I be able to run WSL 2 and other 3rd party virtualization tools such as VMware, or VirtualBox?
Some 3rd party applications cannot work when Hyper-V is in use, which means they will not be able to run when WSL 2 is enabled, such as VMware and VirtualBox. However, recently both VirtualBox and VMware have released versions that support Hyper-V and WSL2. Learn more about VirtualBox’s changes here and VMware’s changes here. For troubleshooting issues, take a look at the VirtualBox issue discussions in the WSL repo on GitHub.
We are consistently working on solutions to support third-party integration of Hyper-V. For example, we expose a set of APIs called Hypervisor Platform that third-party virtualization providers can use to make their software compatible with Hyper-V. This lets applications use the Hyper-V architecture for their emulation such as the Google Android Emulator, and VirtualBox 6 and above which are both now compatible with Hyper-V.
See the WSL issues repo for more background and discussion on WSL 2 issues with VirtualBox 6.1.
*If you’re looking for a Windows 10 virtual machine, VMWare, Hyper-V, VirtualBox, and Parallels VM downloads are available on the Windows Dev Center.
Can I access the GPU in WSL 2? Are there plans to increase hardware support?
We have released support for accessing the GPU inside of WSL 2 distributions! This means you can now use WSL for machine learning, artificial intelligence, and data science scenarios more easily when big data sets are involved. Check out the get started with GPU support tutorial. As of right now WSL 2 does not include serial support, or USB device support. We are investigating the best way to add these features.
Will WSL 2 be able to use networking applications?
Yes, in general networking applications will be faster and work better since we have full system call compatibility. However, the new architecture uses virtualized networking components. This means that in initial preview builds WSL 2 will behave more similarly to a virtual machine, e.g: WSL 2 will have a different IP address than the host machine. We are committed to making WSL 2 feel the same as WSL 1, and that includes improving our networking story.
Can I run WSL 2 in a virtual machine?
Yes! You need to make sure that the virtual machine has nested virtualization enabled. This can be enabled in your parent Hyper-V host by running the following command in a PowerShell window with Administrator privileges:
Set-VMProcessor -VMName -ExposeVirtualizationExtensions $true
Make sure to replace ‘ ‘ with the name of your virtual machine.
Can I use wsl.conf in WSL 2?
WSL 2 supports the same wsl.conf file that WSL 1 uses. This means that any configuration options that you had set in a WSL 1 distro, such as automounting Windows drives, enabling or disabling interop, changing the directory where Windows drives will be mounted, etc. will all work inside of WSL 2. You can learn more about the configuration options in WSL in the Distribution Management page. Learn more about support for mounting drives, disks, devices, or virtual hard disks (VHDs) in the Mount a Linux disk in WSL 2 article.
Where can I provide feedback?
- Search existing issues to see if there are any associated with a problem that you are having. Note that in the search bar, you can remove «is:open» to include issues that have already been resolved in your search. Please consider commenting or giving a thumbs up to any open issues that you would like to express your interest in moving forward as a priority.
- File a new issue. If you have found a problem with WSL and there does not appear to be an existing issue, you can select the green New issue button and then choose WSL — Bug Report. You will need to include a title for the issue, your Windows build number (run cmd.exe /c ver to see your current build #), whether you’re running WSL 1 or 2, your current Linux Kernel version # (run wsl.exe —status or cat /proc/version ), the version # of your distribution (run lsb_release -r ), any other software versions involved, the repro steps, expected behavior, actual behavior, and diagnostic logs if available and appropriate. For more info, see contributing to WSL.
- File a feature request by selecting the green New issue button and then select Feature request. You will need to address a few questions describing your request.
- File a documentation issue using the WSL docs repo. To contribute to the WSL docs, see the Microsoft Docs contributor guide.
- File a Windows Terminal issue using the the Windows Terminal product repo if your problem is related more to the Windows Terminal, Windows Console, or the command-line UI.
If you’d like to stay up to date with the latest WSL news you can do so with:
- Our command-line team blog
- Twitter. Please follow @craigaloewen on Twitter to learn of news, updates, etc.
Источник


