- How to Install Android SDK Manager on Ubuntu 16.04
- Install Android SDK on Ubuntu 16.04
- Usage of Android SDK manager from command line
- List packages
- Install packages
- Update all installed packages
- How to install SDK manager on linux ubuntu 16.04?
- 1 Answer 1
- How To Install Android SDK Tools On Ubuntu 20.04
- Download SDK Tools
- Install SDK Tools
- Download and Install Platform Tools
- Configure Environment Variable
- Using the SDK Manager
- Using the Emulator and AVD Manager
- Summary
- How to Install Android SDK Manager on Ubuntu 18.04
- Install Android SDK Tools Package
- Android SDK Manager usage from terminal
- List installed, available packages and updates
- Install, update and uninstall packages using sdkmanager
- Read also :
How to Install Android SDK Manager on Ubuntu 16.04
In this article, we will see how to install Android SDK manager on ubuntu 16.04 with the command line. The sdkmanager is a command line tool that allows you to view, install, update, and uninstall packages for the Android SDK. If you’re using Android Studio, then you do not need to use this tool and you can instead manage your SDK packages from the IDE. Let’s start with installation.
Install Android SDK on Ubuntu 16.04
Step 1: Before starting the installation of Android SDK, we need to install java on the machine. Android SDK requires java to run. Execute below command to install java on machine
You can check the installation status by checking the version of installed java, Execute below command to check the installed version if it gives version in output, Java is installed successfully.
If you have already java version installed on the machine, please ignore this step.
Step 2: Now, download sdkmanager binaries from the Download page of Android website. You will get link of binaries at the page under command line tools. After copying the link, execute below command to download binaries.
You need to replace the link with your copied one in above command.
Step 3: Extract the downloaded zip file on your choice of directory. I am extracting it in the home directory.
One new directory named ‘tools’ will be created. We have successfully installed Android SDK. Now, let’s configure it.
Step 4: Add SDK tools directory in PATH environment variable to make executable available globally. Add below line
/.profile file to make it permanent.
Use relative path according to your installation directory in above line.
Usage of Android SDK manager from command line
List packages
You can list installed and available packages by executing below commands. It will show installed packages, available packages and available updates on installed packages.
Install packages
sdkmanager packages [options]
Here, the ‘packages’ argument is an SDK-style path as shown with the —list command(Refer output of ‘sdkmanager —list’ command and check path column) , wrapped in double quotes (for example, «build-tools;24.0.2» or «platforms;android-25»)
$ sdkmanager «platforms;android-25» «build-tools;24.0.2» done
Alternatively, you can give package_file as argument which contains all the packages which needs to be installed.
To uninstall the existing packages, all you need to do is to insert simple —uninstall flag as shown below
Update all installed packages
We have successfully installed and configured Android SDK on ubuntu 16.04. Android studio is required for the development of Android, For building application only, sdkmanager is sufficient. If you want to use your machine as build machine only to generate android apk instead of development, Then this approach is ideal for you. Please share your thoughts in the comment section.
Источник
How to install SDK manager on linux ubuntu 16.04?
I was trying to install Android SDK with the help of the SDK command line tools downloaded from the link https://dl.google.com/android/repository/sdk-tools-linux-3859397.zip on my Linux Ubuntu 16.04 PC.
i run the command following command for installation
./android update sdk
The «android» command is deprecated. For manual SDK, AVD, and project management, please use Android Studio. For command-line tools, use tools/bin/sdkmanager and tools/bin/avdmanager
«android» SDK commands can be translated to sdkmanager commands on a best-effort basis. Continue? (This prompt can be suppressed with the—use-sdk-wrapper command-line argument or by setting the USE_SDK_WRAPPER environment variable) [y/N]: y
Running /home/user/Android/Sdk/bin/sdkmanager —update
Warning: java.net.SocketException: Connection reset
Warning: Failed to download any source lists!
Done
how to solve this error.or suggest me a way to install android sdk on my linux pc without installing android studio.
1 Answer 1
A bit late, but in the same situation. It looks like this isn’t an error, but the way the tools evolved: they are pushing users to use Android Studio if they want the GUI for the sdk manager, it’s usable only from the IDE.
You still have the command line available at bin/sdkmanager in this folder from the download, and instructions can be found here, but they are not great, either, so I’ll share what I did:
- downloaded the latest compressed file from this page (link way down there)
- unzipped somewhere (I chose /opt/Android/android-sdk )
- created a symlink to add sdkmanager to my path ( ln -s /opt/Android/android-tools/bin/sdkmanager
/.local/bin/sdkmanager )
You can check the versions available using sdkmanager —list , and figure what you need to support and download tools for other versions. The download will not show any kind of progress, it’ll only tell you it’s done after a while.
I suppose it’s not a big deal to keep Android Studio installed solely to have access to the sdk manager GUI, but I’ll make do with the command line tools. That’s very shady of Google, specially to people not really into their hacked up Intellij version.
Источник
How To Install Android SDK Tools On Ubuntu 20.04
It provides all the steps required to install Android SDK Tools on Ubuntu 20.04 LTS.
In this tutorial, we will discuss all the steps required to install Android SDK Tools, SDK Manager, and AVD Manager on the popular Linux distribution i.e. Ubuntu 20.04 with Java 16. This tutorial provides the steps to install Android SDK Tools on Ubuntu 20.04 LTS, though the steps should be the same for other versions of Ubuntu and Linux systems.
This post is useful for the developers using Android SDK Tools with other IDEs without installing Android Studio for the use cases including hybrid app development using Ionic. It also assumes that a valid JAVA_HOME environment variable exists pointing to the installation directory of Java. You may follow the Java installation tutorials written by us including How To Install Java 8 On Ubuntu, How To Install Java 16 On Ubuntu 20.04 LTS, and How To Install OpenJDK 16 On Ubuntu 20.04 LTS.
In case you are interested in developing Android applications using Android Studio, you can also follow the other tutorials written by us including How To Install Android SDK Tools On Windows, How To Install Android Studio On Windows, and How To Install Android Studio On Ubuntu 20.04.
You may also be required to execute the below-mentioned command in case you have set the options previously for Java 9 or Java 10.
Notes: The Ubuntu 18.04 LTS version of this tutorial is available at — How To Install Android SDK Tools On Ubuntu 18.04. You can continue this tutorial for Ubuntu 20.04 LTS.
Download SDK Tools
Open the download tab of Android Studio and scroll down to the Command line tools only section. This section shows various options to download the SDK tools as shown in Fig 1.
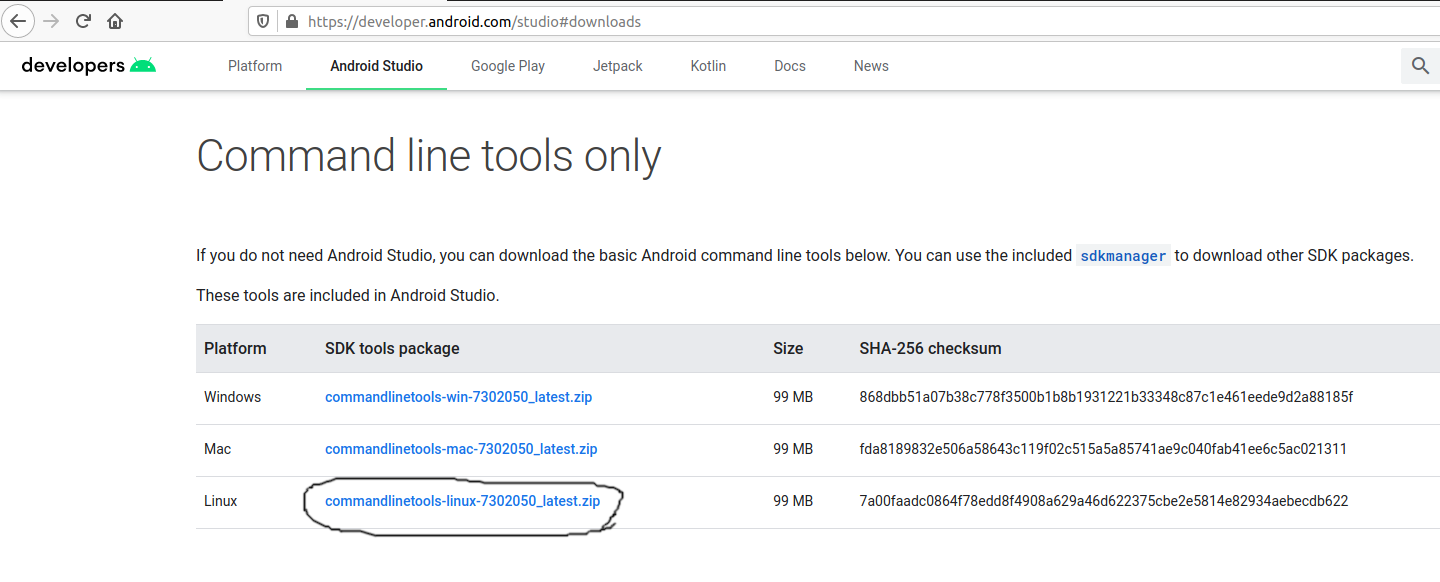
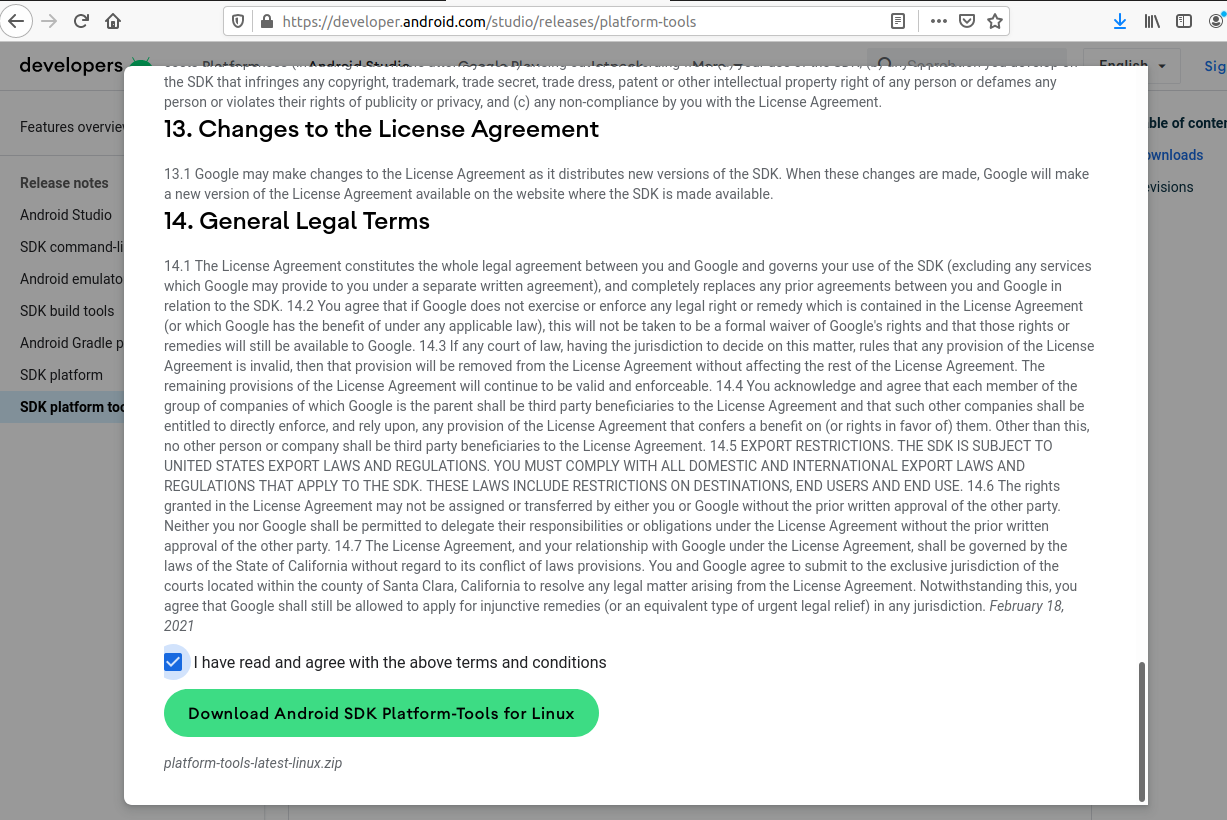
Click on the Download Link as highlighted in Fig 1. It will ask to accept the Terms and Conditions as shown in Fig 2.
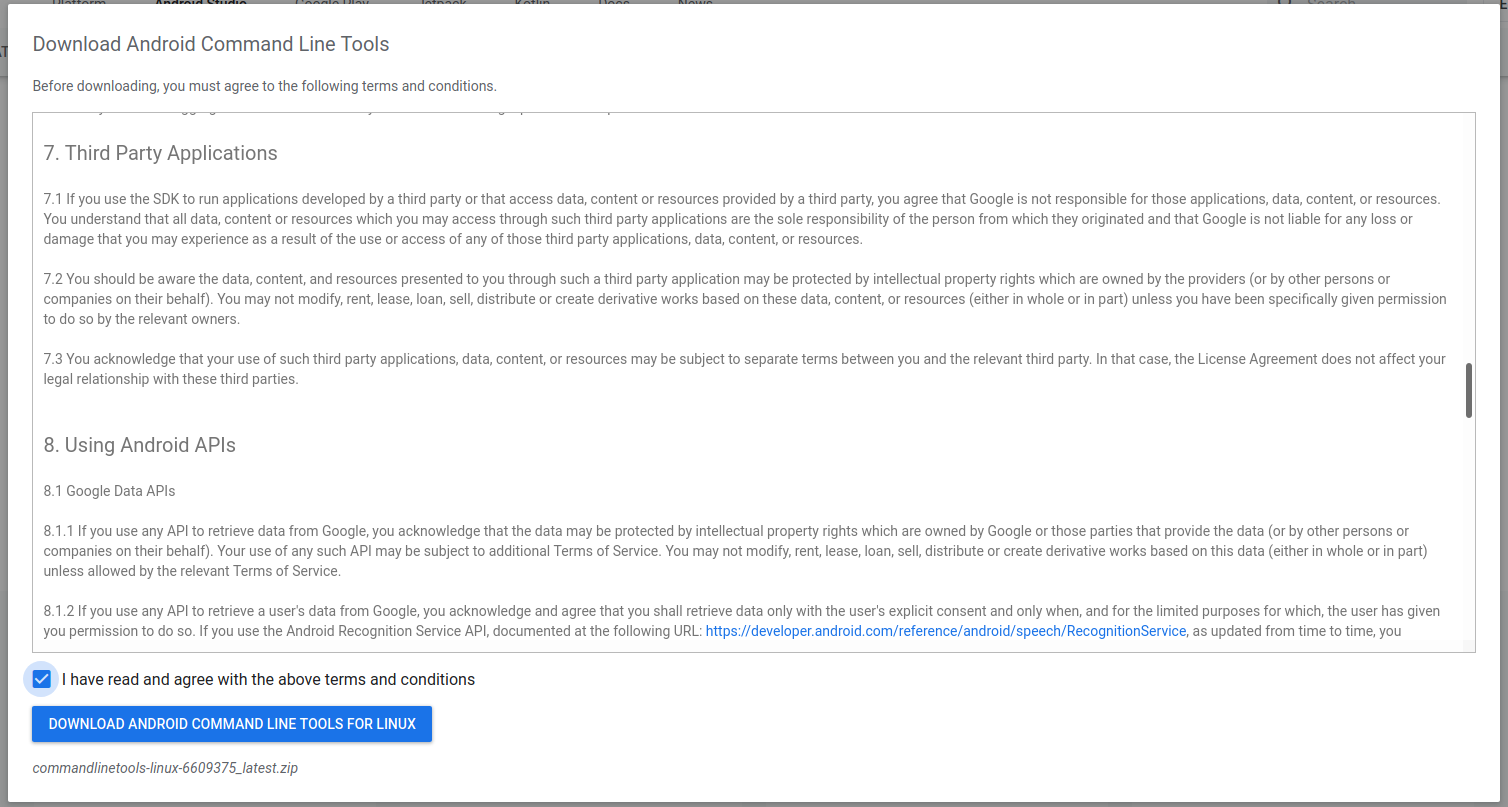
Go through the details, agree to the terms and conditions, and click the Download Button to start the download.
Install SDK Tools
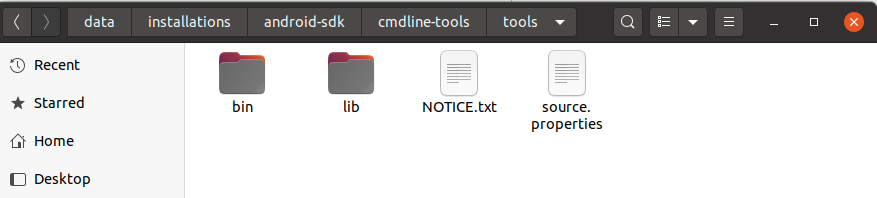
In this step, we will install the Android SDK Tools on Ubuntu. Create a directory having the name set to android-sdk and extract the content of the downloaded SDK Tools zip to this directory. Create another directory android-sdk/cmdline-tools to store the sdk-tools. Make sure that the tools directory is available directly within the android-sdk/cmdline-tools directory created by us.
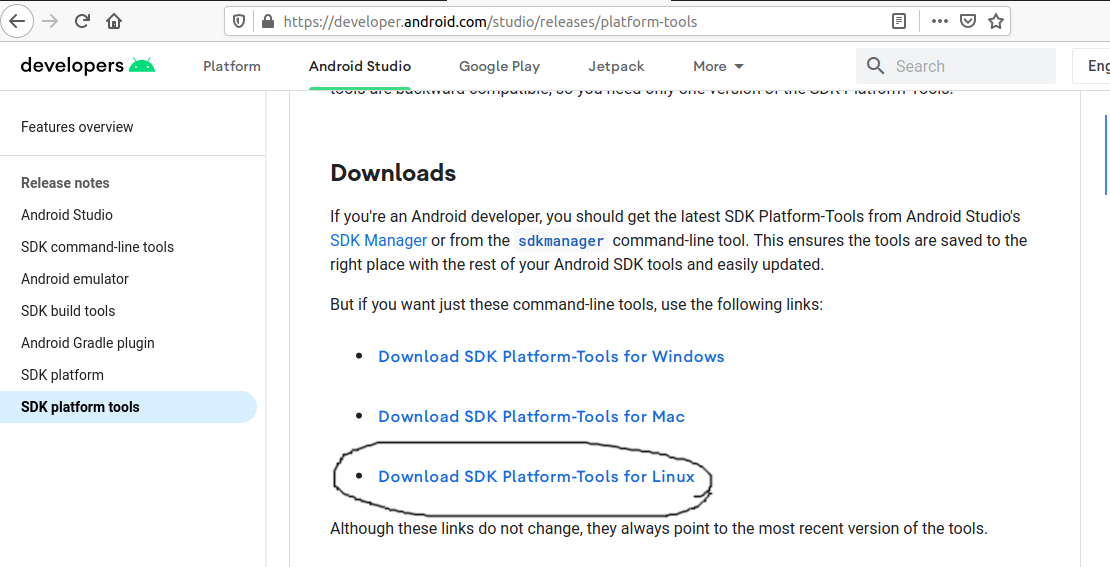
Download and Install Platform Tools
In this step, we will install the Android Platform Tools on Ubuntu. Follow the same steps similar to Android SDK Tools as shown in Fig 4, Fig 5, and Fig 6 to install Android Platform Tools using the download link.
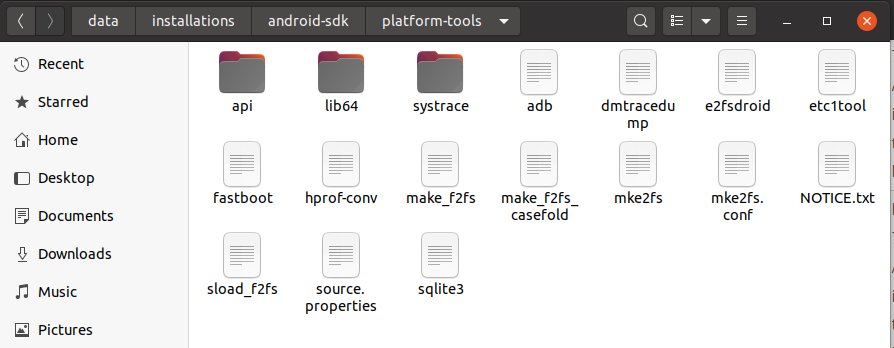
Make sure that the platform-tools content is available within the directory platform-tools. The directory structure should be similar to:
Configure Environment Variable
In this step, we will configure the environment variable to use the SDK tools installed by us. There are two ways to do it. In the first approach, we can update the .bashrc file of the user account. Another approach is to update /etc/profile file which works for all the accounts.
Approach A
Update .bashrc file of the user account.
Notes: Replace the android sdk path based on your installation directory.
Approach B
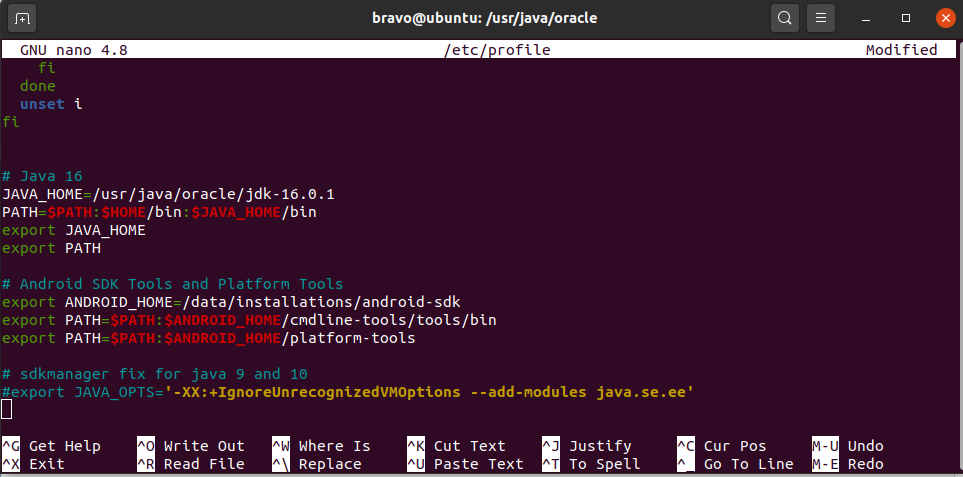
Update /etc/profile file.
Scroll down by pressing the Page Down button and add at the end of this file:
Make sure that you provide the correct path to the android-sdk directory.
Now press Ctrl + O and press Enter to write our change. Press Ctrl + X to exit the nano editor. The nano editor should look like Fig 7.
Notes: Approach B didn’t work for me.
Now test the Android SDK installed by us using the environment variables configured by us.
Using the SDK Manager
Update SDK Manager — Update the SDK manager using the below-mentioned command.
List — We can list the installed and available packages and images using the list command as shown below.
Install Platform — Use the below-mentioned command to install the Android 10 (API level 29) using the SDK manager.
It will ask to accept the terms and conditions. Enter y and hit Enter Key to accept the terms and conditions. This command creates the directories licenses and platforms within android-sdk and installs the package android-30 within the platforms directory having all the required files to run the emulator for Android 11.
If we again check the installed packages, the list command shows the installed options as shown below.
After installing the platforms, the directory structure should be:
Add System Image — We can add system image from available images shown by the list command using the SDK manager as shown below. We are adding the most recent default 64-bit system image.
Accept the License Agreement to complete the download. There are several projects which need Google Play Services. We need system images specific to Google Play Services as shown below.
Now again use the command list as shown below.
After installing the default system image, the directory structure should be:
Install Emulator — You might be required to install the emulator before creating the AVD using SDK Manager. The emulator gets installed while adding the system images in the previous steps.
Install Build Tools — Install the most recent build tool listed by the list command.
After installing the build tools, the directory structure should be:
Now again use the command list as shown below.
Using the Emulator and AVD Manager
Create AVD — Create the AVD using the system image downloaded in the previous step as shown below. Replace with actual name.
The above commands ask a bunch of questions to configure the AVD if we choose the custom hardware profile option. We have excluded the details of these options from this tutorial since these configuration details depend on the actual needs. After completing all the configurations, it creates the AVD using the name provided by us while configuring it.
List AVDs — Now go to the tools directory(only required in case you have omitted to add tools path to PATH while configuring environment variables) on the command line and check the installed platform as shown below.
It will list all the AVDs installed by us.
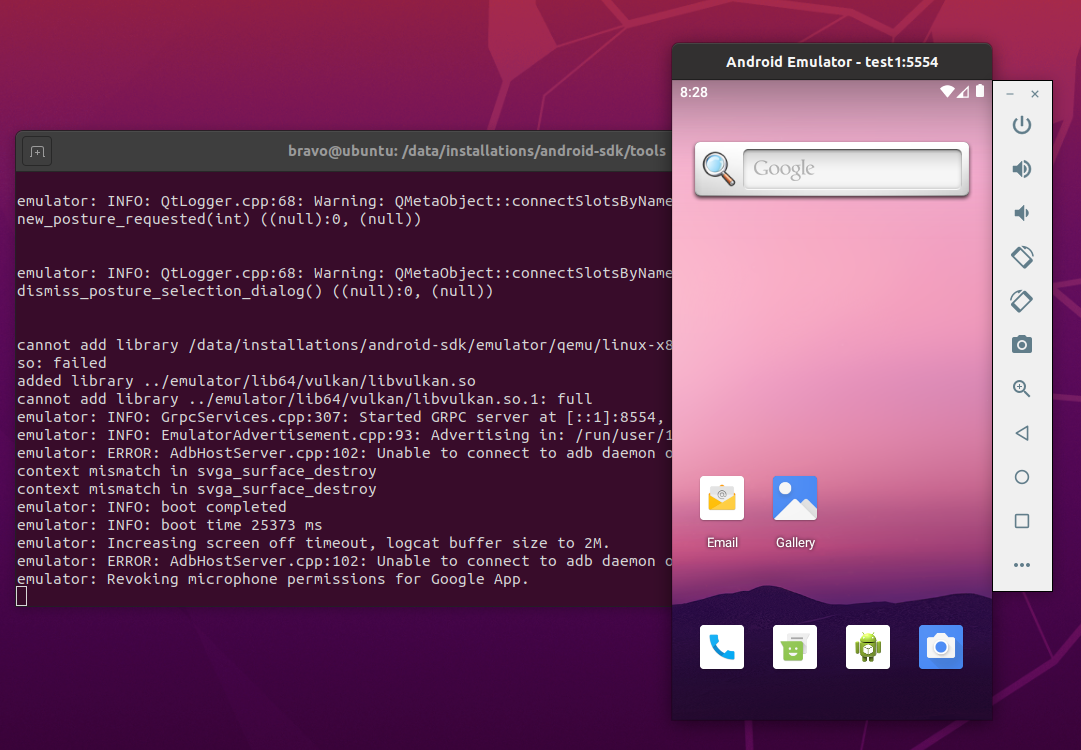
Launch AVD — We can launch the AVD using the emulator as shown below.
The emulator will take some time to completely launch the AVD. The final results should look similar to Fig 8.
Notes: I have used Ubuntu 20.04 LTS installed as VM using VMware Workstation Player, hence I have enabled the Virtualization for my Virtual Machine.
Delete Emulator — We can also delete an existing emulator as shown below.
Summary
This tutorial provided all the steps required to install Android SDK Tools and Android Platform Tools on Ubuntu 20.04 LTS. It also provided the steps required to launch the AVD using the Android Emulator.
Источник
How to Install Android SDK Manager on Ubuntu 18.04

The sdkmanager is a CLI tool that allows users to view, install, update, and uninstall available packages for the Android SDK.
This tutorial is going to teach you how to install Android SDK Manager on Ubuntu 18.04 using terminal. Earlier we have seen how to Install Android SDK Manager on Ubuntu 16.04.
If you’re already using Android Studio, you don’t need to use sdkmanager as you can manage your SDK packages from the IDE instead. The sdkmanager tool is provided in the Android SDK Tools package, so we are going to install the latter to be able to use sdkmanager.
Install Android SDK Tools Package
Before installing the preferred tool, we need to update all packages and install JAVA, as the Android SDK requires it to run. To do so you can run the following commands in the order mentioned below:
Once JAVA is installed on the machine we can run the following command to check the java version and to be sure it has been installed correctly:
The output must look like this
After successful JAVA installation, we can proceed to the installation of Android SDK. We need to download the binaries from Android Developers Website. If you open the link above in the browser you can find available zip files under the «Command Line Tools only» part. To download binaries from terminal run the command below:
Once it’s installed unzip with the following command
A new directory will be created named tools. To complete the installation we need to add the following paths to our PATH environment variable. To do so, you can run the command below:
If you’ve downloaded or unzipped the SDK-tools package into other directory, please don’t forget to use appropriate paths. To add the directories permanently, just add the line above to the
Android SDK Manager usage from terminal
Once Android SDK has been installed we can use sdkmanager tool to view, install, update and uninstall packages for the Android SDK from terminal.
List installed, available packages and updates
To list all installed, available packages and ones that have update we can run:
The output will look like the one below:
You can have issues when running this command. E.g. the output of the command can be an error like the one below:
To resolve this issue edit the sdkamanger script which is located in bin folder of the installation folder (in our case the full path to the file was /home/ubuntu/tools/bin/sdkamanager ) and add the following line in the 31st line:
After the editing, that line must look like below:
Once you’ve edited the file and saved you can run the sdkmanager —list command again. Only installed packages will be shown and another error message will appear which will be like the one below:
Actually there are two separate errors in the message above. One is related to secure connection due to which it cannot view available packages and check the packages for updates. The second one says that sdkmanager cannot load /home/ubuntu/.android/repositories.cfg file.
To fix the errors we create the repositories.cfg file (as it hasn’t been created by default) and run the sdkmanager —list command with —no_https flag. Run the following commands in the order below:
After running these commands you will be able to see the output shown above in this article.
Install, update and uninstall packages using sdkmanager
To install package, run the following command:
If you want to uninstall several packages you can add them to a file and use —package_file flag. For example
Note that package_name must be from available packages list and if you don’t use no_https flag it will throw the same error when we ran the sdkmanager —list command.
To update all packages, you can run:
Note that if you update SDK tools you need to edit /home/ubuntu/tools/bin/sdkamanager file again and add -XX:+IgnoreUnrecognizedVMOptions —add-modules java.se.ee in the 31st line, as the mentioned above file will be fetched from the server and will become the default one.
To uninstall package, run the command below:
Read also :
The installation of Android SDK Manager itself is very simple, but during the process you may face different issues which are related to JAVA. However, there are workarounds described for types of issues you can face. So using this tutorial you can be sure that you’ll make it work.
Источник


