- Подключитесь используя anyconnect из командной строки
- Installing and Using AnyConnect on Ubuntu Desktop
- Available Languages
- Download Options
- Objective
- Introduction
- AnyConnect Software Version
- Table of Contents
- Installing AnyConnect Secure Mobility Client v4.9.x
- Prerequisites
- Check these other articles out!
- Applicable Devices | Software Version
- Licensing Information
- Step 1
- Step 2
- Step 3
- Step 4
- Step 5
- Step 6
- Step 7
- Step 8
- Step 9
- Using AnyConnect Secure Mobility Client v4.9.x
- Step 1
- Step 2
- Step 3
- Step 4
- Uninstalling AnyConnect Secure Mobility Client v4.9.x
- Step 1
- Step 2
- Step 3
- Conclusion
- AnyConnect App
- Configure AnyConnect Secure Mobility Client for Linux using Client Certificate Authentication on an ASA
- Available Languages
- Download Options
- Contents
- Introduction
- Prerequisites
- Requirements
- Components Used
- Backgound Information
- Configure
- Network Diagram
- Configurations
- Verify
- Troubleshoot
Подключитесь используя anyconnect из командной строки
Я пытаюсь использовать Cisco anyconnect 3.1 из командной строки Linux для подключения к серверу. Я могу подключиться, но мне нужно отправить по одному параметру за раз. Я хотел бы подключиться из сценария, который будет работать на другом сервере. Я могу это сделать? Что-то типа
Предполагается, /opt/cisco/anyconnect/bin/vpnagentd что работает так, как это должно быть автоматически:
Для подключения :
Заменить USERNAME , PASSWORD и HOST . В \ny конце принимается баннер входа в систему — это специфично для моего хоста.
Обратите внимание на одинарные кавычки ‘ вместо двойных кавычек » — это потому, что двойные кавычки говорят Bash интерпретировать определенные символы в строках, такие как восклицательные знаки, как команды истории Bash. Двойные кавычки приведут к сбою этой команды с ошибкой «событие не найдено», если пароль содержит восклицательный знак. Строки в одинарных кавычках передают восклицательные знаки без их интерпретации.
Чтобы отключить :
Это было проверено с AnyConnect v3.1.05160.
/.anyconnect_credentials | /opt/cisco/anyconnect/bin/vpn -s connect HOST
Я столкнулся с той же трудностью, пытаясь использовать Cisco AnyConnect от Mac OS X Terminal. Чтобы команда Cisco vpn получала свой ввод от стандартного ввода, необходимо указать параметр -s, который переводит команду Cisco vpn в интерактивный режим. Затем вы можете предоставить ответы, которые вы даете в интерактивном режиме.
Ответы, которые вам нужно дать, зависят от того, как администратор сервера VPN настроил сервер. Для меня интерактивные подсказки vpn
Итак, команда, которую я запускаю,
(Кавычки вокруг EOF предназначены для предотвращения расширения / замены команды / параметра в следующем входе.)
Выход в конце, чтобы выйти из интерактивного режима в Cisco VPN.
Мне нравится упрощать командную строку, поэтому я использую описанный выше подход в сценарии оболочки под названием gotowork. Как и выше, мне нужно указать группу, мое имя пользователя и пароль, состоящий из личного PIN-кода и пароля RSA SecurID. Я не должен отвечать на вышеизложенное «принять?» вопрос. Все, кроме пароля RSA находится в скрипте, поэтому командная строка
Я должен запустить его как root. Предположим, что PIN-код 1234. Основы сценария:
Используя anyconnect 3.1.05170. Протестировано на Debian 6, LinuxMint 17
Это то, что работало для меня на OSX El Capitan. Заполнители окружены [квадратными скобками].
Включить
Отключить
* Я знаю, что это похоже на ответ Питера С. выше.
Источник
Installing and Using AnyConnect on Ubuntu Desktop
Available Languages
Download Options
Objective
The objective of this article is to guide you through installing, using, and the option of uninstalling AnyConnect VPN Client v4.9.x on Ubuntu Desktop.
This article is only applicable to the RV34x series routers, not Enterprise products.
Introduction
AnyConnect Secure Mobility Client is a modular endpoint software product. It not only provides Virtual Private Network (VPN) access through Secure Sockets Layer (SSL) and Internet Protocol Security (IPsec) Internet Key Exchange version2 (IKEv2) but also offers enhanced security through various built-in modules.
Follow the steps in this article to install the Cisco AnyConnect VPN Mobility Client on a Ubuntu Desktop. In this article, Ubuntu version 20.04 is used.
AnyConnect Software Version
Table of Contents
Installing AnyConnect Secure Mobility Client v4.9.x
This toggled section provides details and tips for beginners.
Prerequisites
- You need to purchase client license(s) from a partner like CDW or through your company’s device procurement. There are options for 1 user (L-AC-PLS-3Y-S5) or packets of licenses including one year for 25 users (AC-PLS-P-25-S). Other license options available as well, including perpetual licenses. For more details on licensing, check out the links in the Licensing Information section below.
- Download the latest version of firmware available for your router.
Check these other articles out!
Applicable Devices | Software Version
- RV340 | 1.0.03.21 (Download latest)
- RV340W | 1.0.03.21 (Download latest)
- RV345 | 1.0.03.21 (Download latest)
- RV345P | 1.0.03.21 (Download latest)
Licensing Information
AnyConnect client licenses allow the use of the AnyConnect desktop clients as well as any of the AnyConnect mobile clients that are available. You will need a client license to download and use the Cisco AnyConnect Secure Mobility Client. A client license enables the VPN functionality and are sold in packs of 25 from partners like CDW or through your company’s device procurement.
Want to know more about AnyConnect licensing? Here are some resources:
Step 1
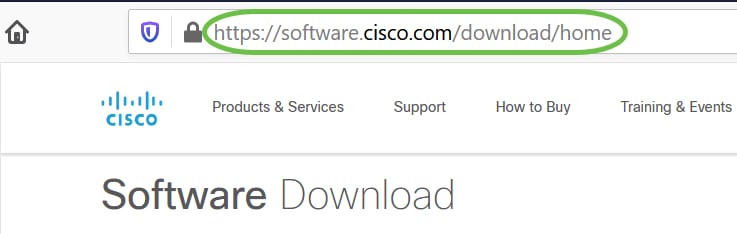
Open a web browser and navigate to the Cisco Software Downloads webpage.
Step 2
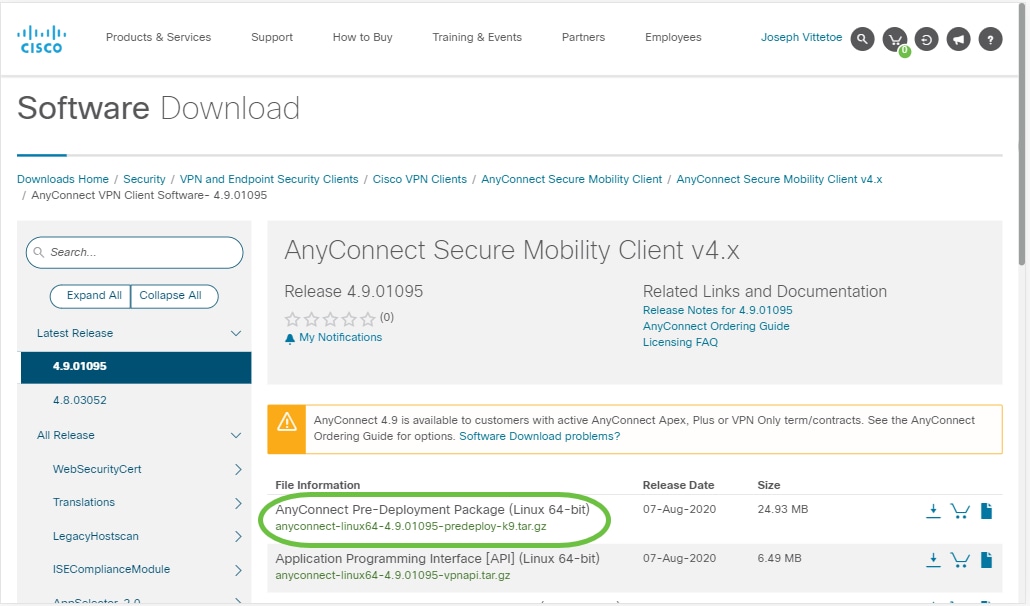
In the search bar, start typing ‘Anyconnect’ and the options will appear. Select AnyConnect Secure Mobility Client v4.x.
Step 3
Download the Cisco AnyConnect VPN Client. Most users will select the AnyConnect Pre-Deployment Package (Linux 64-bit) option.
The images in this article are for AnyConnect v4.9.x, which was latest version at the time of writing this document.
If you purchased a license and you are unable to download AnyConnect, call +1 919-993-2724. Select option 2. You will need to know your Cisco ID (the one you use to log into Cisco.com) and the sales order number when you call. They will get that situation all straightened out.
Step 4
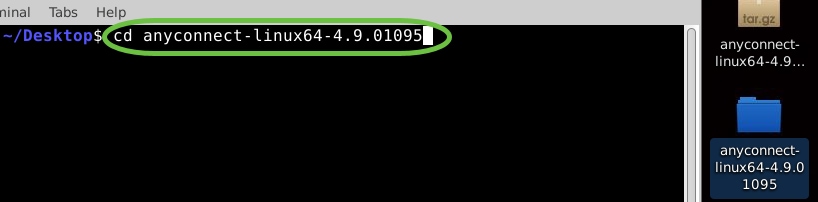
Open the Terminal by pressing Ctrl+Alt+T on your keyboard. To navigate to the folder where you have downloaded the AnyConnect Client Package, use the command, ‘cd directory name’. For more information on the ‘cd’ command, click here.
cd [Directory Name]
In this example, the file is placed on the Desktop.
The directory may be different based on the location of the AnyConnect file download. For long filenames or paths, start typing some characters and press the tab key on your keyboard. The filename will auto-populate. If it doesn’t even after you press tab twice, it indicates that you need to type more number of unique characters. Alternately, you can use the ‘ls’ command to list the files in your current directory.

Step 5
The initial download is a tarball archive (several files packed into one), which must be extracted. The command ‘tar xvf filename’ will extract the contents to the same directory in which the initial file is located.
tar xvf [Filename]
For more information on the ‘tar’ command, click here.

Step 6
Once the folder is extracted, use the ‘cd directory name’ command again to navigate into the folder.
cd [Directory Name]
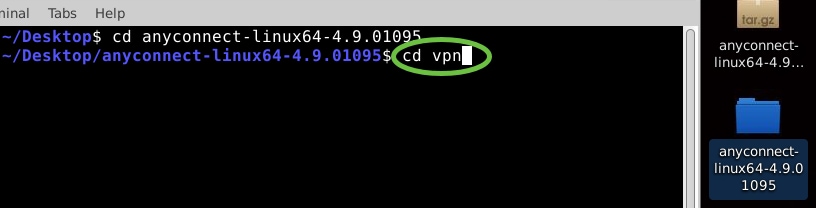
Step 7
After navigating into the main folder, ‘cd’ into the vpn sub-folder.
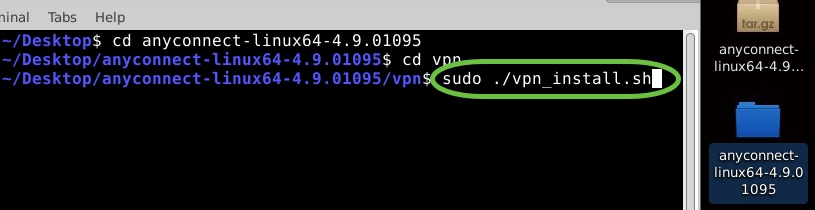
Step 8
To run the AnyConnect install script, type ‘sudo ./vpn_install.sh’. This will begin the installation process using superuser permissions.
For more details on the ‘sudo’ command, click here.
Step 9
Accept the terms in the license agreement to complete the installation by typing ‘y’.
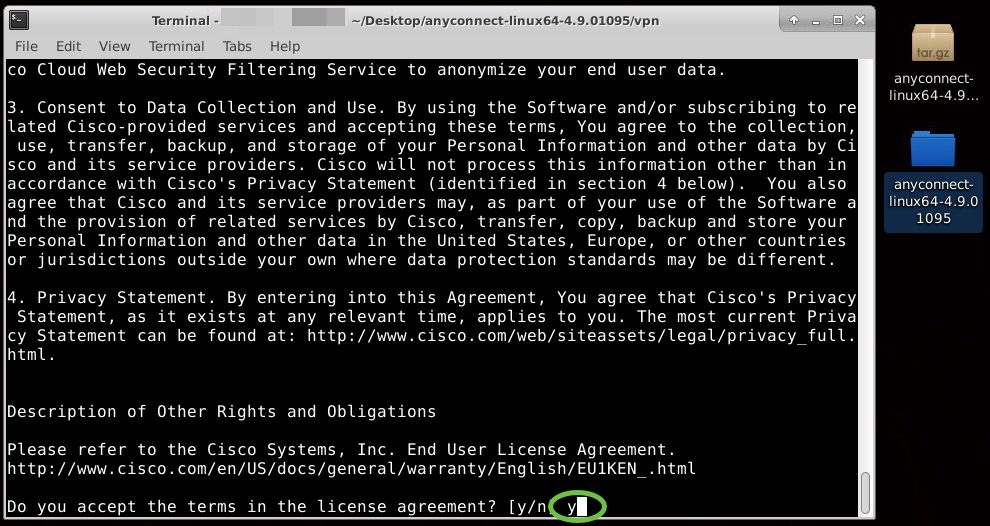
The AnyConnect installation should complete, and the Terminal window can be closed.
Using AnyConnect Secure Mobility Client v4.9.x
Step 1
To access the Anyconnect app, open the Terminal by pressing Ctrl+Alt+T on your keyboard. Use the command, ‘/opt/cisco/anyconnect/bin/vpnui’.
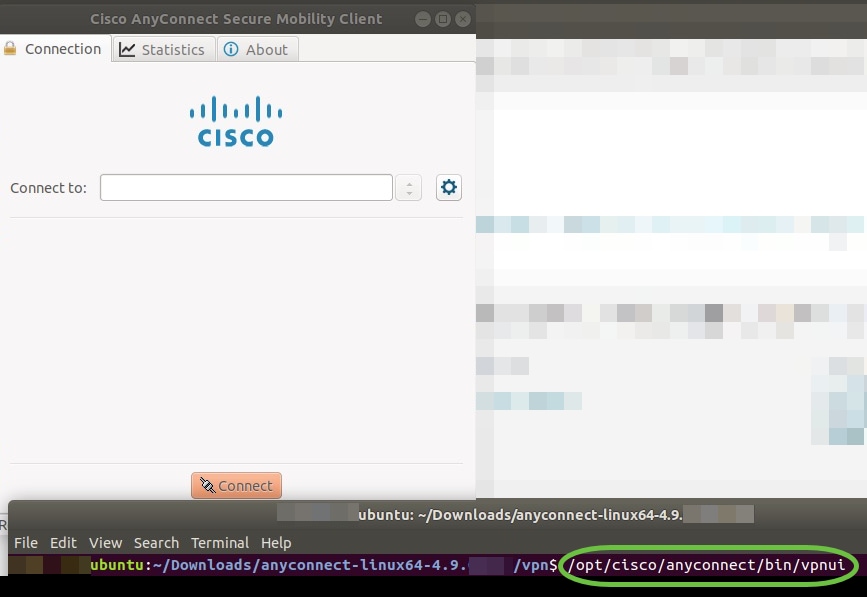
If you encounter any errors through the Terminal, you can access the app from the applications menu as shown below.
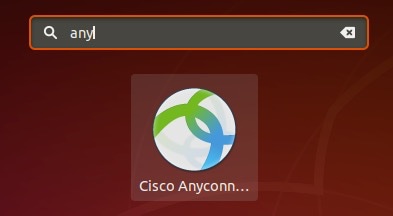
To access the applications menu using the User Interface (UI), click on the start icon (appears as nine dots on the lower left corner). Choose the Anyconnect app.
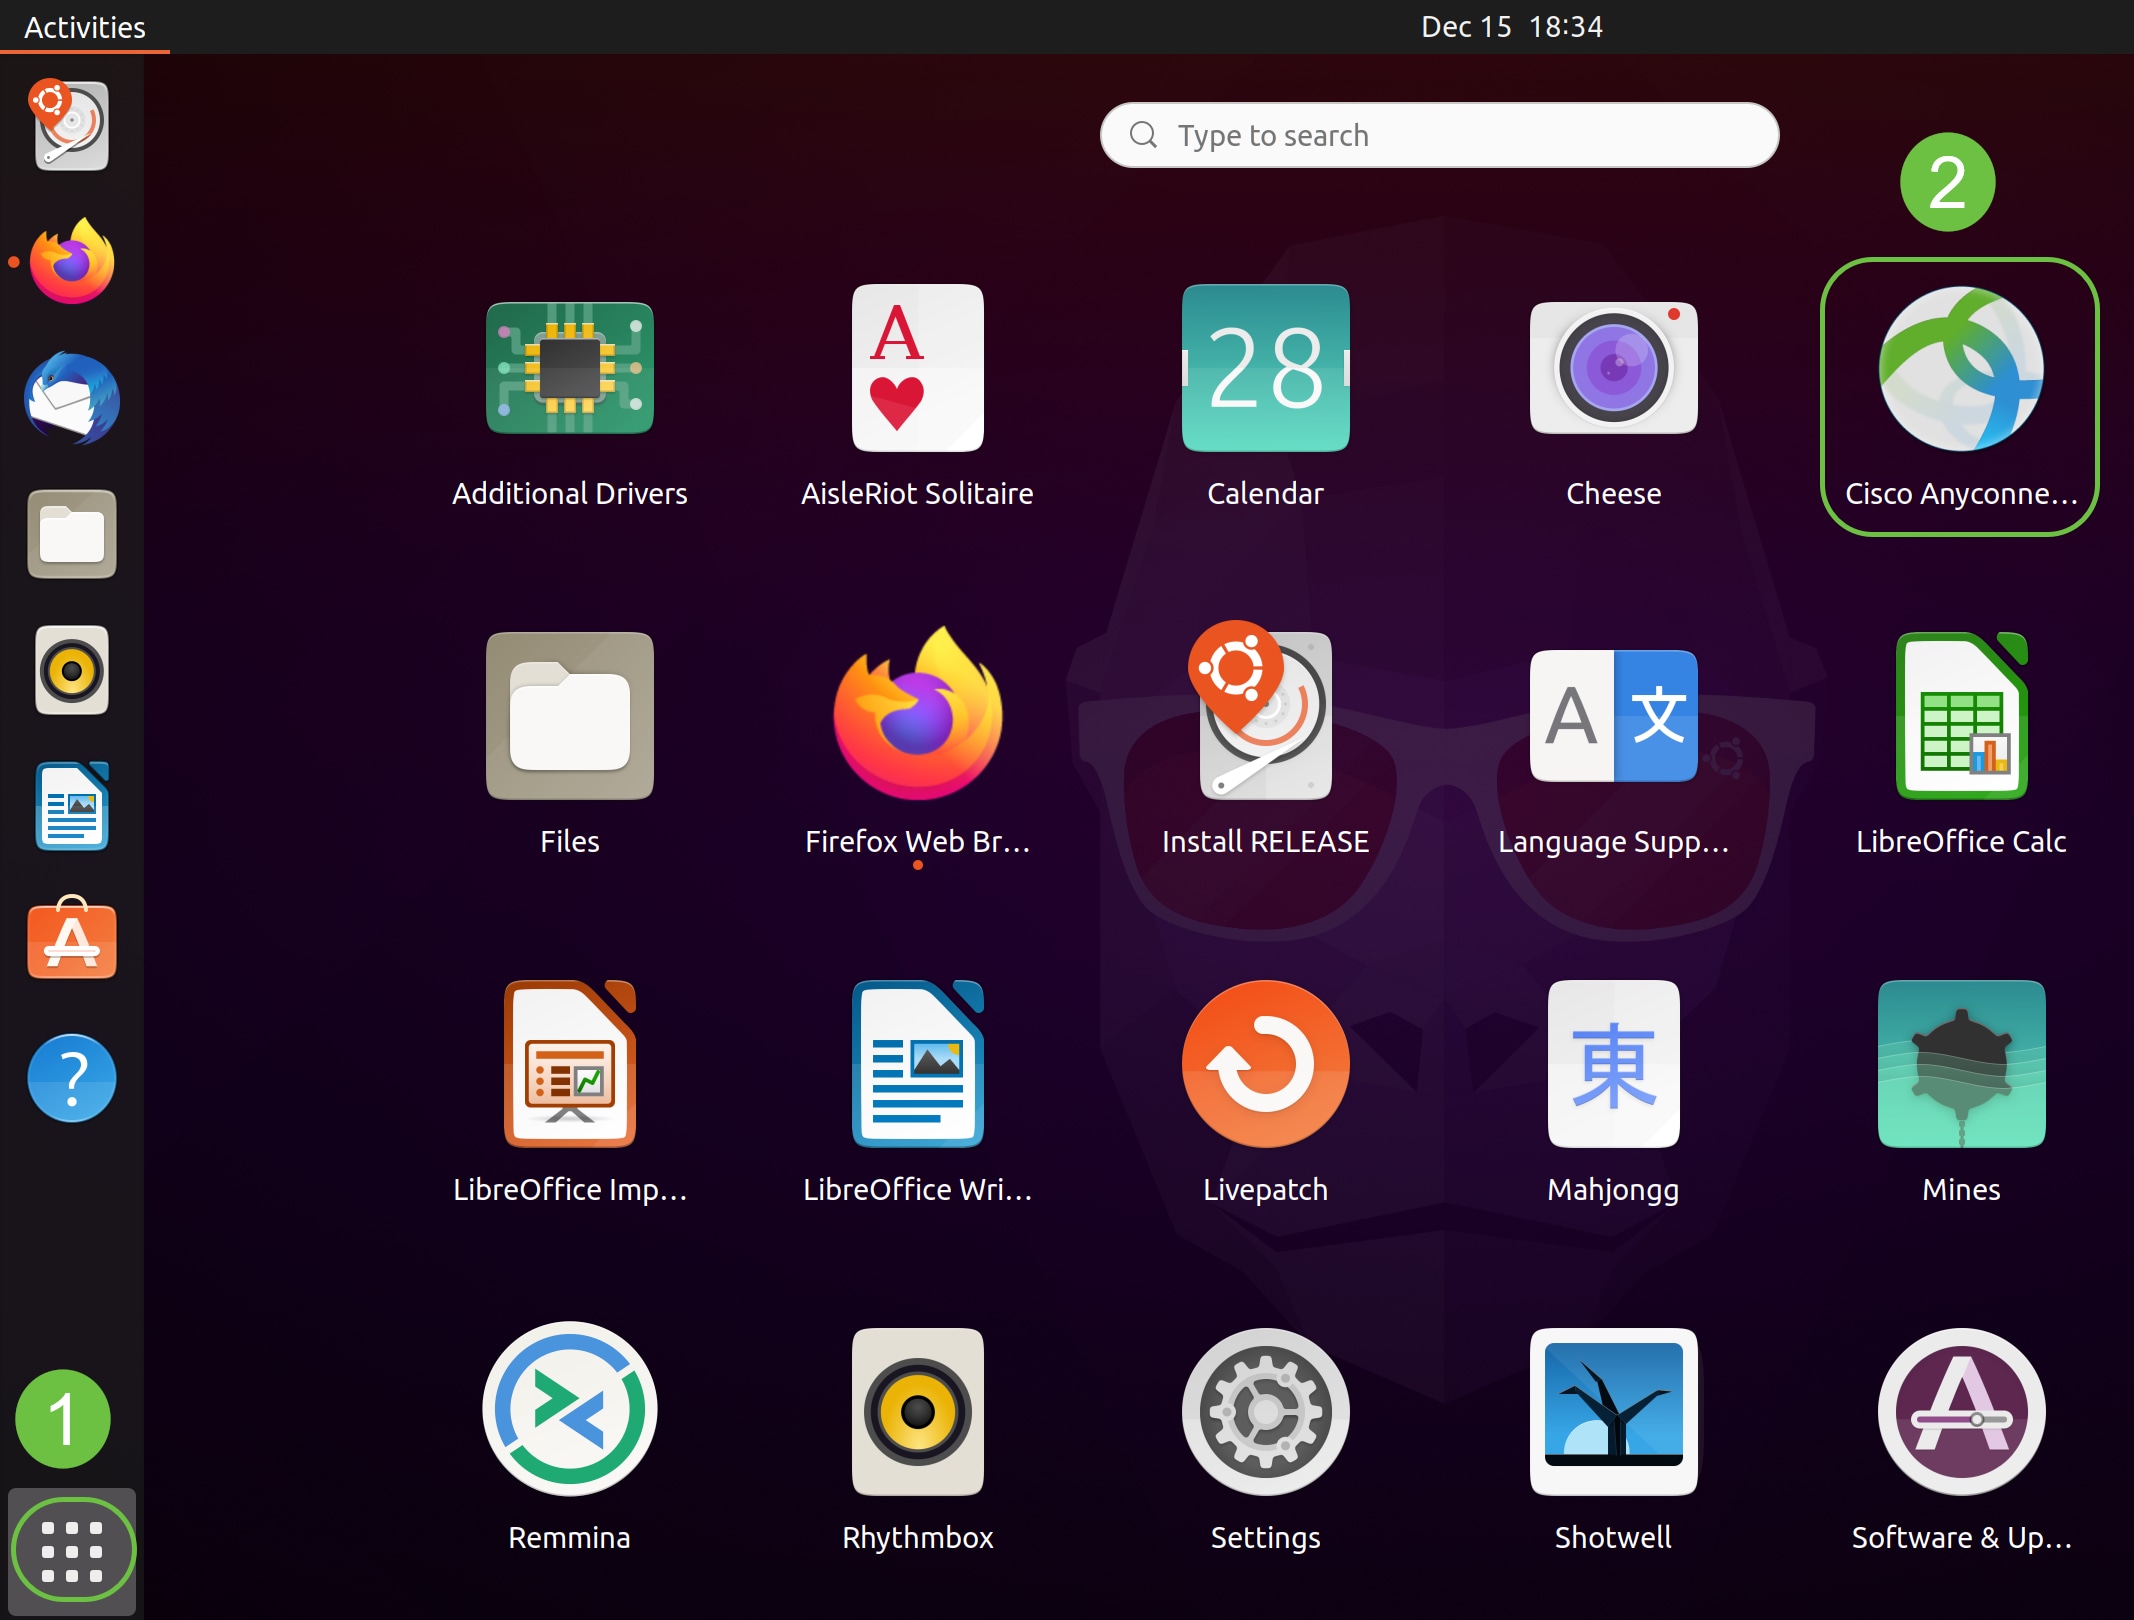
Alternatively, press Super+A (Super key is the windows icon key) on your keyboard to bring up the search bar. Start typing ‘Anyconnect’ and the app will appear.
Step 2
Click on the Anyconnect app.

Step 3
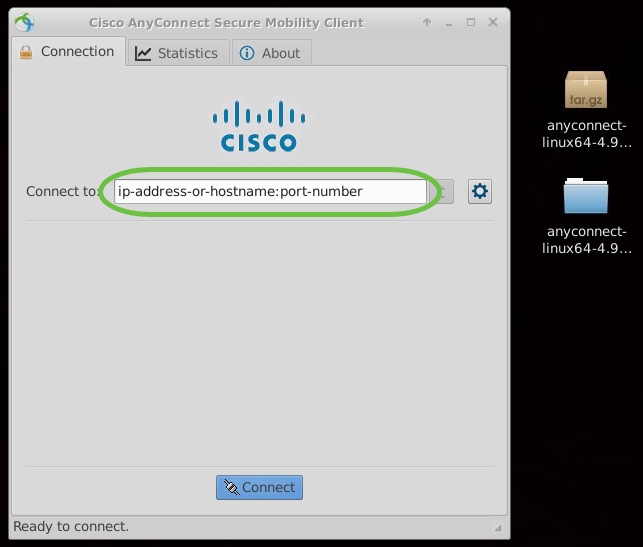
Enter the IP Address or Hostname of your desired server followed by the port number.
For RV340 family, the default port number is 8443.
Step 4
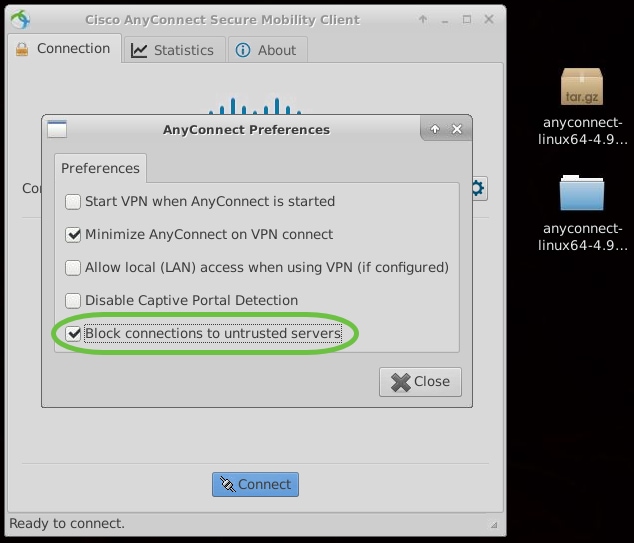
Some connections may not be secure using a trusted SSL certificate. By default, AnyConnect Client will block connection attempts to these servers.
Uncheck Block connections to untrusted servers to connect to these servers.
Uninstalling AnyConnect Secure Mobility Client v4.9.x
Step 1
Using Terminal, navigate to the folder that contains the uninstall shell script using the ‘cd’ command.
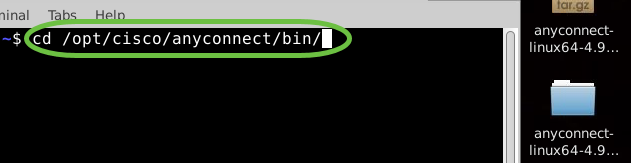
In a default installation, these files will be located in /opt/cisco/anyconnect/bin/.
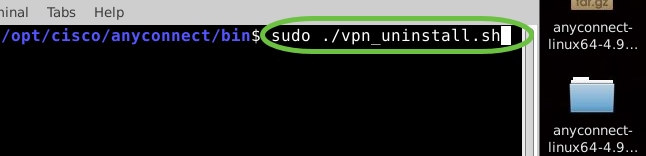
Step 2
To run the Anyconnect uninstall script, enter ‘sudo ./vpn_uninstall.sh’
This will begin the uninstall process using superuser permissions. For more information on the ‘sudo’ command, click here.
Step 3
At the prompt, enter the sudo password and the client software will complete uninstallation.

Conclusion
There you have it! You have now successfully learned the steps to install, use, and uninstall the Cisco AnyConnect Secure Mobility Client v4.9.x on Ubuntu Desktop.
For community discussions on Site-to-Site VPN, go to the Cisco Small Business Support Community page and do a search for Site-to-Site VPN.
We want the best for our customers, so if you have any comments or suggestions regarding this topic, please send us an email to the Cisco Content Team.
AnyConnect App
The Anyconnect App can be downloaded from the Google Play store or the Apple store.
Источник
Configure AnyConnect Secure Mobility Client for Linux using Client Certificate Authentication on an ASA
Available Languages
Download Options
Contents
Introduction
This document describes a configuration example for Adaptive Security Appliance (ASA) Cisco AnyConnect Secure Mobility Client access that uses client certificate for authentication for a Linux Operative System (OS) for an AnyConnect user to connect successfully to an ASA Headend.
Contributed by Dinesh Moudgil, Cisco HTTS Engineer.
Prerequisites
Requirements
This document assumes that the ASA is fully operational and configured to allow the Cisco Adaptive Security Device Manager (ASDM) or Command Line Interface (CLI) to make configuration changes.
Cisco recommends that you have knowledge of these topics:
Basic knowledge of ASA’s CLI and ASDM
SSLVPN configuration on the Cisco ASA Head End
Fundamental knowledge of PKI
Familiarity with Linux OS
Components Used
The information in this document is based on these software and hardware versions:
Cisco Adaptive Security Appliance ASA5585-SSP-20
Cisco Adaptive Security Appliance Software Version 9.9(2)36
Adaptive Security Device Manager Version 7.9(1)
AnyConnect Version 4.6.03049
Ubuntu OS 16.04.1 LTS
Note: Download the AnyConnect VPN Client package (anyconnect-linux*.pkg) from the Cisco Software Download (registered customers only) site. Copy the AnyConnect VPN client to the ASA’s flash memory, which is then downloaded to the remote user computers in order to establish the SSL VPN connection with the ASA.
The information in this document was created from the devices in a specific lab environment. All of the devices used in this document started with a cleared (default) configuration. If your network is live, make sure that you understand the potential impact of any command.
Backgound Information
For a successful client certificate authentication on Linux devices, AnyConnect secure mobility client supports the following certificate stores:
1. Linux OS (PEM) certificate store
2. Firefox (NSS) certificate store
This document is based on client certificate authentication using a Linux OS (PEM) certificate store.
1. To use Linux OS certificate store, PEM file-based certificates are placed in these directories.
| Entity | Path | Example |
| Certificate authority (CA) certificate | /opt/.cisco/certificates/ca | tactest: $ ls /opt/.cisco/certificates/ca |
| User certificate | /home/tactest/.cisco/certificates/client | tactest: $ ls /home/tactest/.cisco/certificates/client |
| User private key [Initially used to create CSR] : | /home/tactest/.cisco/certificates/client/private | tactest: $ ls /home/tactest/.cisco/certificates/client/private |
Note: By default, the path for installing client certificate and the private key is not present so it needs to be manually created using this command.
mkdir -p .cisco/certificates/client/private/
If you are using a Windows Certificate Authority,
1. Download the CA Certificate (Base64 encoded) with extension .cer
2. Download the User Identity Certificate (Base64 encoded) with extension .cer
3. Change the extension of certificates from .cer to .pem extension
2. To use Firefox (NSS) certificate store, user can import their certificate via Firefox.
The CA certificate for the ASA can be imported into NSS certificate store by AnyConnect client automatically if the user clicks “Always Connect” button on the certificate security warning dialog when browsing to ASA via HTTPS.
AnyConnect Linux uses Firefox certificate store (NSS) as default, if it fails then it would turn to use Linux OS certificate store.
Note: Currently, AnyConnect on a Linux OS doesn’t support GNOME Keyring so AnyConnect won’t able to use the certificate imported to the GNOME Keyring.
Please make sure there are no related certificates in Linux OS certificate store and Firefox (NSS) certificate store before importing a new user certificate.
Ensure that your files meet the following requirements:
- All certificate files must end with the extension .pem.
- All private key files must end with the extension .key.
- A client certificate and its corresponding private key must have the same filename. For example: client.pem and client.key.
For a clean start, please consider the following approach:
- Linux OS (PEM) certificate store:
A. Remove unnecessary PEM files under “/opt/.cisco/certificates”, but keep the “/opt/.cisco/certificates/ca/VeriSignClass3PublicPrimaryCertificationAuthority-G5.pem” certificate intact. This is the CA certificate AnyConnect relies on to perform the code signing verification.
B. Remove the user certificates that are not required from the path
Use firefox settings to inspect and delete related certificates imported by user or AnyConnect itself.
Configure
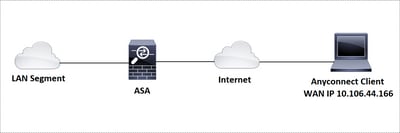
Network Diagram
Configurations
Linux Client Setup
Step 1. Download the Anyconnect package, extract the contents and install the Anyconnect application on the Linux client.
Step 2. Create a certificate signing request for the identity certificate on Linux client using OpenSSL.
Step 3. The CSR generated above can be used to request CA to issue a user identity certificate.
Step 4. Once the certificate is issued by CA, copy the certificate to the Linux client.
ASA CLI Configuration
This section provides the CLI configuration for the Cisco AnyConnect Secure Mobility Client for reference purposes.
Verify
Use this section in order to confirm that your configuration works properly.
Note: The Output Interpreter Tool (registered customers only) supports certain show commands. Use the Output Interpreter Tool in order to view an analysis of show command output.
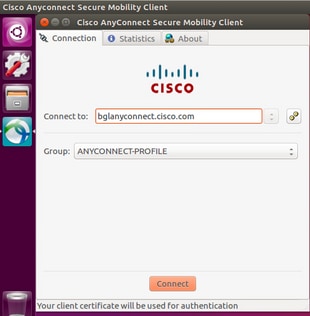
- On an Ubuntu OS 16.04.1 LTS, connect Anyconnect via GUI
If you wish to connect Anyconnect via command line on a Linux client, navigate to the following path:
Verify the Anyconnect client is able to establish connection:
Note: If Anyconnect GUI client is already opened and you try to connect Anyconnect via CLI, you get this error.
In this case, close the Anyconnect GUI client and then connect via Anyconnect CLI.
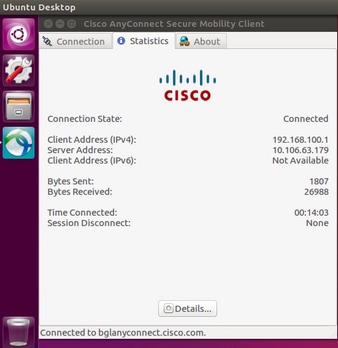
Once successfully connected, Anyconnect client details can be verified by navigating to Statistics tab in the Anyconnect GUI client
This command is used to confirm the CA and Identity certificates present on the Adaptive Security Appliance (ASA).
These show commands can be executed to confirm the status of AnyConnect client and its statistics.
In order to confirm if the Linux client has the certificate in the correct format (Base64 encoding with .pem extension), browse to the given path and use the following command:
If you get the following error it means that you are trying to view a DER-encoded certificate and it is not a PEM encoded certificate
Troubleshoot
This section provides the information you can use in order to troubleshoot your configuration.
Note: Refer to Important Information on Debug Commands before you use debug commands.
Caution: On the ASA, you can set various debug levels; by default, level 1 is used. If you change the debug level, the verbosity of the debugs might increase. Do this with caution, especially in production environments.
To troubleshoot an incoming AnyConnect client connection from Linux OS client, you can use the following:
- For AnyConnect process on an ASA
debug webvpn anyconnect 255
Here is a sample debug taken on an ASA from a working scenario:
- For client certificate authentication on an ASA
debug crypto ca 255
debug crypto ca messages 255
debug crypto ca transactions 255
Here is a sample debug taken for a successful client certificate authentication on an ASA:
- For the AnyConnect process on a Linux client
On a Linux device, Anyconnect logs can be found in the file named «syslog» at path:/var/log/
Here is a sample of working logs taken from a Linux client. The below command can be run to gather live logs for an Anyconnect client connection.
- DART(Diagnostic and Reporting Tool) on Linux Client
Similar to Windows and MAC, Linux client also has DART functionality. This can be used either using GUI and CLI.
Please note that DART needs to be run as an admin user in order to collect complete logs on a Linux client.
Step 1. DART can be executed from the command line by navigating to the following path:
Step 2. To execute DART from GUI, search for «anyconnect» on Linux GUI and click on Cisco DART and follow the instructions. The collected DART bundle is stored on the desktop.
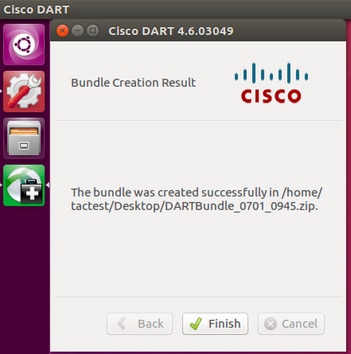
Step 3. To copy dart bundle from the Linux client to your workstation, use the command
scp username@10.106.44.166:/home/ /Desktop/DARTBundle_0701_0945.zip /Users/dmoudgil/Desktop/Ubuntu/
Here is a document for reference to DART on different OS: https://community.cisco.com/t5/security-documents/how-to-collect-the-dart-bundle-for-anyconnect/ta-p/3156025
Источник


