- Настройка UFW Ubuntu
- Команда UFW Ubuntu
- 1. Синтаксис ufw
- 2. Команды UFW
- Настройка UFW Ubuntu
- 1. Как включить UFW
- 2. Политика по умолчанию
- 3. Добавление правил UFW
- 4. Правила limit ufw
- 5. Просмотр состояния UFW
- 6. Удаление правил ufw
- 7. Логгирование в ufw
- 8. Отключение UFW
- Выводы
- 10 Useful Open Source Security Firewalls for Linux Systems
- 1. Iptables
- Features of IPtables
- 2. IPCop Firewall
- Features of IPCop Firewall
- 3. Shorewall
- Feature of Shorewall
- 4. UFW – Uncomplicated Firewall
- Features of UFW
- 5. Vuurmuur
- Features of Vuurmuur
- 6. pfSense
- Features of pfsense
- 7. IPFire
- Features of IPFire
- 8. SmoothWall & SmoothWall Express
- Features of SmoothWall
- 9. Endian
- Features of Endian
- 10. ConfigServer Security Firewall
- Features of CSF
- If You Appreciate What We Do Here On TecMint, You Should Consider:
Настройка UFW Ubuntu
Во всех дистрибутивах Linux для обеспечения сетевой безопасности и изоляции внутренних процессов от внешней среды используется брандмауэр iptables. Но его настройка может показаться очень сложной для новых пользователей, поэтому многие дистрибутивы создают собственные оболочки, которые упрощают процесс настройки.
В Ubuntu используется оболочка под названием UFW или Uncomplicated FireWall. В этой статье мы разберём, как выполняется настройка UFW Ubuntu, а также как пользоваться основными возможностями этой программы.
Команда UFW Ubuntu
1. Синтаксис ufw
Для управления возможностями брандмауэра используется одноимённая команда — ufw. Давайте сначала рассмотрим её опции и параметры, а потом перейдём к настройке. Синтаксис команды такой:
$ ufw опции действие параметры
Опции определяют общие настройки поведения утилиты, действие указывает, что нужно сделать, а параметры — дополнительные сведения для действия, например, IP-адрес или номер порта.
Сначала разберём опции утилиты:
- —version — вывести версию брандмауэра;
- —dry-run — тестовый запуск, никакие реальные действия не выполняются.
2. Команды UFW
Для выполнения действий с утилитой доступны такие команды:
- enable — включить фаерволл и добавить его в автозагрузку;
- disable — отключить фаерволл и удалить его из автозагрузки;
- reload — перезагрузить файервол;
- default — задать политику по умолчанию, доступно allow, deny и reject, а также три вида трафика — incoming, outgoing или routed;
- logging — включить журналирование или изменить уровень подробности;
- reset — сбросить все настройки до состояния по умолчанию;
- status — посмотреть состояние фаервола;
- show — посмотреть один из отчётов о работе;
- allow — добавить разрешающее правило;
- deny — добавить запрещающее правило;
- reject — добавить отбрасывающее правило;
- limit — добавить лимитирующее правило;
- delete — удалить правило;
- insert — вставить правило.
Это были все опции и команды, которые вы можете использовать в ufw. Как видите, их намного меньше, чем в iptables и всё выглядит намного проще, а теперь давайте рассмотрим несколько примеров настройки.
Настройка UFW Ubuntu
1. Как включить UFW
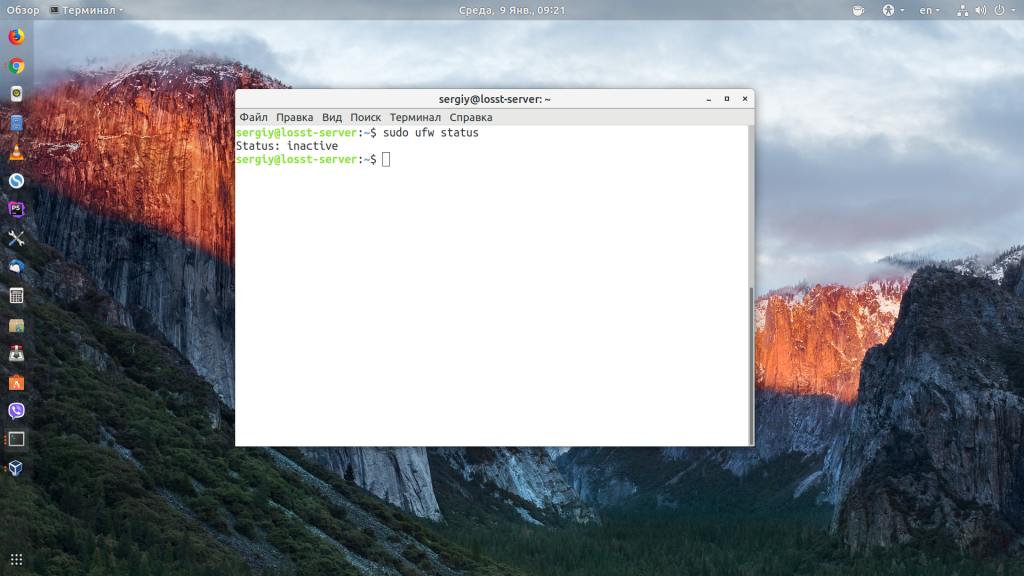
Сначала нужно отметить, что в серверной версии Ubuntu UFW по умолчанию включён, а в версии для рабочего стола он отключён. Поэтому сначала смотрим состояние фаервола:
sudo ufw status
Если он не включён, то его необходимо включить:
sudo ufw enable

Затем вы можете снова посмотреть состояние:
sudo ufw status

Обратите внимание, что если вы работаете по SSH, то перед тем, как включать брандмауэр, нужно добавить правило, разрешающее работу по SSH, иначе у вас не будет доступа к серверу. Подождите с включением до пункта 3.
2. Политика по умолчанию
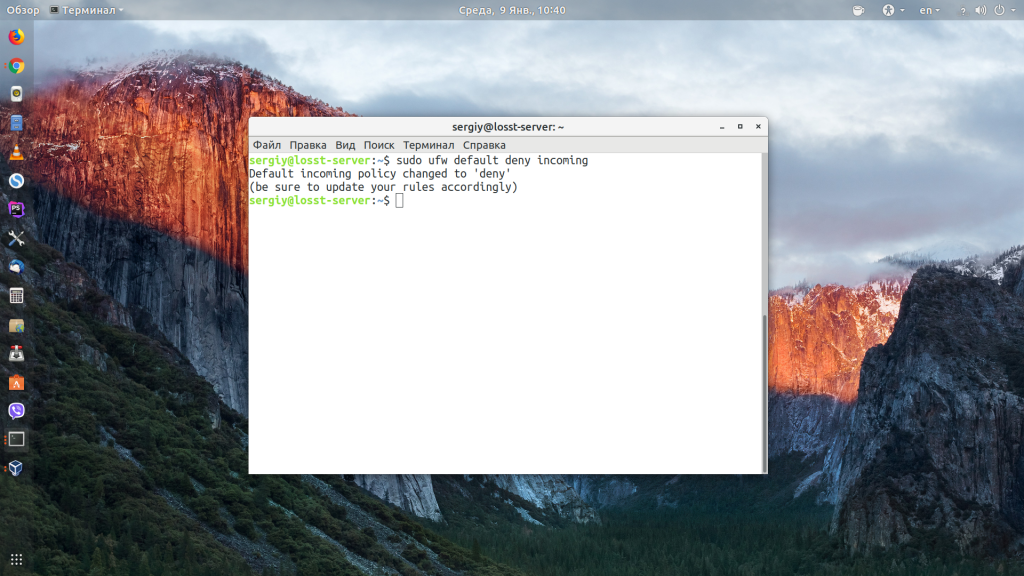
Перед тем, как мы перейдём к добавлению правил, необходимо указать политику по умолчанию. Какие действия будут применяться к пакетам, если они не подпадают под созданные правила ufw. Все входящие пакеты будем отклонять:
sudo ufw default deny incoming
А все исходящие разрешим:
sudo ufw default allow outgoing
3. Добавление правил UFW
Чтобы создать разрешающее правило, используется команда allow. Вместо allow могут использоваться и запрещающие правила ufw — deny и reject. Они отличаются тем, что для deny компьютер отсылает отправителю пакет с уведомлением об ошибке, а для reject просто отбрасывает пакет и ничего не отсылает. Для добавления правил можно использовать простой синтаксис:
$ ufw allow имя_службы
$ ufw allow порт
$ ufw allow порт/протокол
Например, чтобы открыть порт ufw для SSH, можно добавить одно из этих правил:
sudo ufw allow OpenSSH
sudo ufw allow 22
sudo ufw allow 22/tcp
Первое и второе правила разрешают входящие и исходящие подключения к порту 22 для любого протокола, третье правило разрешает входящие и исходящие подключения для порта 22 только по протоколу tcp.
Посмотреть доступные имена приложений можно с помощью команды:
sudo ufw app list

Можно также указать направление следования трафика с помощью слов out для исходящего и in для входящего.
$ ufw allow направление порт
Например, разрешим только исходящий трафик на порт 80, а входящий запретим:
sudo ufw allow out 80/tcp
sudo ufw deny in 80/tcp

Также можно использовать более полный синтаксис добавления правил:
$ ufw allow proto протокол from ip_источника to ip_назначения port порт_назначения
В качестве ip_источника может использоваться также и адрес подсети. Например, разрешим доступ со всех IP-адресов для интерфейса eth0 по протоколу tcp к нашему IP-адресу и порту 3318:
sudo ufw allow proto tcp from 0.0.0.0/24 to 192.168.1.5 port 3318

4. Правила limit ufw
С помощью правил limit можно ограничить количество подключений к определённому порту с одного IP-адреса, это может быть полезно для защиты от атак перебора паролей. По умолчанию подключения блокируются, если пользователь пытается создать шесть и больше подключений за 30 секунд:
sudo ufw limit ssh/tcp
К сожалению, настроить время и количество запросов можно только через iptables.
5. Просмотр состояния UFW
Посмотреть состояние и действующие на данный момент правила можно командой status:
sudo ufw status
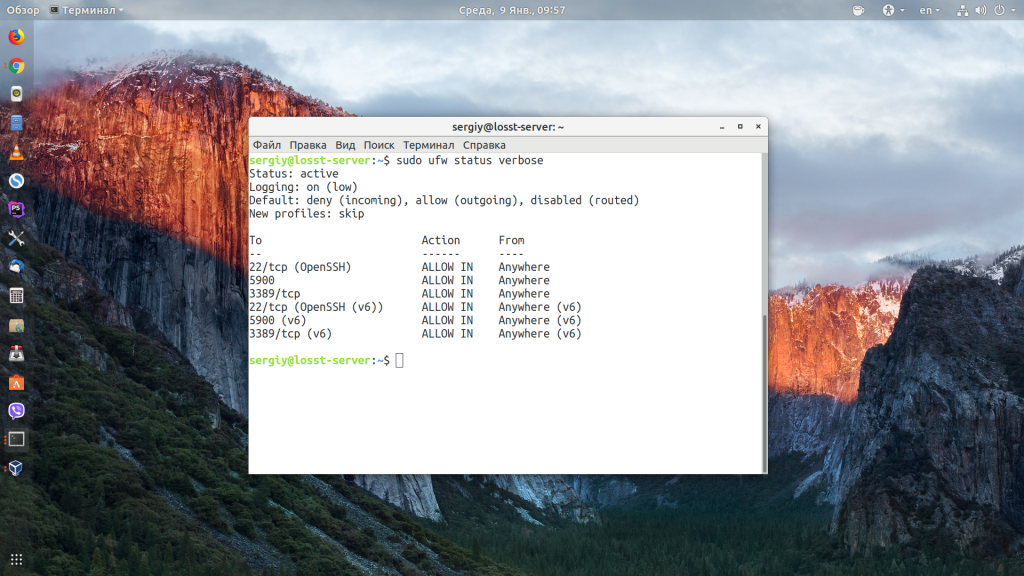
Чтобы получить более подробную информацию, используйте параметр verbose:
sudo ufw status verbose
С помощью команды show можно посмотреть разные отчеты:
- raw — все активные правила в формате iptables;
- builtins — правила, добавленные по умолчанию;
- before-rules — правила, которые выполняются перед принятием пакета;
- user-rules — правила, добавленные пользователем;
- after-rules — правила, которые выполняются после принятия пакета;
- logging-rules — правила логгирования пакетов;
- listening — отображает все прослушиваемые порты и правила для них;
- added — недавно добавленные правила;
Например, посмотрим список всех правил iptables:
sudo ufw show raw

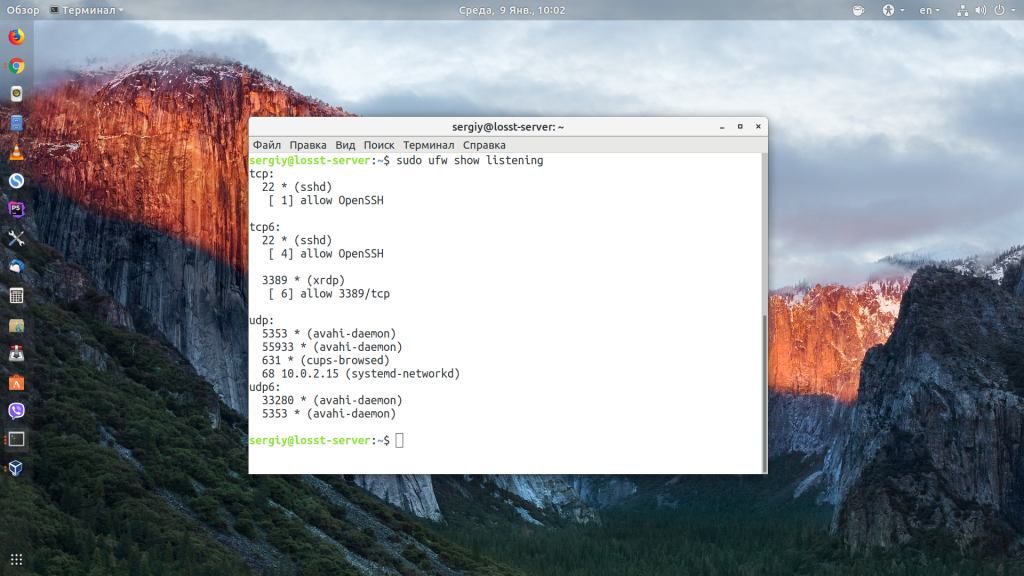
Посмотрим все прослушиваемые порты:
sudo ufw show listening
Или недавно добавленные правила:
sudo ufw show added

6. Удаление правил ufw
Чтобы удалить правило ufw, используется команда delete. Например, удалим ранее созданные правила для порта 80:
sudo ufw delete allow out 80/tcp
sudo ufw delete deny in 80/tcp

7. Логгирование в ufw
Чтобы отлаживать работу ufw, могут понадобится журналы работы брандмауэра. Для включения журналирования используется команда logging:
sudo ufw logging on
sudo ufw logging medium

Также этой командой можно изменить уровень логгирования:
- low — минимальный, только заблокированные пакеты;
- medium — средний, заблокированные и разрешённые пакеты;
- high — высокий.
Лог сохраняется в папке /var/log/ufw. Каждая строчка лога имеет такой синтаксис:
[UFW действие] IN=интерфейс OUT=итерфейс SRC=ip_источника DST=ip_назначения LEN=размер_пакета TOS=0x10 PREC=0x00 TTL=64 DF PROTO=протокол SPT=порт_источника DPT=порт назначения LEN=размер_пакета
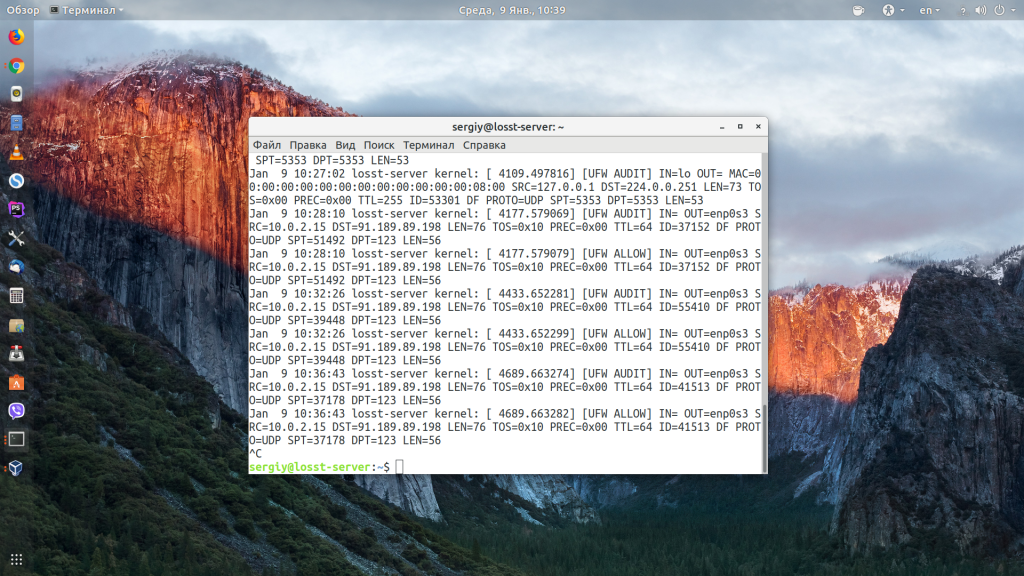
В качестве действия приводится то, что UFW сделал с пакетом, например ALLOW, BLOCK или AUDIT. Благодаря анализу лога настройка UFW Ubuntu станет гораздо проще.
8. Отключение UFW
Если вы хотите полностью отключить UFW, для этого достаточно использовать команду disable:
sudo ufw disable
Также, если вы что-то испортили в настройках и не знаете как исправить, можно использовать команду reset для сброса настроек до состояния по умолчанию:
Выводы
В этой небольшой статье мы разобрали, как настроить UFW Ubuntu для защиты вашего компьютера от угроз из сети. Это особенно актуально для серверов, потому что они постоянно доступны из интернета.
Источник
10 Useful Open Source Security Firewalls for Linux Systems
Being an Nix admin over 5+ years, I always be responsible for the security management of Linux servers. Firewalls plays an important role in securing Linux systems/networks. It acts like an security guard between internal and external network by controlling and managing incoming and outgoing network traffic based on set of rules. These set of firewall rules only allows legitimate connections and blocks those which are not defined.
![]() 10 Open Source Linux Firewalls
10 Open Source Linux Firewalls
There are dozens of open source firewall application available for download in the market. Here in this article, we’ve come up with 10 most popular open source firewalls that might be very useful in selecting one that suits your requirements.
1. Iptables
Iptables/Netfilter is the most popular command line based firewall. It is the first line of defence of a Linux server security. Many system administrators use it for fine-tuning of their servers. It filters the packets in the network stack within the kernel itself. You can find a more detailed overview of Iptables here.
Features of IPtables
- It lists the contents of the packet filter ruleset.
- It’s lightning fast because it inspects only the packet headers.
- You can Add/Remove/Modify rules according to your needs in the packet filter rulesets.
- Listing/zeroing per-rule counters of the packet filter rulesets.
- Supports Backup and restoration with files.
2. IPCop Firewall
IPCop is an Open Source Linux firewall distribution, IPCop team is continuously working to provide a stable, more secure, user friendly and highly configurable Firewall management system to their users. IPCop provides a well designed web interface to manage the firewall. It’s very useful and good for Small businesses and Local PCs.
You can configure an Old PC as a secure VPN to provide a secure environment over the internet. It’s also keeps some frequently used information to provide better web browsing experience to its users.
Features of IPCop Firewall
- Its Color coded Web Interface allows you to Monitor the performance Graphics for CPU, Memory and Disk as well as Network throughput.
- It views and auto rotate logs.
- Support Multiple language support.
- Provides very secure stable and easily implementable upgrade and add on patches.
3. Shorewall
Shorewall or Shoreline Firewall is another very popular Open source firewall specialized for GNU/Linux. It is build upon the Netfilter system built into the Linux kernel that also supports IPV6.
Feature of Shorewall
- Uses Netfilter’s connection tracking facilities for stateful packet filtering.
- Supports a wide range of routers/firewall/gateway applications.
- Centralized firewall Administration.
- A GUI interface with Webmin control Panel.
- Multiple ISP support.
- Supports Masquerading and port forwarding.
- Supports VPN
4. UFW – Uncomplicated Firewall
UFW is the default firewall tool for Ubuntu servers, it is basically designed to lesser the complexity of the iptables firewall and makes it more user friendly. A Graphical user interface of ufw, GUFW is also available for Ubuntu and Debian users.
Features of UFW
- Supports IPV6
- Extended Logging options with On/Off facility
- Status Monitoring
- Extensible Framework
- Can be Integrated with Applications
- Add/Remove/Modify Rules according to your needs.
5. Vuurmuur
Vuurmuur is another powerful Linux firewall manager built or manage iptables rules for your server or network. At the same time its very user friendly to administrate, no prior iptables working knowledge required to use Vuurmuur.
Features of Vuurmuur
- Support IPV6
- Traffic shaping
- More advanced Monitoring features
- Real time monitoring connection and bandwidth usage
- Can be easily configured with NAT.
- Have Anti-spoofing features.
6. pfSense
pfSense is another Open Source and a very reliable firewall for FreeBSD servers. Its based on the concept of Stateful Packet filtering. It offers wide ranges of feature which is normally available on expensive commercial firewalls only.
Features of pfsense
- Highly configurable and upgraded from its Web – based interface.
- Can be deployed as a perimeter firewall, router, DHCP & DNS server.
- Configured as wireless access point and a VPN endpoint.
- Traffic shaping and Real Time information about the server.
- Inbound and Outbound load balancing.
7. IPFire
IPFire is another open source Linux based firewalls for Small Office , Home Office (SOHO) environments. Its designed with modularity and highly flexibility. IPfire community also took care of Security and developed it as a Stateful Packet Inspection(SPI) firewall.
Features of IPFire
- Can be deployed as a firewall, a proxy server or a VPN gateway.
- Content filtering
- Inbuilt Intrusion detection system
- Supports through Wiki, forums and Chats
- Support hypervisors like KVM, VmWare and Xen for Virtualization environment.
8. SmoothWall & SmoothWall Express
SmoothWall is an Open Source Linux firewall with a highly configurable Web based interface. Its Web based interface is know as WAM (Web Access manager). A freely distributable version of SmoothWall is know as SmoothWall Express.
Features of SmoothWall
- Supports LAN, DMZ, and Wireless networks, plus External.
- Real Time content filtering
- HTTPS filtering
- Support proxies
- Log viewing and firewall activity monitor
- Traffic stats management on per IP, interface and visit basis
- Backup and restoration facility like.
9. Endian
Endian firewall is another Stateful packet Inspection concept based firewall which can be deployed as routers, proxy and Gateway VPN with OpenVPN. Its originally developed from IPCop firewall which is also a fork of Smoothwall.
Features of Endian
- Bidirectional firewall
- Snort Intrusion prevention
- Can secure web server with HTTP &FTP proxies, antivirus and URL blacklist.
- Can secure Mail servers with SMTP and POP3 proxies, Spam Auto-learning, Greylisting.
- VPN with IPSec
- Real time Network traffic logging
10. ConfigServer Security Firewall
Last, But not the last Configserver security & firewall. It’s a cross platform and a very versatile Firewall, it’s also based on the concept of Stateful packet inspection (SPI) Firewall. It supports almost all Virtualization environments like Virtuozzo, OpenVZ, VMware, XEN, KVM and Virtualbox.
Features of CSF
- Its daemon process LFD( Login failure daemon) checks for login failures of sensitive servers like ssh, SMTP, Exim, Imap,Pure & ProFTP, vsftpd, Suhosin and mod_security failures.
- Can configure email alerts to notify if something goes unusual or detect any kind of intrusion on your server.
- Can be easily integrated popular web hosting control panels like cPanel, DirectAdmin and Webmin.
- Notifies excessive resource user and suspicious process via email alerts.
- Advanced Intrusion detection system.
- Can protect your linux box with the attacks like Syn flood and ping of death.
- Checks for exploits
- Easy to start/restart/stop & lots more
Other than these Firewalls there are many other firewalls like Sphirewall, Checkpoint, ClearOS, Monowall available in the web to secure your Linux box. Please let the world know which is your favourite firewall for your Nix box and leave your valuable suggestions and queries below in the comment box. I’ll come with another interesting article soon, till then stay healthy and connected with Tecmint.com.
If You Appreciate What We Do Here On TecMint, You Should Consider:
TecMint is the fastest growing and most trusted community site for any kind of Linux Articles, Guides and Books on the web. Millions of people visit TecMint! to search or browse the thousands of published articles available FREELY to all.
If you like what you are reading, please consider buying us a coffee ( or 2 ) as a token of appreciation.

We are thankful for your never ending support.
Источник


