- Creating and extracting multivolume tar files
- Creating the multivolume tar file
- To unpack the multivolume tar archive
- Creating single tar files:
- Tar Incremental/Multivolume Backup
- Experimenting tar incremental backup
- Multiple Volumes with tar
- Multiple Volumes with tar
- Backup under Linux (Re: Dump Backup failed. )
- Многопоточное архивирование в Linux при помощи tar
- Linux архиватор multi volumes
- 9.6.1 Archives Longer than One Tape or Disk
- Аналоги WinRAR для Linux
- Аналоги WinRAR в Linux
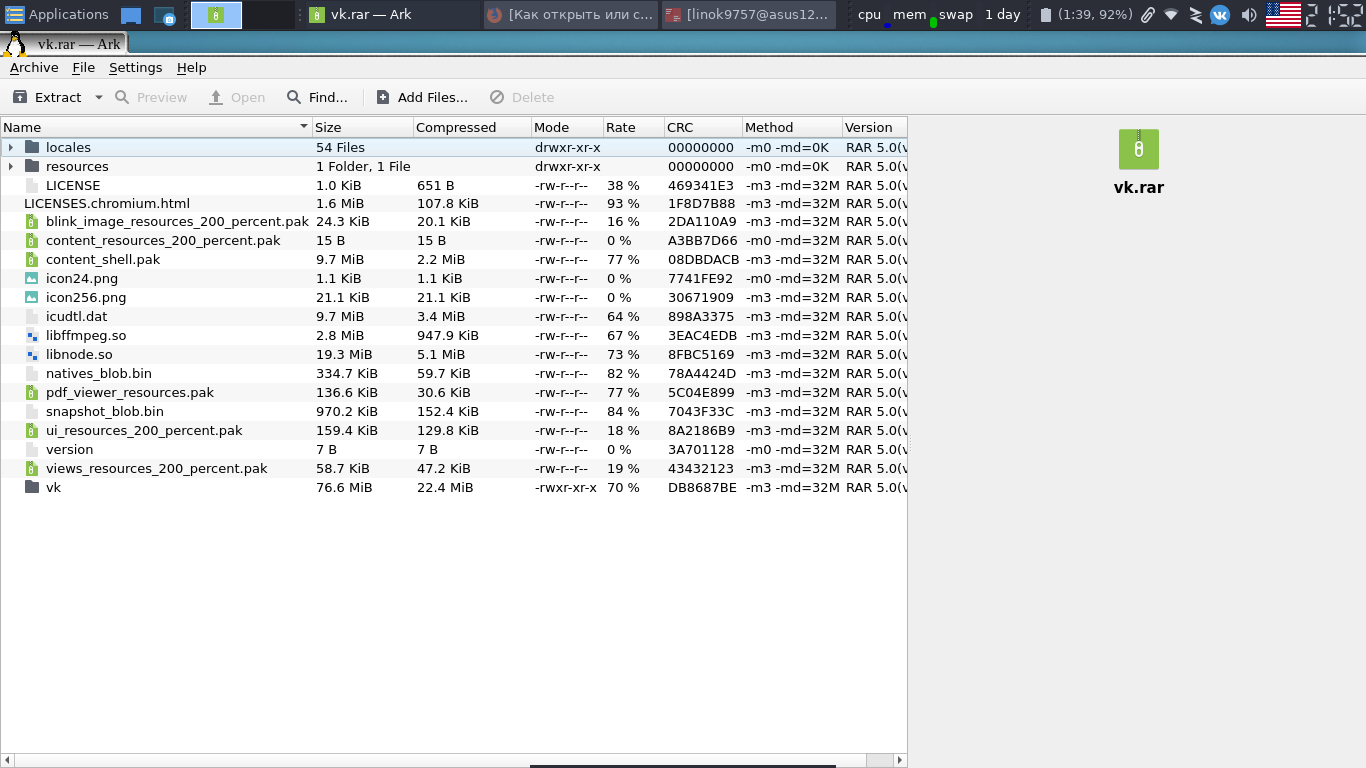
- 1. Ark
- 2. File Roller
- 3. PeaZIP
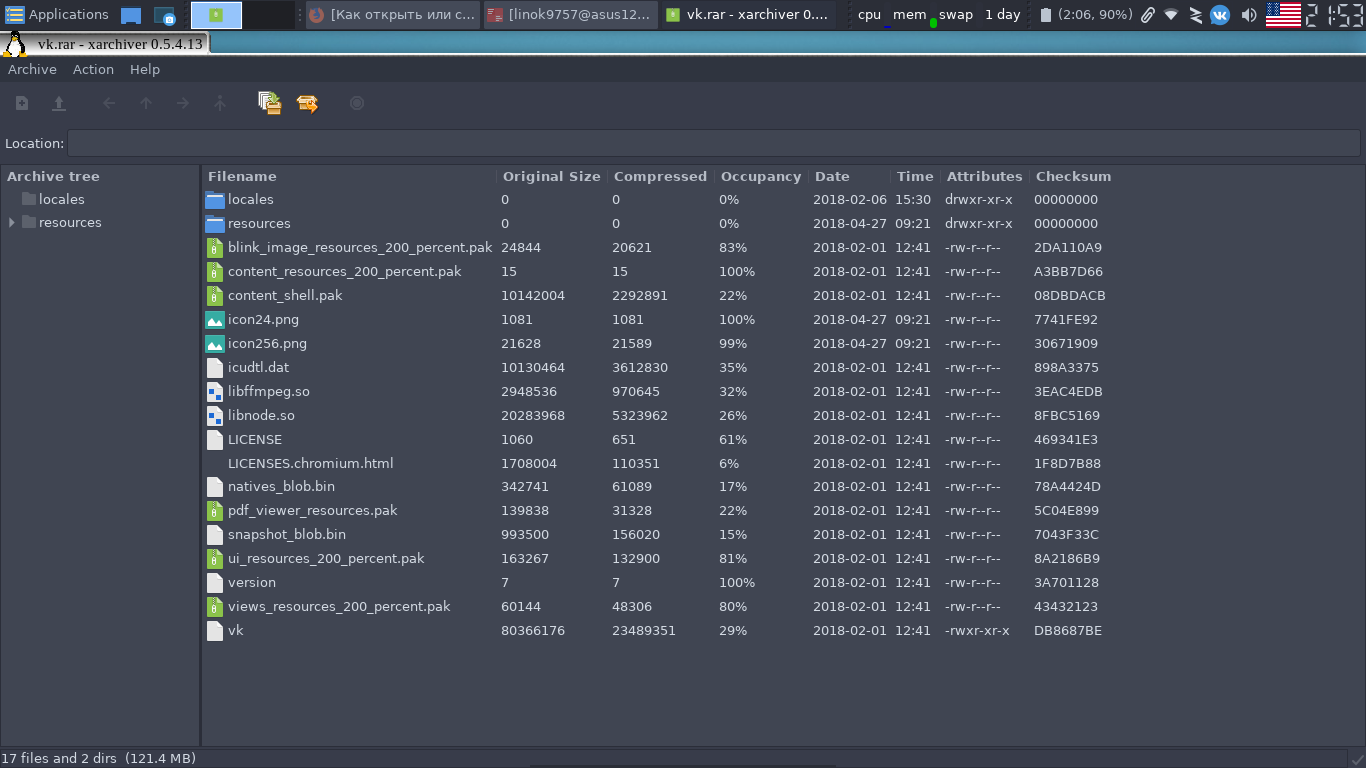
- 4. Xarchiver
- Выводы
- Оцените статью:
- Об авторе
- 31 комментарий
Creating and extracting multivolume tar files
Some servers do not support files larger than 2GB, also when creating archives larger than 2GB most probably server will run out of memory or other resources. So is best to split large archives in multiple files. This is a good way to move large sites to another server.
Creating the multivolume tar file
If for example you have a folder «my_documents» and you want to create multivolume tar archive with its contents, this command will start archiving it and will split the files to 1.2GB:
When first file reached 1.2GB (after some minutes) it will display a prompt to move to next file, it will ask if volume #2 for this archive is ready, type this answer, notice the «2«:
press enter, it will ask if files are ready, press enter again to confirm without typing anything. On next prompt type «n my_documents3.tar» and press enter twice again, and so on. You should now have multiple files of maximum 1.2GB named: my_documents.tar, my_documents2.tar, my_documents3.tar.
Unlike with zip files, it doesn’t seem to be a command for testing multivolume tar files.
If you created the files in order to move a large site, I would recommend to move them with wget triggered from destination server:
You should do some basic testing to compare file integrity if copied from another server, for example use «cksum my_documents.tar» on old and new server to make sure it returns same result, meaning that files are the same.
To unpack the multivolume tar archive
Use this command to unpack the multivolume tar archive, this would probably hapen on the new server if you moved a site:
After some work (minutes on most servers), it will ask for next file, type this:
Then on next question type n my_documents3.tar, etc.
Creating single tar files:
To create one single tar file, for example archiving «images» folder:
unpack single files (not multivolume) with this command:
Источник
Tar Incremental/Multivolume Backup
Experimenting tar incremental backup
— only one file created!
— Failed. Specifying -M won’t help.
investigate why above failed
need to organizate the archive into a sequence of files —info-script=SCRIPT-NAME
better add some label? —label=»SOME-PREFIX `date +SOME-FORMAT`«
Multiple Volumes with tar
The multi-volume with tar kind of assumes you will be swapping tapes out; so what you need to do is create a script to «simulate» a tape switch by renaming files. You can manually rename the file to file1, etc, and let tar «think» you changed tapes.
Below is an example. The following example only counts to 10 correctly, but you can get the idea. The problem with tar multi-volume is that if you want to compress, you have to compress afterwards, and the results are not predictable to know how to fill a cd, etc. There is a backup solution called «dar», (do a google search); which will let you set a «compressed multi-volume size». It is worth checking out.
I have a better set of scripts which does this with perl, but I hate do distribute them because they are suited to my system, but if you want a copy, email me. My scripts count as high as you need, and break each directory into it’s own backup, in case you need to restore just one directory. There are restore scripts too, which do the opposite function to reassemble the tar segments.
And here is the backup-rotate.sh
Multiple Volumes with tar
this is how they work. You run «do-backup root» or «do-backup home». They will tar and gzip all directories, and break them into small pieces, for easier copying. /usr is broken into it’s sub-dirs since it’s so big.
The homedirs are also broken into subdirs, AND all the hidden files and directories are saved into a separate directory «rootbacktemp», so when you restore, remember to copy them back to your homedir root.
When the cd’s are make, 3 programs are copied to each cd, «restore,restore-rotate.pl, and microperl». microperl is a small version of perl, that allows you to restore from scratch, without a perl installation.
To restore, just copy all the files you want into a directory, along with «restore,restore-rotate.pl, and microperl». Then run restore. Everything will be automatic after that. These cd’s are written as ext2, so if you boot with a rescue floppy, and try to mount the cd’s to copy them in, use «mount -t ext2 /dev/hdc /mnt» (or whatever is right for you.)
The «cdwrite» script , way down at the bottom, has the setting for cdrecord. Use «cdrecord -scanbus» to get your dev, and put it in there. The dummy switch is for testing.
If you use the dummy switch, and keep inserting a blank cdr when prompted, you won’t write any cd’s but all the iso’s will be created, in /.
This script isn’t perfect, it requires that you have a good bit of free space on the hard drive for the iso’s. The iso’s are saved in /, but you could modify the script to delete each iso after it is written to cdr, if you are tight on space. There is a line in cdwrite which is commented out «#unlink image.iso». Just uncomment that line to delete isos after they are written.
I suggest using the dummy switch first, and see how it goes, if the iso’s are created, then you are doing it right.
I tried to do some parallel processing in this script, so it will write and process the next iso at the same time. This is very cpu intensive, so it is best to do this when nothing else is happening.
The scripts run fine with a scsi cdwriter, I don’t know if they behave well with ide-scsi.
Good luck, feel free to modify and use the scripts as you desire.
P.S. If you don’t feel comfortable with running the binary «microperl» which I’ve include (I wouldn’t run any binary sent to me); you can make your own or you can change the restore scripts to run with #!/usr/bin/perl
Microperl can be made from the perl5.8 distibution, with «make -f Makefile.micro».
These scripts run good once you understand them.
Backup under Linux (Re: Dump Backup failed. )
You can do incremental backups with tar. Here is my tar script for backing up everything which changed since the last backup. In my case, I do it to a zipdisk, but you could modify this to do it to a tape. You would have to store the date of the last incremental backup somewhere; I do it on the zipdisk. You would also have to use mt commands to position yourself on the tape. And I would strongly recommend using the eof option of mt to add an EOF after each record. Then you can use mt fsf skipping twice for each record to position the tape.
Источник
Многопоточное архивирование в Linux при помощи tar
Обратил я тут внимание на то что архивирование в Linux через tar занимает только одно ядро и решил поискать как это можно исправить и утилизировать все 4 ядра своего процессора.
В мануале по tar я нашел такую опцию:
-I, –use-compress-program PROG
filter through PROG (must accept -d)
А поиск по интернету выдал мне многопоточные архиваторы:
Установить все три можно в Ubuntu командой:
Команды для архивации:
- gz: tar -czf tarball.tar.gz files
- bz2: tar -cjf tarball.tar.bz2 files
- xz: tar -cJf tarball.tar.xz files
Команды для разархивации:
- gz: tar -xzf tarball.tar.gz
- bz2: tar -xjf tarball.tar.bz2
- xz: tar -xJf tarball.tar.xz
А теперь параллельная версия архивации:
- gz: tar -I pigz -cf tarball.tar.gz files
- bz2: tar -I pbzip2 -cf tarball.tar.bz2 files
- xz: tar -I pxz -cf tarball.tar.xz files
- gz: tar -I pigz -xf tarball.tar.gz
- bz2: tar -I pbzip2 -xf tarball.tar.bz2
- xz: tar -I pxz -xf tarball.tar.xz
Воспользуюсь исходниками ядра Linux версии 4.15 буду архивировать и разархивировать на M.2 SSD диске используя CPU Intel(R) Core(TM) i5-6200U CPU @ 2.30GHz 4 cores, 4 threads, 8Gb RAM
Время архивации(больше проверять не вижу смысла):
. gzip bzip2 xz
Однопоточное 26.409s 1m23.939s 6m43.628s
Многопоточное 10.048s 34.784s 2m45.230s
Источник
Linux архиватор multi volumes

 | ||
9.6.1 Archives Longer than One Tape or DiskTo create an archive that is larger than will fit on a single unit of the media, use the —multi-volume ( -M ) option in conjunction with the —create option (see create). A archive can be manipulated like any other archive (provided the —multi-volume option is specified), but is stored on more than one tape or disk. When you specify —multi-volume , tar does not report an error when it comes to the end of an archive volume (when reading), or the end of the media (when writing). Instead, it prompts you to load a new storage volume. If the archive is on a magnetic tape, you should change tapes when you see the prompt; if the archive is on a floppy disk, you should change disks; etc. You can read each individual volume of a multi-volume archive as if it were an archive by itself. For example, to list the contents of one volume, use —list , without —multi-volume specified. To extract an archive member from one volume (assuming it is described that volume), use —extract , again without —multi-volume . If an archive member is split across volumes (ie. its entry begins on one volume of the media and ends on another), you need to specify —multi-volume to extract it successfully. In this case, you should load the volume where the archive member starts, and use ‘ tar —extract —multi-volume ’— tar will prompt for later volumes as it needs them. See extracting archives, for more information about extracting archives. —info-script= script-name ( —new-volume-script= script-name , -F script-name ) (see info-script) is like —multi-volume ( -M ), except that tar does not prompt you directly to change media volumes when a volume is full—instead, tar runs commands you have stored in script-name . For example, this option can be used to eject cassettes, or to broadcast messages such as ‘ Someone please come change my tape ’ when performing unattended backups. When script-name is done, tar will assume that the media has been changed. Multi-volume archives can be modified like any other archive. To add files to a multi-volume archive, you need to only mount the last volume of the archive media (and new volumes, if needed). For all other operations, you need to use the entire archive. If a multi-volume archive was labeled using —label= archive-label ( -V archive-label ) (see label) when it was created, tar will not automatically label volumes which are added later. To label subsequent volumes, specify —label= archive-label again in conjunction with the —append , —update or —concatenate operation. —multi-volume -M Creates a multi-volume archive, when used in conjunction with —create ( -c ). To perform any other operation on a multi-volume archive, specify —multi-volume in conjunction with that operation. Источник Аналоги WinRAR для LinuxВ этой статье мы познакомимся с различными программами для просмотра, создания и распаковки архивов — аналогами WinRAR Linux, а так же установим их на различные дистрибутивы. У многих пользователей, которые только перешли на Linux, часто возникает вопрос, а есть ли какие-либо менеджеры архивов под данную ОС, которые будут нормальной альтернативой WinRAR. Далее я покажу вам 4 хорошие, на мой взгляд, программы. Аналоги WinRAR в LinuxПо сути все архиваторы для Linux, которые работают в графическом интерфейсе, являются оболочками для консольных утилит, поэтому они поддерживают одни и те же форматы архивов. Но для этой поддержки нужно, чтобы в системе были установлены соответствующие утилиты (zip, unzip, rar, unrar, tar, lzma, p7zip, bzip2 и другие), если они вам нужны. 1. ArkАрхиватор, входящий в комплект программ KDE. Код программы написан на C++, интерфейс с использованием Qt. По сути является графической оболочкой для библиотек и консольных приложений, работающих с архивами. Распространяется под лицензией GPL.
Ubuntu Ark присутствует в основном репозитории, просто введите следующую команду: sudo apt install ark Arch Данный архиватор также имеется в стандартных репозиториях Arch: sudo pacman -S ark 2. File RollerАналог WinRAR Linux, разрабатываемый для оболочки Gnome (но это не значит, что её можно использовать только там). По сути File Roller является Front-end, графической оболочкой, дающей пользователю единый интерфейс для различных консольных архиваторов. Данная программа написана на C, а интерфейс на GTK+. Распространяется под лицензией GPL. Внимание! На момент написания статьи программа не обновлялась с 23.09.13!
Ubuntu Данный пакет присутствует в официальном репозитории Ubuntu, так что используйте следующую команду: sudo apt install file-roller Arch Программа также есть в стандартных репозиториях: sudo pacman -S file-roller 3. PeaZIPБесплатный, кроссплатформенный архиватор, написанный на Object Pascal и Pascal. Распространяется для Windows 9x, Windows NT и Linux. Имеет свой формат пакетов «*.pea», который поддерживает многотомные архивы, сжатие, системы шифрования и контроля целостности. Работа же с другими форматами чаще обеспечивается за счёт различных внешних библиотек. Интерфейс программы имеет реализацию как на Qt, так и на GTK+. Распространяется под лицензиями GPL и LGPL. Внимание! Поддержка кодировки UTF-8 реализована не полностью!
Ubuntu В официальных репозиториях Ubuntu данного пакета нет. Лучше скачайте deb-файл с сайта проекта, выбрав нужную вам версию. Arch Данного пакета нет и в стандартных репозиториях Arch, так что придётся воспользоваться AUR. Qt версия: yaourt -S peazip-qt yaourt -S peazip-gtk2 4. XarchiverЛегковесный файловый архиватор. Архиватор по умолчанию для таких сред, как LXDE и XFCE. Написана данная программа на C, интерфейс же построен на GTK+. Распространяется под лицензией GPLv2. Внимание! Разработка приостановлена!
Ubuntu Чтобы установить данную программу в этом дистрибутиве, просто выполните следующую команду в терминале: sudo apt install xarchiver Arch Пакет с данной программой есть и в официальных репозиториях Arch: sudo pacman -S xarchiver ВыводыВ данной статье мы рассмотрели несколько программ, которые можно использовать как аналоги WinRAR Linux. Какую из них использовать, решать вам. А каким архиватором предпочитаете пользоваться вы? Напишите в комментариях! Нет похожих записей Оцените статью:Об автореОбычный подросток. Интересуюсь современными технологиями, СПО и различными ОС, начиная от Kolibri и React, заканчивая *BSD и GNU/Linux. На данный момент я использую Xubuntu. 31 комментарийДля информации. Запустил свой любимый архиватор WinRAR под WINE и пользуюсь Для сведения — со своим любимым WinRar вместе с Wine ты запустил еще оччччччень много всего))))) Пользуйся, открывай ворота Смотри ниже , не туда запулил Mне лично еще с DOSовских времён всегда было удобнее пользоваться консольными утилитами — zip, gz, arj, ace, rar, 7z и тд, запускаемыми в файл-менеджерах вроде double / total commander буквально одним кликом. peazip как оболочку, xz как архиватор, в редких случаях пакую в zip/bzip2 для старых компов Благословляешь? Спасибо, уже многим пользуюсь. Абсолютной защиты конечно нет, но можно сильно поднять непробиваемость. Для широко улыбающихся: Не забудьте указать файл Regedit.exe, иначе Вы сами не сможете больше запустить редактор реестра! Для сброса ограничения на запуск программ надо установить значение ключа RestrictRun в 0 И уже не много всего))))), можно сказать вообще ничего. Пользуйсь, закрываю Источник | ||