- How To Boot To Console (Text) Mode Using Debian / Ubuntu, Fedora, Arch Linux / Manjaro And More
- Case A. Temporary booting to console mode (text mode)
- Case B. Permanently booting to text mode (console mode)
- Thread: How to boot to command line interface?
- How to boot to command line interface?
- Re: How to boot to command line interface?
- Thread: booting to terminal
- booting to terminal
- Re: booting to terminal
- Re: booting to terminal
- Re: booting to terminal
- Re: booting to terminal
- Re: booting to terminal
- GRUB консоль. Запускаем Linux
- 4 комментариев к “ GRUB консоль. Запускаем Linux ”
How To Boot To Console (Text) Mode Using Debian / Ubuntu, Fedora, Arch Linux / Manjaro And More
This article explains how to boot a Linux distribution like Debian, Ubuntu, Fedora, Arch Linux / Manjaro, etc., in console mode, either temporarily or permanently.
The instructions in this article should work with any Linux distribution that uses systemd (for the permanent mode below) and GNU GRUB (for the temporary mode), but I personally only tried this with Debian, Ubuntu, Manjaro and Fedora.
Case A. Temporary booting to console mode (text mode)
Using these instructions, your computer will boot to console only for the current boot. After restarting the computer it will boot normally, so these changes are temporary.
1. To temporarily boot to console mode (tty), start your computer and immediately after the BIOS / UEFI splash screen, press and hold the Shift (BIOS), or press the Esc (UEFI) key repeatedly, to access the GRUB menu.
2. Once you see the GNU GRUB screen, with the first entry from the menu selected, press the e key. This allows you to edit the kernel parameters before booting.
Look for the line that begins with linux (use the Up / Down / Left / Right arrow keys to navigate); vmlinuz should also be on the same line. At the end of this line (you can place the cursor using the arrow keys at the beginning of the line, then press the End key to move the cursor to the end of that line) add a space followed by the number 3 . Don’t change anything else.
This 3 represents the multi-user.target systemd target which is mapped to the old, now obsolete runlevel 2, 3 and 4 (used to start and stop groups of services). For example the old runlevel 5 is mapped to the systemd graphical.target and using this starts. you’ve guessed it, the graphical (GUI) target. For more on systemd targets see this page.
Example #1. This is how the line beginning with «linux» looks like for Ubuntu 18.04 LTS (it doesn’t have to be identical for you, it’s just so you get an idea):
And this is how the line beginning with «linux» looks after adding the 3 at the end:
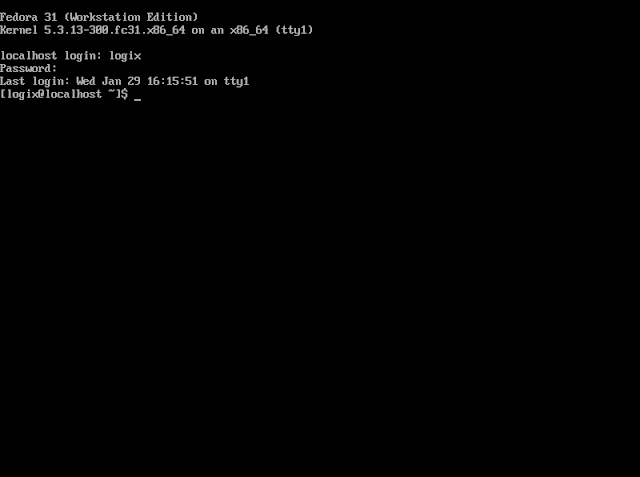
Example #2. This is how the line beginning with «linux» looks for Fedora 31 (it’s not identical for you, it’s just so you get an idea):
And this is how it looks after adding the 3 at the end of the line:
3. After doing this, press Ctrl + x or F10 to boot to console (text) mode.
To reboot your system while in console mode, use the reboot command ( sudo reboot ).
It’s worth noting that Debian and Ubuntu based Linux distributions (including Linux Mint, Elementary OS, Pop!_OS, Zorin OS, etc.) come with a recovery mode built into the GNU GRUB menu. So in case you use Debian / Ubuntu or some Linux distribution based on it, get to the GNU GRUB menu as explained above, then select Advanced options , and from the new list that comes up select the first entry that ends with (recovery mode) . Select this entry and hit the Enter key, and you’ll get to a menu that, among others, allows you to drop to root shell prompt — when selected, your system continues to boot to the command line and not a graphical user interface, allowing you to login using your root password. This allows access to the filesystem in read-only mode; for read-write use mount -o remount,rw / . Use this for example to reset a lost user / administrator password on Ubuntu, Linux Mint, Elementary OS, etc.
Case B. Permanently booting to text mode (console mode)
Getting your Linux system to always boot to console (text / tty) mode is as easy as running a single command:
This command sets text mode as the default systemd target (runlevel as it used to be called before systemd). After running this command, reboot your system and it will automatically boot to console / text mode every time.
Don’t know the current systemd target used on your system? Use this command, which will show the currently set target:
Extra tip: using this, your Linux computer will boot to tty1 (text-only virtual console). You can switch to a different virtual console by using Ctrl + Alt + F2 for tty2, Ctrl + Alt + F3 for tty3, and so on until tty7.
In case you want to undo this change and get your Linux system to boot to the default graphical mode, use:
After using this command, reboot ( sudo reboot ) and your system should start in graphical mode, as it was by default.
Источник
Thread: How to boot to command line interface?
Thread Tools
Display
How to boot to command line interface?
Is there a way to boot Ubuntu-11.10 to a command line interface so I can bypass the graphics to regain control of my PC and do some apt-get updating? I have been hit by “Cannot display this video mode” again and this time, no matter what I do, I cannot get past this hurdle.
I installed Ubuntu-11.10 a little over a month ago and had some problems connecting to an old Dell 1280×1024 60 Hz LCD screen: “Cannot display this video mode” when Ubuntu tries to take final control of the screen after boot-up. Thanks to advice from Fantab (posting #4), I was able to resolve the issue by creating a script to set the screen to a known-good resolution/frequency and placing a link to this script in /etc/X11/Xsession.d/ so the script would be executed on startup.
Regrettably, this fix no longer works. I could only access my PC with a Ubuntu-11.10 CD.
Several things changed after the last update on 30-Dec-11:
- The link to the fix resolution script was remove from /etc/X11/Xsession.d/, probably because this folder was overwritten. However, restoring the link did not remedy the situation.
- “CRT1” is no longer recognized by xranadr. It has changed to “VGA-0”. However, fixing the resolution restoring script to address this did not remedy the situation.
Other efforts that failed:
- Changing the resolution restoring script to set a lower resolution from 1280×1024 60 to 1024×768 60 used successfully by the Ubuntu-11.10 CD.
- Uncommenting “# GRUB_GFXMODE=640×480” and changing it to “GRUB_GFXMODE=1280x1024x16,800x600x24,640×480”.
..and, uncommenting “#GRUB_TERMINAL=console” still resulted in a black “Cannot display this video mode”.
In short, my PC is unusable until I can get the screen to work again. Worse yet, I am unable to install any updates that may have resolved the «Cannot display..» issue.
![]()
Re: How to boot to command line interface?
Is there a way to boot Ubuntu-11.10 to a command line interface so I can bypass the graphics to regain control of my PC and do some apt-get updating? I have been hit by “Cannot display this video mode” again and this time, no matter what I do, I cannot get past this hurdle.
I installed Ubuntu-11.10 a little over a month ago and had some problems connecting to an old Dell 1280×1024 60 Hz LCD screen: “Cannot display this video mode” when Ubuntu tries to take final control of the screen after boot-up. Thanks to advice from Fantab (posting #4), I was able to resolve the issue by creating a script to set the screen to a known-good resolution/frequency and placing a link to this script in /etc/X11/Xsession.d/ so the script would be executed on startup.
Regrettably, this fix no longer works. I could only access my PC with a Ubuntu-11.10 CD.
Several things changed after the last update on 30-Dec-11:
- The link to the fix resolution script was remove from /etc/X11/Xsession.d/, probably because this folder was overwritten. However, restoring the link did not remedy the situation.
- “CRT1” is no longer recognized by xranadr. It has changed to “VGA-0”. However, fixing the resolution restoring script to address this did not remedy the situation.
Other efforts that failed:
- Changing the resolution restoring script to set a lower resolution from 1280×1024 60 to 1024×768 60 used successfully by the Ubuntu-11.10 CD.
- Uncommenting “# GRUB_GFXMODE=640×480” and changing it to “GRUB_GFXMODE=1280x1024x16,800x600x24,640×480 ”.
..and, uncommenting “#GRUB_TERMINAL=console” still resulted in a black “Cannot display this video mode”.
In short, my PC is unusable until I can get the screen to work again. Worse yet, I am unable to install any updates that may have resolved the «Cannot display..» issue.
If you hold shift at boot, does anything happen? It should bring up the bootloader, and you can boot to a root shell prompt.
Источник
Thread: booting to terminal
Thread Tools
Display
booting to terminal
I have a question..
Is there a way I can boot into terminal rather then booting into the GUI desktop?? Then do a «startx» command if i need to go into the GUI desktop. I am new to linux and thought it would be a VERY GOOD!! hobby to pick up..
Thank You all who view this
![]()
Re: booting to terminal
Hi and welcome to the forums!
![]()
Re: booting to terminal
2 sisco311 .. it’s not polite to send peoples to reading manuals)))
2 sIXXvIRUS . CTRL+ALT+F1 (for first text terminal) and graphic ALT+F7 to return in GNOME («GUI»)
Re: booting to terminal
2 sisco311 .. it’s not polite to send peoples to reading manuals)))
2 sIXXvIRUS . CTRL+ALT+F1 (for first text terminal) and graphic ALT+F7 to return in GNOME («GUI»)
sisco311’s response is right on and why rewrite all that when he has an excelent link to refrence?
Kirca_Belka your showing him the wrong way.
![]()
Re: booting to terminal
I think you ‘re wrong.. if we ‘ll send peoples to manuals most of them drops idea to use Ubuntu.. do you remember what means in translation word «Ubuntu»? Humanity.
I spent just a second.. and showed sIXXvIRUS easiest way.. just example..if he ‘s interested more .. he ‘ll find more info using www or forum.. if he needed just urgent answer he got it.
![]()
Re: booting to terminal
This is a FAQ. I answered it several times. I didn’t post a link to manual, but to one of my posts on this forums.
Источник
GRUB консоль. Запускаем Linux
Дата 30.05.2017 Автор Alex Рубрика iT
Иногда после установки Linux GRUB загрузчик показывает консоль вместо списка операционных систем. В статье расскажу как попросить grub начать загрузку системы через консоль.
Запускаем Linux через консоль GRUB
Если при загрузке компьютера появилась консоль grub, то не отчаивайтесь:

Для начала надо определить на каком диске находится система. В этом поможет команда:
Введите её и появится список всех дисков и разделов:

Теперь надо пройтись по всем дискам и разделам, чтобы найти два файла. Эти файлы начинаются на vmlinuz и initrd.img. В поиске этих файлов поможет та же команда ls. Скорее всего файлы будут лежать в корневой директории раздела ‘/’. Начинаем перебирать все диски и разделы:
Перебираем до тех пор, пока не найдём фалы vmlinuz и initrd.img. Верный результат будет выглядеть примерно так:

Запускаем Linux
Теперь надо запустить Linux. К сожалению, придётся минимум один раз наступить на грабли, но о них чуть позже.
Для загрузки Linux необходимо ввести следующие команды:
linux /vmlinuz-4.4.0-53-generic root=/dev/sda1
В приведённом примере необходимо заменить все пути и названия файлов на свои.
Чтобы облегчить задачу по набору всех значков в именах файлов, можно время от времени нажимать TAB на клавиатуре. Консоль сама будет завершать названия файлов. К примеру, набрали из второй строки «linux /vm», затем нажали TAB, строчка сама дописалась до «linux /vmlinuz-4.4.0-53-generic».
Если при вводе вышеуказанных команд консоль не вернула никаких сообщений, то всё сделано правильно и начнётся загрузка после ввода «boot».
ALERT! /dev/sda1 does not exist Dropping to shell!
При загрузке система монтируется на определенный раздел, в который её устанавливали. К примеру, если установка происходила в /dev/sda1 надо смонтировать систему туда. Но если система была установлена не в /dev/sda1, то во время запуска система выдаст ошибку:
ALERT! /dev/sda1 does not exist. Dropping to shell!
Это и есть грабли, о которых говорил ранее. На второй строчке примера было указано root=/dev/sda1:
linux /vmlinuz-4.4.0-53-generic root=/dev/sda1
Необходимо задать правильный раздел, потому что /dev/sda1 не подходит. Для этого вводим команду:
Появится список всех смонтированных разделов и их адреса:

Находим что-то похожее на root. В моём примере это
Перезапускаем систему и заново вводим в консоль grub все известные команды, но уже с правильным разделом для root:
linux /vmlinuz-4.4.0-53-generic root=/dev/mapper/mint—vg-root
Заключение
В статье описан один способов запуска linux через grub консоль. Есть и другие методы запуска. Читайте о них в следующих статьях.
4 комментариев к “ GRUB консоль. Запускаем Linux ”
Привет, а как сделать так, чтобы каждый раз не вводить при загрзке:
set root=(hd1,gpt2)
linux /vmlinuz-4.4.0-53-generic root=/dev/sda1
Привет. Ох, если бы я только знал!:)
Если найду — обязательно поделюсь. Но пока не нашёл. Поэтому пришлось забросить ультрабук prestigio, из-за которого и начал писать эту статью.
Привет. Помоги, пожалуйста, с установкой Linux. При выборе загрузочной флэшки появляется такое окно. Оставь контакты, как с тобой можно связаться? Спасибо.
А если загрузиться в систему и сделать update-grub — это не поможет «запомнить» настройки?
Источник


