- Linux bootable cd rom
- How to Create Bootable Linux CD
- More about images
- Step # 1: Copy boot.iso to /tmp
- Step # 2: Insert blank CD R/RW media
- Write diskboot.img to floppy
- Create Bootable CD/DVD/USB Based on Windows PE or Linux
- AOMEI Backupper
- Key Features
- Create System Image
- Create Disk Image
- Backup Files
- Clone Hard Disk
- Automatic Backup
- AOMEI Freeware
- User Say
- Introduction of Bootable CD
- Making Windows PE Bootable CD
- Making Bootable USB Flash Drive or USB Disk
- Making Linux Bootable CD
- Making Bootable ISO File
Linux bootable cd rom
Note: This section was contributed by Rizwan Mohammed Darwe ( rizwan AT clovertechnologies dot com )
This section assumes that you are familiar with the process and workings of writing CDs in linux. Consider this to be a quick reference to include the ability to boot the CD which you will burn. The CD-Writing-HOWTO should give you an in-depth reference.
For the x86 platform, many BIOS’s have begun to support bootable CDs. The patches for mkisofs is based on the standard called «El Torito». Simply put, El Torito is a specification that says how a cdrom should be formatted such that you can directly boot from it.
The «El Torito» spec says that any cdrom drive should work (SCSI or EIDE) as long as the BIOS supports El Torito. So far this has only been tested with EIDE drives because none of the SCSI controllers that has been tested so far appears to support El Torito. The motherboard definately has to support El Torito. How do you if your motherboard supports «El Torito»? Well, the ones that support lets you choose booting from HD, Floppy, Network or CDROM.
The El Torito standard works by making the CD drive appear, through BIOS calls, to be a normal floppy drive. This way you simply put any floppy size image (exactly 1440k for a 1.44 meg floppy) somewhere in the ISO filesystem. In the headers of the ISO fs you place a pointer to this image. The BIOS will then grab this image from the CD and for all purposes it acts as if it were booting from the floppy drive. This allows a working LILO boot disk, for example, to simply be used as is.
Roughly speaking, the first 1.44 (or 2.88 if supported) Mbytes of the CD-ROM contains a floppy-disk image supplied by you. This image is treated like a floppy by the BIOS and booted from. (As a consequence, while booting from this virtual floppy, your original drive A: ( /dev/fd0 ) may not be accessible, but you can try with /dev/fd1 ).
First create a file, say «boot.img», which is an exact image of the bootable floppy-disk which you want to boot via the CD-ROM. This must be an 1.44 MB bootable floppy-disk. The command below will do this
Place this image somewhere in the hierarchy which will be the source for the iso9660 filesystem. It is a good idea to put all boot related files in their own directory («boot/» under the root of the iso9660 fs, for example).
One caveat — Your boot floppy must load any initial ramdisk via LILO, not the kernel ramdisk driver! This is because once the linux kernel starts up, the BIOS emulation of the CD as a floppy disk is circumvented and will fail. LILO will load the initial ramdisk using BIOS disk calls, so the emulation works as designed.
The El Torito specification requires a «boot catalog» to be created as well. This is a 2048 byte file which is of no interest except it is required. The patchwork done by the author of mkisofs will cause it to automatically create the boot catalog, but you must specify where the boot catalog will go in the iso9660 filesystem. Usually it is a good idea to put it in the same place as the boot image, and a name like boot.catalog seems appropriate.
So we have our boot image in the file boot.img , and we are going to put it in the directory boot/ under the root of the iso9660 filesystem. We will have the boot catalog go in the same directory with the name boot.catalog . The command to create the iso9660 fs in the file bootcd.iso is then:
Now burn the CD with the usual cdrecord command and it is ready to boot.
The first step is to get hold of the bootable image used by the source CD. But you cannot simply mount the CD under linux and dd the first 1440k to a floppy disk or to a file like boot.img . Instead you simply boot with the source CD-ROM.
When you boot the Win98 CD you are dropped to A: prompt which is the actual ramdisk. And D: or Z: is where all the installables are residing. By using the diskcopy command of dos copy the A: image into the actual floppy drive which is now B: The command below will do this.


| Features | Windows PE bootable CD | Linux bootable CD |
| File, Folder, Disk and partition backup |  |  |
| System Backup | | |
| System Restore | | |
| File, Folder, Disk and partition Restore | | |
| Disk and partition clone | | |
| Explore image file | | |
| Support hardware RAID | | |
Making Windows PE Bootable CD
When making a Windows PE bootable CD, the free backup software -В AOMEI Backupper will check out whether your operating system meets the corresponding requirements. For instance, is it necessary to install Windows AIK? If it does, this software will provide corresponding notices. If your operating system is Vista or higher version of OS, such as, Windows 7/8/2008 R2/2011/2012, usually you can directly create a bootable CD without installing Windows AIK.
Here come the steps of how to create bootable disc with AOMEI Backupper.
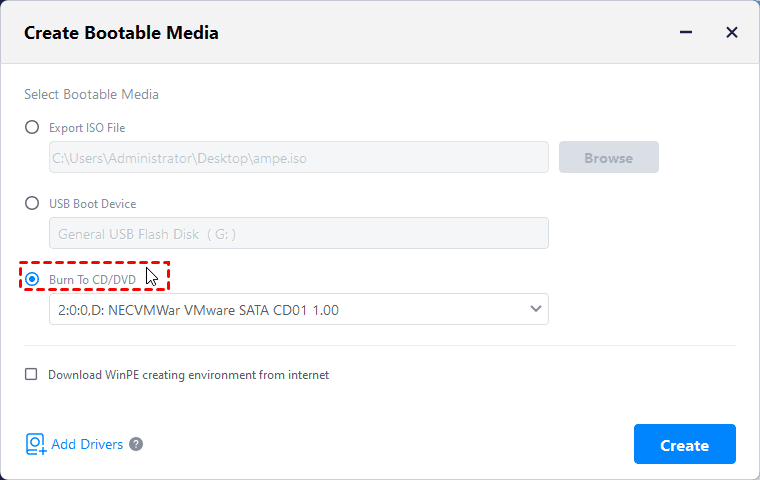
Step 1.В Under the «Tools» tab, select «Create Bootable Media» option.

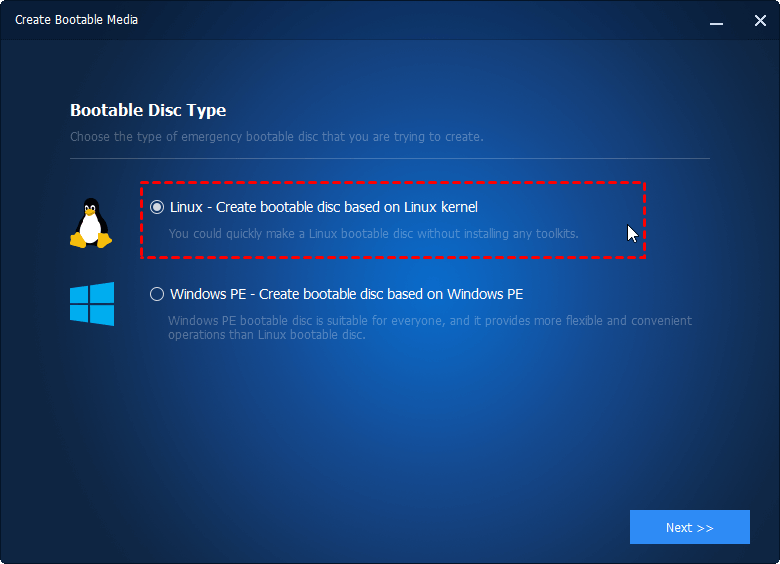
Step 2.В In the pop-up window, choose «Windows PE-create bootable disc based on Windows PE» option, and then click «Next».

Step 3. In the pop-up window, select «Burn to CD/DVD» option, and then click «Next». (Notes: you need a CD-burning program, and also you need to insert the CD/DVD into the CD-ROM, or the «Burn to CD/DVD» option will not be available).
Step 4. When the operation is done, just click «Finish» to exit the interface.
Here you have already made a bootable CD. Then, you can reboot your computer, and set the CD-ROM as the first boot device in BIOS settings and test if your computer can boot from the disc. Then, when something bad happens, you can performВ windows 10 system image restore to different computer, even with dissimilar hardware.
Making Bootable USB Flash Drive or USB Disk
If you do not have a CD/DVD, but a USB flash drive, you can use a USB drive to replace CD/DVD, to create a bootable USB drive. The making way is the same as creating a bootable CD. You just need to see the following screenshot, select «USB Boot Device» and click Next.

Making Linux Bootable CD
The way to create Linux bootable CD is just the same as those steps of creating Windows PE bootable CD/USB Drive. The only difference is that you can create this kind of CD at any time without meeting any requirement, or need a Windows AIK installation. Just like what has been said before, the compatibility of Linux bootable CD might be a little bit poorer.
The operating process of making Linux bootable disc is just similar to that of making Windows PE bootable disc. You can just refer to the steps above. Here is is screenshot:
During the process of making Linux CD, if you do not possess a CD, AOMEI Backupper allows you create a bootable USB drive. The only requirement is that, when choosing the bootable media type, select the USB Boot Device. Then you can boot the operating system from the USB disk to do the recovery operations.
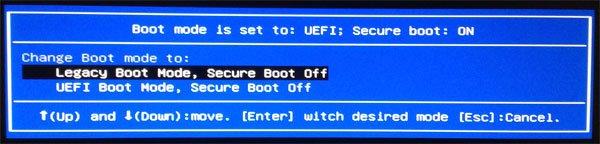
Note: Linux bootable media does not support for EFI/UEFI boot, if your computer boot mode is UEFI mode, you need to enter into BOIS to change the BIOS boot mode from UEFI to Legacy Boot Mode like the following snapshot (you may also learn how to change the setting by referring to the manual of your motherboard).
Making Bootable ISO File
If you do not have CD or USB disk, or if there is a problem when making the bootable CD, you could create a bootable ISO file first, and then employ some burning software, like Nero to burn ISO file to a CD or USB disk.
Here come the operating steps of creating bootable ISO file.
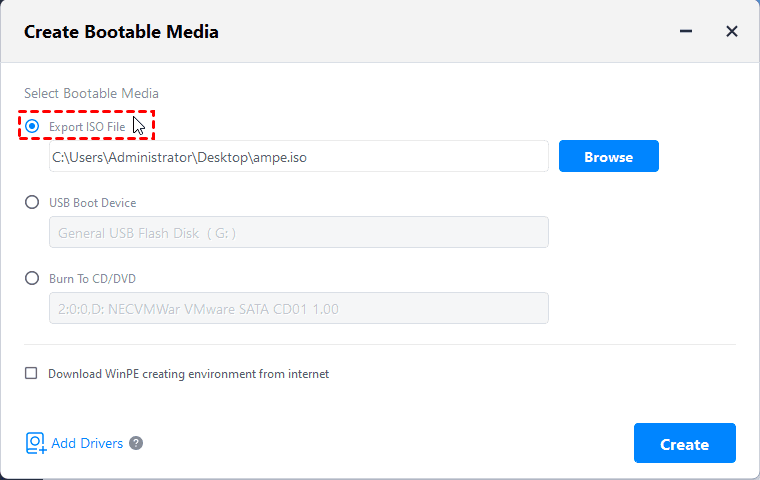
First, select «Create Bootable Media» option under the «Utilities» item. Then,В select the «Export ISO file» option, and then click «Next».
At last, click «Finish» when the operation has been done.
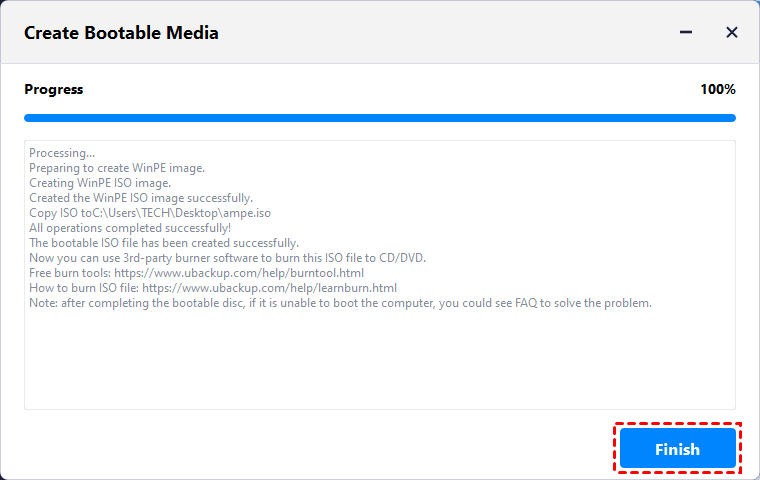
Now, after creating the ISO file, you can easily burn ISO to CD or USB with burning tool and follow the tutorial how to burn ISO file to CD/USB to burn this ISO file. Also, you can complete this task with the Windows 7 integrates built-in burning utility by right clicking this ISO file > Open With > Windows Disc Image Burner.
Note: If you don’t want to create bootable disc, you could enable AOMEI Backupper recovery environment in Windows boot options menu, then boot from the recovery environment to backup, restore, clone data.
Источник


