- Загрузка операционной системы из командной строки Grub
- How To Boot Into Linux Command Line
- Why Do This?
- Accessing GRUB Menu
- Specify the Runlevel
- Runlevels
- Switch From Command-Line
- 1.18. Booting Linux
- 1.18.1. Introduction
- 1.18.2. The bootm command
- 1.18.2.1. Passing Kernel Arguments
- 1.18.2.2. Creating root= options for the Kernel
- 1.18.3. The boot command
- 1.18.3.1. Boot entries
- 1.18.3.2. Bootloader Spec
- 1.18.4. Network boot
- Use Linux efibootmgr Command to Manage UEFI Boot Menu
- 1 Displaying Current Settings
- 2. Changing Boot Order
- 3. Adding Boot Entry
- 4. Deleteing Boot Entry
- 5. Setting a Boot Entry Active or Inactive
- Wrapping Up
- 36 Responses to “Use Linux efibootmgr Command to Manage UEFI Boot Menu”
Загрузка операционной системы из командной строки Grub
У меня на домашнем компьютере стоит две операционные системы, Windows 7 и Linux (Arch). Причем вторая появилась относительно недавно. Да и особых знаний о новой (для меня) ОС не было. Тем не менее систему я поставил и даже относительно настроил под себя. Энтузиазм и программерское любопытство меня пересиливало, поэтому, в качестве ознакомления, стал экспериментировать с различного рода пакетами. К сожалению, не всегда вчитываясь в детали.
Решил я переставить Grub, а точнее обновиться до Grub2. (Слышал я такое мнение, что в духе Linux принято держать последнюю версию пакета… Про изменения Grub2 хорошо написано тут.)
Ну и как результат «спешной» установки — перестала грузиться система. Единственное за что можно было зацепиться — это приглашение командной строки:
По нажатию на Tab вываливается список возможных команд. Их существенно меньше чем в командной строке Linux, но их достаточно для загрузки системы. Почитав про grub тут я решил загрузить Windows, все-таки тут я пока себя чувствую увереннее. Для этого нужно было указать где находиться загрузчик ОС и передать ему управление:
grub> root (hd0,2) [Устанавливаем корневой раздел и монтируем. Тут главное помнить, на каком разделе стоит операционная система]
Запись (hd0,2) означает устройство диска номер 0 (мастер), раздел номер 2.
что соответствует устройству /dev/sda2 (в моем случае). У вас это может быть или /dev/hd2, или еще что-нибудь, в зависимости от дистрибутива. Нумерация устройств идет по-порядку и начинается с (hd0,1) или /dev/sda1.
Далее вводим:
grub> chainloader +1 [пробел перед «+» важен. сhainloader — передает управление загрузкой по цепочке другому загрузчику. В моем случае это был NTLDR]
grub> boot
NTLDR — это загрузчик Windows.
Система стала грузиться, а раз это дало результат — можно копаться дальше (все-таки не Windows теперь предмет изучений).
Перезагружаемся и вводим снова.
grub> root (hd0,6)
grub> linux /boot/vmlinuz26 root=/dev/sda6 [Загружает указанное linux-ядро (/boot/vmlinuz26) с параметрами(root=/dev/sda6)]
Тут стоит различать команду root (hd0,6) и параметр root=/dev/sda6. Первое монтирует раздел к среде выполнения. А второе указывает где находиться root загружаемой ОС. В моем случае ядро и корень оказались на одном разделе, хотя это может быть не так.
grub> initrd /boot/kernel26.img [Загружает указанный initrd-образ]
grub> boot
Мне это помогло, надеюсь вам это не пригодиться, а если и пригодиться, то поможет.
Кстати, если неправильно указать root, процесс загрузки завершиться ошибкой и появиться приглашение вида:
[ramfs /]#
Можно набрать:
[ramfs /]# ls /dev
и посмотреть список устройств(если вы вдруг его забыли как я).
Моя проблема установки gurb2 была в том, что при установке затер файл меню grub (обычно он находиться /boot/grub/menu.lst), а новый файл не создал. Для создания файла конфигурации надо было выполнить grub-mkconfig.
Если у вас сбились настройки grub, то отличия в командах будут минимальными:
- для загрузки Windows вместо root (h d0,2) надо набирать rootnoverify (hd0,1). Нумерация устройств начинается с (hd0,0), а не (hd0,1). А командой rootnoverify вы устанавите корневое устройство, но не смонтируете его.
- для загрузки Linux поменяется другая команда: вместо linux вам понадобится команда kernel (полный аналог, даже параметры теже).
UPD: дописал про отличия загрузки с grub от grub2. Спасибо bliznezz
Источник
How To Boot Into Linux Command Line

There may be times where you need or want to boot up a Linux system without using a GUI, that is with no X, but rather opt for the command line. Whatever the reason, fortunately, booting straight into the Linux command-line is very simple. It requires a simple change to the boot parameter after the other kernel options. This change specifies the runlevel to boot the system into.
Why Do This?
If your system does not run Xorg because the configuration is invalid, or if the display manager is broken, or whatever may prevent the GUI from starting properly, booting into the command-line will allow you to troubleshoot by logging into a terminal (assuming you know what you’re doing to start with) and do whatever you need to do. Booting into the command-line is also a great way to become more familiar with the terminal, otherwise, you can do it just for fun.
Accessing GRUB Menu
On startup, you will need access to the GRUB boot menu. You may need to hold the SHIFT key down before the system boots if the menu isn’t set to display every time the computer is started. In the menu, the Linux distribution entry must be selected. Once highlighted, press ‘e’ to edit the boot parameters. 
Older GRUB versions follow a similar mechanism. The boot manager should provide instructions on how to edit the boot parameters.
Specify the Runlevel
An editor will appear and you will see the options that GRUB parses to the kernel. Navigate to the line that starts with ‘linux’ (older GRUB versions may be ‘kernel’; select that and follow the instructions). This specifies parameters to parse into the kernel. At the end of that line (may appear to span multiple lines, depending on resolution), you simply specify the runlevel to boot into, which is 3 (multi-user mode, text-only). 
Pressing Ctrl-X or F10 will boot the system using those parameters. Boot-up will continue as normal. The only thing that has changed is the runlevel to boot into.
This is what was started up: 
Runlevels
You can specify different runlevels to boot into with runlevel 5 being the default one. 1 boots into “single-user” mode, which boots into a root shell. 3 provides a multi-user, command-line only system.
Switch From Command-Line
At some point, you may want to run the display manager again to use a GUI, and the quickest way to do that is running this: $ sudo init 5 And it is as simple as that. Personally, I find the command-line much more exciting and hands-on than using GUI tools; however, that’s just my preference.
Источник
1.18. Booting Linux
1.18.1. Introduction
The lowlevel boot command in barebox is bootm — boot an application image . This command can be used directly, but there is also a boot — boot from script, device, … command which offers additional features like a boot sequence which tries to boot different entries until one succeeds.
1.18.2. The bootm command
The bootm — boot an application image command is the lowlevel boot command. Depending on the architecture the bootm command handles different image types. On ARM the following images are supported:
ARM Linux zImage
The images can either be passed directly to the bootm command as argument or in the global.bootm.image variable:
When barebox has an internal devicetree it is passed to the kernel. You can specify an alternative devicetree with the -o DTS option or the global.bootm.oftree variable:
NOTE: it may happen that barebox is probed from the devicetree, but you have want to start a Kernel without passing a devicetree. In this case set the global.bootm.boot_atag variable to true .
1.18.2.1. Passing Kernel Arguments
The simple method to pass bootargs to the kernel is with CONFIG_FLEXIBLE_BOOTARGS disabled: in this case the bootm command takes the bootargs from the bootargs environment variable.
With CONFIG_FLEXIBLE_BOOTARGS enabled, the bootargs are composed from different global device variables. All variables beginning with global.linux.bootargs. will be concatenated to the bootargs:
Additionally all variables starting with global.linux.mtdparts. are concatenated to a mtdparts= parameter to the kernel. This makes it possible to consistently partition devices with the addpart — add a partition description to a device command and pass the same string as used with addpart to the Kernel:
1.18.2.2. Creating root= options for the Kernel
It’s a common case that the Linux Kernel is loaded from a filesystem that later becomes the root filesystem for the Kernel. For several filesystems barebox can automatically append a suitable root= option to the Kernel command line. This is done when global.bootm.appendroot is true. How the root= option is appended depends on the device type and filesystem the kernel is booted from. For disk like devices (SD/MMC, ATA) the partition UUID will be used, the root= option will be something like root=PARTUUID=deadbeef-1 . For UBIFS fileystems it will be root=ubi0:volname ubi.mtd=mtdpartname rootfstype=ubifs . NFS filesystems will result in root=/dev/nfs nfsroot=ip:/path/to/nfsroot,v3,tcp . The v3,tcp part is configurable in global.linux.rootnfsopts .
1.18.3. The boot command
The boot — boot from script, device, … command offers additional convenience for the bootm — boot an application image command. It works with Boot entries and Bootloader Spec entries. Boot entries are located under /env/boot/ and are scripts which setup the bootm variables so that the boot command can run bootm without further arguments.
1.18.3.1. Boot entries
A simple boot entry in /env/boot/mmc could look like this:
This takes the kernel from /mnt/mmc1/zImage (which could be an Automount path registered earlier). The devicetree will be used from /env/oftree . The Kernel gets the command line root=PARTUUID=deadbeef:01 . Note the .dyn in the bootargs variable name. boot entries should always add Kernel command line parameters to variables with .dyn in it. These will be cleared before booting different boot entries. This is done so that following boot entries do not leak command line parameters from the previous boot entries.
This entry can be booted with boot mmc . It can also be made the default by setting the global.boot.default variable to mmc and then calling boot without arguments.
1.18.3.2. Bootloader Spec
barebox supports booting according to the bootloader spec:
It follows another philosophy than the Boot entries . With Boot Entries booting is completely configured in the bootloader. Bootloader Spec Entries on the other hand the boot entries are on a boot medium. This gives a boot medium the possibility to describe where a Kernel is and what parameters it needs.
All Bootloader Spec Entries are in a partition on the boot medium under /loader/entries/*.conf . In the Bootloader Spec a boot medium has a dedicated partition to use for boot entries. barebox is less strict, it accepts Bootloader Spec Entries on every partition barebox can read.
A Bootloader Spec Entry consists of key value pairs:
All paths are absolute paths in the partition. Bootloader Spec Entries can be created manually, but there also is the scripts/kernel-install tool to create/list/modify entries directly on a MMC/SD card or other media. To use it create a SD card / USB memory stick with a /boot partition with type 0xea. The partition can be formatted with FAT or EXT4 filesystem. If you wish to write to it from barebox later you must use FAT. The following creates a Bootloader Spec Entry on a SD card:
The entry can be listed with the -l option:
When on barebox the SD card shows up as mmc1 then this entry can be booted with boot mmc1 or with setting global.boot.default to mmc1 .
machine-id is an optional key. If global.boot.machine_id variable is set to non-empty value, then barebox accepts only Bootloader Spec entries with machine-id key. In case if value of global variable and Bootloader Spec key match each other, barebox will choose the boot entry for booting. All other Bootloader Spec entries will be ignored.
A bootloader spec entry can also reside on an NFS server in which case a RFC2224 compatible NFS URI string must be passed to the boot command:
Additionally to the options defined in the original spec barebox understands the linux-appendroot option. This is a boolean value and if set to true barebox will automatically append a root= string to the Linux commandline based on the device where the entry is found on. This makes it possible to use the same rootfs image on different devices without having to specify a different root= option each time.
1.18.4. Network boot
With the following steps, barebox can start the kernel and root filesystem over the network, a standard development case.
See Networking for informations how to configure your network interfaces.
Note that barebox will pass the same IP settings to the kernel, i.e. it passes ip=$ipaddr:$serverip:$gateway:$netmask::
By default, barebox uses the variables global.user and global.hostname to retrieve its kernel image over TFTP, which makes it possible to use multiple boards for multiple users with one single server. You can adjust those variables using nvvars with these commands:
Copy the kernel (and devicetree if needed) to the root directory of your TFTP server, and name them accordingly; for example:
(In this example, the directory /tftpboot represents the root directory of the TFTP server. That directory depends on the configuration of your TFTP server, some servers may also use /srv/tftp instead.)
barebox will pass nfsroot=/home/$
For more information about booting with nfsroot , see Documentation/admin-guide/nfs/nfsroot.rst in the Linux kernel documentation.
If the preconfigured paths or names are not suitable, they can be adjusted in /env/boot/net :
boot net will then retrieve the kernel (and also the device tree and initramfs, if used) over TFTP and boot it.
Источник
Use Linux efibootmgr Command to Manage UEFI Boot Menu
The Linux efibootmgr command line utility is very handy when it comes to managing UEFI boot menu. This tutorial shows you how to use efibootmgr with 5 examples. It’s assumed that you have installed Linux in UEFI mode.
You can install the efibootmgr command line utility with the following commands.
Fedora, CentOS, RedHat
1 Displaying Current Settings
Simply run the following command. In some Linux distributions like Debian, you need to run it with sudo privilege.
This command allows you to view the default boot entry (BootCurrent), boot order and all boot entries. Each boot entry is identified by a boot number in hexadecimal. The asterisk (*) means the boot entry is active.
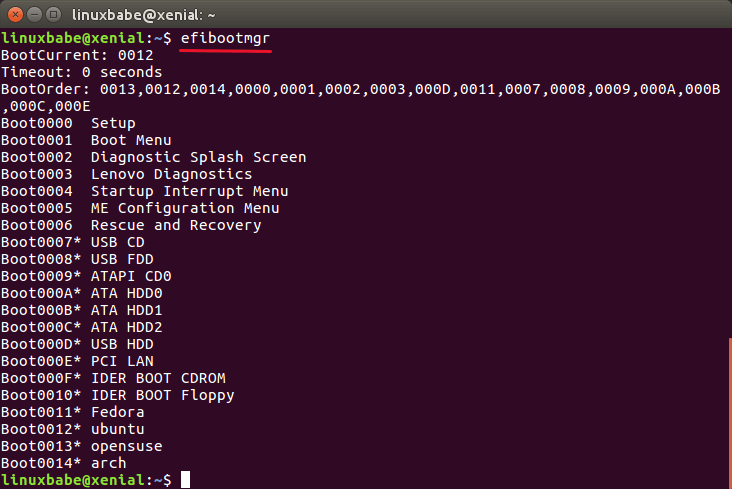
You can also add -v option to show verbose information.
You can see the EFI system partition number, the partition table type (GPT), UUID of the EFI system partition and the boot loader file.

The above screenshot shows that my EFI system partition (ESP) is on the 7th partition of my hard disk (/dev/sda7). It’s a GPT partition table.
2. Changing Boot Order
First, copy the current boot order. For example, my boot order is:
Then type in the following command
And append the boot order to the above command.
Let’s say you want 0012 to be the first boot entry. All you have to do is move it to the left of 0013 and press Enter.
3. Adding Boot Entry
If you have installed multiple Linux distributions on your computer, but one of the Linux distribution doesn’t have a UEFI boot entry, you can manually add it.
Boot into the Linux distro that doesn’t have UFEI boot entry. Then make sure it has the EFI version of GRUB boot loader installed.
Then mount the EFI system partition (ESP) under /boot/efi/ directory. In this example, /dev/sda7 is the ESP.
Then install Grub boot loader to ESP.
x86_64-efi means that we are going to install Grub for UEFI firmware. The default target is i386-pc , which is for traditional BIOS firmware.
Now, you should see a new entry in UEFI boot menu with the bootmgr command. Under the hood, the Grub installer first installs a .efi booloader file to /boot/efi/EFI/ / directory. Usually it’s named grubx64.efi. Then it runs the following command to add a new entry in UEFI boot menu.
Newly added entry will be the first in boot order.
4. Deleteing Boot Entry
Let’s say you have installed multiple Linux distributions on a hard disk so you have multiple boot entries just like the above screenshot. And now you deleted a Linux distro but the boot entry is still there. To remove the respective boot entry, run:
-b option specify the boot number. -B option delete that boot number.
5. Setting a Boot Entry Active or Inactive
A boot entry followed by asterisk indicates that it’s active. Otherwise it’s inactive. To set a boot entry active, run:
To set a boot entry inactive, run:
Wrapping Up
I hope this tutorial is helped you master the Linux efibootmgr command. Ever wondered if you can boot an ISO file without creating a live USB or live CD? Please read the following tutorial:
As always, if you found this post useful, then subscribe to our free newsletter or follow us on Twitter or like our Facebook page. Thanks for visiting!
[Total: 33 Average: 3.9 ]
36 Responses to “Use Linux efibootmgr Command to Manage UEFI Boot Menu”

I have used been using grub2 for several years now, but until recently only on MBR partitioned drives. I installed 5 linux distros on a VirtualBox VM all with UEFI on GPT partitioned drive and didn’t have too much trouble. One thing is I can’t get the EFI to boot to the grub menu directly, it always boots to the EFI shell first no matter what I try.

Could you help me? I was trying to get delete an obsolete input from Ubuntu on bios through efibootmgr. I ended up deleting the bios / uefi setup from my samsung laptop and I can not recover it. I typed the command sudo efibootmgr -b 0 -B … (0 being the setup) .. any suggestions?

In section 4, “Delete Boot Entry,” I need some clarification. Does the -b # option refer to boot order numbering OR the ordinal numbering BELOW the boot order?
So using your example above, if I want to delete:
Boot0003 Lenovo Diagnostics
The boot order # is 7, but it’s ordinal # is 3. Would I do:
efibootmgr -b 7 -B (boot order)
efibootmgr -b 3 -B (ordinal)

The boot number is a 4 digit hexadecimal number. In your case, you need to run
Thanks for the reply, Xiao. My case is not so straightforward.
efibootmgr -v output (without the extra drive info):
BootOrder: 0007,0009,0001,000A,0000,0005
Boot0000* Windows Boot Manager
Boot0001* ubuntu
Boot0005 Windows Boot Manager
Boot0007* ubuntu
Boot0009* ubuntu
Boot000A* Windows Boot Manager
And the one I want to delete is Boot000A. I’ve tried:
efibootmgr -b 000A -B
and
efibootmgr -b 0006 -B
but neither worked. Can you advise, please?

How does one add the boot entry for Windows into grub for Arch based EFI. Currently grub has Windows entry but cannot find.
You need to update the Grub menu from your Linux OS. On Debian/Ubuntu/Linux Mint, run the following command.
On Arch Linux, run

Hi. I tried efibootmgr -B -b 0006 and it worked out flawlessly. First parameter is to delete; second refers to binary entry.

To 3. Adding Boot Entry:
You have to specify the backslashes twice (to mask the backslash):
efibootmgr -c -d /dev/sda -p 7 -L -l \\EFI\\\\grubx64.efi
Otherwise, the specified path is illegal.
correction (now quoted):
sorry, third try:
I give it up, to post the entire line correctly as a comment here. The commands above are not displayed as I wrote it, regardless my escaping tries.
Just be aware, that you specify the backslashes twice (to mask the backslashes) when you type the the path after option -l for the efibootmgr command.
Try it via Encode!

Hello there, just to let you know, there is a small typo in the instructions for adding an entry:
it should be instead of
Got it. The typo is now corrected.

Very nice article! I had debian installed on a atom board with 32bit efi, cloned the installation to a board with 64bit efi and used this guide – nice. Worked a flaw!

You have no idea how you saved my life…

Thanks a lot, save my life!

I’m really having a peculiar issue with mine.
The output of efibootmgr doesn’t match what I see in the grub version I boot from?
BootOrder: 0002,0001,0000,0003,0011,0004,0012,0006,0009,000A
Boot0000* Windows Boot Manager HD(2,GPT,f5b046e2-4afa-48fd-b099-4b72a63b00d8,0x109000,0x32000)/File(\EFI\Microsoft\Boot\bootmgfw.efi)WINDOWS………x…B.C.D.O.B.J.E.C.T.=.<.9.d.e.a.8.6.2.c.-.5.c.d.d.-.4.e.7.0.-.a.c.c.1.-.f.3.2.b.3.4.4.d.4.7.9.5.>…,…………….
Boot0001* ubuntu HD(2,GPT,f5b046e2-4afa-48fd-b099-4b72a63b00d8,0x109000,0x32000)/File(\EFI\ubuntu\shimx64.efi)
Boot0002* Nitrux HD(2,GPT,f5b046e2-4afa-48fd-b099-4b72a63b00d8,0x109000,0x32000)/File(\EFI\Nitrux\shimx64.efi)
Boot0003* neon HD(2,GPT,f5b046e2-4afa-48fd-b099-4b72a63b00d8,0x109000,0x32000)/File(\EFI\neon\shimx64.efi)
Boot0004* antiX19 HD(2,GPT,f5b046e2-4afa-48fd-b099-4b72a63b00d8,0x109000,0x32000)/File(\EFI\antiX19\grubx64.efi)
Boot0006 Generic Usb Device VenHw(99e275e7-75a0-4b37-a2e6-c5385e6c00cb)
Boot0009 CD/DVD Device VenHw(99e275e7-75a0-4b37-a2e6-c5385e6c00cb)
Boot000A UEFI OS VenHw(99e275e7-75a0-4b37-a2e6-c5385e6c00cb)
Boot0011* UEFI OS HD(7,GPT,33250818-c513-4c22-8b31-ff030d6403d1,0x11926800,0x47000)/File(\EFI\BOOT\BOOTX64.EFI)
Boot0012* ubuntu HD(2,GPT,f5b046e2-4afa-48fd-b099-4b72a63b00d8,0x109000,0x32000)/File(\EFI\Ubuntu\grubx64.efi)
I over wrote the neon partition with Zorin and Nitrux no longer displays in Grub?
I’m curious how I edit the names of the OS on the partitions too?
You can update Grub menu with:

Hi got a question. After deleting boot entries i shoud update grup right? But what if i use systemd-boot ? Which command should i use? bootctl update ?
Thank you.
I mean update grub

Hey there,
I deleted an entry from boot option by the instruction, but after reboot the option CAME BACK!
It seems that the extra option belongs to the previous install of the distro.
please help me remove the option from boot menu.
thanks.

Bumped into the same issue. I had to also remove the relevant folder to keep the EFI entry to come back. See https://askubuntu.com/questions/1042031/how-do-i-remove-windows-from-the-uefi-boot-menu-after-custom-installing-ubuntu/1042032#1042032

Hi,
The efibootmgr showed multiple entries of an OS in my bootorder that I had stopped using. I deleted those, but they occupied the initial string of items in the list. Now, I want to renumber the remaining entries which are Grub (0009), Ubuntu (0008), and MacOs (0080) How can I renumber the bootorder?

Hi, Lets say my boot entries look like below:
efibootmgr -v
BootCurrent: 0001
Timeout: 1 seconds
BootOrder: 0001,0002
Boot0001* UEFI OS HD(1,GPT,dd09316a-c79c-4f0d-9ce3-aa67462b9f24,0x800,0x9000)/File(\EFI\BOOT\BOOTX64.EFI)..BO
Boot0002* UEFI: Generic Flash Disk 2.00 PciRoot(0x0)/Pci(0x15,0x0)/USB(1,0)..BO
Now I adding new entry: efibootmgr -c -d /dev/sda -p 1 -L GRUB-CUSTOM -l /EFI/GRUB/bootx64.efi
What if I lose power during invoke above command before data will be stored in non-volatile memory ? EFI check integrity of each variable and just this new one will be ignore ?

Why is efibootmgr show a drive that is no longer in my system? Boot0005* was a SSD drive that died
$ efibootmgr -v
** Warning ** : Boot000a is not UEFI Spec compliant (lowercase hex in name)
** Warning ** : Boot000f is not UEFI Spec compliant (lowercase hex in name)
** Warning ** : please recreate these using efibootmgr to remove this warning.
Timeout: 1 seconds
BootOrder: 0000,0005,0009,000A,000F,0010
Boot0000* ubuntu HD(1,GPT,f4e0fff5-e2ce-4375-b72e-884ce37cce29,0x800,0x100000)/File(\EFI\ubuntu\shimx64.efi)
Boot0005* Hard Drive BBS(HD,,0x0)P0: OWC Mercury EXTREME Pro 6G.
Boot0009* UEFI: SanDisk SDSS PciRoot(0x0)/Pci(0x1f,0x2)/Sata(0,65535,0)/HD(1,GPT,f4e0fff5-e2ce-4375-b72e-884ce37cce29,0x800,0x100000)/File(\EFI\BOOT\BOOTX64.EFI)
Boot000a* CD/DVD Drive BBS(CDROM,,0x0)P3: TSSTcorp CDDVDW SH-S203B .
Boot000f* UEFI: SanDisk PciRoot(0x0)/Pci(0x1c,0x3)/Pci(0x0,0x0)/USB(2,0)/HD(3,GPT,273e49c9-e85a-43f4-a86e-47af010d77fb,0xf43,0x7a120)/File(\EFI\BOOT\BOOTX64.EFI)
Boot0010* UEFI: SanDisk PciRoot(0x0)/Pci(0x1c,0x3)/Pci(0x0,0x0)/USB(2,0)/HD(4,GPT,f38a9e1b-5e2b-48ed-a057-c54fb572f254,0x7b063,0x3de640)/HD(1,MBR,0x6d94e5e7,0x270,0x1f00)/File(\EFI\BOOT\BOOTX64.EFI)

Worked great for helping with the re-install of grub and getting rid of the junk entries in my boot listings. When going to boot the non-default entry with a F12 boot menu choice, it is nice and tiny now, only real entries left :). Thanks for the posting.

Hi, this is my question;
What happens when I stop the UEFI OS?
Can i still enter the “BIOS” environment with F2?
Even when there are no other systems installed?

I installed opensuse in a partition (p4) of a system with fedora. Opensuse created a separate boot partition. Both in fedora and suse, os-prober finds the other os but now only suse is on the boot menu. Only interrupting boot with F12 allows boot to fedora. In opensuse /boot/loader/entries file doesn’t exist. Would manually editing from within suse allow adding the fedora boot entry?

I no longer mess with EFI, this was something cooked up by Microsoft to make dual booting Windows with Linux not an option. I run straight up Linux, if I ever “need” windows, I have it on a separate drive here in my desk drawer. The original 500 GB drive is in there collecting dust, since I replaced it with a Samsung 2 TB SSD last year. Not that Linux needs all that wiggle room but I bought the drive for a good price.
Thumb drives are so large now, you can pick up 256 GB for less than $40. I have often thought about cloning the old Windows OS to a stick as USB 3.0 is pretty fast now. I honestly don’t know what one would use MS Windows for beyond gaming. It is my opinion, EFI drives people away from dual booting, and straight into Linux’s open arms.
You did an excellent write up on this subject Xiao Guoan.
In my experience, UEFI makes dual-booting Windows and Linux a lot easier and more flexible! Secure boot is the problem Microsoft created for Linux users. You can use UEFI without enabling secure boot.
Don’t know why folks have problems with UEFI. It’s much better than the old BIOS in terms of dual booting. I think I should write a UEFI dual-booting guide to clear up the confusion 🙂

Please do that ! 🙂
I have an old Asus P8Z68 deluxe EFI (not UEFI compliance) that has EFI Shell option (never used) and think that Linux efibtootmgr command much easier to understand but since my Mobo isn’t UEFI de facto I am a little scary to mess with old Linux entries at boot…

Section 3. Adding Boot Entry, says “Boot into the Linux distro that doesn’t have UEFI boot entry” (actually it says “UFEI” — that’s a typo to fix). I’ve created an Ubuntu partition, but I can’t boot it precisely because it doesn’t have UEFI boot entry. What am I missing?
Источник


