- Создание и использование снэпшотов в BTRFS
- BTRFS, введение
- Как управлять BTRFS
- Итак, что мы собираемся делать?
- Вид по умолчанию
- Заключение
- Btrfs
- Contents
- Preparation
- File system creation
- File system on a single device
- Multi-device file system
- Configuring the file system
- Copy-on-Write (CoW)
- Disabling CoW
- Compression
- View compression types and ratios
- Subvolumes
- Creating a subvolume
- Listing subvolumes
- Deleting a subvolume
- Mounting subvolumes
- Mounting subvolume as root
- Changing the default sub-volume
- Quota
- Commit interval
- SSD TRIM
- Usage
- Swap file
- Displaying used/free space
- Defragmentation
- Scrub
- Start manually
- Start with a service or timer
- Balance
- Snapshots
- Send/receive
- Deduplication
- Known issues
- Encryption
- btrfs check issues
- Tips and tricks
- Partitionless Btrfs disk
- Ext3/4 to Btrfs conversion
- Checksum hardware acceleration
- Corruption recovery
- Booting into snapshots
- Use Btrfs subvolumes with systemd-nspawn
- Reducing access time metadata updates
- Troubleshooting
- Partition offset
- Missing root
- Mounting timed out
- BTRFS: open_ctree failed
- btrfs check
Создание и использование снэпшотов в BTRFS
BTRFS — это сравнительно новая файловая система, основанная на ZFS от компании Sun, которая привнесла больше всего инноваций в Unix за последние 25 лет, до ее поглощения Oracle. BTRFS до сих пор считается нестабильной, и поэтому не подходит для применения на производстве. Однако эта файловая система имеет множество полезных возможностей, которые стоит изучить. Одна из них — создание cнэпшотов системы.
Позвольте уточнить. Снэпшоты — это мгновенные снимки состояния системы. В некотором смысле, если вы копируете файл и делаете резервную копию, вы тем самым делаете его снимок, относящийся к моменту копирования. Это можно сделать в любом месте и в любое время. Подумайте о файловой системе, которая на самом деле может управлять несколькими копиями ваших файлов в рамках своей структуры, и позволяет использовать их, как вам заблагорассудится. Звучит интересно, будем исследовать.

BTRFS, введение
Перед тем, как мы начнем копать глубже, я хотел бы кратко обрисовать возможности этой файловой системы. BTRFS должна обеспечивать выполнение всех системных операций, связанных с дисками и управлением файлами, для которых обычно требуются дополнительные утилиты. BTRFS обеспечивает дефрагментацию, распределение нагрузки, уменьшение, увеличение, горячую замену, RAID, снэпшоты, сжатие, клонирование, и многие другие возможности, и все это встроено в драйвер файловой системы. С другими файловыми системами вам, вероятно, понадобится множество других драйверов и пользовательских утилит для управления всеми этими видами операций, например программа дефрагментации файловой системы, драйверы RAID и LVM, и так далее.
Встроенная функциональность означает производительность и простоту использования. Однако на данный момент BTRFS еще не полностью пригодна для использования вследствие нестабильности, а также снижения производительности по сравнению с другими файловыми системами, такими как Ext4. Но она имеет громадный потенциал, поэтому ее нельзя игнорировать, а нужно изучать.
В данном руководстве я покажу вам, как управлять снэпшотами. Это суперактуальная возможность, которая позволит вам создавать резервные копии важных файлов перед внесением в них любых изменений и затем при необходимости восстанавливать их. В некотором смысле это похоже на восстановление системы в Windows плюс драйвер отката на уровне файловой системы. Кстати, кроме снэпшотов, в этой статье можно будет также найти немного полезной информации о повседеневной работе с файловой системой BTRFS. Тестирование производилось в системе Fedora 16 Verne с рабочим столом KDE.
Как управлять BTRFS
Вы можете использовать BTRFS для корневой файловой системы за исключением /boot, которая должна быть отформатирована в традиционную журналируемую файловую систему. Для простоты в данном руководстве мы будем работать с отдельным устройством /dev/sdb1, отформатированным в BTRFS и используемым при необходимости. На практике это может быть /home или /data, или что-нибудь еще.
Итак, что мы собираемся делать?
Мы возьмем /dev/sdb1 и смонтируем его. Затем создадим несколько подразделов. Считайте подразделы виртуальными корневыми деревьями, так как любой из них представляет собой отдельную, независимую древовидную структуру данных, даже если данные те же самые.
Ниже приведена последовательность необходимых для этого команд. Не пугайтесь, мы объясним, как они работают.
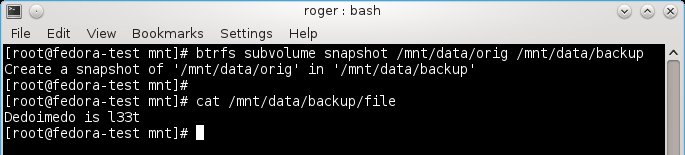
/dev/sdb1 смонтирован в /mnt. Мы создаем подраздел с названием data. Внутри него мы создаем другой подраздел с названием orig. А уже внутри него будут созданы наши файлы. С точки зрения пользователя подразделы выглядят как обычные директории. Другими словами, data и data/orig — это директории.
Далее, мы создаем текстовый файл в origin с названием file, содержащий некоторый текст. И в конце мы создаем снэпшот подраздела orig и называем его backup. Теперь у нас есть идентичная копия подраздела orig. Вот доказательство:
Кроме того, для проверки воспользуемся командой btrfs subvolume list, чтобы просмотреть все подразделы:
Заметьте, что каждый подраздел имеет свой номер ID. Как мы скоро убедимся, это важно.
Вид по умолчанию
В настоящее время в /mnt по умолчанию отображаются как orig, так и backup (все это в data). Мы можем это изменить. Помните, раннее я упоминал о виртуальных корневых древовидных структурах? BTRFS позволяет вам сменить виртуальную корневую директорию на любой из подразделов.
Таким образом, использование подразделов и снэпшотов означает просто переключение между различными иерархиями данных. Не нужно удалять, перезаписывать файлы, или делать что-то еще. Вы просто переключаетесь на другой подраздел. Сейчас мы увидим, как это делается.
Команда btrfs subvolume set-default ID — это все, что нам нужно. Мы установим вид по умолчанию на другой подраздел, затем отмонтируем устройство, и смонтируем его заново. Это важно!
Теперь, если вы работаете с файловой системой, которая не может быть отмонтирована, так как используется, например /usr или /etc, необходимо перезагрузить компьютер, чтобы изменения вступили в силу. Теперь в заданном дереве директорий будет отображаться другой подраздел. Пользователь не заметит разницы, но данные в директориях изменятся.
Чтобы действительно увидеть, как это работает, мы отредактируем файл file в backup. Текст Dedoimedo is l33t заменим на Dedoimedo is NOT l33t.
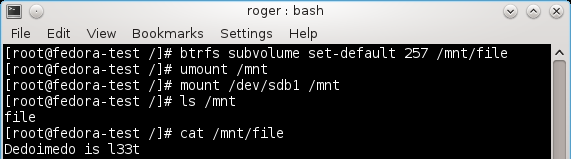
Хорошо, мы знаем ID для всех подразделов. Поэтому смонтируем ID как вид по умолчанию. Это значит, что как только вы перемонтируем /mnt, мы увидим здесь файл с этим содержимым.
А теперь вернем все обратно:
Это можно делать столько раз, сколько нужно:
Выше мы меняли вид между 257 и 260, то есть между orig и backup, в результате мы могли просматривать содержимое измененного файла. Мы просто показывали пользователю разные подразделы.
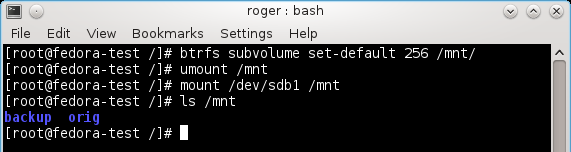
В итоге, если мы хотим видеть как orig, так и backup в директории data, необходимо восстановить вид по умолчанию подраздела верхнего уровня, то есть data. Заметьте, что все данные отображаются в директории /mnt, поскольку мы выбрали ее в качестве точки монтирования. Однако вместо нее можно использовать любую другую директорию.
Заключение
Функция создания снэпшотов в BTRFS реализована достаточно аккуратно, и ее использование не представляет трудностей. Конечно, необходимо действовать внимательно, чтобы использовать правильное дерево данных и ничего не перепутать. Но теперь вы уже знаете основные команды BTRFS и можете действовать более уверенно. В дальнейшем мы протестируем Snapper — фронтенд для BTRFS, доступный в openSUSE, который позволяет реализовать такую же функциональность с помощью графического интерфейса пользователя для тех, кто не любит командную строку.
Источник
Btrfs
Btrfs is a modern copy on write (CoW) filesystem for Linux aimed at implementing advanced features while also focusing on fault tolerance, repair and easy administration. Jointly developed at multiple companies, Btrfs is licensed under the GPL and open for contribution from anyone.
Contents
Preparation
For user space utilities install the btrfs-progs package, which is required for basic operations.
If you need to boot from a Btrfs file system (i.e., your kernel and initramfs reside on a Btrfs partition), check if your boot loader supports Btrfs.
File system creation
The following shows how to create a new Btrfs file system. To convert an ext3/4 partition to Btrfs, see #Ext3/4 to Btrfs conversion. To use a partitionless setup, see #Partitionless Btrfs disk.
See mkfs.btrfs(8) for more information.
File system on a single device
To create a Btrfs filesystem on partition /dev/partition :
The Btrfs default nodesize for metadata is 16KB, while the default sectorsize for data is equal to page size and autodetected. To use a larger nodesize for metadata (must be a multiple of sectorsize, up to 64KB is allowed), specify a value for the nodesize via the -n switch as shown in this example using 32KB blocks:
Multi-device file system
Multiple devices can be used to create a RAID. Supported RAID levels include RAID 0, RAID 1, RAID 10, RAID 5 and RAID 6. Starting from kernel 5.5 RAID1c3 and RAID1c4 for 3- and 4- copies of RAID 1 level. The RAID levels can be configured separately for data and metadata using the -d and -m options respectively. By default the data has one copy ( single ) and the metadata is mirrored ( raid1 ). This is similar to creating a JBOD configuration, where disks are seen as one filesystem, but files are not duplicated. See Using Btrfs with Multiple Devices for more information about how to create a Btrfs RAID volume.
You must include either the udev hook or the btrfs hook in /etc/mkinitcpio.conf in order to use multiple Btrfs devices in a pool. See the Mkinitcpio#Common hooks article for more information.
See #RAID for advice on maintenance specific to multi-device Btrfs file systems.
Configuring the file system
Copy-on-Write (CoW)
By default, Btrfs uses copy-on-write for all files all the time. Writes do not overwrite data in place; instead, a modified copy of the block is written to a new location, and metadata is updated to point at the new location. See the Btrfs Sysadmin Guide section for implementation details, as well as advantages and disadvantages.
Disabling CoW
To disable copy-on-write for newly created files in a mounted subvolume, use the nodatacow mount option. This will only affect newly created files. Copy-on-write will still happen for existing files. The nodatacow option also disables compression. See btrfs(5) for details.
To disable copy-on-write for single files/directories do:
This will disable copy-on-write for those operation in which there is only one reference to the file. If there is more than one reference, e.g. due to file clones / lightweight clones or filesystem snapshots, copy-on-write still occurs. Note that as of coreutils 9.0, cp attempts to perform lightweight copies by default—see cp(1) for more details.
Compression
Btrfs supports transparent and automatic compression. This reduces the size of files as well as significantly increases the lifespan of flash-based media by reducing write amplification. See Fedora:Changes/BtrfsByDefault#Compression, [1], and [2]. It can also improve performance, in some cases (e.g. single thread with heavy file I/O), while obviously harming performance in other cases (e.g. multi-threaded and/or CPU intensive tasks with large file I/O). Better performance is generally achieved with the fastest compress algorithms, zstd and lzo, and some benchmarks provide detailed comparisons.
The compress=alg mount option enables automatically considering every file for compression, where alg is either zlib , lzo , zstd , or no (for no compression). Using this option, btrfs will check if compressing the first portion of the data shrinks it. If it does, the entire write to that file will be compressed. If it does not, none of it is compressed. With this option, if the first portion of the write does not shrink, no compression will be applied to the write even if the rest of the data would shrink tremendously. [3] This is done to prevent making the disk wait to start writing until all of the data to be written is fully given to btrfs and compressed.
The compress-force=alg mount option can be used instead, which makes btrfs skip checking if compression shrinks the first portion, and enables automatic compression try for every file. In a worst-case scenario, this can cause (slightly) more CPU usage for no purpose. However, empirical testing on multiple mixed-use systems showed a significant improvement of about 10% disk compression from using compress-force=zstd over just compress=zstd , which also had 10% disk compression.
Only files created or modified after the mount option is added will be compressed.
To apply compression to existing files, use the btrfs filesystem defragment -calg command, where alg is either zlib , lzo or zstd . For example, in order to re-compress the whole file system with zstd , run the following command:
To enable compression when installing Arch to an empty Btrfs partition, use the compress option when mounting the file system: mount -o compress=zstd /dev/sdxY /mnt/ . During configuration, add compress=zstd to the mount options of the root file system in fstab.
View compression types and ratios
compsize takes a list of files (or an entire btrfs filesystem) and measures compression types used and effective compression ratios. Uncompressed size may not match the number given by other programs such as du(1) , because every extent is counted once, even if it is reflinked several times, and even if part of it is no longer used anywhere but has not been garbage collected. The -x option keeps it on a single filesystem, which is useful in situations like compsize -x / to avoid it from attempting to look in non-btrfs subdirectories and fail the entire run.
Subvolumes
 This article or section is a candidate for merging with User:I2Oc9/Btrfs_subvolumes.
«A btrfs subvolume is not a block device (and cannot be treated as one) instead, a btrfs subvolume can be thought of as a POSIX file namespace. This namespace can be accessed via the top-level subvolume of the filesystem, or it can be mounted in its own right.» [4]
Each Btrfs file system has a top-level subvolume with ID 5. It can be mounted as / (by default), or another subvolume can be mounted instead. Subvolumes can be moved around in the filesystem and are rather identified by their id than their path.
See the following links for more details:
Creating a subvolume
To create a subvolume:
Listing subvolumes
To see a list of current subvolumes and their ids under path :
Deleting a subvolume
To delete a subvolume:
Since Linux 4.18, one can also delete a subvolume like a regular directory ( rm -r , rmdir ).
Mounting subvolumes
Subvolumes can be mounted like file system partitions using the subvol=/path/to/subvolume or subvolid=objectid mount flags. For example, you could have a subvolume named subvol_root and mount it as / . One can mimic traditional file system partitions by creating various subvolumes under the top level of the file system and then mounting them at the appropriate mount points. Thus one can easily restore a file system (or part of it) to a previous state using #Snapshots.
See the Btrfs Wiki FAQ for which mount options can be used per subvolume.
See btrfs(5) for a full list of btrfs-specific mount options.
Mounting subvolume as root
To use a subvolume as the root mountpoint specify the subvolume via a kernel parameter using rootflags=subvol=/path/to/subvolume . Edit the root mountpoint in /etc/fstab and specify the mount option subvol= . Alternatively the subvolume can be specified with its id, rootflags=subvolid=objectid as kernel parameter and subvolid=objectid as mount option in /etc/fstab .
Changing the default sub-volume
The default sub-volume is mounted if no subvol= mount option is provided. To change the default subvolume, do:
where subvolume-id can be found by listing.
Changing the default subvolume with btrfs subvolume set-default will make the top level of the filesystem inaccessible, except by use of the subvol=/ or subvolid=5 mount options [5].
Quota
Quota support in Btrfs is implemented at a subvolume level by the use of quota groups or qgroup: Each subvolume is assigned a quota groups in the form of 0/subvolume_id by default. However it is possible to create a quota group using any number if desired.
To use qgroups you need to enable quota first using
From this point onwards newly created subvolumes will be controlled by those groups. In order to retrospectively enable them for already existing subvolumes, enable quota normally, then create a qgroup (quota group) for each of those subvolume using their subvolume_id and rescan them:
Quota groups in Btrfs form a tree hierarchy, whereby qgroups are attached to subvolumes. The size limits are set per qgroup and apply when any limit is reached in tree that contains a given subvolume.
Limits on quota groups can be applied either to the total data usage, un-shared data usage, compressed data usage or both. File copy and file deletion may both affect limits since the unshared limit of another qgroup can change if the original volume’s files are deleted and only one copy is remaining. For example a fresh snapshot shares almost all the blocks with the original subvolume, new writes to either subvolume will raise towards the exclusive limit, deletions of common data in one volume raises towards the exclusive limit in the other one.
To apply a limit to a qgroup, use the command btrfs qgroup limit . Depending on your usage either use a total limit, unshared limit ( -e ) or compressed limit ( -c ). To show usage and limits for a given path within a filesystem use
Commit interval
The resolution at which data are written to the filesystem is dictated by Btrfs itself and by system-wide settings. Btrfs defaults to a 30 seconds checkpoint interval in which new data are committed to the filesystem. This can be changed by appending the commit mount option in /etc/fstab for the btrfs partition.
System-wide settings also affect commit intervals. They include the files under /proc/sys/vm/* and are out-of-scope of this wiki article. The kernel documentation for them is available at https://www.kernel.org/doc/html/latest/admin-guide/sysctl/vm.html.
SSD TRIM
A Btrfs filesystem is able to free unused blocks from an SSD drive supporting the TRIM command. Starting with kernel version 5.6 there is asynchronous discard support, enabled with mount option discard=async . Freed extents are not discarded immediately, but grouped together and trimmed later by a separate worker thread, improving commit latency.
More information about enabling and using TRIM can be found in Solid State Drives#TRIM.
Usage
Swap file
Swap files in Btrfs are supported since Linux kernel 5.0.[6] The proper way to initialize a swap file is to first create a non-snapshotted subvolume to host the file, cd into its directory, then create a zero length file, set the No_COW attribute on it with chattr, and make sure compression is disabled:
Displaying used/free space
General linux userspace tools such as df(1) will inaccurately report free space on a Btrfs partition. It is recommended to use btrfs filesystem usage to query Btrfs partitions. For example, for a full breakdown of device allocation and usage stats:
Alternatively, btrfs filesystem df allows a quick check on usage of allocated space without the requirement to run as root:
See [7] for more information.
The same limitations apply to tools which analyze space usage for some subset of the filesystem, such as du(1) or ncdu(1) , as they do not take into account reflinks, snapshots and compression. Instead, see btdu AUR and compsize for btrfs-aware alternatives.
Defragmentation
Btrfs supports online defragmentation through the mount option autodefrag , see btrfs(5) § MOUNT OPTIONS . To manually defragment your root, use:
Using the above command without the -r switch will result in only the metadata held by the subvolume containing the directory being defragmented. This allows for single file defragmentation by simply specifying the path.
Defragmenting a file which has a COW copy (either a snapshot copy or one made with cp or bcp) plus using the -c switch with a compression algorithm may result in two unrelated files effectively increasing the disk usage.
Btrfs offers native «RAID» for #Multi-device file systems. Notable features which set btrfs RAID apart from mdadm are self-healing redundant arrays and online balancing. See the Btrfs wiki page for more information. The Btrfs sysadmin page also has a section with some more technical background.
Scrub
 This article or section needs expansion.
The Btrfs Wiki Glossary says that Btrfs scrub is «[a]n online filesystem checking tool. Reads all the data and metadata on the filesystem, and uses checksums and the duplicate copies from RAID storage to identify and repair any corrupt data.»
Start manually
To start a (background) scrub on the filesystem which contains / :
To check the status of a running scrub:
Start with a service or timer
The btrfs-progs package brings the btrfs-scrub@.timer unit for monthly scrubbing the specified mountpoint. Enable the timer with an escaped path, e.g. btrfs-scrub@-.timer for / and btrfs-scrub@home.timer for /home . You can use systemd-escape -p /path/to/mountpoint to escape the path, see systemd-escape(1) for details.
You can also run the scrub by starting btrfs-scrub@.service (with the same encoded path). The advantage of this over btrfs scrub (as the root user) is that the results of the scrub will be logged in the systemd journal.
On large NVMe drives with insufficient cooling (e.g. in a laptop), scrubbing can read the drive fast enough and long enough to get it very hot. If you are running scrubs with systemd, you can easily limit the rate of scrubbing with the IOReadBandwidthMax option described in systemd.resource-control(5) by using a drop-in file.
Balance
«A balance passes all data in the filesystem through the allocator again. It is primarily intended to rebalance the data in the filesystem across the devices when a device is added or removed. A balance will regenerate missing copies for the redundant RAID levels, if a device has failed.» [8] See Upstream FAQ page.
On a single-device filesystem a balance may be also useful for (temporarily) reducing the amount of allocated but unused (meta)data chunks. Sometimes this is needed for fixing «filesystem full» issues.
Snapshots
«A snapshot is simply a subvolume that shares its data (and metadata) with some other subvolume, using btrfs’s COW capabilities.» See Btrfs Wiki SysadminGuide#Snapshots for details.
To create a snapshot:
To create a readonly snapshot add the -r flag. To create writable version of a readonly snapshot, simply create a snapshot of it.
Send/receive
A subvolume can be sent to stdout or a file using the send command. This is usually most useful when piped to a Btrfs receive command. For example, to send a snapshot named /root_backup (perhaps of a snapshot you made of / earlier) to /backup you would do the following:
The snapshot that is sent must be readonly. The above command is useful for copying a subvolume to an external device (e.g. a USB disk mounted at /backup above).
You can also send only the difference between two snapshots. For example, if you have already sent a copy of root_backup above and have made a new readonly snapshot on your system named root_backup_new , then to send only the incremental difference to /backup do:
Now a new subvolume named root_backup_new will be present in /backup .
See Btrfs Wiki’s Incremental Backup page on how to use this for incremental backups and for tools that automate the process.
Deduplication
Using copy-on-write, Btrfs is able to copy files or whole subvolumes without actually copying the data. However whenever a file is altered a new proper copy is created. Deduplication takes this a step further, by actively identifying blocks of data which share common sequences and combining them into an extent with the same copy-on-write semantics.
Tools dedicated to deduplicate a Btrfs formatted partition include duperemove , bees , bedup AUR and btrfs-dedup. One may also want to merely deduplicate data on a file based level instead using e.g. rmlint , jdupes AUR or dduper-git AUR . For an overview of available features of those programs and additional information have a look at the upstream Wiki entry.
Furthermore Btrfs developers are working on inband (also known as synchronous or inline) deduplication, meaning deduplication done when writing new data to the filesystem. Currently it is still an experiment which is developed out-of-tree. Users willing to test the new feature should read the appropriate kernel wiki page.
Known issues
A few limitations should be known before trying.
Encryption
Btrfs has no built-in encryption support, but this may come in the future. Users can encrypt the partition before running mkfs.btrfs . See dm-crypt/Encrypting an entire system#Btrfs subvolumes with swap.
Existing Btrfs file systems can use something like EncFS or TrueCrypt, though perhaps without some of Btrfs’ features.
btrfs check issues
The tool btrfs check has known issues and should not be run without further reading, see section #btrfs check.
Tips and tricks
Partitionless Btrfs disk
Btrfs can occupy an entire data storage device, replacing the MBR or GPT partitioning schemes, using subvolumes to simulate partitions. However, using a partitionless setup is not required to simply create a Btrfs filesystem on an existing partition that was created using another method. There are some limitations to partitionless single disk setups:
- Cannot place other file systems on another partition on the same disk.
- If using a Linux kernel version before 5.0, you cannot use swap area as Btrfs did not support swap files pre-5.0 and there is no place to create swap partition
- Cannot use UEFI to boot.
To overwrite the existing partition table with Btrfs, run the following command:
For example, use /dev/sda rather than /dev/sda1 . The latter would format an existing partition instead of replacing the entire partitioning scheme. Because the root partition is Btrfs, make sure btrfs is compiled into the kernel, or put btrfs into mkinitcpio.conf#MODULES and regenerate the initramfs.
Install the boot loader like you would for a data storage device with a Master Boot Record. See Syslinux#Manual install or GRUB/Tips and tricks#Install to partition or partitionless disk. If your kernel does not boot due to Failed to mount /sysroot. , please add GRUB_PRELOAD_MODULES=»btrfs» in /etc/default/grub and generate the grub configuration (GRUB#Generate the main configuration file).
Ext3/4 to Btrfs conversion
Boot from an install CD, then convert by doing:
Mount the partion and test the conversion by checking the files. Be sure to change the /etc/fstab to reflect the change (type to btrfs and fs_passno [the last field] to 0 as Btrfs does not do a file system check on boot). Also note that the UUID of the partition will have changed, so update fstab accordingly when using UUIDs. chroot into the system and rebuild your bootloaders menu list (see Install from existing Linux). If converting a root filesystem, while still chrooted run mkinitcpio -p linux to regenerate the initramfs or the system will not successfully boot.
After confirming that there are no problems, complete the conversion by deleting the backup ext2_saved sub-volume. Note that you cannot revert back to ext3/4 without it.
Finally balance the file system to reclaim the space.
Remember that some applications which were installed prior have to be adapted to Btrfs.
Checksum hardware acceleration
 The factual accuracy of this article or section is disputed.
CRC32 is a new instruction in Intel SSE4.2. To verify if Btrfs checksum is hardware accelerated:
If you see crc32c=crc32c-generic , it is probably because your root partition is Btrfs, and you will have to compile crc32c-intel into the kernel to make it work. Putting crc32c-intel into mkinitcpio.conf does not work.
Corruption recovery
btrfs-check cannot be used on a mounted file system. To be able to use btrfs-check without booting from a live USB, add it to the initial ramdisk:
Then if there is a problem booting, the utility is available for repair.
See the Btrfs Wiki page for more information.
Booting into snapshots
In order to boot into a snapshot, the same procedure applies as for mounting a subvolume as your root parition, as given in section mounting a subvolume as your root partition, because snapshots can be mounted like subvolumes.
- If using GRUB you can automatically populate your boot menu with btrfs snapshots when regenerating the configuration file with the help of grub-btrfs or grub-btrfs-gitAUR .
- If using rEFInd you can automatically populate your boot menu with btrfs snapshots with the help of refind-btrfsAUR , after enabling refind-btrfs.service .
Use Btrfs subvolumes with systemd-nspawn
Reducing access time metadata updates
Because of the copy-on-write nature of Btrfs simply accessing files can trigger the metadata copy and writing. Reducing the frequency of access time updates may eliminate this unexpected disk usage and increase performance. See fstab#atime options for the available options.
Troubleshooting
See the Btrfs Problem FAQ for general troubleshooting.
Partition offset
The offset problem may happen when you try to embed core.img into a partitioned disk. It means that it is OK to embed GRUB’s core.img into a Btrfs pool on a partitionless disk (e.g. /dev/sdX ) directly.
GRUB can boot Btrfs partitions, however the module may be larger than other file systems. And the core.img file made by grub-install may not fit in the first 63 sectors (31.5KiB) of the drive between the MBR and the first partition. Up-to-date partitioning tools such as fdisk and gdisk avoid this issue by offsetting the first partition by roughly 1MiB or 2MiB.
Missing root
The factual accuracy of this article or section is disputed.
Users experiencing the following: error no such device: root when booting from a RAID style setup then edit /usr/share/grub/grub-mkconfig_lib and remove both quotes from the line echo » search —no-floppy —fs-uuid —set=root $
Mounting timed out
Sometimes, especially with large RAID1 arrays, mounting might time out during boot with a journal message such as:
This can easily be worked around by providing a longer timeout via the systemd-specific mount option x-systemd.mount-timeout in fstab. For example:
BTRFS: open_ctree failed
As of November 2014 there seems to be a bug in systemd or mkinitcpio causing the following error on systems with multi-device Btrfs filesystem using the btrfs hook in mkinitcpio.conf :
A workaround is to remove btrfs from the HOOKS array in /etc/mkinitcpio.conf and instead add btrfs to the MODULES array. Then regenerate the initramfs and reboot.
You will get the same error if you try to mount a raid array without one of the devices. In that case you must add the degraded mount option to /etc/fstab . If your root resides on the array, you must also add rootflags=degraded to your kernel parameters.
As of August 2016, a potential workaround for this bug is to mount the array by a single drive only in /etc/fstab , and allow btrfs to discover and append the other drives automatically. Group-based identifiers such as UUID and LABEL appear to contribute to the failure. For example, a two-device RAID1 array consisting of ‘disk1′ and disk2’ will have a UUID allocated to it, but instead of using the UUID, use only /dev/mapper/disk1 in /etc/fstab . For a more detailed explanation, see the following blog post.
Another possible workaround is to remove the udev hook in mkinitcpio.conf and replace it with the systemd hook. In this case, btrfs should not be in the HOOKS or MODULES arrays.
See the original forums thread and FS#42884 for further information and discussion.
btrfs check
The btrfs check command can be used to check or repair an unmounted Btrfs filesystem. However, this repair tool is still immature and not able to repair certain filesystem errors even those that do not render the filesystem unmountable.
Источник


