- How to Set A Custom Screen Resolution in Ubuntu Desktop
- Changing the Resolution or Orientation of the Screen Using Displays
- Changing the Resolution or Orientation of the Screen Using Xrandr
- Set Screen Resolution in Ubuntu
- How to Add Missing or Set Custom Display Resolution Using xrandr
- If You Appreciate What We Do Here On TecMint, You Should Consider:
- Ubuntu Documentation
- Resolution
- Native Resolution
- Refresh Rate
- Scale
- Orientation
- How to Change Screen Resolution on Ubuntu
- About the author
- Sidratul Muntaha
- Разрешение экрана в Linux
- Настройка разрешения экрана в GUI
- Как изменить разрешение экрана через терминал
- Выводы
How to Set A Custom Screen Resolution in Ubuntu Desktop
Is your screen (or external monitor) resolution is low? thus making the items on your screen look larger and less clear? Or do you want to simply increase the current maximum resolution or add a custom resolution?
In this article, we will show how to add missing or set custom display resolution in Ubuntu and its derivatives such as Linux Mint. By the end of this article, you will be able to set to a higher resolution, making content on your screen appear sharper and clearer.
Changing the Resolution or Orientation of the Screen Using Displays
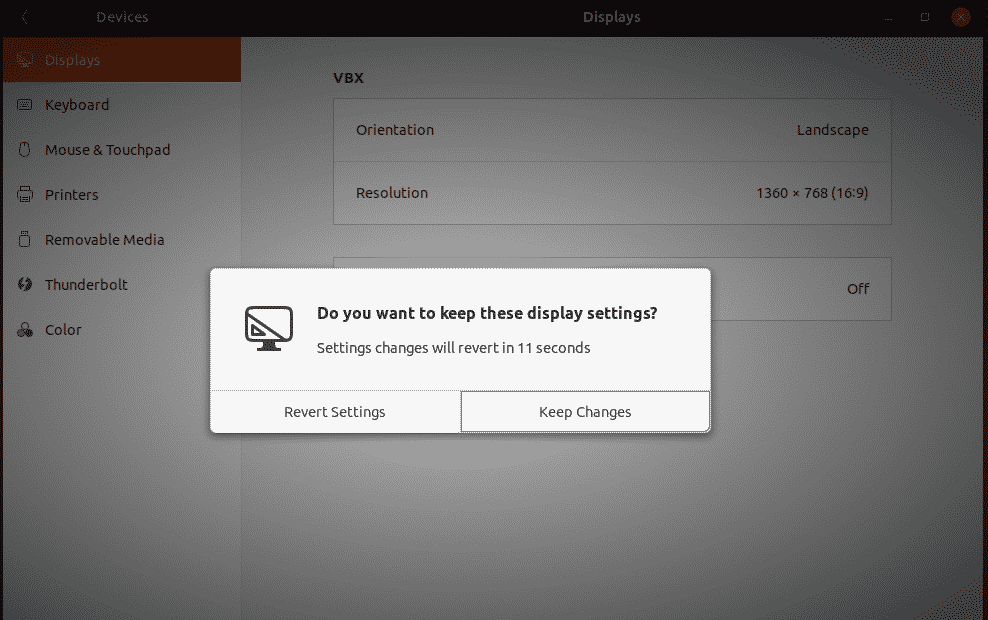
Normally, to change the resolution or orientation of the screen, you can use the Displays graphical user interface tool (open the Activities overview and type Displays, click to open it or System Menu then type Displays and open it).
Note: In case you have multiple displays connected to your computer (as shown in the following image), if they are not mirrored, you can have different settings on each display. To change the settings for a display device, select it in the preview area.
Next, select the resolution or scale you want to use, and choose the orientation then click Apply. Then select Keep This Configuration.
![]() Change Screen Resolution in Ubuntu
Change Screen Resolution in Ubuntu
Changing the Resolution or Orientation of the Screen Using Xrandr
Alternatively, you can also use the powerful xrandr tool (a command-line interface to RandR (Resize and Rotate) X Window System extension) which is used to set the size, orientation and/or reflection of the outputs for a screen.
You can also use it to set the screen size or list all active monitors as shown.
![]() List Active Monitors in Ubuntu
List Active Monitors in Ubuntu
To show the names of different outputs available on your system and resolutions available on each, run xrandr without any arguments.
![]() List Available Screen Resolutions in Ubuntu
List Available Screen Resolutions in Ubuntu
Set Screen Resolution in Ubuntu
To set the resolution for a screen for an external monitor named DP-1 to 1680×1050, use the —mode flag as shown.
You can also set the refresh rate using the —rate flag as shown.
You can also use the —left-of , —right-of , —above , —below , and —same-as options to arrange your screens either relatively to each other.
For example, I want my external monitor (DP-1) to be positioned left of the Laptop screen (eDP-1) in correspondence to the actual physical positioning:
Keep in mind that any changes made using xrandr will only last until you log out or restart the system. To make xrandr changes persistently, use the xorg.conf configuration files for Xorg X server (run man xorg.conf for details on how to create a xorg.conf file) – this is the most effective method.
You can also use the
/.xprofile file (add xrandr commands in it), however, there are some disadvantages of using this method, one is that this script is read fairly late in the startup process, thus it will not alter the resolution of the display manager (if you use one e.g lightdm).
How to Add Missing or Set Custom Display Resolution Using xrandr
It is possible to add a missing or custom display resolution e.g 1680 x 1000 to Displays panel, for a specific display device (DP-1), as explained below.
![]() Add Missing Display Resolution in Ubuntu
Add Missing Display Resolution in Ubuntu
To add a missing or custom display resolution, you need to calculate the VESA Coordinated Video Timing (CVT) modes for it. You can do this using the cvt utility as follows.
For example, if you need a horizontal and vertical resolution of 1680 x 1000, run the following command.
Next, copy the Modeline (“1680x1000_60.00″ 139.25 1680 1784 1960 2240 1000 1003 1013 1038 -hsync +vsync) from the output of the cvt command and use it to create a new mode using the xrandr as shown.
Then add the new mode to the display.
![]() Add Missing Resolution in Ubuntu
Add Missing Resolution in Ubuntu
Now open the Displays and check if the new resolution has been added.
![]() Verify Resolution
Verify Resolution
The above changes are only temporary and work for the current session (they last until you log out or restart the system).
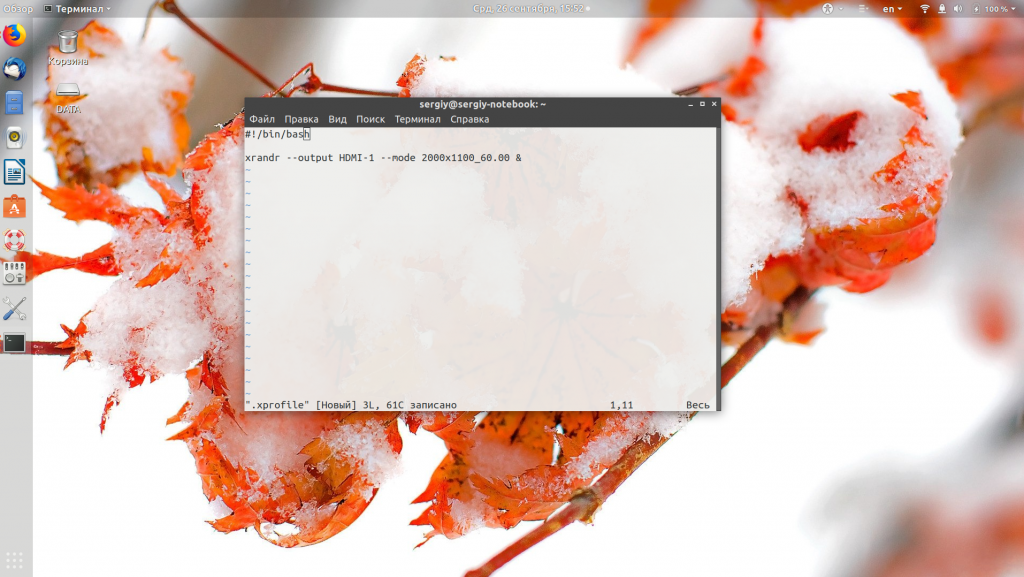
To add the resolution permanently, create a script called external_monitor_resolution.sh in the directory /etc/profile.d/.
Then add the following lines in the file:
Save the changes and exit the file.
For more information on how xrandr works and how to use it, read its man page:
That brings us to the end of this article. If you have any thoughts to share or queries, reach us via the feedback form below.
If You Appreciate What We Do Here On TecMint, You Should Consider:
TecMint is the fastest growing and most trusted community site for any kind of Linux Articles, Guides and Books on the web. Millions of people visit TecMint! to search or browse the thousands of published articles available FREELY to all.
If you like what you are reading, please consider buying us a coffee ( or 2 ) as a token of appreciation.

We are thankful for your never ending support.
Источник
Ubuntu Documentation
You can change how big (or how detailed) things appear on the screen by changing the screen resolution . You can change which way up things appear (for example, if you have a rotating display) by changing the rotation .
Open the Activities overview and start typing Displays .
Click Displays to open the panel.
If you have multiple displays and they are not mirrored, you can have different settings on each display. Select a display in the preview area.
Select the orientation, resolution or scale, and refresh rate.
Click Apply . The new settings will be applied for 20 seconds before reverting back. That way, if you cannot see anything with the new settings, your old settings will be automatically restored. If you are happy with the new settings, click Keep Changes .
Resolution
The resolution is the number of pixels (dots on the screen) in each direction that can be displayed. Each resolution has an aspect ratio , the ratio of the width to the height. Wide-screen displays use a 16∶9 aspect ratio, while traditional displays use 4∶3. If you choose a resolution that does not match the aspect ratio of your display, the screen will be letterboxed to avoid distortion, by adding black bars to the top and bottom or both sides of the screen.
You can choose the resolution you prefer from the Resolution drop-down list. If you choose one that is not right for your screen it may look fuzzy or pixelated .
Native Resolution
The native resolution of a laptop screen or LCD monitor is the one that works best: the pixels in the video signal will line up precisely with the pixels on the screen. When the screen is required to show other resolutions, interpolation is necessary to represent the pixels, causing a loss of image quality.
Refresh Rate
The refresh rate is the number of times per second the screen image is drawn, or refreshed.
Scale
The scale setting increases the size of objects shown on the screen to match the density of your display, making them easier to read. Choose 100% or 200% .
Orientation
On some devices, you can physically rotate the screen in many directions. Click Orientation in the panel and choose from Landscape , Portrait Right , Portrait Left , or Landscape (flipped) .
If your device rotates the screen automatically, you can lock the current rotation using the  button at the bottom of the system menu . To unlock, press the
  button
Источник
How to Change Screen Resolution on Ubuntu
Before changing the resolution, make sure that your system contains all the latest graphics driver. Get the latest driver of NVIDIA, AMD or Intel.
Go to GNOME menu.

Search for “resolution”.
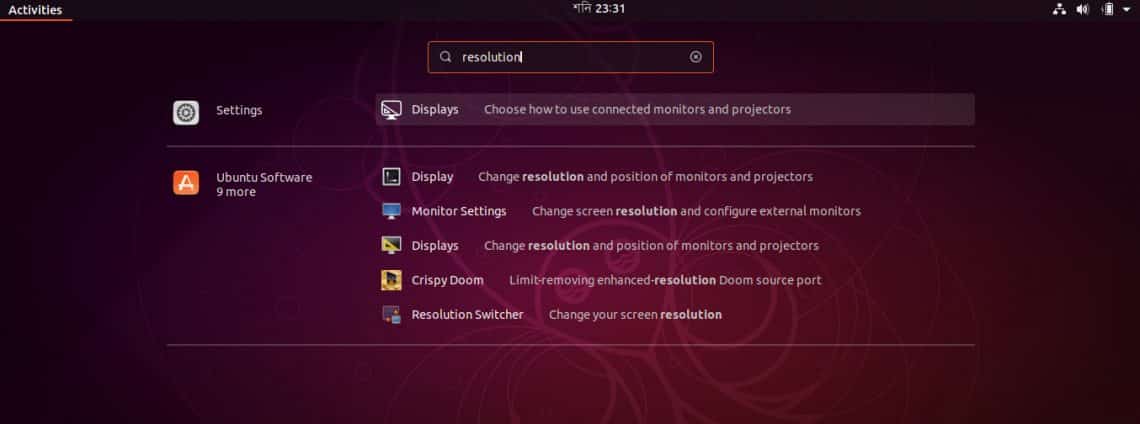
Open “Displays” from “Settings” section.

Here, you’ll have the option of changing the resolution.
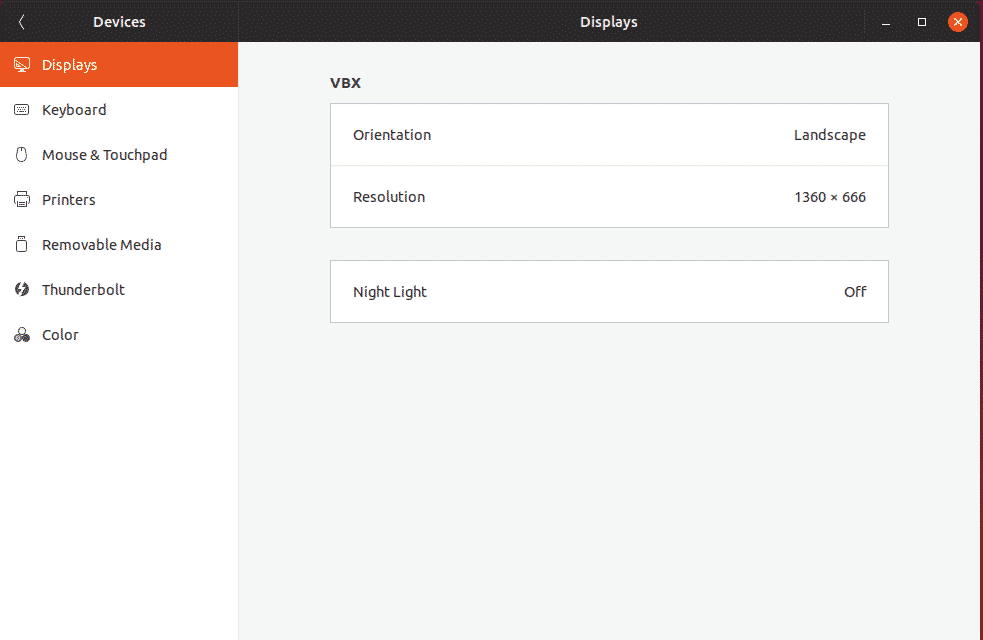
Click on the “Resolution” section.
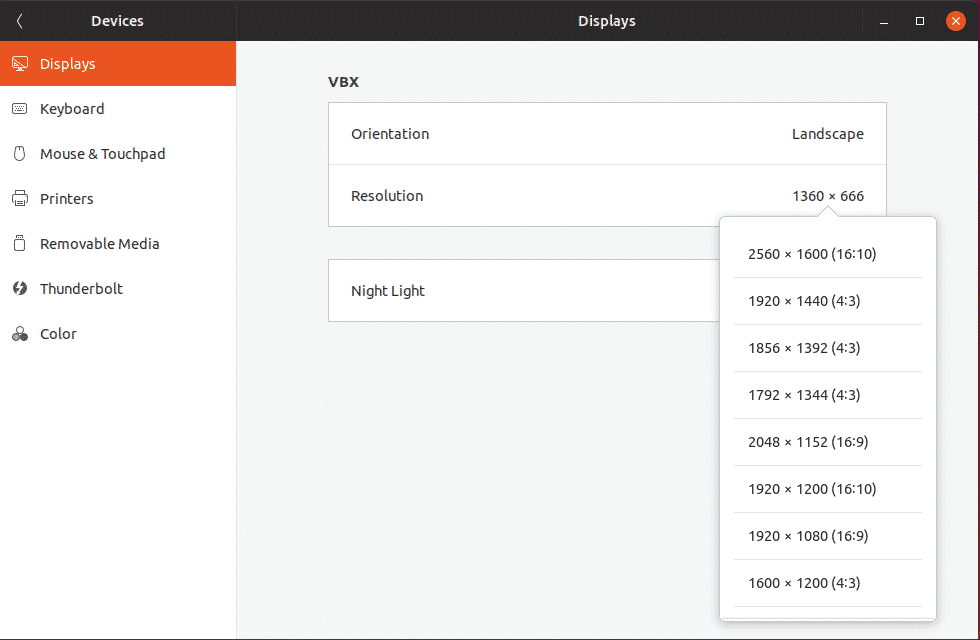
There are a number of available resolutions. By default, the present one should be your system’s resolution. Here are some of the most popular screen resolutions with their acronyms.
- Standard HD (720p) – 1280 × 720 px
- HD (1080p) – 1920 x 1080 px
- Quad HD (1440p) – 2560 x 1440 px
- 4K – 3480 x 2160 px
Once you’ve selected the option, you’ll notice the “Apply” button on the top-right corner of the window.
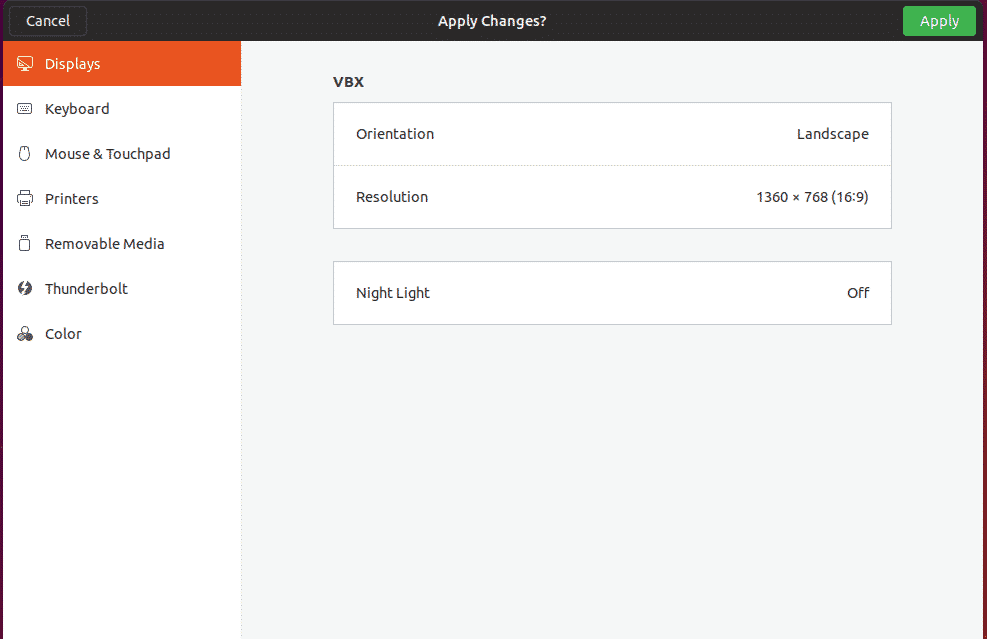
After applying the option, the system will wait for 15 seconds for your surety to change the resolution. If you don’t decide to change, the system will revert back to the default resolution again. Sometimes, you may have chosen a wrong resolution with the revert option way out of the screen. In that case, the countdown can save you a lot of trouble.
After applying the resolution, it’s better to restart your system for letting all the apps to adjust to the new resolution.
About the author

Sidratul Muntaha
Student of CSE. I love Linux and playing with tech and gadgets. I use both Ubuntu and Linux Mint.
Источник
Разрешение экрана в Linux
С развитием технологий экраны для компьютеров смогли значительно увеличить разрешение. Если старые экраны показывали 640х800 пикселей, то более новые отображают уже 1920х1080. У последних моделей разрешение ещё выше.
В операционной системе Linux существует несколько способов настройки разрешения экрана. В обычных системах, как правило, это не нужно. Но если вы хотите использовать несколько мониторов или решили запустить Linux на виртуальной машине, то разрешение может определиться неправильно и тогда придётся его настроить. В этой статье мы рассмотрим, как изменить разрешение экрана в Linux через графический интерфейс и терминал.
Настройка разрешения экрана в GUI
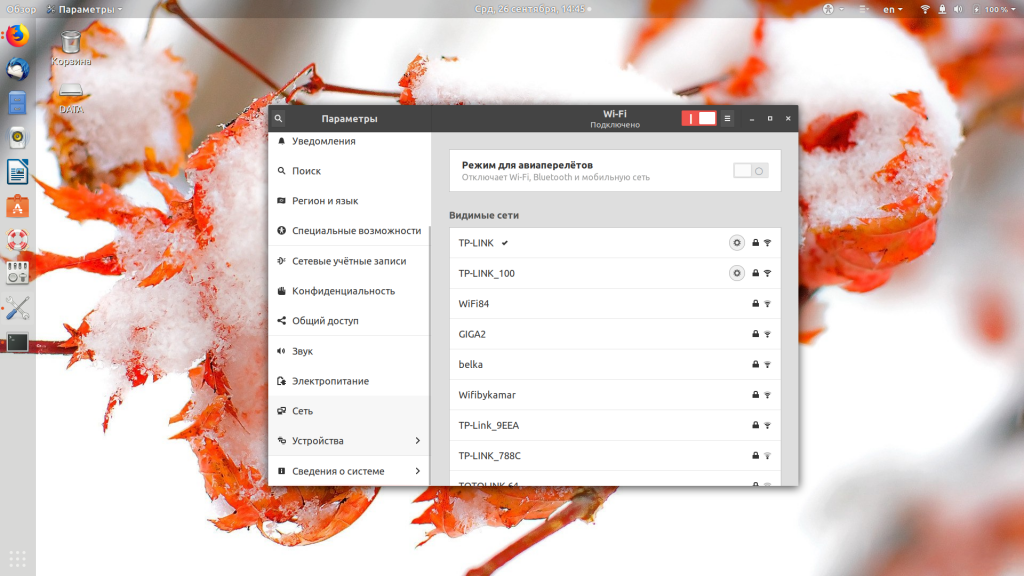
Разберём настройку разрешения на примере дистрибутива Ubuntu и окружения рабочего стола Gnome. Откройте утилиту Настройки из главного меню:
Перейдите на вкладку Устройства, а затем выберите пункт Настройка экранов:
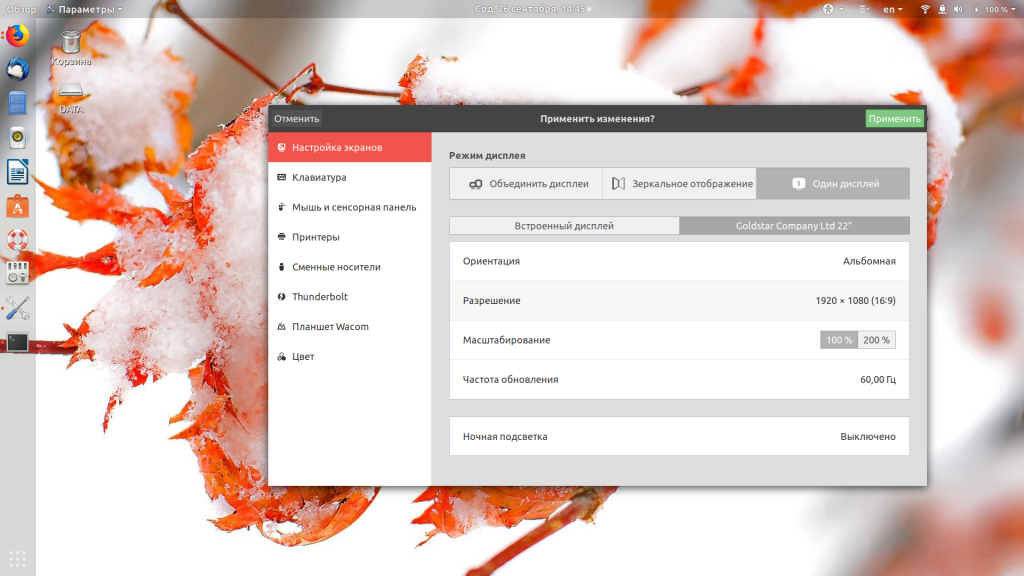
Если к компьютеру подключено два монитора Linux или больше, то у вас будет три варианта работы экранов:
- Объединение — все экраны объединяются в одно рабочее пространство;
- Зеркальное отображение — одинаковая картинка на всех экранах;
- Один экран — картинка только на одном экране, другие отключены.
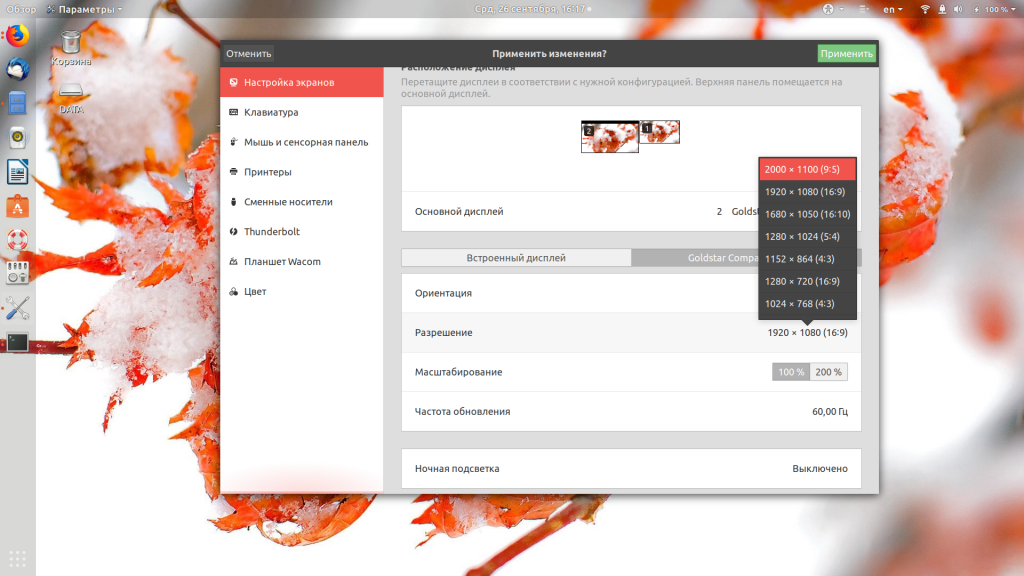
Независимо от того, какой режим вы выбираете, будут доступны настройки Разрешение и Частота обновления, где вы сможете настроить нужные вам параметры:

Так выполняется настройка монитора Linux через графический интерфейс. Если вы хотите объединить экраны, то можно указать разрешение мониторов Linux для каждого из них отдельно:
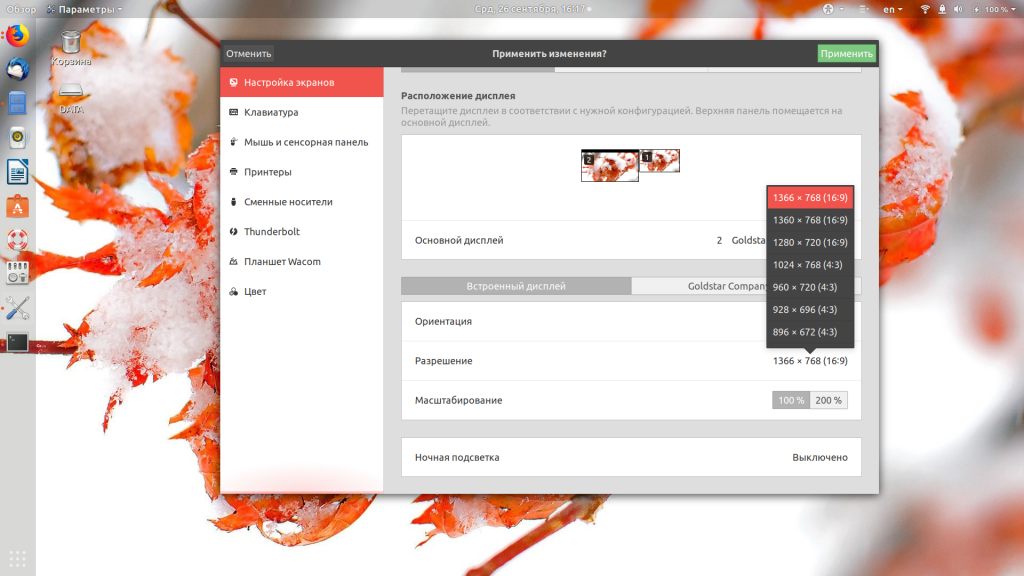
Но здесь есть один недостаток, вы можете выбрать только то разрешение экрана, которое предлагает система. Если вы захотите установить разрешение выше или ниже тех, что есть, то у вас ничего не выйдет. Для этого надо воспользоваться терминалом.
Как изменить разрешение экрана через терминал
Для управления настройками экрана из терминала можно использовать утилиту xrandr. Синтаксис утилиты очень прост:
xrandr опции параметры
Разберём основные опции утилиты, которые будем использовать:
- —verbose — включить более подробный вывод;
- —version — версия программы;
- —query — когда установлена эта опция или не указанно никаких опций, выводится текущая конфигурация;
- -d, —display — позволяет указать какой X экран использовать по имени;
- -s, —screen — устанавливает дисплей для настройки по ID;
- —output — устанавливает дисплей для настройки по имени или ID;
- —primary — выбрать основной экран;
- —size — позволяет указать размер экрана;
- —rate — устанавливает частоту обновления;
- —dpi — устанавливает DPI, количество точек на дюйм, которое позволяет вычислить правильный размер для окон;
- —newmode — создаёт новый режим отображения по размеру и частоте;
- —rmmode — удаляет режим отображения;
- —addmode — добавляет созданный режим к списку доступных для использования;
- —delmode — удалить режим из списка доступных;
- —mode — активирует указанный режим;
- —off — отключает экран;
- —gamma — позволяет установить коррекцию гаммы, в формате красный:зеленый:синий;
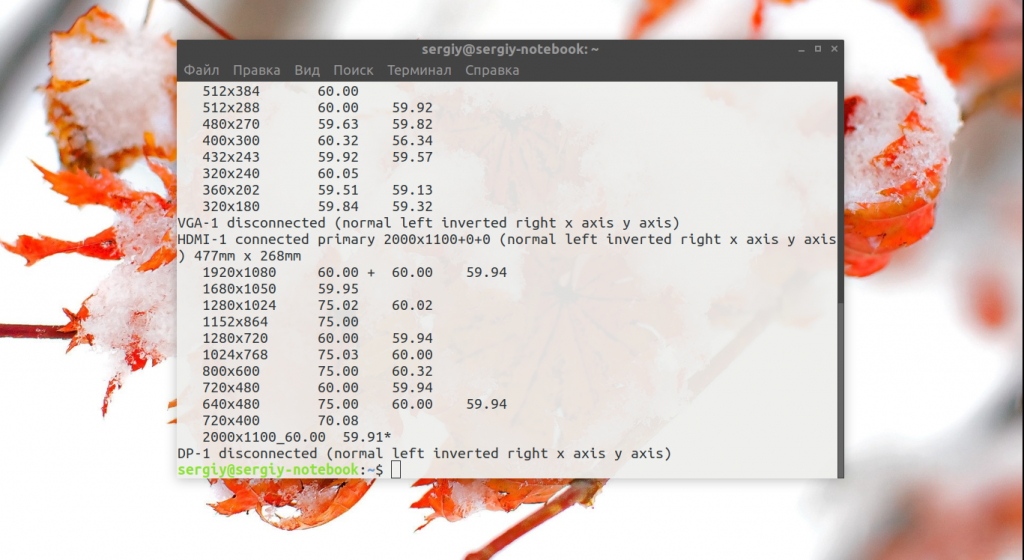
Чтобы посмотреть текущие параметры системы, запустите утилиту без параметров:
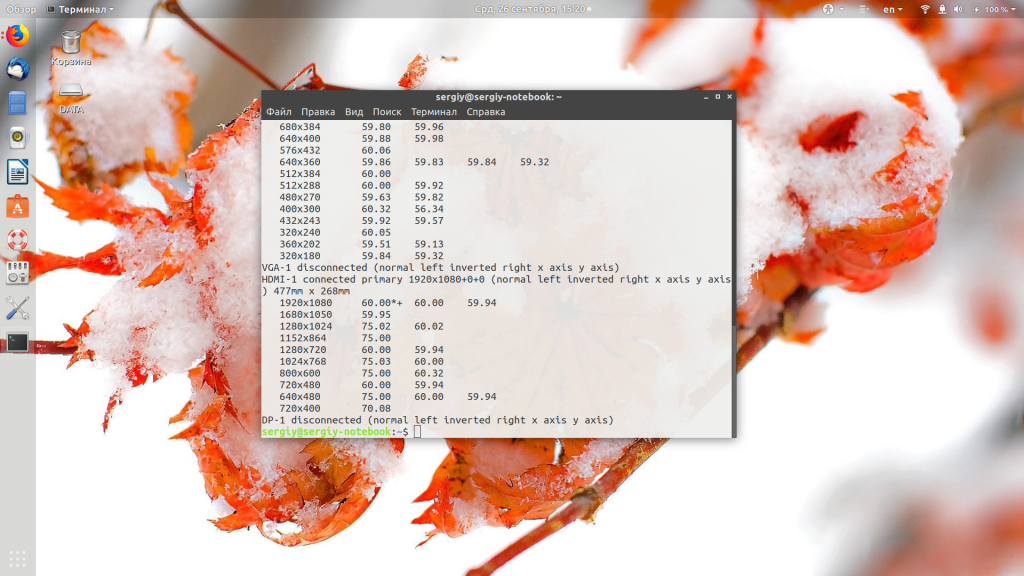
Как видите, к моей системе подключено два экрана:
- LVDS-1 — встроенный экран ноутбука;
- HDMI-1 — внешний экран;
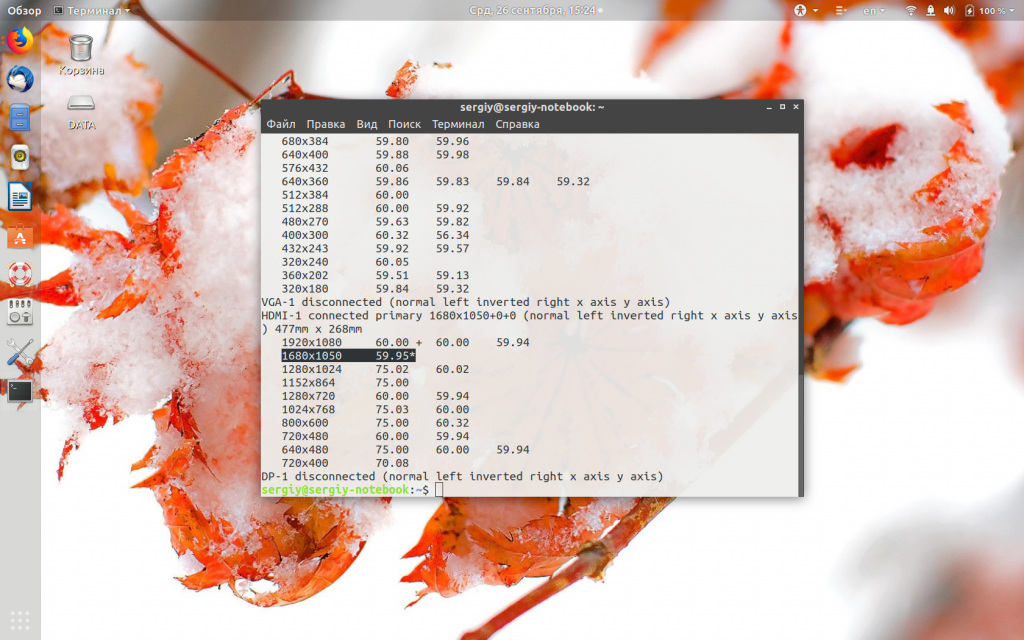
Для каждого экрана доступно несколько разрешений, текущее разрешение отмечено звёздочкой. Чтобы изменить разрешение экрана Linux на одно из доступных, используйте опцию —mode вместе с —output:
xrandr —output HDMI-1 —mode 1680×1050
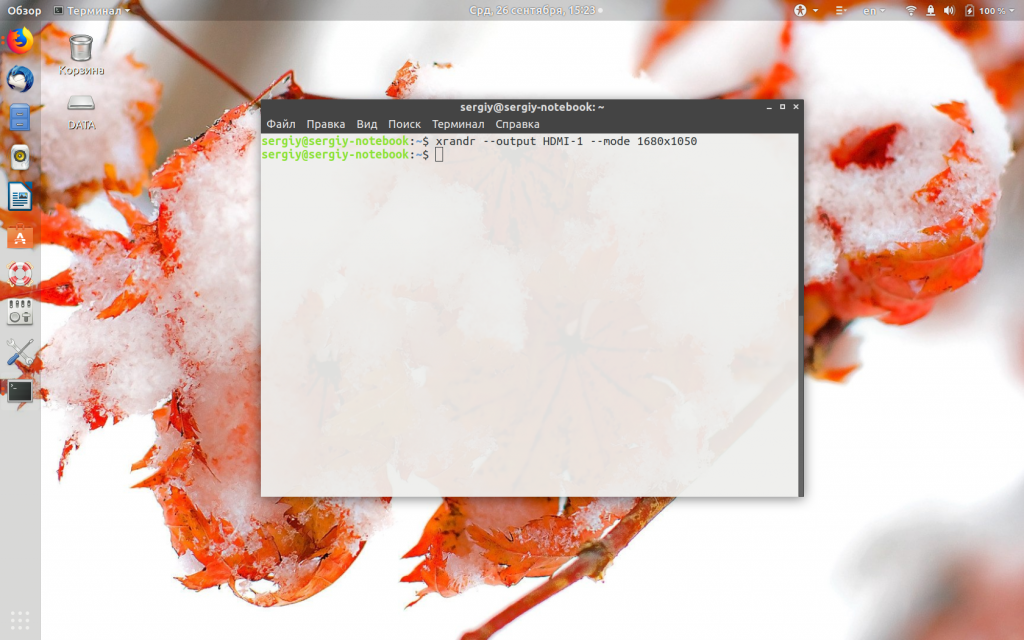
Теперь звёздочка выводится около разрешения 1680х1050.
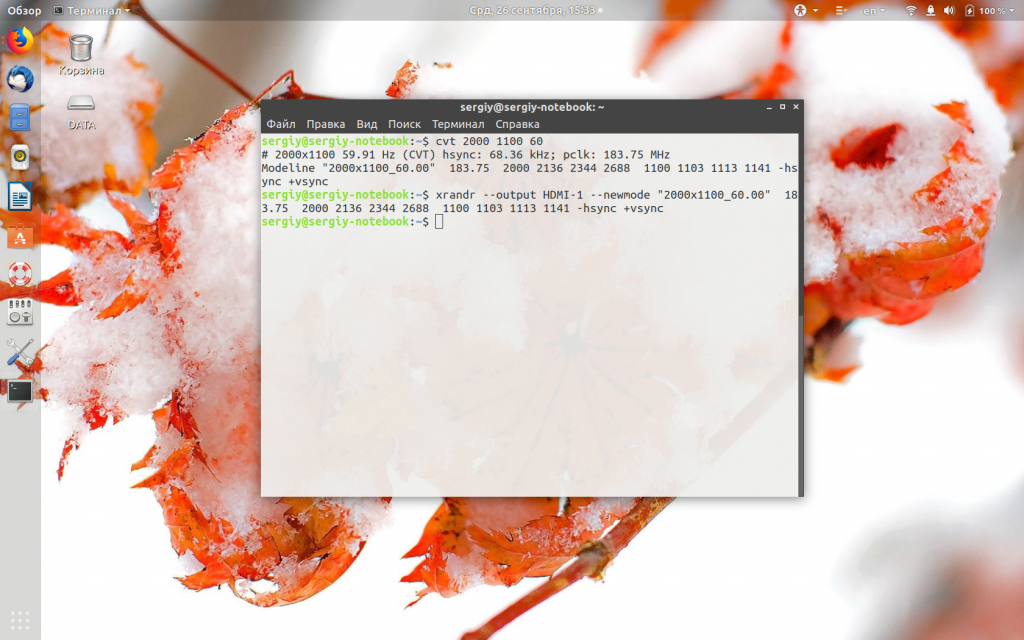
Хорошо, мы разобрались с тем, как добавить одно из существующих разрешений. По сути, то же самое, что и в графическом интерфейсе. Но если нужного разрешения в списке нет, то его можно добавить. Для этого сначала нужно конвертировать обычную запись в формат VESA. Для этого используйте утилиту cvt. Например, создадим режим с разрешением 2000х1100 и частотой обновления 60:
cvt 2000 1100 60

Дальше надо скопировать из вывода утилиты всё, что написано после «Modeline». Осталось использовать скопированный текст в xrandr:
xrandr —newmode «2000x1100_60.00» 183.75 2000 2136 2344 2688 1100 1103 1113 1141 -hsync +vsync
Добавляем только что созданное разрешение к списку доступных для нужного нам экрана:
xrandr —addmode HDMI-1 2000x1100_60.00
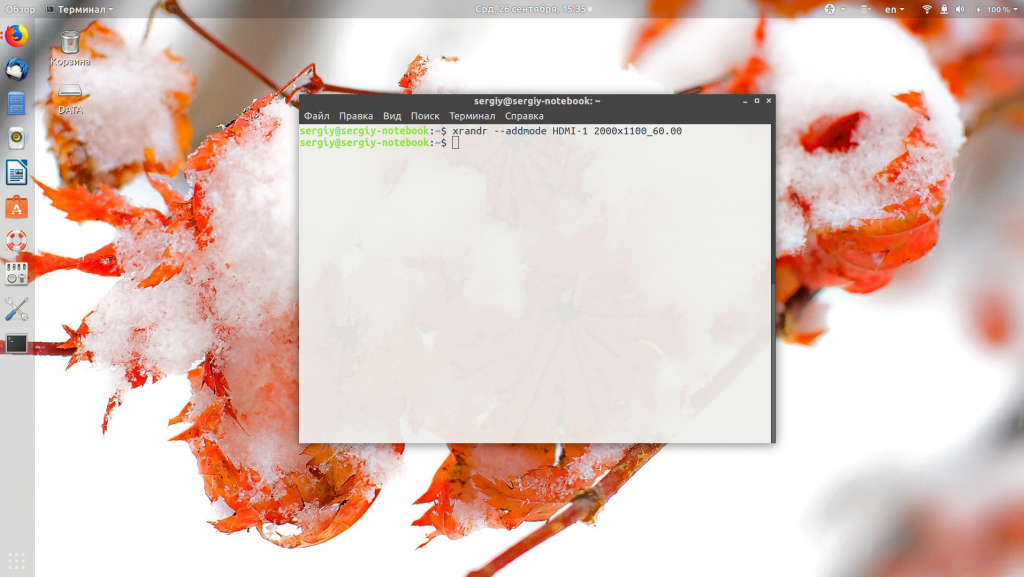
А затем активируем, как описывалось выше:
xrandr —output HDMI-1 —mode 2000x1100_60.00
Но будьте аккуратны с новыми разрешениями. Если вы устанавливаете разрешение выше, чем поддерживает ваш монитор, то он просто не будет показывать. Но такая штука может быть полезна с VirtualBox, или если компьютер не определяет, что ваш монитор поддерживает более высокое разрешение.
Чтобы сохранить настройки после перезагрузки, добавьте команду активации разрешения в конфигурационный файл
Синтаксис файла очень похож на
/.xinitrc. Все команды из него автоматически выполняются при старте сессии. Или же вы можете использовать любой другой метод автозагрузки, который работает после запуска X.
Выводы
В этой статье мы рассмотрели несколько способов настроить разрешение экрана Linux с помощью графического интерфейса или через терминал. Как видите, это не так сложно, как может показаться на первый взгляд.
Источник


