- How To Change Group Ownership Of Files and Directories with chgroup in Linux?
- Syntax
- Change File Group
- Change File Group Recursively
- Change File Group Verbosely
- Verbose Output Only Group Ownership Change
- 12 Linux Chown Command Examples to Change Owner and Group
- 1. Change the owner of a file
- 2. Change the group of a file
- 3. Change both owner and the group
- 4. Using chown command on symbolic link file
- 5. Using chown command to forcefully change the owner/group of symbolic file.
- 6. Change owner only if a file is owned by a particular user
- 7. Change group only if a file already belongs to a certain group
- 8. Copy the owner/group settings from one file to another
- 9. Change the owner/group of the files by traveling the directories recursively
- 10. Using chown command on a symbolic link directory
- 11. Using chown to forcefully change the owner/group of a symbolic link directory recursively
- 12. List all the changes made by the chown command
- chgrp command in Linux with Examples
- How to Change File/Directory User and Group Ownership in Linux
- What’s chown Command
- 1) How to Change the Owner of a File/Directory on Linux Using the chown Command
- 2) How to Change the Group Ownership of a File/Directory on Linux Using the chown Command
- 3) How to Change the User and Group Ownership of a File/Directory on Linux Using the chown Command
- 4) How to Change the User and Group Ownership Recursively on Linux Using the chown Command
- 5) How to Change User and Group Ownership of Multiple Files on Linux Using the chown Command
- 6) How to Change the User and Group Ownership of Link Files on Linux Using the chown Command
- 7) How do i Change the User and Group Ownership of a File Using the “–from=” option Using the chown Command?
- 8) How to Copy User and Group Ownership from One File to Another on Linux Using the chown Command
- 9) Bonus Tips: How To Find And Change Ownership of Files Based On Specific Extension
How To Change Group Ownership Of Files and Directories with chgroup in Linux?
Linux provides different tools for the similar or same functionality. chgrp is the shortcuts for change group where used to change files group ownership. In this tutorial we will look different uses cases for chgrp and examples. chgrp provides similar functionality to chown
Syntax
Syntax is simple where we provide options , group name and files in a row.
Change File Group
We will start with a simple example where we will just just given file group. In this example we will change file named test to the group named root . We generally need root privileges in order to change group. In this example we will use sudo to get root privilege.
Change File Group Recursively
Another useful use case for chgrp is changing group ownership recursively. We will use -r option for this operation. We will change the group to the ismail in the directory named /home/ismail recursively.
Change File Group Verbosely
While changing group we may need more information about the operation. We call this as verbose mode. We can see operations verbosely with the -v option like below. In this example we will change directory named /home/ismail/.local into group named ismail recursively and print operations verbosely. We can see that if current file or folder is all ready assigned to the group we want to change we will get a message retained as
 Change File Group Verbosely
Verbose Output Only Group Ownership Change
We may want to see verbose output only if the group ownership of a file or directory is changed. In this situation we can use -c option. We will use previous example but only show changed files and folder. As we can see changed files will annotated with from root to ismail which means groups ownership is changed from root to ismail.
 Verbose Output Only Group Ownership Change
Источник
12 Linux Chown Command Examples to Change Owner and Group
The concept of owner and groups for files is fundamental to Linux. Every file is associated with an owner and a group. You can use chown and chgrp commands to change the owner or the group of a particular file or directory.
In this article, we will discuss the ‘chown’ command as it covers most part of the ‘chgrp’ command also.
Even if you already know this command, probably one of the examples mentioned below might be new to you.
1. Change the owner of a file
So we see that the owner of the file was changed from ‘himanshu’ to ‘root’.
2. Change the group of a file
Through the chown command, the group (that a file belongs to) can also be changed.
If you observe closely, the group of the file changed from ‘family’ to ‘friends’. So we see that by just adding a ‘:’ followed by the new group name, the group of the file can be changed.
3. Change both owner and the group
So we see that using the syntax ‘ : ’, the owner as well as group can be changed in one go.
4. Using chown command on symbolic link file
Here is a symbolic link :
So we see that the symbolic link ‘tmpfile_symlink’ links to the file ‘tmpfile’.
Lets see what happens if chown command is issued on a symbolic link:
When the chown command was issued on symbolic link to change the owner as well as the group then its the referent of the symbolic link ie ‘tmpfile’ whose owner and group got changed. This is the default behavior of the chown command. Also, there exists a flag ‘–dereference’ for the same.
5. Using chown command to forcefully change the owner/group of symbolic file.
Using flag ‘-h’, you can forcefully change the owner or group of a symbolic link as shown below.
6. Change owner only if a file is owned by a particular user
Using chown “–from” flag, you can change the owner of a file, only if that file is already owned by a particular owner.
- In the example above, we verified that the original owner/group of the file ‘tmpfile’ was root/friends.
- Next we used the ‘–from’ flag to change the owner to ‘himanshu’ but only if the existing owner is ‘guest’.
- Now, as the existing owner was not ‘guest’. So, the command failed to change the owner of the file.
- Next we tried to change the owner if the existing owner is ‘root’ (which was true) and this time command was successful and the owner was changed to ‘himanshu’.
On a related note, if you want to change the permission of a file, you should use chmod command.
If you are a beginner, you should start by reading the basics of file permissions.
7. Change group only if a file already belongs to a certain group
Here also the flag ‘–from’ is used but in the following way:
Since the file ‘tmpfile’ actually belonged to group ‘friends’ so the condition was correct and the command was successful.
So we see that by using the flag ‘–from=: ’ we can change the group under a particular condition.
NOTE: By following the template ‘–from= : ’, condition on both the owner and group can be applied.
8. Copy the owner/group settings from one file to another
This is possible by using the ‘–reference’ flag.
In the above example, we first checked the owner/group of the reference-file ‘file’ and then checked the owner/group of the target-file ‘tmpfile’. Both were different. Then we used the chown command with the ‘–reference’ option to apply the owner/group settings from the reference file to the target file. The command was successful and the owner/group settings of ‘tmpfile’ were made similar to the ‘file’.
9. Change the owner/group of the files by traveling the directories recursively
This is made possible by the ‘-R’ option.
So we see that after checking the owner/group of all the files in the directory ‘linux’ and its two sub-directories ‘ubuntu’ and ‘redhat’. We issued the chown command with the ‘-R’ option to change both the owner and group. The command was successful and owner/group of all the files was changed successfully.
10. Using chown command on a symbolic link directory
Lets see what happens if we issue the ‘chown’ command to recursively change the owner/group of files in a directory that is a symbolic link to some other directory.
Here is a symbolic link directory ‘linux_symlnk’ that links to the directory ‘linux’ (already used in example ‘9’ above) :
Now, lets change the owner (from himanshu to root) of this symbolic link directory recursively :
In the ouput above we see that the owner of the files and directories was not changed. This is because by default the ‘chown’ command cannot traverse a symbolic link. This is the default behavior but there is also a flag ‘-P’ for this.
11. Using chown to forcefully change the owner/group of a symbolic link directory recursively
This can be achieved by using the flag -H
So we see that by using the -H flag, the owner/group of all the files/folder were changed.
12. List all the changes made by the chown command
Use the verbose option -v, which will display whether the ownership of the file was changed or retained as shown below.
Источник
chgrp command in Linux with Examples
chgrp command in Linux is used to change the group ownership of a file or directory. All files in Linux belong to an owner and a group. You can set the owner by using “chown” command, and the group by the “chgrp” command.
Syntax:
Note: First we need to have administrator permission to add or delete groups. We can Login as root for this purpose or using sudo. In order to add a new group we can use:
Example 1: To change the group ownership of a file.

Here the group name of the file abc.txt was changed from kcVirtual to geeksforgeeks. Note that when files are created the groupname of the file is same as the owner under which the file was created.
Example 2: To change the group ownership of a folder.

Example 3: To recursively change the group ownership of a folder and all of its contents.

As we can see the group of the folder GFG and its contents F1, F2 was all kcvirtual initially and they were changed to geeksforgeeks with the single command.
Example 4: Using the groupname of a reference file to change the group of another file or folder.
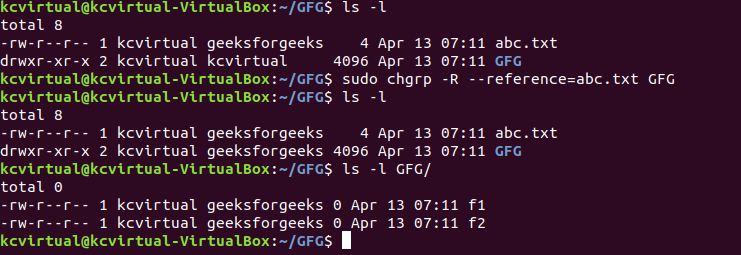
The groupname of the reference file abc.txt was used to recursively change the group of the folder GFG and all its contents using the –reference option.
Options:
- -c or –changes : To describe the action for each File whose group actually changes.
Example:

-f : To suppress error messages.
Example:

-v : To describe the action or non-action taken for every File.
Example:

–dereference/ –no-dereference: To change the group name of link files.
Example:

Here file symbolic_link is the link_file for file f1. With “–dereference” option the group name of actual file pointed by symbolic_link gets changed.
Example:

Here file symbolic_link is the link_file for file f1. With “–no-dereference” option the group name of the symbolic_link itself gets changed.
Источник
How to Change File/Directory User and Group Ownership in Linux
Linux is a multi-user system that can be accessed simultaneously by multiple users.
File permissions are a way to restrict users to access other user’s files on Linux.
It is controlled by file ownership and file permissions.
Each file in Linux has 3 types of owners, it’s user, group, and others.
A user is the owner of the file, and group is the one to which the user belongs to.
Each file and directory has three permissions for all three owners, such as read, write, and execute.
This can be done using the chown command and the chgrp command.
By default these commands do not display any output, so use the “-v” option to get information about what’s being done.
Use the ls command to find out who owns a file and which group the file belongs to.
What’s chown Command
The chown command is used to change the user and/or group ownership of each given file. This allows the user to perform various actions and the details are described below.
The common syntax is as follows:
- USER – If you provide only a username, the group of files will not be changed, becoming the owner of a given user file.
- USER: – If you provide a username followed by a colon, the given user will become the owner of the files and the group of files will be converted into that user login group.
- USER:GROUP – If you provide a username followed by a colon and group name, the given user will become the owner of the files and the group of files.
- :GROUP – If you provide a group name after the colon, and owner is excluded, only the group of files will be transferred. It works the same way as chgrp.
- : – If you only provide a colon, no action is performed.
Alternatively, you can use “-c” switch instead of “-v” switch, it works like verbose but report only when a change is made.
1) How to Change the Owner of a File/Directory on Linux Using the chown Command
In this example, we are going to change the ownership of the “passwd-up.sh” file from “daygeek” to “root”.
Before
2) How to Change the Group Ownership of a File/Directory on Linux Using the chown Command
In this example, we are going to change the group ownership of the file “mysql_backup.sh” from “daygeek” to “root”.
3) How to Change the User and Group Ownership of a File/Directory on Linux Using the chown Command
Use the example below to change the file’s user and group ownership. In this example, the user and group ownership of the “test.txt” file will be changed from “daygeek” to “root”.
4) How to Change the User and Group Ownership Recursively on Linux Using the chown Command
In this example, the ownership of all the files and its sub-directories is changed from “daygeek” to “root”, which includes the parent directory rights.
5) How to Change User and Group Ownership of Multiple Files on Linux Using the chown Command
To change the user and group ownership of multiple files, use the example below.
6) How to Change the User and Group Ownership of Link Files on Linux Using the chown Command
Use the following examples for changing ownership of link files.
When you use the chown command as usual in link files, it only changes the ownership of the source file, not the link file itself. In this example, it changes the ownership of the “output.txt” file from “daygeek” to “root”.
Use the “-h” option with the chown command to change the ownership of the link file instead of the source file.
Note: “-L” and “-H” options can be used when recursively changing the symbolic link directory ownership.
7) How do i Change the User and Group Ownership of a File Using the “–from=” option Using the chown Command?
Alternatively, you can use the “–from=” option to change ownership of files.
8) How to Copy User and Group Ownership from One File to Another on Linux Using the chown Command
In some cases, if you want to copy ownership from one file to another, use the example below.
In this example, the owner permission is copied from the “2.txt” file to the “renu.txt” file.
9) Bonus Tips: How To Find And Change Ownership of Files Based On Specific Extension
In this example, the ownership of the “.sh” extension files will be changed to “daygeek”.
Here are some helpful find command tutorials for you.
Источник


