- fdisk
- Contents
- Installation
- List partitions
- Backup and restore partition table
- Create a partition table and partitions
- Create new table
- Create partitions
- List partition types
- Change partition type
- Make a partition bootable.
- Write changes to disk
- Moving partitions
- Tips and tricks
- Sort partitions
- fdisk — простой способ управления разделами дисков в Linux
- Как ядро Linux работает с жесткими дисками?
- Что такое fdisk?
- Как установить fdisk в Linux
- Как вывести список доступных дисков с помощью команды fdisk
- Как вывести список определенных разделов диска с помощью команды fdisk
- Как вывести список доступных действий для команды fdisk?
- Как вывести список типов разделов с помощью команды fdisk
- Как создать раздел на диске с помощью команды fdisk
- Как создать расширенный раздел диска с помощью команды fdisk
- Как просмотреть нераспределенное дисковое пространство с помощью команды fdisk
- Как создать логический раздел с помощью команды fdisk
- Как удалить раздел с помощью команды fdisk
- Как отформатировать раздел или создать файловую систему на разделе
- Как смонтировать раздел в Linux
- Partitioning
- Contents
- Partition table
- Master Boot Record
- Master Boot Record (bootstrap code)
- Master Boot Record (partition table)
- GUID Partition Table
- Choosing between GPT and MBR
- Partitionless disk
- Btrfs partitioning
- Partition scheme
- Single root partition
- Discrete partitions
- Example layouts
- UEFI/GPT layout example
- BIOS/MBR layout example
- BIOS/GPT layout example
- Tools
- Partitioning tools
- fdisk
- GPT fdisk
- GNU Parted
- Backup
- Recovery
- Partition alignment
- GPT kernel support
- Troubleshooting
fdisk
util-linux fdisk is a dialogue-driven command-line utility that creates and manipulates partition tables and partitions on a hard disk. Hard disks are divided into partitions and this division is described in the partition table.
This article covers fdisk(8) and its related sfdisk(8) utility.
Contents
Installation
fdisk and its associated utilities are provided by the util-linux package, which is a dependency of the base meta package.
List partitions
To list partition tables and partitions on a device, you can run the following, where device is a name like /dev/sda :
Backup and restore partition table
Before making changes to a hard disk, you may want to backup the partition table and partition scheme of the drive. You can also use a backup to copy the same partition layout to numerous drives.
For both GPT and MBR you can use sfdisk to save the partition layout of your device to a file with the -d / —dump option. Run the following command for device /dev/sda :
The file should look something like this for a single ext4 partition that is 1 GiB in size:
To later restore this layout you can run:
Create a partition table and partitions
The first step to partitioning a disk is making a partition table. After that, the actual partitions are created according to the desired partition scheme. See the partition table article to help decide whether to use MBR or GPT.
Before beginning, you may wish to backup your current partition table and scheme.
Recent versions of fdisk have abandoned the deprecated system of using cylinders as the default display unit, as well as MS-DOS compatibility by default. fdisk automatically aligns all partitions to 2048 sectors, or 1 MiB, which should work for all EBS sizes that are known to be used by SSD manufacturers. This means that the default settings will give you proper alignment.
Start fdisk against your drive as root. In this example we are using /dev/sda :
This opens the fdisk dialogue where you can type in commands.
Create new table
To create a new partition table and clear all current partition data type o at the prompt for a MBR partition table or g for a GUID Partition Table (GPT). Skip this step if the table you require has already been created.
Create partitions
 This article or section needs expansion.
Create a new partition with the n command. You enter a partition type, partition number, starting sector, and an ending sector.
When prompted, specify the partition type, type p to create a primary partition or e to create an extended one. There may be up to four primary partitions.
The first sector must be specified in absolute terms using sector numbers. The last sector can be specified using the absolute position in sectors or using the + symbol to specify a position relative to the start sector measured in sectors, kibibytes ( K ), mebibytes ( M ), gibibytes ( G ), tebibytes ( T ), or pebibytes ( P ); for instance, setting +2G as the last sector will specify a point 2GiB after the start sector. Pressing the Enter key with no input specifies the default value, which is the start of the largest available block for the start sector and the end of the same block for the end sector.
This article or section needs expansion.
See the respective articles for considerations concerning the size and location of these partitions.
Repeat this procedure until you have the partitions you desire.
List partition types
Press l to list available partition types.
Change partition type
Each partition is associated with a Type. Press t to change the type of a partition. The default, Linux filesystem , should be fine for most use.
Make a partition bootable.
You can make the partition bootable by typing a .
Write changes to disk
Write the table to disk and exit via the w command.
Moving partitions
In order to move a partition, you need to have free space available where the partition will be moved. If necessary, you can make room by shrinking your partitions and the filesystems on them. See Parted#Shrinking partitions. To relocate a partition:
Where sectors is the number of sectors to move the partition (the + indicates moving it forward), device is the device that holds the partition, and number is the partition number. Note that if you add a new partition in the middle or at the beginning of your disk, you will likely want to renumber the partitions. See #Sort partitions or the «extra functionality» mode of fdisk.
Tips and tricks
Sort partitions
This applies for when a new partition is created in the space between two partitions or a partition is deleted. /dev/sda is used in this example.
After sorting the partitions if you are not using Persistent block device naming, it might be required to adjust the /etc/fstab and/or the /etc/crypttab configuration files.
Источник
fdisk — простой способ управления разделами дисков в Linux
Оригинал: fdisk – Easy way to manage disk partitions in Linux
Автор: Magesh Maruthamuthu
Дата публикации: 28 января 2019 года
Перевод: А. Кривошей
Дата перевода: ноябрь 2019 г.
Жесткие диски можно разделить на один или несколько логических дисков, называемых разделами. Это разделение описано в таблице разделов (MBR или GPT) в секторе 0 диска.
Linux нужен как минимум один раздел, а именно для его корневой файловой системы, и мы не можем установить Linux на диск без разделов.
После создания раздел должен быть отформатирован в соответствующей файловой системе, прежде чем в него можно будет записывать файлы. Нам понадобится какая-нибудь утилита для выполнения этого действия в Linux.
Для этого в Linux доступно множество утилит. Мы писали о Parted Command в прошлом, и сегодня мы будем обсуждать fdisk. Команда fdisk является одним из лучших инструментов для управления разделами диска в Linux. Она поддерживает диски максимум 2 ТБ, и все предпочитают использовать fdisk.
Эта утилита используется большим количеством администраторов Linux, потому что мы практически не используем более 2 ТБ сегодня из-за LVM и SAN. Она используется в большей части инфраструктуры Linux по всему миру. Тем не менее, если вы хотите создать большие разделы, например, более 2 ТБ, вам нужно использовать команду Parted или команду cfdisk.
Создание разделов диска и файловых систем — одна из рутинных задач администратора Linux. Если вы работаете в большой компании, вам придется выполнять эту задачу несколько раз в день.
Как ядро Linux работает с жесткими дисками?
Как человек, мы можем легко понять разные вещи, но компьютер нуждается в правильном преобразовании имен, чтобы понять все и вся.
В Linux устройства расположены в разделе /dev, и ядро понимает жесткий диск в следующем формате.
/dev/hdX[a-z]: IDE-диск с именем hdX в Linux
/dev/sdX[a-z]: SCSI-диск с именем sdX в Linux
/dev/xdX[a-z]: XT-диск с именем xdX в Linux
/dev/vdX[a-z]: виртуальный жесткий диск с именем vdX в Linux
/dev/fdN: гибкий диск с именем fdN в Linux
/dev/scdN or /dev/srN: CD-ROM с именем /dev/scdN или /dev/srN в Linux
Что такое fdisk?
fdisk обозначает «fixed disk» или «format disk». Это утилита командной строки, которая позволяет пользователям выполнять различные действия с дисками. Она позволяет нам просматривать, создавать, изменять размеры, удалять, перемещать и копировать разделы.
Она понимает таблицы разделов MBR, Sun, SGI и BSD, не понимает таблицу разделов GUID (GPT) и не предназначена для больших разделов.
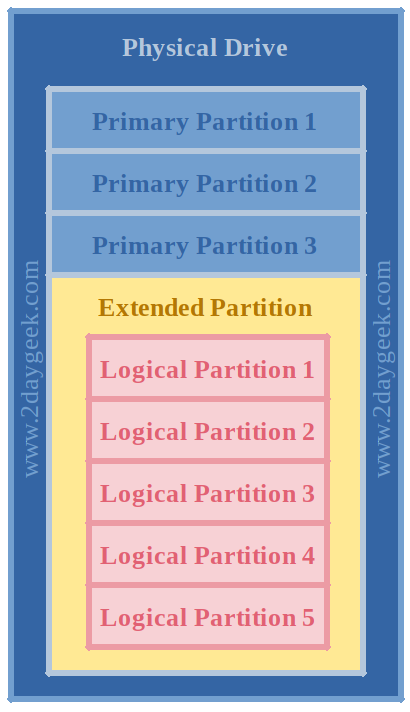
fdisk позволяет нам создать максимум четыре основных раздела на диск. Один из них может быть расширенным разделом, и он может содержать несколько логических разделов.
1-4 зарезервировано для четырех основных разделов, а логические разделы начинаются с 5.
Как установить fdisk в Linux
Вам не нужно устанавливать fdisk в системе Linux, потому что он установлен по умолчанию как часть утилит core.
Как вывести список доступных дисков с помощью команды fdisk
Сначала мы должны узнать, какие диски были добавлены в систему, прежде чем выполнять какие-либо действия. Для просмотра списка всех доступных дисков в вашей системе выполните приведенную ниже команду. Она выведет возможные сведения о дисках, такие как имя диска, количество разделов на нем, размер диска, тип метки диска, идентификатор диска, идентификатор раздела и тип раздела.
Как вывести список определенных разделов диска с помощью команды fdisk
Если вы хотите увидеть определенный диск и его разделы, используйте следующий формат команды:
Как вывести список доступных действий для команды fdisk?
Если вы нажмете m в команде fdisk, вы увидите доступные действия.
Как вывести список типов разделов с помощью команды fdisk
Если вы нажмете l в команде fdisk, она покажет вам доступные типы разделов.
Как создать раздел на диске с помощью команды fdisk
Если вы хотите создать новый раздел, выполните следующие действия. В моем случае я собираюсь создать 4 раздела (3 основных и 1 расширенный) на диске /dev/sdc.
Поскольку он принимает значение из таблицы разделов, нажмите Enter для первого сектора. Введите размер, который вы хотите установить для раздела (мы можем добавить размер раздела, используя КБ, МБ, ГБ и ТБ) для последнего сектора.
Например, если вы хотите добавить раздел размером 1 ГБ, последним значением сектора должно быть + 1G. Как только вы создали 3 раздела, fdisk автоматически изменит тип раздела на расширенный по умолчанию. Если вы все еще хотите создать четвертый первичный раздел, тогда нажмите p вместо значения по умолчанию e.
Как создать расширенный раздел диска с помощью команды fdisk
Обратите внимание, что вы должны использовать все оставшееся пространство при создании расширенного раздела, потому что вы затем можете создать в нем несколько логических разделов.
Как просмотреть нераспределенное дисковое пространство с помощью команды fdisk
Как описано в предыдущем разделе, мы полностью создали 4 раздела (3 основных и 1 расширенный). Дисковое пространство расширенного раздела будет отображаться как неразмеченное, пока вы не создадите в нем логические разделы.
Используйте приведенную ниже команду для просмотра неразмеченного пространства для диска. В соответствии с приведенным ниже выводом у нас есть 7ГБ неразмеченного диска.
Как создать логический раздел с помощью команды fdisk
Выполните ту же процедуру, описанную выше, чтобы создать логический раздел после создания расширенного раздела. Здесь я создал логический раздел размером 1 ГБ с именем /dev/sdc5, вы можете убедиться в этом, проверив значение таблицы разделов.
Как удалить раздел с помощью команды fdisk
Если раздел больше не используется в системе, мы можем удалить его, используя следующие шаги.
Убедитесь, что вы будете вводить правильный номер раздела, чтобы удалить его. В данном случае я собираюсь удалить раздел /dev/sdc2.
Как отформатировать раздел или создать файловую систему на разделе
Файловая система контролирует, как хранятся и извлекаются данные через таблицы inode.
Без файловой системы система не может найти, где хранится информация на разделе. Файловая система может быть создана тремя способами. Здесь я собираюсь создать файловую систему в разделе /dev/sdc1.
Когда вы создаете файловую систему на этом разделе, это даст вам следующие важные вещи.
UUID файловой системы: UUID означает универсальный уникальный идентификатор, UUID используются для идентификации блочных устройств в Linux. Это 128-битные числа, представленные 32 шестнадцатеричными цифрами.
Superblock: в суперблоке хранятся метаданные файловой системы. Если суперблок файловой системы поврежден, файловая система не может быть смонтирована и, следовательно, файлы не доступны.
Inode: это структура данных в файловой системе Unix-подобной операционной системы, в которой хранится вся информация о файле, кроме его имени и его фактических данных.
Journal: журналируемая файловая система — это файловая система, которая поддерживает специальный файл, называемый журналом, который используется для исправления любых несоответствий, возникающих в результате неправильного выключения компьютера.
Как смонтировать раздел в Linux
После того, как вы создали раздел и файловую систему, нам нужно смонтировать раздел для использования.
Для этого нам нужно создать точку монтирования для монтирования раздела. Используйте команду mkdir для создания точки монтирования.
Для временного монтирования используйте приведенную ниже команду. Эта точка монтирования не сохранится после перезагрузки вашей системы.
Для постоянного монтирования добавьте информацию о разделе в файл fstab. Это можно сделать двумя способами: добавить имя устройства или значение UUID.
Постоянное монтирование с использованием имени устройства:
Постоянное монтирование с использованием значения UUID. Чтобы получить UUID раздела, используйте команду blkid.
То же самое было проверено с помощью команды df.
Источник
Partitioning
Disk partitioning or disk slicing is the creation of one or more regions on secondary storage, so that each region can be managed separately.
An entire disk may be allocated to a single partition, or multiple ones for cases such as dual-booting, maintaining a swap partition, or to logically separate data such as audio and video files. The partitioning scheme is stored in a partition table such as Master Boot Record (MBR) or GUID Partition Table (GPT).
Partition tables are created and modified using one of many partitioning tools. The tools available for Arch Linux are listed in the #Partitioning tools section.
Partitions usually contain a file system directly which is accomplished by creating a file system on (a.k.a. formatting) the partition. Alternatively, partitions can contain LVM, block device encryption or RAID, which ultimately provide device files on which a file system can be placed (or the devices can be stacked further).
Any block device (e.g. disk, partition, LUKS device, LVM logical volume or RAID array) that directly contains a mountable file system is called a volume.
Contents
Partition table
There are two main types of partition table available. These are described below in the #Master Boot Record (MBR) and #GUID Partition Table (GPT) sections along with a discussion on how to choose between the two. A third, less common alternative is using a partitionless disk, which is also discussed.
Use a partitioning tool to view the partition table of a block device.
Master Boot Record
The Master Boot Record (MBR) is the first 512 bytes of a storage device. It contains an operating system bootloader and the storage device’s partition table. It plays an important role in the boot process under BIOS systems. See Wikipedia:Master boot record#Disk partitioning for the MBR structure.
Master Boot Record (bootstrap code)
The first 440 bytes of MBR are the bootstrap code area. On BIOS systems it usually contains the first stage of the boot loader. The bootstrap code can be backed up, restored from backup or erased using dd.
Master Boot Record (partition table)
In the MBR partition table (also known as DOS or MS-DOS partition table) there are 3 types of partitions:
Primary partitions can be bootable and are limited to four partitions per disk or RAID volume. If the MBR partition table requires more than four partitions, then one of the primary partitions needs to be replaced by an extended partition containing logical partitions within it.
Extended partitions can be thought of as containers for logical partitions. A hard disk can contain no more than one extended partition. The extended partition is also counted as a primary partition so if the disk has an extended partition, only three additional primary partitions are possible (i.e. three primary partitions and one extended partition). The number of logical partitions residing in an extended partition is unlimited. A system that dual boots with Windows will require for Windows to reside in a primary partition.
The customary numbering scheme is to create primary partitions sda1 through sda3 followed by an extended partition sda4. The logical partitions on sda4 are numbered sda5, sda6, etc.
GUID Partition Table
GUID Partition Table (GPT) is a partitioning scheme that is part of the Unified Extensible Firmware Interface specification; it uses globally unique identifiers (GUIDs), or UUIDs in the Linux world, to define partitions and partition types. It is designed to succeed the Master Boot Record partitioning scheme method.
At the start of a GUID Partition Table disk there is a protective Master Boot Record (PMBR) to protect against GPT-unaware software. This protective MBR just like an ordinary MBR has a bootstrap code area which can be used for BIOS/GPT booting with boot loaders that support it.
Choosing between GPT and MBR
GUID Partition Table (GPT) is an alternative, contemporary, partitioning style; it is intended to replace the old Master Boot Record (MBR) system. GPT has several advantages over MBR which has quirks dating back to MS-DOS times. With the recent developments to the formatting tools, it is equally easy to get good dependability and performance for GPT or MBR.
Some points to consider when choosing:
- To dual-boot with Windows (both 32-bit and 64-bit) using Legacy BIOS, the MBR scheme is required.
- To dual-boot Windows 64-bit using UEFI mode instead of BIOS, the GPT scheme is required.
- If you are installing on older hardware, especially on old laptops, consider choosing MBR because its BIOS might not support GPT (but see below how to fix it).
- If you are partitioning a disk that is larger than 2 TiB, you need to use GPT.
- It is recommended to always use GPT for UEFI boot, as some UEFI implementations do not support booting to the MBR while in UEFI mode.
- If none of the above apply, choose freely between GPT and MBR. Since GPT is more modern, it is recommended in this case.
Some advantages of GPT over MBR are:
- Provides a unique disk GUID and unique partition GUID (PARTUUID) for each partition — A good filesystem-independent way of referencing partitions and disks.
- Provides a filesystem-independent partition name (PARTLABEL).
- Arbitrary number of partitions — depends on space allocated for the partition table — No need for extended and logical partitions. By default the GPT table contains space for defining 128 partitions. However if you want to define more partitions, you can allocate more space to the partition table (currently only gdisk is known to support this feature).
- Uses 64-bit LBA for storing Sector numbers — maximum addressable disk size is 2 ZiB. MBR is limited to addressing 2 TiB of space per drive.[1]
- Stores a backup header and partition table at the end of the disk that aids in recovery in case the primary ones are damaged.
- CRC32 checksums to detect errors and corruption of the header and partition table.
The section on #Partitioning tools contains a table indicating which tools are available for creating and modifying GPT and MBR tables.
Partitionless disk
This article or section needs expansion.
Partitionless disk a.k.a. superfloppy refers to a storage device without a partition table, having one file system occupying the whole storage device. The boot sector present on a partitionless device is called a volume boot record (VBR).
Btrfs partitioning
Btrfs can occupy an entire data storage device and replace the MBR or GPT partitioning schemes. See the Btrfs#Partitionless Btrfs disk instructions for details.
Partition scheme
This article or section needs expansion.
There are no strict rules for partitioning a hard drive, although one may follow the general guidance given below. A disk partitioning scheme is determined by various issues such as desired flexibility, speed, security, as well as the limitations imposed by available disk space. It is essentially personal preference. If you would like to dual boot Arch Linux and a Windows operating system please see Dual boot with Windows.
Single root partition
This scheme is the simplest and should be enough for most use cases. A swapfile can be created and easily resized as needed. It usually makes sense to start by considering a single / partition and then separate out others based on specific use cases like RAID, encryption, a shared media partition, etc.
Discrete partitions
This article or section needs expansion.
Separating out a path as a partition allows for the choice of a different filesystem and mount options. In some cases like a media partition, they can also be shared between operating systems.
Below are some example layouts that can be used when partitioning, and the following subsections detail a few of the directories which can be placed on their own separate partition and then mounted at mount points under / . See file-hierarchy(7) for a full description of the contents of these directories.
The root directory is the top of the hierarchy, the point where the primary filesystem is mounted and from which all other filesystems stem. All files and directories appear under the root directory / , even if they are stored on different physical devices. The contents of the root filesystem must be adequate to boot, restore, recover, and/or repair the system. Therefore, certain directories under / are not candidates for separate partitions.
The / partition or root partition is necessary and it is the most important. The other partitions can be replaced by it.
/ traditionally contains the /usr directory, which can grow significantly depending upon how much software is installed. 15–20 GiB should be sufficient for most users with modern hard disks. If you plan to store a swap file here, you might need a larger partition size.
The /boot directory contains the kernel and ramdisk images as well as the boot loader configuration file and boot loader stages. It also stores data that is used before the kernel begins executing user-space programs. /boot is not required for normal system operation, but only during boot and kernel upgrades (when regenerating the initial ramdisk).
A suggested size for /boot is 200 MiB unless you are using EFI system partition as /boot , in which case at least 260 MiB is recommended.
The /home directory contains user-specific configuration files, caches, application data and media files.
Separating out /home allows / to be re-partitioned separately, but note that you can still reinstall Arch with /home untouched even if it is not separate—the other top-level directories just need to be removed, and then pacstrap can be run.
You should not share home directories between users on different distributions, because they use incompatible software versions and patches. Instead, consider sharing a media partition or at least using different home directories on the same /home partition. The size of this partition varies.
The /var directory stores variable data such as spool directories and files, administrative and logging data, pacman’s cache, etc. It is used, for example, for caching and logging, and hence frequently read or written. Keeping it in a separate partition avoids running out of disk space due to flunky logs, etc.
It exists to make it possible to mount /usr as read-only. Everything that historically went into /usr that is written to during system operation (as opposed to installation and software maintenance) must reside under /var .
/var will contain, among other data, the pacman cache. Retaining these packages is helpful in case a package upgrade causes instability, requiring a downgrade to an older, archived package. The pacman cache will grow as the system is expanded and updated, but it can be safely cleared if space becomes an issue. 8–12 GiB on a desktop system should be sufficient for /var , depending on how much software will be installed.
One can consider mounting a «data» partition to cover various files to be shared by all users. Using the /home partition for this purpose is fine as well. The size of this partition varies.
A swap is a file or partition that provides disk space used as virtual memory. Swap files and swap partitions are equally performant, but swap files are much easier to resize as needed. A swap partition can potentially be shared between operating systems, but not if hibernation is used.
Historically, the general rule for swap partition size was to allocate twice the amount of physical RAM. As computers have gained ever larger memory capacities, this rule is outdated. For example, on average desktop machines with up to 512 MiB RAM, the 2× rule is usually adequate; if a sufficient amount of RAM (more than 1024 MiB) is available, it may be possible to have a smaller swap partition.
To use hibernation (a.k.a suspend to disk) it is advised to create the swap partition at the size of RAM. Although the kernel will try to compress the suspend-to-disk image to fit the swap space there is no guarantee it will succeed if the used swap space is significantly smaller than RAM. See Power management/Suspend and hibernate#Hibernation for more information.
Example layouts
This article or section needs expansion.
The following examples use /dev/sda as the example disk with /dev/sda1 as the first partition. The block device naming scheme will differ if you are partitioning a NVMe disk (e.g. /dev/nvme0n1 with partitions starting from /dev/nvme0n1p1 ) or an SD card or eMMC disk (e.g. /dev/mmcblk0 with partitions starting from /dev/mmcblk0p1 ). See Device file#Block device names for more information.
UEFI/GPT layout example
| Mount point on the installed system | Partition | Partition type GUID | Partition attributes | Suggested size |
|---|---|---|---|---|
| /boot or /efi 1 | /dev/sda1 | C12A7328-F81F-11D2-BA4B-00A0C93EC93B : EFI system partition | At least 260 MiB | |
| [SWAP] | /dev/sda2 | 0657FD6D-A4AB-43C4-84E5-0933C84B4F4F : Linux swap | More than 512 MiB | |
| / | /dev/sda3 | 4F68BCE3-E8CD-4DB1-96E7-FBCAF984B709 : Linux x86-64 root (/) | Remainder of the device |
BIOS/MBR layout example
| Mount point on the installed system | Partition | Partition type ID | Boot flag | Suggested size |
|---|---|---|---|---|
| [SWAP] | /dev/sda1 | 82 : Linux swap | No | More than 512 MiB |
| / | /dev/sda2 | 83 : Linux | Yes | Remainder of the device |
| N/A | Unallocated space 2 | N/A | N/A | At least 16.5 KiB at the end of the disk |
BIOS/GPT layout example
| Mount point on the installed system | Partition | Partition type GUID | Partition attributes | Suggested size |
|---|---|---|---|---|
| None | /dev/sda1 | 21686148-6449-6E6F-744E-656564454649 : BIOS boot partition 3 | 1 MiB | |
| [SWAP] | /dev/sda2 | 0657FD6D-A4AB-43C4-84E5-0933C84B4F4F : Linux swap | More than 512 MiB | |
| / | /dev/sda3 | 4F68BCE3-E8CD-4DB1-96E7-FBCAF984B709 : Linux x86-64 root (/) | Remainder of the device |
- The ESP can be mounted to /efi if the used boot loader is capable of accessing the file system (and everything above it) on which the kernel and initramfs images are located. See EFI system partition#Typical mount points and the warning in Arch boot process#Boot loader for details.
- An unpartitioned space of at least 33 512-byte sectors (16.5 KiB) at the end of the disk to allow converting to GPT in the future. The space will be required for the backup GPT header. The recommendation to preserve an unpartitioned space applies to all MBR partitioned disks.
- A BIOS boot partition is only required when using GRUB for BIOS booting from a GPT disk. The partition has nothing to do with /boot , and it must not be formatted with a file system or mounted.
Tools
Partitioning tools
The following programs are used to create and/or manipulate device partition tables and partitions. See the linked articles for the exact commands to be used.
This table will help you to choose utility for your needs:
| MBR | GPT | |
|---|---|---|
| Dialog | fdisk parted | fdisk gdisk parted |
| Pseudo-graphics | cfdisk | cfdisk cgdisk |
| Non-interactive | sfdisk parted | sfdisk sgdisk parted |
| Graphical | GParted gnome-disk-utility partitionmanager | GParted gnome-disk-utility partitionmanager |
fdisk
fdisk and its related utilities are described in the fdisk article.
- fdisk ( util-linux )
- fdisk(8) – Dialog-driven program for creation and manipulation of partition tables.
- cfdisk(8) – Curses-based variant of fdisk.
- sfdisk(8) – Scriptable variant of fdisk.
GPT fdisk
gdisk and its related utilities are described in the gdisk article.
GNU Parted
These group of tools are described in the GNU Parted article.
Backup
- fdisk can create a backup of the partitions table. See fdisk#Backup and restore partition table.
- GPT fdisk can create a binary backup consisting of the protective MBR, the main GPT header, the backup GPT header, and one copy of the partition table. See GPT fdisk#Backup and restore partition table.
Recovery
- gpart — A utility that guesses the contents of a destroyed MBR partition table. Its usage is explained in the gpart(8) man page.
https://github.com/baruch/gpart || gpart
- GPT fdisk — A partitioning tool that can restore the primary GPT header (located at the start of the disk) from the secondary GPT header (located at the end of the disk) or vice versa.
https://www.rodsbooks.com/gdisk/ || gptfdisk
- TestDisk — A utility that supports recovering lost partitions on both MBR and GPT.
https://www.cgsecurity.org/index.html?testdisk.html || testdisk
Partition alignment
fdisk, gdisk and parted handle alignment automatically. See GNU Parted#Check alignment if you want to verify your alignment after partitioning.
For certain drives Advanced Format might be able to provide a better-performing alignment.
GPT kernel support
The CONFIG_EFI_PARTITION option in the kernel config enables GPT support in the kernel (despite the name, EFI PARTITION). This option must be built in the kernel and not compiled as a loadable module. This option is required even if GPT disks are used only for data storage and not for booting. This option is enabled by default in all Arch’s officially supported kernels. In case of a custom kernel, enable this option by doing CONFIG_EFI_PARTITION=y .
Troubleshooting
This article or section needs expansion.
Источник


