- How to Change a USER and GROUP ID on Linux For All Owned Files
- Change a USER and GROUP ID on Linux
- Linux command to change UID and GID
- Conclusion
- How To Use chmod and chown Command in Linux
- Understanding file permissions for chmod and chown command
- read (r), write (w), and execute (x) permission
- Viewing Linux/Unix file permissions and ownership
- – rw-r–r– file and d rwxr-xr-x directory permission explained
- Displaying file permission using the stat command
- chown command
- Chown Command: Change Owner of File in Linux
- Linux Chown Command Syntax
- How to Check Ownership of a File in Linux
- How to Change the Owner of a File
- Change the Owner of a File With UID
- Change Ownership of Multiple Linux Files
- How to Change the Group of a File
- Change the Group of a File Using GID
- Change Owner and the Group
- Change Group to a Users Login Group
- Transfer Ownership and Group Settings from One File to Another
- Check Owner and Group Before Making Changes
- Check Owner Only
- Check Group Only
- How to Recursively Change File Ownership
- Chown Command and Symbolic Links
- Display Chown Command Process Details
- Suppress Chown Command Errors
How to Change a USER and GROUP ID on Linux For All Owned Files
- Become superuser or get an equivalent role using sudo command/su command
- First, assign a new UID to user using the usermod command.
Tutorial details Difficulty level Easy Root privileges Yes Requirements None Est. reading time 2m - Second, assign a new GID to group using the groupmod command.
- Finally, use the chown and chgrp commands to change old UID and GID respectively. You can automate this with the help of find command.
- Verify that the group owner of the file has changed using the ls command
Change a USER and GROUP ID on Linux
It cannot be stressed enough how important it is to make a backup of your system before you do this. Make a backup. Let us say, our sample user name is foo
- Foo’s old UID: 1005
- Foo’s new UID: 2005
- Our sample group name: foo
- Foo’s old GID: 2000
- Foo’s new GID: 3000
Linux command to change UID and GID
To assign a new UID to user called foo, enter:
# usermod -u 2005 foo
To assign a new GID to group called foo, enter:
# groupmod -g 3000 foo
Verify that you changed UID and GID for given users with the help of ls command:
# ls -l
Please note that all files which are located in the user’s home directory will have the file UID changed automatically as soon as you type above two command. However, files outside user’s home directory need to be changed manually. To manually change files with old GID and UID respectively, enter:
# find / -group 2000 -exec chgrp -h foo <> \;
# find / -user 1005 -exec chown -h foo <> \;
The -exec command executes chgrp or chmod command on each file. The -h option passed to the chgrp/chmod command affect each symbolic link instead of any referenced file. Use the following command to verify the same:
# ls -l /home/foo/
# id -u foo
# id -g foo
# grep foo /etc/passwd
# grep foo /etc/group
# find / -user foo -ls
# find / -group sales -ls
- No ads and tracking
- In-depth guides for developers and sysadmins at Opensourceflare✨
- Join my Patreon to support independent content creators and start reading latest guides:
- How to set up Redis sentinel cluster on Ubuntu or Debian Linux
- How To Set Up SSH Keys With YubiKey as two-factor authentication (U2F/FIDO2)
- How to set up Mariadb Galera cluster on Ubuntu or Debian Linux
- A podman tutorial for beginners – part I (run Linux containers without Docker and in daemonless mode)
- How to protect Linux against rogue USB devices using USBGuard
Join Patreon ➔
Conclusion
This page explained how to change group and user ownership of a file in Linux operating systems using the command-line utilities such as chgrp and others. See man page of chgrp for more info here.
🐧 Get the latest tutorials on Linux, Open Source & DevOps via
Источник
How To Use chmod and chown Command in Linux
Understanding file permissions for chmod and chown command
One can use file permissions to control access to their files. Sysadmins can enforce a security policy based upon file permissions. All files have three types:
- Owner – Person or process who created the file.
- Group – All users have a primary group, and they own the file, which is useful for sharing files or giving access.
- Others – Users who are not the owner, nor a member of the group. Also, know as world permission.
read (r), write (w), and execute (x) permission
We can set the following permissions on both files and directories:
| Permission | File | Directory |
|---|---|---|
| r | Reading access/view file | Users can read file. In other words, they can run the ls command to list contents of the folder/directory. |
| w | Writing access/update/remove file | Users can update, write and delete a file from the directory. |
| x | Execution access. Run a file/script as command | Users can execute/run file as command and they have r permission too. |
| — | No access. When you want to remove r, w, and x permission | All access is taken away or removed. |
Please note that permission priority decided as follows by the kernel:
User permissions -> Group permissions -> Other permissions
It means user permission overrides group permission and group permissions overrides other permission.
Viewing Linux/Unix file permissions and ownership
Run the ls command:
ls -l
# Show information about a file named file1 #
ls -l file1
ls -l /path/to/file1
# Get information about a directory named dir1 #
ls -ld dir1
ls -l -d /path/to/dir1
For example, we can list permissions for /etc/hosts and /etc/ directory as follows:
ls -l /etc/hosts
Pass the -d option to ls to list directories themselves, not their contents:
From above outputs it is clear that the first character indicate the file type in drwxr-xr-x and -rw-r–r– and the next 9 characters are the actual file permissions.
– rw-r–r– file and d rwxr-xr-x directory permission explained
| First character | Description |
|---|---|
| — | Regular file. |
| b | Block special file. |
| c | Character special file. |
| d | Directory. |
| l | Symbolic link. |
| p | FIFO. |
| s | Socket. |
| w | Whiteout. |
Next nine characters are the file permissions divided into three sets/triad of three characters for owner permissions, group permissions, and other/world permissions as follows:
| Three permission triads defined what the user/group/others can do | First triad defines what the owner can do | Second triad explains what the group members can do | Third triad defines what other users can do |
|---|---|---|---|
| — rw- r— r— | Owner has only read and write permission ( rw- ) | Group has read permission ( r— ) | Others has read permission ( r— ) |
| d rwx r-x r-x | Owner has full permission ( rwx ) | Group has read and execute permission ( r-x ) | Others has read and execute permission ( r-x ) |
Displaying file permission using the stat command
Run the following command:
stat file1
stat dir1
stat /etc/passwd
stat /etc/resolv.conf
GUI displaying file permissions:
chown command
The chown command changes the user and/or group ownership of for given file. The syntax is:
Источник
Chown Command: Change Owner of File in Linux
Home » SysAdmin » Chown Command: Change Owner of File in Linux
The chown command changes user ownership of a file, directory, or link in Linux. Every file is associated with an owning user or group. It is critical to configure file and folder permissions properly.
In this tutorial, learn how to use the Linux chown command with examples provided.
- Linux or UNIX-like system
- Access to a terminal/command line
- A user with sudo privileges to change the ownership. Remember to run the commands with sudo to execute them properly.
Linux Chown Command Syntax
The basic chown command syntax consists of a few segments. The help file shows the following format:
- [OPTIONS] – the command can be used with or without additional options.
- [USER] – the username or the numeric user ID of the new owner of a file.
- [:] – use the colon when changing a group of a file.
- [GROUP] – changing the group ownership of a file is optional.
- FILE – the target file.
Superuser permissions are necessary to execute the chown command.
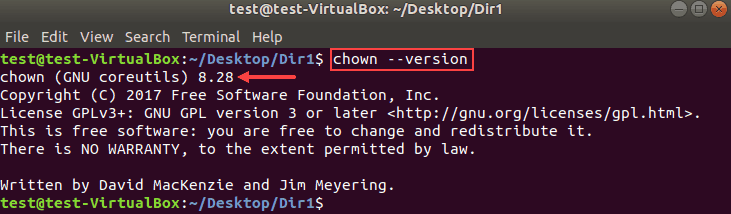
In this guide, we tested the command examples with the chown version 8.28 in Ubuntu 18.04.2 LTS.
To check the chown version on your machine, enter:
The output will look similar to this:
How to Check Ownership of a File in Linux
First, you need to know the original file owner or group before making ownership changes using the chown command.
To check the group or ownership of Linux files and directories in the current location, run the following command:
An example output of the ls command looks like this:

How to Change the Owner of a File
Changing the owner of a file with chown requires you to specify the new owner and the file. The format of the command is:
The following command changes the ownership of a file sample from root to the user test:
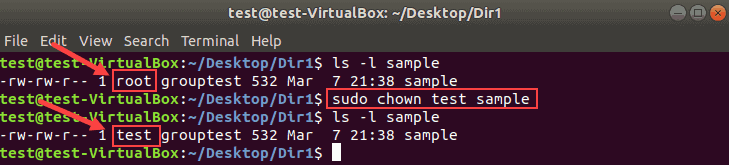
Use the same format to change the ownership for both files and directories.
Change the Owner of a File With UID
Instead of a username, you can specify a user ID to change the ownership of a file.
Make sure there is no user with the same name as the numeric UID. If there is, the chown command gives priority to the username, not the UID.
Note: To check a user’s ID, run id -u USERNAME from the terminal.
Change Ownership of Multiple Linux Files
List the target file names after the new user to change the ownership for multiple files. Use single spaces between the file names.
In the following example, root will be the new owner of files sample2 and sample3.
Combine file names and directory names to change their ownership with one command. For example:
Do not forget that the commands are case sensitive.
How to Change the Group of a File
With chown, you can change a group for a file or directory without changing the owning user. The result is the same as using the chgrp command.
Run the chown command using the colon and a group name:
The following example changes the group of the file sample3 from grouptest to group3.
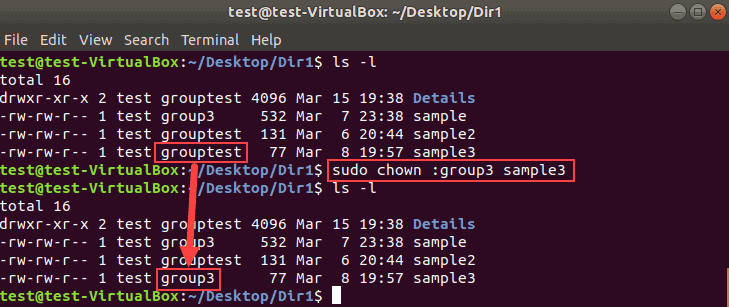
List multiple names of files or directories to make bulk changes.
Change the Group of a File Using GID
Similar to UID, use a group ID (GID) instead of a group name to change the group of a file.
Change Owner and the Group
To assign a new owner of a file and change its group at the same time, run the chown command in this format:
Therefore, to set linuxuser as the new owner and group2 as the new group of the file sample2:
Remember that there are no spaces before or after the colon.
Change Group to a Users Login Group
The chown command assigns the owner’s login group to the file when no group is specified.
To do so, define a new user followed by a colon, space, and the target file:
The following example changes the group ownership to the login group of linuxuser:
Transfer Ownership and Group Settings from One File to Another
Rather than changing the ownership to a specific user, you can use the owner and a group of a reference file.
Add the —reference option to the chown command to copy the settings from one file to another:
Remember to type in the names of the files correctly to avoid the error message:
![]()
Check Owner and Group Before Making Changes
The chown command —from option lets you verify the current owner and group and then apply changes.
The chown syntax for checking both the user and group looks like this:
The example below shows we first verified the ownership and the group of the file sample3:
Then chown changed the owner to linuxuser and the group to group3.
Check Owner Only
The option —from can be used to validate only the current user of a file.
Check Group Only
Similar to the previous section, you can validate only the group of a file using the option —from .
Here is an example where we verified the current group before changing it:
Remember to use the colon for both group names to avoid error messages.
How to Recursively Change File Ownership
The chown command allows changing the ownership of all files and subdirectories within a specified directory. Add the -R option to the command to do so:
In the following example, we will recursively change the owner and the group for all files and directories in Dir1.
Chown Command and Symbolic Links
To change the owner of a symbolic link, use the -h option. Otherwise, the ownership of the linked file will be changed.
The following image shows how symbolic links behave when -h is omitted.
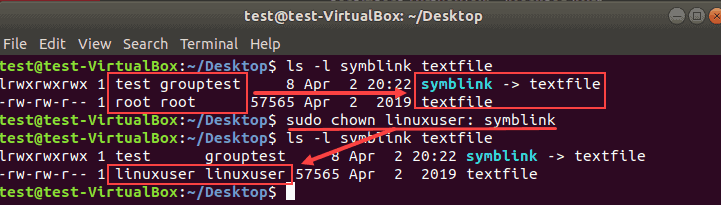
The owner and group of the symbolic link remain intact. Instead, the owner and the group of the file textfile changed.
To push the changes to the link, run the chown command with the -h flag:
In the following example, we changed the owner and group of a symbolic link.

Display Chown Command Process Details
By default, the terminal does not display the chown process information. To see what happens under the hood, use one of the two command line flags:
- The option –v produces the process details even when the ownership stays the same.
- The option –c displays the output information only when an owner or group of the target file changes.
For example, if we specify the current owner as a new owner of the file:
The terminal produces the following output:

Switch from -v to -c and there will be no messages in this case. This happens because there are no owner or group changes.
The information is particularly useful with the recursive chown command:

In this example, the output lists all objects affected after running the command.
Suppress Chown Command Errors
To avoid seeing potential error messages when running the chown command, use the -f option:
The example below shows the error message for a non-existent file or directory:

Adding the -f flag suppresses most error messages. However, if you specify an invalid username, the error message appears:

Now you know how to use chown command in Linux to change a file’s user and/or group ownership.
Take extra caution when changing the group or ownership of a file or directories.
Источник


