- 6 приложений для анализа жесткого диска в Linux
- Командная строка
- Baobab
- KDirStat и GdMap
- Filelight
- Philesight
- xdiskusage
- 7 easy methods to check disk type (HDD or SSD) in Linux
- Check disk type (HDD or SSD)
- Method 1: Check if the disk is rotational
- Method 2: Using lsblk
- Method 3: Using disk model number
- Check disk interface types
- Method 1: Using lspci
- Method 2: Using lshw
- Why the bus info is SCSI when the disk interface type is ATA Disk?
- Method 3: Using hdparm
- Method 4: Using lsblk
- Conclusion
- Related Posts
- Linux Check Disk Space Command To View System Disk Usage
- Linux commands to check disk space using:
- Linux check disk space with df command
- See information about specific filesystem
- Understanding df command output
- Express df output in human readable form
- Display output using inode usage instead of block usage
- Find out the type of each file system displayed
- Limit listing to file systems of given type
- Exclude given file system type
- Show all file system
- Getting more help about the df command
- Linux check disk space with the du command
- See du output in human readable format
- Finding information about any directory trees or files
- How do I summarize disk usage for given directory name?
- Putting it all together
- Dealing with btrfs file system
- Examples
- Conclusion
6 приложений для анализа жесткого диска в Linux
Командная строка
Если вы истинный линуксоид, самый легкий и быстрый способ – использовать команду «df» в командной строке. Просто напечатать:
в терминале, и он покажет вам загрузку жесткого диска в процентах

Как видно из представленного выше скриншота, способ может служить лишь в качестве быстрого просмотра доступного места на диске и определенно не является самым удобным для проведения анализа жесткого диска.
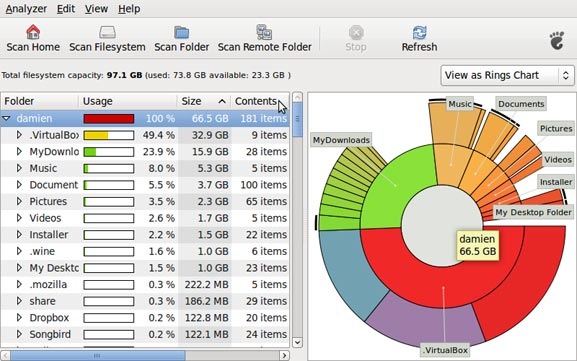
Baobab
Большинство линукс-дистрибутивов с Gnome(в частности Убунту), используют Baobab в качестве дефолтного приложения для просмотра диска.Это замечательное приложение, способное до последней папки разделить и проанализировать структуру хранения данных на жестком диске. Просто укажите папки необходимые для сканирования, и в результате получите круговую диаграмму, отражающую количество занимаемого места каждым файлом.
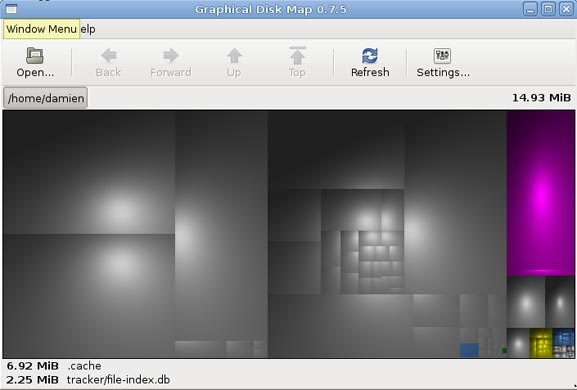
KDirStat и GdMap
Если вы использовали WinDirStat в Windows, то согласитесь, что это очень удобное приложение, позволяющее анализировать и оптимизировать ваше дисковое пространство. Однако мало людей знают, что WinDirStat это на самом деле клон KDirStat. KDirStat обладает той же функциональностью что и WinDirStat (или может быть наоборот), за исключением того, что он предназначен для использования в Linux. Несмотря на то, что KDirStat разрабатывался для KDE, он также совместим с любым оконным менеджером X11.
KDirStat отображает ваши папки/файлы в виде прямоугольников. Чем больше размер файла, тем больше прямоугольник. Это позволяет вам быстро просмотреть файловую систему, и легко определить какая папка/файл занимают много места на жестком диске.

Gd Map это эквивалент KDirStat для Gnome, кроме того что он не отображает древовидную структуру папок, и не позволяет очищать жесткий диск.
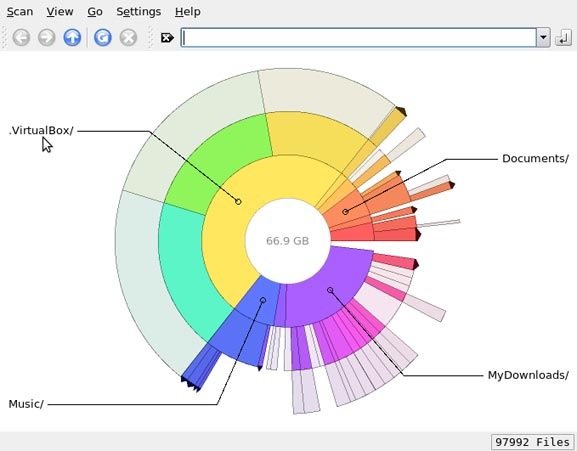
Filelight
Подобно Baobab, Filelight, создает интерактивную карту концентрических, сегментированных колец, помогающих визуализировать использование диска на вашем компьютере.Вы легко можете приблизить нужные папки, путем клика на соответствующем сегменте колец.
Philesight
Philesight это реализация Filelight в качестве веб-приложения, может быть запущена на удаленном сервере, не имеющим графического интерфейса. Philesight использует командную строку для генерации PNG-файлов в браузере и включает CGI-скрипты для навигации по файловой системе. Одна из ее особенностей, красочная радуга концентрических колец, что делает ее весьма приятной на вид.

xdiskusage
xdiskusage маленькая программка, отображающая файловую систему иерархически, слева направо, прямоугольными фигурами, с размерами, соответствующими размеру файлов. Если вы сканируете домашнюю папку, слева будет находится прямоугольник, отображающий полностью папку home, а справа все файлы, находящиеся внутри нее.
Вы легко можете приближать/удалять, нужные папки, по двойному щелчку на соответствующем прямоугольнике.
Источник
7 easy methods to check disk type (HDD or SSD) in Linux
Table of Contents
In this article I will share different commands which can be used to check the hard drive (disk) type in your Linux environment. I have verified these commands on RHEL/CentOS Linux so if you are using a different distribution such as Ubuntu, Debian, etc then some of the commands may now work.
Check disk type (HDD or SSD)
There are different types of disk available out of which the most used are Hard Drive (HDD) and Solid State Drive (SSD). You can use the following methods to identify your disk type whether it is HDD or SSD
Method 1: Check if the disk is rotational
You should check the value of /sys/block/sdX/queue/rotational , where sdX is the drive name. If the value is 0, you’re dealing with an SSD, and 1 means plain old HDD.
These are the available disks on my Linux server:
Now we can check the rotational value of these individual disks:
As the value for both the disks are 1, it means my both the disks are HDD.
Method 2: Using lsblk
Here also we will use the concept of identifying the disks with rotational feature to check the disk type. Although here we are using lsblk to list all the available connected disk types and their respective rotational values:
So all the identified disks have rotational value as 1 so this means they all are part of HDD.
Here I have another setup with SSD disks:

Method 3: Using disk model number
We can get the model number of the disk using lsblk command:
If you are using any kind of RAID such as hardware or software raid then it is possible you won’t get the model number with above command. In such case we have to rely on some third party tools. For example on my HPE Proliant Blades we are using hardware and software raid so on those servers I get following output:
As you see instead of Model Number, I get » LOGICAL VOLUME » so here I rely on HPE third party software such as ssacli and HPE Array Configuration Utility (acu cli) to get the model number. First we need the physical drive location, which can be collected using:
Now that we have the Physical Drive location i.e. 1I:1:1, we can query the details for this PD:
As you see it gives us a bunch of information about the drive we are using along with the model number.
Now that we have the model number of both our disk, we can search for the specification guide of these disks. For example the above model number is for Smasung disk which as per their online specification guide is SSD
You can also use different commands to get the model number of the disks, such as
This can give you a long list of output but you can filter the model number from the output, sample below from my server:
Check disk interface types
Now that you are familiar with the type of disk you are using, you should know the type of disk interface you are using in your environment. The different types of available disk interface types are
- Advanced technology attachment (ATA)
- Integrated Drive Electronics (IDE)
- Serial ATA (SATA)
- Small Computer system interface (SCSI)
- Serial attached SCSI (SAS)
- Fibre Channel
Method 1: Using lspci
lspci is a utility for displaying information about PCI buses in the system and devices connected to them. We can grep for the specific interface type from the output of lspci
Method 2: Using lshw
lshw is a small tool to extract detailed information on the hardware configuration of the machine. It can report exact memory configuration, firmware version, mainboard configuration, CPU version and speed, cache configuration, bus speed, etc. on DMI-capable x86 or IA-64 systems and on some PowerPC machines. It currently supports DMI (x86 and IA-64 only), OpenFirmware device tree (PowerPC only), PCI/AGP, CPUID (x86), IDE/ATA/ATAPI, PCMCIA (only tested on x86), SCSI and USB
Here is a sample output with SCSI disk interface
Here is a sample output with SATA interface
Here is a sample output from NVME disks
Here is a sample output with ATA disk interface
Why the bus info is SCSI when the disk interface type is ATA Disk?
If you observe the above output, we have ATA as the disk interface while the bus info is SCSI. The bud info is SCSI because that is the subsystem that provides IO for these disks.
It basically means that even though the disk interface is ATA, the drivers interact to the next kernel layer (the generic disk driver) using SCSI. This isn’t actually true of all SATA drivers on all kernel versions with all kernel compile-time configurations, but it’s common. Even PATA devices can appear as SCSI at that level (again, that depends on the kernel version and kernel compile-time configuration, as well as whether the ide-scsi module is used).
Method 3: Using hdparm
hdparm provides a command line interface to various kernel interfaces supported by the Linux SATA/PATA/SAS «libata» subsystem and the older IDE driver sub-system. Many newer (2008 and later) USB drive enclosures now also support «SAT» (SCSI-ATA Command Translation) and therefore may also work with hdparm.
We can use -I with hdparm which will request identification info directly from the drive, which is displayed in a new expanded format. Here are some example outputs:
But hdparm works exclusively with devices which speak the ATA protocol, for disks with other protocols, you may get the following error:
Method 4: Using lsblk
This can be one of the most reliable method to get the disk interface type. lsblk lists information about all available or the specified block devices. Using -o with lsblk we can print additional columns. To get the disk interface type we can use «TRAN» which will print the device transport type.
For example on a server using Fibre Channel:
On a server using HDD, here both the disks are using SAS protocol.
On Virtual Box environment, the virtual disks are using SATA while the DVD is using ATA protocol:
Conclusion
In this tutorial we explored different commands and methods which can be used to check the disk type and the disk interface type used to detect the disks in the server. But before you use these commands, you should be familiar with all the different disk and interfaces available.
Related Posts: how to check my hard disk is ssd or hdd. how to check if you have a solid state drive. what kind of hard drive do I have. how to check ssd. how to check disk type hdd or ssd. how to check disk interface type in Linux.
Related Posts
Didn’t find what you were looking for? Perform a quick search across GoLinuxCloud
If my articles on GoLinuxCloud has helped you, kindly consider buying me a coffee as a token of appreciation.

For any other feedbacks or questions you can either use the comments section or contact me form.
Thank You for your support!!
Источник
Linux Check Disk Space Command To View System Disk Usage
Linux commands to check disk space using:
- df command – Shows the amount of disk space used and available on Linux file systems.
- du command – Display the amount of disk space used by the specified files and for each subdirectory.
- btrfs fi df /device/ – Show disk space usage information for a btrfs based mount point/file system.
Linux check disk space with df command
- Open the terminal and type the following command to check disk space.
- The basic syntax for df is:
df [options] [devices]
Type: - df
- df -H

Fig.01: df command in action
See information about specific filesystem
You can give a device or mount point as an argument, and df report data only for the filesystem physically residing on that device. For example, the following command provides information only for the partition /dev/sda:
$ df /dev/sda
$ df -h /dev/sdc1
$ df /data/
Sample outputs:
Understanding df command output
The valid fields are as follows:
| Display name | Valid field name (for —output option) | Description |
|---|---|---|
| Filesystem | source | The source of the mount point, usually a device. |
| 1K-blocks | size | Total number of blocks. |
| Used | used | Number of used blocks. |
| Available | avail | Number of available blocks. |
| Use% | pcent | Percentage of USED divided by SIZE. |
| Mounted on | target | The mount point. |
You can pass the output format defined by ‘valid field name’ as follows:
$ df —output=field1,field2.
$ df —output=source,used,avail /data/
Sample outputs:
You can print all available fields, enter:
$ df —o
Sample outputs:
Express df output in human readable form
Pass the -h option to see output in human readable format. You will device size in gigabytes or terabytes or megabytes:
$ df -h ### Human format
$ df -m ### Show output size in one-megabyte
$ df -k ### Show output size in one-kilobyte blocks (default)
Display output using inode usage instead of block usage
An inode is a data structure on a Linux file system that stores all information about file. To list inode information, enter:
$ df -i
$ df -i -h
Sample outputs:
Find out the type of each file system displayed
Pass the -T option to display the type of each filesystems listed such as ext4, btrfs, ext2, nfs4, fuse, cgroup, cputset, and more:
$ df -T
$ df -T -h
$ df -T -h /data/
Sample outputs:
Limit listing to file systems of given type
The syntax is:
$ df -t ext3 #Only see ext3 file system
$ df -t ext4 #Only see ext4 file system
$ df -t btrfs #Only see btrfs file system
Exclude given file system type
To list all but exclude ext2 filesystem pass the -x TYPE option, enter:
$ df -x ext2
Show all file system
Pass the -a or —all option to the df command to include in its output filesystems that have a size of zero blocks, run:
$ df -a
These file systems omitted by default.
Getting more help about the df command
Pass the —help option see a brief help message:
$ df —help
Or read its man page by typing the following command:
$ man df
Linux check disk space with the du command
The NA command is very useful to track down disk space hogs. It is useful to find out the names of directories and files that consume large amounts of space on a disk. The basic syntax is:
du
du /path/do/dir
du [options] [directories and/or files]
To see the names and space consumption of each of the directories including all subdirectories in the directory tree, enter:
$ du
Sample outputs:
The first column is expressed in kilobytes (file size) and the second column is the filename or directory name.
See du output in human readable format
Pass the -h option to display size in K (kilobytes), M (megabytes), G (gigabytes) instead of the default kilobytes:
$ du -h
Sample outputs:
Finding information about any directory trees or files
To find out /etc/ directory space usage, enter:
# du /etc/
# du -h /etc/
The following will report the sizes of the thee files named hdparm, iptunnel and ifconfig that are located in the /sbin directory:
$ du /sbin/hdparm /sbin/iptunnel /sbin/ifconfig
$ du -h /sbin/hdparm /sbin/iptunnel /sbin/ifconfig
Sample outputs:
How do I summarize disk usage for given directory name?
Pass the -s option to the du command. In this example, ask du command to report only the total disk space occupied by a directory tree and to suppress subdirectories:
# du -s /etc/
# du -sh /etc/
Sample outputs:
Pass the -a (all) option to see all files, not just directories:
# du -a /etc/
# du -a -h /etc/
Sample outputs:
You can also use star ( * ) wildcard, which will match any character. For example, to see the size of each png file in the current directory, enter:
$ du -ch *.png
The -c option tells du to display grand total.
Putting it all together
To list top 10 directories eating disk space in /etc/, enter:
# du -a /etc/ | sort -n -r | head -n 10
Sample outputs:
- No ads and tracking
- In-depth guides for developers and sysadmins at Opensourceflare✨
- Join my Patreon to support independent content creators and start reading latest guides:
- How to set up Redis sentinel cluster on Ubuntu or Debian Linux
- How To Set Up SSH Keys With YubiKey as two-factor authentication (U2F/FIDO2)
- How to set up Mariadb Galera cluster on Ubuntu or Debian Linux
- A podman tutorial for beginners – part I (run Linux containers without Docker and in daemonless mode)
- How to protect Linux against rogue USB devices using USBGuard
Join Patreon ➔
For more information on the du command, type:
$ man du
$ du —help
Dealing with btrfs file system
For btrfs filesystem use the btrfs fi df command to see space usage information for a mount point. The syntax is:
Examples
# btrfs fi df /data/
# btrfs fi df -h /data/
Sample outputs:
To see raw numbers in bytes, run:
# btrfs fi df -b /data/
OR
# btrfs fi df -k /data/ ### show sizes in KiB ##
# btrfs fi df -m /data/ ### show sizes in MiB ##
# btrfs fi df -g /data/ ### show sizes in GiB ##
# btrfs fi df -t /data/ ### show sizes in TiB ##
Conclusion
Here is quick summary for Linux check disk space commands. Use the du command when you need to estimate file space usage. To report Linux file system disk space usage use the df command. The btrfs df command must be used when using btrfs file system. Fore more info see GNU coreutils page here.
🐧 Get the latest tutorials on Linux, Open Source & DevOps via
| Category | List of Unix and Linux commands |
|---|---|
| Documentation | help • mandb • man • pinfo |
| Disk space analyzers | df • duf • ncdu • pydf |
| File Management | cat • cp • less • mkdir • more • tree |
| Firewall | Alpine Awall • CentOS 8 • OpenSUSE • RHEL 8 • Ubuntu 16.04 • Ubuntu 18.04 • Ubuntu 20.04 |
| Linux Desktop Apps | Skype • Spotify • VLC 3 |
| Modern utilities | bat • exa |
| Network Utilities | NetHogs • dig • host • ip • nmap |
| OpenVPN | CentOS 7 • CentOS 8 • Debian 10 • Debian 8/9 • Ubuntu 18.04 • Ubuntu 20.04 |
| Package Manager | apk • apt |
| Processes Management | bg • chroot • cron • disown • fg • glances • gtop • jobs • killall • kill • pidof • pstree • pwdx • time • vtop |
| Searching | ag • grep • whereis • which |
| Shell builtins | compgen • echo • printf |
| Text processing | cut • rev |
| User Information | groups • id • lastcomm • last • lid/libuser-lid • logname • members • users • whoami • who • w |
| WireGuard VPN | Alpine • CentOS 8 • Debian 10 • Firewall • Ubuntu 20.04 |
Comments on this entry are closed.
Nice article. What about “ncdu”
For graphical overview… 🙂
How do i format a 39TB drive with ext4?
web-a1
Источник


