- 7 easy methods to check disk type (HDD or SSD) in Linux
- Check disk type (HDD or SSD)
- Method 1: Check if the disk is rotational
- Method 2: Using lsblk
- Method 3: Using disk model number
- Check disk interface types
- Method 1: Using lspci
- Method 2: Using lshw
- Why the bus info is SCSI when the disk interface type is ATA Disk?
- Method 3: Using hdparm
- Method 4: Using lsblk
- Conclusion
- Related Posts
- 10 Commands to Check Disk Partitions and Disk Space on Linux
- 1. fdisk
- 2. sfdisk
- 3. cfdisk
- 4. parted
- 6. pydf
- 7. lsblk
- 8. blkid
- 9. hwinfo
- 10. Inxi
- Summary
- 47 thoughts on “ 10 Commands to Check Disk Partitions and Disk Space on Linux ”
- Как получить данные о жестких дисках в вашей Linux-системе
- 1. Hdparm
- Предупреждение
- 1.1. Установка hdparm в Linux
- 1.2. Определение параметров жесткого диска в Linux с помощью Hdparm
- 2. lshw
- 2.1. Установка lshw in Linux
- 2.2. Определение параметров жесткого диска в Linux с помощью lshw
- 3. inxi
- 3.1. Инсталляция inxi в Linux
- 3.2. Определение параметров жесткого диска в Linux с помощью Inxi
- 4. Smartctl
- 4.1. Определение параметров жесткого диска в Linux с помощью Smartctl
- 5. GNOME Disks
- 5.1. Определение параметров жесткого диска в Linux с помощью GNOME Disks
7 easy methods to check disk type (HDD or SSD) in Linux
Table of Contents
In this article I will share different commands which can be used to check the hard drive (disk) type in your Linux environment. I have verified these commands on RHEL/CentOS Linux so if you are using a different distribution such as Ubuntu, Debian, etc then some of the commands may now work.
Check disk type (HDD or SSD)
There are different types of disk available out of which the most used are Hard Drive (HDD) and Solid State Drive (SSD). You can use the following methods to identify your disk type whether it is HDD or SSD
Method 1: Check if the disk is rotational
You should check the value of /sys/block/sdX/queue/rotational , where sdX is the drive name. If the value is 0, you’re dealing with an SSD, and 1 means plain old HDD.
These are the available disks on my Linux server:
Now we can check the rotational value of these individual disks:
As the value for both the disks are 1, it means my both the disks are HDD.
Method 2: Using lsblk
Here also we will use the concept of identifying the disks with rotational feature to check the disk type. Although here we are using lsblk to list all the available connected disk types and their respective rotational values:
So all the identified disks have rotational value as 1 so this means they all are part of HDD.
Here I have another setup with SSD disks:

Method 3: Using disk model number
We can get the model number of the disk using lsblk command:
If you are using any kind of RAID such as hardware or software raid then it is possible you won’t get the model number with above command. In such case we have to rely on some third party tools. For example on my HPE Proliant Blades we are using hardware and software raid so on those servers I get following output:
As you see instead of Model Number, I get » LOGICAL VOLUME » so here I rely on HPE third party software such as ssacli and HPE Array Configuration Utility (acu cli) to get the model number. First we need the physical drive location, which can be collected using:
Now that we have the Physical Drive location i.e. 1I:1:1, we can query the details for this PD:
As you see it gives us a bunch of information about the drive we are using along with the model number.
Now that we have the model number of both our disk, we can search for the specification guide of these disks. For example the above model number is for Smasung disk which as per their online specification guide is SSD
You can also use different commands to get the model number of the disks, such as
This can give you a long list of output but you can filter the model number from the output, sample below from my server:
Check disk interface types
Now that you are familiar with the type of disk you are using, you should know the type of disk interface you are using in your environment. The different types of available disk interface types are
- Advanced technology attachment (ATA)
- Integrated Drive Electronics (IDE)
- Serial ATA (SATA)
- Small Computer system interface (SCSI)
- Serial attached SCSI (SAS)
- Fibre Channel
Method 1: Using lspci
lspci is a utility for displaying information about PCI buses in the system and devices connected to them. We can grep for the specific interface type from the output of lspci
Method 2: Using lshw
lshw is a small tool to extract detailed information on the hardware configuration of the machine. It can report exact memory configuration, firmware version, mainboard configuration, CPU version and speed, cache configuration, bus speed, etc. on DMI-capable x86 or IA-64 systems and on some PowerPC machines. It currently supports DMI (x86 and IA-64 only), OpenFirmware device tree (PowerPC only), PCI/AGP, CPUID (x86), IDE/ATA/ATAPI, PCMCIA (only tested on x86), SCSI and USB
Here is a sample output with SCSI disk interface
Here is a sample output with SATA interface
Here is a sample output from NVME disks
Here is a sample output with ATA disk interface
Why the bus info is SCSI when the disk interface type is ATA Disk?
If you observe the above output, we have ATA as the disk interface while the bus info is SCSI. The bud info is SCSI because that is the subsystem that provides IO for these disks.
It basically means that even though the disk interface is ATA, the drivers interact to the next kernel layer (the generic disk driver) using SCSI. This isn’t actually true of all SATA drivers on all kernel versions with all kernel compile-time configurations, but it’s common. Even PATA devices can appear as SCSI at that level (again, that depends on the kernel version and kernel compile-time configuration, as well as whether the ide-scsi module is used).
Method 3: Using hdparm
hdparm provides a command line interface to various kernel interfaces supported by the Linux SATA/PATA/SAS «libata» subsystem and the older IDE driver sub-system. Many newer (2008 and later) USB drive enclosures now also support «SAT» (SCSI-ATA Command Translation) and therefore may also work with hdparm.
We can use -I with hdparm which will request identification info directly from the drive, which is displayed in a new expanded format. Here are some example outputs:
But hdparm works exclusively with devices which speak the ATA protocol, for disks with other protocols, you may get the following error:
Method 4: Using lsblk
This can be one of the most reliable method to get the disk interface type. lsblk lists information about all available or the specified block devices. Using -o with lsblk we can print additional columns. To get the disk interface type we can use «TRAN» which will print the device transport type.
For example on a server using Fibre Channel:
On a server using HDD, here both the disks are using SAS protocol.
On Virtual Box environment, the virtual disks are using SATA while the DVD is using ATA protocol:
Conclusion
In this tutorial we explored different commands and methods which can be used to check the disk type and the disk interface type used to detect the disks in the server. But before you use these commands, you should be familiar with all the different disk and interfaces available.
Related Posts: how to check my hard disk is ssd or hdd. how to check if you have a solid state drive. what kind of hard drive do I have. how to check ssd. how to check disk type hdd or ssd. how to check disk interface type in Linux.
Related Posts
Didn’t find what you were looking for? Perform a quick search across GoLinuxCloud
If my articles on GoLinuxCloud has helped you, kindly consider buying me a coffee as a token of appreciation.

For any other feedbacks or questions you can either use the comments section or contact me form.
Thank You for your support!!
Источник
10 Commands to Check Disk Partitions and Disk Space on Linux
In this post we are taking a look at some commands that can be used to check up the partitions on your system.
The commands would check what partitions there are on each disk and other details like the total size, used up space and file system etc.
Commands like fdisk, sfdisk and cfdisk are general partitioning tools that can not only display the partition information, but also modify them.
1. fdisk
Fdisk is the most commonly used command to check the partitions on a disk. The fdisk command can display the partitions and details like file system type. However it does not report the size of each partitions.
Each device is reported separately with details about size, seconds, id and individual partitions.
2. sfdisk
Sfdisk is another utility with a purpose similar to fdisk, but with more features. It can display the size of each partition in MB.
3. cfdisk
Cfdisk is a linux partition editor with an interactive user interface based on ncurses. It can be used to list out the existing partitions as well as create or modify them.
Here is an example of how to use cfdisk to list the partitions.
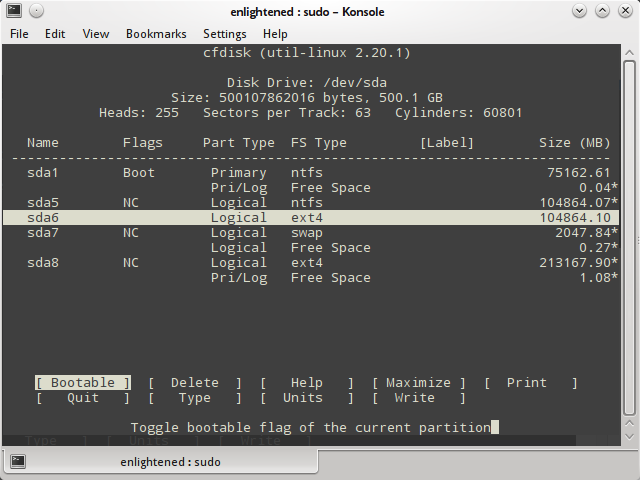
Cfdisk works with one partition at a time. So if you need to see the details of a particular disk, then pass the device name to cfdisk.
4. parted
Parted is yet another command line utility to list out partitions and modify them if needed.
Here is an example that lists out the partition details.
Df is not a partitioning utility, but prints out details about only mounted file systems. The list generated by df even includes file systems that are not real disk partitions.
Here is a simple example
Only the file systems that start with a /dev are actual devices or partitions.
Use grep to filter out real hard disk partitions/file systems.
To display only real disk partitions along with partition type, use df like this
Note that df shows only the mounted file systems or partitions and not all.
6. pydf
Improved version of df, written in python. Prints out all the hard disk partitions in a easy to read manner.
Again, pydf is limited to showing only the mounted file systems.
7. lsblk
Lists out all the storage blocks, which includes disk partitions and optical drives. Details include the total size of the partition/block and the mount point if any.
Does not report the used/free disk space on the partitions.
If there is no MOUNTPOINT, then it means that the file system is not yet mounted. For cd/dvd this means that there is no disk.
Lsblk is capbale of displaying more information about each device like the label and model. Check out the man page for more information
Display UUID and Model of device
The «-o» option can be used to specify the columns to display. The following example shows the UUID and model name column along with other columns.
The above output has all the necessary information about all the storage devices present on the system or connected via usb. You can see the device name, size, mount point, uuid, model name etc.
This is the best command to see all information about storage devices together in one place.
8. blkid
Prints the block device (partitions and storage media) attributes like uuid and file system type. Does not report the space on the partitions.
9. hwinfo
The hwinfo is a general purpose hardware information tool and can be used to print out the disk and partition list.
The output however does not print details about each partition like the above commands.
To learn more about the Hwinfo command check this post:
Check hardware information on Linux with hwinfo command
10. Inxi
Inxi is a very useful command line program that can display information about various hardware components present on the system. To display information about the disk drives and storage devices use the «-D» option with inxi.
The «-x» option prints extra available information.
The output from inxi does not contains details like UUID and mount directory.
To learn more about the inxi command check out this post:
Inxi is an amazing tool to check hardware information on Linux
Summary
The output of parted is concise and complete to get an overview of different partitions, file system on them and the total space. Pydf and df are limited to showing only mounted file systems and the same on them.
Fdisk and Sfdisk show a whole lot of information that can take sometime to interpret whereas, Cfdisk is an interactive partitioning tool that display a single device at a time.
So try them out, and do not forget to comment below.
A Tech Enthusiast, Blogger, Linux Fan and a Software Developer. Writes about Computer hardware, Linux and Open Source software and coding in Python, Php and Javascript. He can be reached at [email protected] .
47 thoughts on “ 10 Commands to Check Disk Partitions and Disk Space on Linux ”
Thank you for this great summary of relevant commands and also showing whether SU privileges are needed or not.
Good article. Thanks for writing this .
I’d also suggest including “ncdu” (stands for ncurses du) – https://dev.yorhel.nl/ncdu – in this as it’s quite useful in knowing the disk usage on the terminal in a graphical way
pydf hands down the best alternative if you want a quick glance at disk usage!
Very useful, thank you!
very useful,
How about GUI tools?
Hardinfo is a GUI tool that shows hardware information including disk drives and partitions..
On ubuntu it can be installed with the following command
sudo apt-get install hardinfo
Another tool is gparted.
It is a partition management tool, but can also be used to list the disk drives and partitions
Well done — I learned something!
glad to know that.
thanks for the comment.
Very useful. Thank you for your effort.
Detailed and to the point post. Thanks A Ton!
Источник
Как получить данные о жестких дисках в вашей Linux-системе
Оригинал: How To Find Hard Disk Drive Details In Linux
Автор: SK
Дата публикации: 11 мая 2020 г.
Перевод: В.Костромин
Дата перевода: 14 мая 2020 г.
В этой статье перечислены различные методы поиска сведений о жестких дисках в операционной системе Linux. Используя приведенные ниже методы, вы можете определить марку жесткого диска, тип жесткого диска, его размер, версию прошивки и другие параметры оборудования. Сначала мы рассмотрим, как определить данные жесткого диска с помощью утилиты командной строки hdparm.
1. Hdparm
Hdparm — это программа командной строки для получения или изменения аппаратных параметров для устройств PATA, SATA, SAS и SSD. Она рассматривает любое устройство как устройство хранения данных, подключенное к интерфейсам IDE, SATA, SAS, поэтому мы даже можем получать информацию о дисках CD / DVD. Используя утилиту hdparm, мы можем настроить жесткий диск или DVD-привод, узнать скорость жесткого диска или твердотельного накопителя, снизить уровень шума путем активации акустического режима, включить или выключить энергосберегающий режим, включить или отключить спящий режим, включить / отключить кэш диска и даже надежно стереть содержимое диска. Hdparm написан Марком Лордом (Mark Lord), ведущим разработчиком (E) IDE драйвера для Linux и текущим участником подсистемы «libata».
Предупреждение
Хотя hdparm предоставляет возможности для увеличения производительности диска, эта программа также ЧРЕЗВЫЧАЙНО ОПАСНА . При неправильном использовании некоторых ее параметров очень высока вероятность массовой потери данных. Документация hdparm предупреждает, что Вы НЕ ДОЛЖНЫ ИСПОЛЬЗОВАТЬ НЕКОТОРЫЕ КОМАНДЫ ПРИ ЛЮБЫХ ОБСТОЯТЕЛЬСТВАХ . Поэтому я не показываю такие опасные команды в этой статье. Что еще более важно, всегда рекомендуется сделать резервную копию вашего жесткого диска перед тестированием hdparm в вашей системе Linux.
1.1. Установка hdparm в Linux
Hdparm поставляется в составе большинства дистрибутивов Linux. Если она не включена в дистрибутив по каким-либо причинам, вы можете установить ее, используя имеющийся в вашей системем менеджер пакетов.
В Arch Linux и Manjaro Linux:
В Debian, Ubuntu, Linux Mint:
В Fedora, CentOS, RHEL:
1.2. Определение параметров жесткого диска в Linux с помощью Hdparm
Чтобы отобразить подробную информацию о жестком диске, просто запустите hdparm от имени root-а или используя sudo, как показано ниже:
Здесь sda — это мой жесткий диск. Замените sda на указание вашего жесткого диска. В примере я использовал утилиту “less” для того, чтобы ограничить количество выводимой на экран информации. Чтобы увидеть весь объем этой информации, используйте клавиши ENTER или клавиши UP/DOWN. Если хотите завершить вывод, нажмите q.
Пример вывода этой команды в системе с Ubuntu:
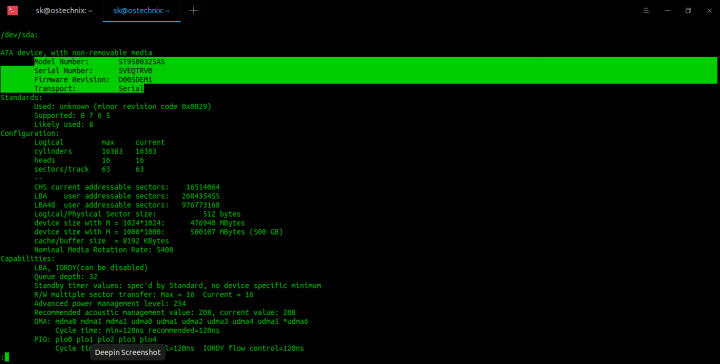
Как вы можете видеть, hdparm отображает номер модели жесткого диска, серийный номер, версию прошивки, за которой следует конфигурация жесткого диска (количество цилиндров, головок, секторов), настройки DMA, список включенных функций, параметры безопасности и т.д. Вы видите, что в данном случае активны (задействованы) возможности, помеченные звездочкой .
Подобным образом вы можете получить информацию о других устройствах.
Если команда hdparm запускается без параметров, предполагается следующий их набор -acdgkmur. Посмотрите страницу руководства man, чтобы узнать, для чего служит каждая из этих опций.
Другие детали ищите в руководстве man.
2. lshw
Lshw (Hardware Lister) — это это простая, но полнофункциональная утилита, которая предоставляет подробную информацию о конфигурации оборудования Linux-системы. Она может сообщить вам точную конфигурацию памяти, версию прошивки, конфигурацию материнской платы, версию и скорость процессора, информацию о жестком диске, конфигурацию кэша, скорость шины и многое другое.
2.1. Установка lshw in Linux
lshw включена по умолчанию в состав некоторых дистрибутивов Linux, например, Ubuntu. Если вы ее не находите в составе дистрибутива, установите lshw в вашу Linux-систему, используя менеджер пакетов по умолчанию, как показано ниже.
В Arch Linux и его вариантах, например, в Manjaro Linux, выполните:
В Debian, Ubuntu, Linux Mint:
В Fedora, CentOS, RHEL:
2.2. Определение параметров жесткого диска в Linux с помощью lshw
После инсталляции lshw, просто запустите следующую команду, чтобы получить информацию о вашем жестком диске в Linux:
Пример вывода команды lshw:
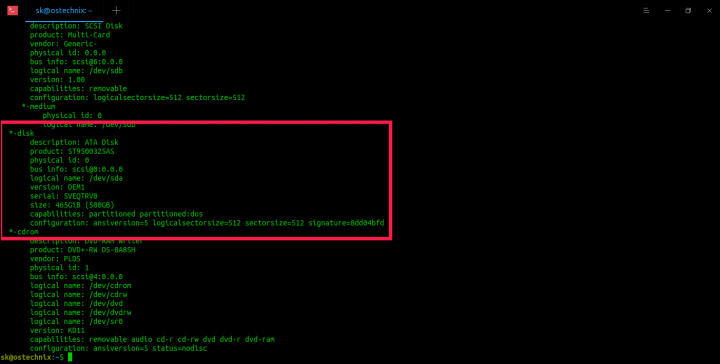
Чтобы отобразить только название дисков, запустите:
Пример вывода:
Подробности ищите на странице руководства man.
3. inxi
Inxi — еще один полнофункциональный инструмент командной строки для получения системной информации. Она показывает информацию о системном оборудовании, процессоре, драйверах, Xorg, рабочем столе, ядре, версии GCC, процессах, использовании оперативной памяти и множество других полезных сведений. Идет ли речь о жестком диске или CPU, материнской плате или полной детализации вашей системы, inxi предоставит вам нужные данные в течение нескольких секунд.
3.1. Инсталляция inxi в Linux
Inxi также представлена по умолчанию в репозиториях большинства Linux-дистрибутивов.
В Arch Linux она доступна в AUR. Вы можете установить ее с помощью любых вспомогательных программ AUR, например, Yay.
В Debian, Ubuntu:
В CentOS и RHEL:
Задействуйте репозиторий [EPEL], используя следующую команду:
3.2. Определение параметров жесткого диска в Linux с помощью Inxi
Чтобы получить подробную информацию об установленных жестких дисках в вашей системе Linux, запустите команду:
Пример вывода:

В отличие от программ Hdparm и lshw, inxi отображает только данные жесткого диска. Утилиты hdparm и lshw отобразят информацию обо всех дисководах, включая CD / DVD ROM.
Подробнее смотрите на man-странице.
4. Smartctl
Smartclt — это утилита командной строки, предназначенная для управления и мониторинга за SMART-дисками. Она основана на технологии самоконтроля, анализа и отчетности Self-Monitoring, Analysis and Reporting Technology (кратко SMART), встроенной в большинство жестких дисков ATA / SATA, SCSI / SAS и твердотельных накопителей. Команда Smartclt является частью пакета smartmontools, который предустановлен в большинстве версий Linux.
4.1. Определение параметров жесткого диска в Linux с помощью Smartctl
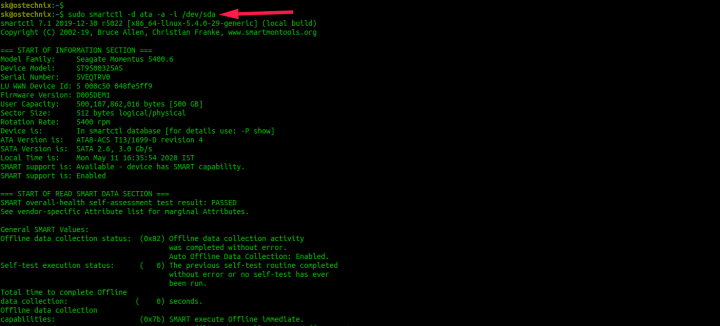
Чтобы получить полную информацию о жестком диске в вашей Linux-системе, запустите следующую команду:
Пример вывода:
Подробности опять же ищите на странице руководства man.
5. GNOME Disks
Disks или Gnome-disk-utility — это программа с графическим интерфейсом для просмотра, изменения и настройки доступных устройств хранения и носителей в системе Linux. Если вас не устраивает способ использования командной строки, вы можете использовать GNOME Disks для создания и восстановления образов дисков, для создания разделов, для форматирования дисков, проверки скорости дисков, тестирования дисков, проверки состояния и т.д. GNOME Disks предустановлен во всех дистрибутивах Linux, которые имеет рабочую среду GNOME.
5.1. Определение параметров жесткого диска в Linux с помощью GNOME Disks
Запустите Disks либо через меню, либо из панели. Будет выведена информация о всех доступных дисках и носителях в вашей Linux-системе.

Надеюсь, что эта статья оказалась вам полезной.
Вы можете найти на нашем сайте другие статьи о программах для получения информации о вашем оборудовании:
Источник


