- Как проверить работоспособность SSD/HDD в Linux
- Проверка работоспособности SSD накопителя с помощью Smartctl
- Ubuntu
- RHEL и CentOS
- FEDORA
- Проверка работоспособности SSD/HDD
- Проверка работоспособности SSD/HDD дисков с помощью Gnome
- Установка Gnome Disks
- Заключение
- S.M.A.R.T.
- Contents
- Smartmontools
- smartctl
- Run a test
- View test results
- Generate table with attributes of all disks
- smartd
- daemon management
- Define the devices to monitor
- Notifying potential problems
- Power management
- Schedule self-tests
- Alert on temperature changes
- Complete smartd.conf example
- Console applications
Как проверить работоспособность SSD/HDD в Linux
SMART (Технология самоконтроля, анализа и отчетности) — это функция, включенная во все современные жесткие диски и твердотельные накопители для мониторинга и тестирования надежности. Он проверяет различные атрибуты диска, чтобы обнаружить возможность отказа диска. Существуют различные инструменты, которые доступны в Linux и Windows для выполнения интеллектуальных тестов работоспособности.
Из этой инструкции вы узнаете, как проверить работоспособность SSD/HDD в Linux с помощью CLI и GUI
Здесь объясняются два метода:
- Использование Smartctl
- Использование Gnome disk
Проверка работоспособности SSD накопителя с помощью Smartctl
Smartctl — это утилита командной строки, которая может быть использована для проверки состояния жесткого диска или SSD с поддержкой S.M.A.R.T в системе Linux.
Утилита Smartctl utility tool поставляется вместе с пакетом smartmontools.Smartmontools доступна по умолчанию во всех дистрибутивах Linux, включая Ubuntu, RHEL, Centos и Fedora.
Как установить smartmontools в Linux:
Ubuntu
$ sudo apt install smartmontools
Запустите службу с помощью следующей команды.
RHEL и CentOS
$ sudo yum install smartmontools
FEDORA
$ sudo dnf install smartmontools
Служба Smartd запустится автоматически после успешной установки.
Если вдруг Smartd не запустился, сделать это можно командой:
Проверка работоспособности SSD/HDD
Чтобы проверить общее состояние введите команду:
Опишу команды подробнее:
d – Указывает тип устройства.
ata – тип устройства ATA, используйте scsi для типа устройства SCSI.
H – Проверяет устройство, чтобы сообщить о его состоянии и работоспособности.
 Проверка общего состояния
Полученный результат указывает на то, что диск исправен. Если устройство сообщает о неисправном состоянии работоспособности, это означает, что устройство уже вышло из строя или может выйти из строя очень скоро.
Это указывает на неудачное использование и появляется возможность получить дополнительную информацию.
Вы можете увидеть следующие атрибуты:
[ID 5] Reallocated Sectors Count – Количество секторов, перераспределенных из-за ошибок чтения.
[ID 187] Reported Uncorrect – Количество неисправимых ошибок при доступе к сектору чтения/записи.
[ID 230] Индикатор износа носителя – Текущее состояние работы диска на основе срока службы.
Если вы видите 100 — это лучшее значение. А если видите 0 — это ХУДШЕЕ значение.
Дополнительные сведения см. в разделе Сведения о интеллектуальных атрибутах.
Чтобы инициировать расширенный тест (long), выполните следующую команду:
Чтобы выполнить самотестирование, введите команду:
Чтобы найти результат самопроверки диска, используйте эту команду.
Чтобы оценить время выполнения теста, выполните следующую команду.
Вы можете распечатать журналы ошибок диска с помощью команды:
Проверка работоспособности SSD/HDD дисков с помощью Gnome
С помощью утилиты GNOME disks вы можете получить информацию о ваших SSD-дисков. Можете отформатировать диски, создать образ диска, выполнить стандартные тесты SSD-дисков и восстановить образ диска.
Установка Gnome Disks
В Ubuntu 20.04 приложение GNOME поставляется с установленным инструментом GNOME disk. Если вы не можете найти инструмент, используйте следующую команду для его установки.
$ sudo apt-get install gnome-disk-utility
GNOME Disk теперь установлен, далее вы можете перейти в меню рабочего стола и запустить его. Из приложения вы можете просмотреть все подключенные диски. А также можете использовать следующую команду для запуска приложения GNOME Disk.
Для того чтоб выполнить тест, запустите GNOME disks и выберите диск, который вы хотите протестировать. Вы можете найти быструю оценку дисков, таких как размер, разделение, серийный номер, температура и работоспособность. Нажмите на значок шестеренки и выберите SMART Data & Self-tests.
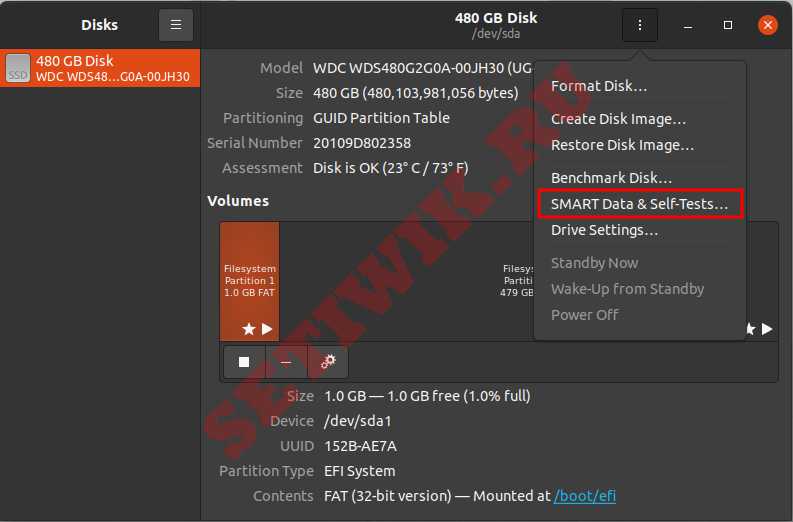 GNOME disks данные и самопроверки
В новом окне вы можете найти результаты последнего теста. В правом верхнем углу окна вы можете обнаружить, что интеллектуальная опция включена. Если SMART отключен, его можно включить, нажав на ползунок. Чтобы начать новый тест, нажмите на кнопку Начать тестирование.
 GNOME disks работает самотестирование
Как только будет нажата кнопка Начать Тестирование, появится выпадающее меню для выбора типа тестов:
- Короткие
- Расширенные
- Транспортировочные.
Выберите тип теста и введите свой пароль sudo. На индикаторе прогресса можно увидеть процент завершения теста.
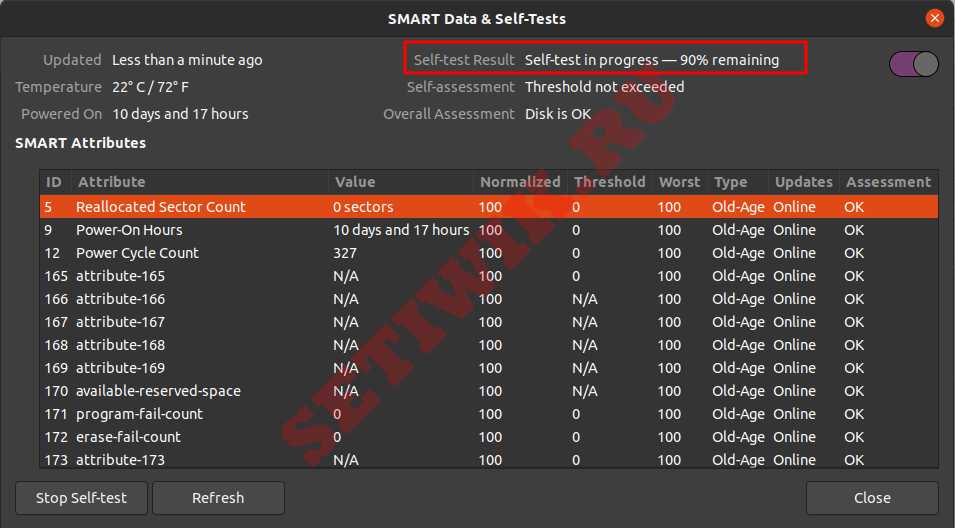 Результат самопроверки
Заключение
В этой инструкции я объяснил основную концепцию технологии S. M. A. R. T,. Кроме того, я рассказал о том, как установить утилиту командной строки smartctl компьютер с Linux и как ее можно использовать для мониторинга работоспособности жестких дисков. У вас также есть представление о утилите GNOME Disks utility tool для мониторинга SSD-накопителей. Надеюсь, что эта статья поможет вам контролировать ваши SSD-диски с помощью утилиты smartctl и GNOME Disks.
Источник
S.M.A.R.T.
S.M.A.R.T. (Self-Monitoring, Analysis, and Reporting Technology) is a supplementary component built into many modern storage devices through which devices monitor, store, and analyze the health of their operation. Statistics are collected (temperature, number of reallocated sectors, seek errors. ) which software can use to measure the health of a device, predict possible device failure, and provide notifications on unsafe values.
Contents
Smartmontools
The smartmontools package contains two utility programs for analyzing and monitoring storage devices: smartctl and smartd . Install the smartmontools package to use these tools.
SMART support must be available and enabled on each storage device to effectively use these tools. You can use #smartctl to check for and enable SMART support. That done, you can manually #Run a test and #View test results, or you can use #smartd to automatically run tests and email notifications.
smartctl
smartctl is a command-line tool that «controls the Self-Monitoring, Analysis and Reporting Technology (SMART) system built into most ATA/SATA and SCSI/SAS hard drives and solid-state drives.»
The -i / —info option prints a variety of information about a device, including whether SMART is available and enabled:
If SMART is available but not enabled, you can enable it:
You may need to specify a device type. For example, specifying —device=ata tells smartctl that the device type is ATA, and this prevents smartctl from issuing SCSI commands to that device.
Run a test
There are three types of self-tests that a device can execute (all are safe to user data):
- Short: runs tests that have a high probability of detecting device problems,
- Extended or Long: the test is the same as the short check but with no time limit and with complete disk surface examination,
- Conveyance: identifies if damage incurred during transportation of the device.
The -c / —capabilities flag prints which tests a device supports and the approximate execution time of each test. For example:
Use -t / —test= flag to run a test:
View test results
You can view a device’s overall health with the -H flag. «If the device reports failing health status, this means either that the device has already failed, or that it is predicting its own failure within the next 24 hours. If this happens […] get your data off the disk and to someplace safe as soon as you can.»
You can also view a list of recent test results and detailed information about a device:
Generate table with attributes of all disks
![]() This article or section needs language, wiki syntax or style improvements. See Help:Style for reference.
This article or section needs language, wiki syntax or style improvements. See Help:Style for reference.![]()
smartd
The smartd daemon monitors SMART statuses and emits notifications when something goes wrong. It can be managed with systemd and configured using the /etc/smartd.conf configuration file. The configuration file syntax is esoteric, and this wiki page provides only a quick reference. For more complete information, read the examples and comments within the configuration file, or read smartd.conf(5) .
daemon management
To start the daemon, check its status, make it auto-start on system boot and read recent log file entries, simply start/enable the smartd.service systemd unit.
smartd respects all the usual systemctl and journalctl commands.
Define the devices to monitor
To monitor for all possible SMART errors on all disks, the following setting must be added in the configuration file.
Note this is the default smartd configuration and the -a parameter, which is the default parameter, may be omitted.
To monitor for all possible SMART errors on /dev/sda and /dev/sdb , and ignore all other devices:
To monitor for all possible SMART errors on externally connected disks (USB-backup disks spring to mind) it is prudent to tell smartd the UUID of the device since the /dev/sdX of the drive might change during a reboot.
First, you will have to get the UUID of the disk to monitor: ls -lah /dev/disk/by-uuid/ now look for the disk you want to Monitor
I know that my USB disk attached to /dev/sde during boot. Now to tell smartd to monitor that disk simply use the /dev/disk/by-uuid/ path.
Note that you may additionally need -d removable for smartd to work.
Now your USB disk will be monitored even if the /dev/sdX path changes during reboot.
Notifying potential problems
To have an email sent when a failure or new error occurs, use the -m option:
To be able to send the email externally (i.e. not to the root mail account) a MTA (Mail Transport Agent) or a MUA (Mail User Agent) will need to be installed and configured. Common MUAs are msmtp and Postfix, but perhaps the easiest dma will suffice. Common MTAs are sendmail and Postfix. It is enough to simply configure S-nail if you do not want anything else, but you will need to follow these instructions.
The -M test option causes a test email to be sent each time the smartd daemon starts:
Emails can take quite a while to be delivered. To make sure you are warned immediately if your hard drive fails, you may also define a script to be executed in addition to the email sending:
To send an email and a system notification, put something like this into /usr/local/bin/smartdnotify :
If you are running a desktop environment, you might also prefer having a popup to appear on your desktop. In this case, you can use this script (replace X_user and X_userid with the user and userid running X respectively) :
This requires libnotify and a compatible desktop environment. See Desktop notifications for more details.
You can also put your custom scripts into /usr/share/smartmontools/smartd_warning.d/ :
This scripts notifies every logged in users on the system via libnotify.
This script requires libnotify and procps-ng and a compatible desktop environment.
You can execute your custom scripts with
Power management
If you use a computer under control of power management, you should instruct smartd how to handle disks in low power mode. Usually, in response to SMART commands issued by smartd, the disk platters are spun up. So if this option is not used, then a disk which is in a low-power mode may be spun up and put into a higher-power mode when it is periodically polled by smartd.
On some devices the -n does not work. You get the following error message in syslog:
As an alternative, you can use the -i option of smartd. It controls how often smartd spins the disks up to check their status. Default is 30 minutes. To change it create and edit /etc/default/smartmontools .
For more info see smartd(8) .
Schedule self-tests
smartd can tell disks to perform self-tests on a schedule. The following /etc/smartd.conf configuration will start a short self-test every day between 2-3am, and an extended self test weekly on Saturdays between 3-4am:
Alert on temperature changes
smartd can track disk temperatures and alert if they rise too quickly or hit a high limit. The following will log changes of 4 degrees or more, log when temp reaches 35 degrees, and log/email a warning when temp reaches 40:
Complete smartd.conf example
Putting together all of the above gives the following example configuration:
- DEVICESCAN smartd scans for disks and monitors all it finds
- -a monitor all attributes
- -o on enable automatic offline data collection
- -S on enable automatic attribute autosave
- -n standby,q do not check if disk is in standby, and suppress log message to that effect so as not to cause a write to disk
- -s . schedule short and long self-tests
- -W . monitor temperature
- -m . mail alerts
Console applications
- skdump — utility to monitor and manage SMART devices to monitor and report hard disk drive health.
http://0pointer.de/blog/projects/being-smart.html || libatasmart
iostat -x (from sysstat ) also provides some disk health metrics: in particular, high values in the f_await column mean that the disk does not respond quickly to requests, and might be failing.
Источник


