- 🐧 Как определить, является ли диск SSD или HDD на Linux
- Определяем типа диска, HDD или SSD
- Метод 1 – Проверьте, вращается ли диск
- Способ 2 – Использование команды lsblk
- Метод 3 – Использование инструментов мониторинга SMART
- Способ 4 – Использование dmesg + Google
- Способ 5 – Использование деталей SCSI + Google
- Метод 6 – Использование Sg3-utils
- Метод 7 – Тест производительности доступа к диску
- Что делать, если есть несколько дисков?
- 7 easy methods to check disk type (HDD or SSD) in Linux
- Check disk type (HDD or SSD)
- Method 1: Check if the disk is rotational
- Method 2: Using lsblk
- Method 3: Using disk model number
- Check disk interface types
- Method 1: Using lspci
- Method 2: Using lshw
- Why the bus info is SCSI when the disk interface type is ATA Disk?
- Method 3: Using hdparm
- Method 4: Using lsblk
- Conclusion
- Related Posts
- How to Check Disk SSD or HDD in Linux
- Method 1: Using lsblk command
- Method 2: Check Rotational
- Method 3: Using smartctl
- Conclusion
- How to Know if You’re Using SSD or HDD Parts in Linux
- Method 1: Using lsblk to Distinguish Between SSD and HDD Volumes
- Method 2: Check HDD or SSD Status Using the /sys Directory
🐧 Как определить, является ли диск SSD или HDD на Linux

Определяем типа диска, HDD или SSD
Метод 1 – Проверьте, вращается ли диск
Как вы, возможно, уже знаете, традиционный жесткий диск (HDD) хранит данные на круговом диске, известном как диск. Когда диск вращается, движущаяся головка чтения / записи получит доступ к данным.
Чем быстрее диск вращается (вращается), тем быстрее работает жесткий диск.
С другой стороны, твердотельный накопитель (SDD) – это современная технология хранения данных и более быстрый тип накопителя, который хранит данные на мгновенно доступных микросхемах флэш-памяти.
В отличие от традиционных жестких дисков, твердотельные накопители не имеют движущихся частей, а твердотельные накопители не вращаются.
Поэтому, если вы хотите узнать, является ли установленный диск твердотельным или обычным жестким диском, просто проверьте, вращается ли диск, с помощью следующей команды:
Таким образом, выходной сигнал должен быть нулевым, если в вашей системе есть SSD.
Каждый диск имеет каталог в /sys/class/block/location. Таким образом, вы можете проверить и другие данные дисков.
Способ 2 – Использование команды lsblk
Команда lsblk читает файловую систему sysfs и базу данных udev для сбора информации обо всех доступных или указанных блочных устройствах.
Команда lsblk является частью пакета util-linux и поставляется с предустановленным большинством дистрибутивов Linux.
На случай, если команда lsblk недоступна, просто установите пакет util-linux с помощью диспетчера пакетов вашего дистрибутива.
Например, в системах на основе Arch вы можете установить его с помощью команды:
На Debian подобных:
На rpm системамх:
Вывод:
Здесь «rota» означает устройство вращения.
Если вы получите значение вращения в приведенном выше выводе как 1, диск является жестким диском.
Если значение равно 0 (ноль), то диск SSD.
Метод 3 – Использование инструментов мониторинга SMART
Другой способ определить, является ли диск SSD или HDD, использует команду smartctl.
Smartctl является частью пакета инструментов мониторинга S.M.A.R.T, который используется для контроля и мониторинга S.M.A.R.T.
Включены жесткие диски ATA и SCSI.
Чтобы установить средства мониторинга SMART в Arch Linux и его вариантах, выполните:
На Debian, Ubuntu:
После установки пакета smartmontools выполните следующую команду, чтобы определить, является ли диск SSD или HDD:
Если диск SSD, вы получите вывод, как показано ниже.
Если диск HDD, вы получите такой вывод:
Способ 4 – Использование dmesg + Google
Это не прямой подход к поиску типа диска.
В этом методе мы используем команду dmesg, чтобы найти модель диска, а затем Google детализирует эту информацию, чтобы определить, является ли диск SSD или HDD.
Вы увидите название модели диска среди всех других деталей.
Просто прогуглите эту модель, чтобы найти детали диска.
Способ 5 – Использование деталей SCSI + Google
Это то же самое, что и вышеописанный метод.
Мы извлекаем модель диска из каталога /proc с помощью команды:
Просто прогуглите эту модель, чтобы найти детали диска.
Метод 6 – Использование Sg3-utils
Sg3-utils – это набор утилит для устройств, использующих набор команд SCSI.
Каждая утилита в этом пакете реализует одну команду SCSI.
Sg3-utils доступен в репозиториях по умолчанию Debian и Ubuntu.
Чтобы установить его в своей системе, просто запустите:
Теперь проверьте Vital Product Data (VPD) для характеристик блочного устройства, выполнив следующую команду:
Метод 7 – Тест производительности доступа к диску
Найдите, является ли диск SSD или HDD, читая случайные блоки с диска, используя команду:
Эта команда будет читать 1000 случайных блоков 4k из первых 16 ГБ диска.
Если ваш диск SSD, операция должна завершиться примерно через секунду.
Если диск является жестким диском, то для его завершения потребуется несколько секунд.
Это будет полезно для проверки дисков в вашем VPS.
Что делать, если есть несколько дисков?
Что если у меня два диска, один из которых SSD, а другой HDD?
Оба диска одинакового размера и от одного производителя.
Я не знаю, на каком диске установлен мой Linux.
В этом случае просто найдите, на каком диске находится корневая файловая система, с помощью следующей команды:
Или используйте команду lshw, чтобы узнать больше о дисках:
Источник
7 easy methods to check disk type (HDD or SSD) in Linux
Table of Contents
In this article I will share different commands which can be used to check the hard drive (disk) type in your Linux environment. I have verified these commands on RHEL/CentOS Linux so if you are using a different distribution such as Ubuntu, Debian, etc then some of the commands may now work.
Check disk type (HDD or SSD)
There are different types of disk available out of which the most used are Hard Drive (HDD) and Solid State Drive (SSD). You can use the following methods to identify your disk type whether it is HDD or SSD
Method 1: Check if the disk is rotational
You should check the value of /sys/block/sdX/queue/rotational , where sdX is the drive name. If the value is 0, you’re dealing with an SSD, and 1 means plain old HDD.
These are the available disks on my Linux server:
Now we can check the rotational value of these individual disks:
As the value for both the disks are 1, it means my both the disks are HDD.
Method 2: Using lsblk
Here also we will use the concept of identifying the disks with rotational feature to check the disk type. Although here we are using lsblk to list all the available connected disk types and their respective rotational values:
So all the identified disks have rotational value as 1 so this means they all are part of HDD.
Here I have another setup with SSD disks:

Method 3: Using disk model number
We can get the model number of the disk using lsblk command:
If you are using any kind of RAID such as hardware or software raid then it is possible you won’t get the model number with above command. In such case we have to rely on some third party tools. For example on my HPE Proliant Blades we are using hardware and software raid so on those servers I get following output:
As you see instead of Model Number, I get » LOGICAL VOLUME » so here I rely on HPE third party software such as ssacli and HPE Array Configuration Utility (acu cli) to get the model number. First we need the physical drive location, which can be collected using:
Now that we have the Physical Drive location i.e. 1I:1:1, we can query the details for this PD:
As you see it gives us a bunch of information about the drive we are using along with the model number.
Now that we have the model number of both our disk, we can search for the specification guide of these disks. For example the above model number is for Smasung disk which as per their online specification guide is SSD
You can also use different commands to get the model number of the disks, such as
This can give you a long list of output but you can filter the model number from the output, sample below from my server:
Check disk interface types
Now that you are familiar with the type of disk you are using, you should know the type of disk interface you are using in your environment. The different types of available disk interface types are
- Advanced technology attachment (ATA)
- Integrated Drive Electronics (IDE)
- Serial ATA (SATA)
- Small Computer system interface (SCSI)
- Serial attached SCSI (SAS)
- Fibre Channel
Method 1: Using lspci
lspci is a utility for displaying information about PCI buses in the system and devices connected to them. We can grep for the specific interface type from the output of lspci
Method 2: Using lshw
lshw is a small tool to extract detailed information on the hardware configuration of the machine. It can report exact memory configuration, firmware version, mainboard configuration, CPU version and speed, cache configuration, bus speed, etc. on DMI-capable x86 or IA-64 systems and on some PowerPC machines. It currently supports DMI (x86 and IA-64 only), OpenFirmware device tree (PowerPC only), PCI/AGP, CPUID (x86), IDE/ATA/ATAPI, PCMCIA (only tested on x86), SCSI and USB
Here is a sample output with SCSI disk interface
Here is a sample output with SATA interface
Here is a sample output from NVME disks
Here is a sample output with ATA disk interface
Why the bus info is SCSI when the disk interface type is ATA Disk?
If you observe the above output, we have ATA as the disk interface while the bus info is SCSI. The bud info is SCSI because that is the subsystem that provides IO for these disks.
It basically means that even though the disk interface is ATA, the drivers interact to the next kernel layer (the generic disk driver) using SCSI. This isn’t actually true of all SATA drivers on all kernel versions with all kernel compile-time configurations, but it’s common. Even PATA devices can appear as SCSI at that level (again, that depends on the kernel version and kernel compile-time configuration, as well as whether the ide-scsi module is used).
Method 3: Using hdparm
hdparm provides a command line interface to various kernel interfaces supported by the Linux SATA/PATA/SAS «libata» subsystem and the older IDE driver sub-system. Many newer (2008 and later) USB drive enclosures now also support «SAT» (SCSI-ATA Command Translation) and therefore may also work with hdparm.
We can use -I with hdparm which will request identification info directly from the drive, which is displayed in a new expanded format. Here are some example outputs:
But hdparm works exclusively with devices which speak the ATA protocol, for disks with other protocols, you may get the following error:
Method 4: Using lsblk
This can be one of the most reliable method to get the disk interface type. lsblk lists information about all available or the specified block devices. Using -o with lsblk we can print additional columns. To get the disk interface type we can use «TRAN» which will print the device transport type.
For example on a server using Fibre Channel:
On a server using HDD, here both the disks are using SAS protocol.
On Virtual Box environment, the virtual disks are using SATA while the DVD is using ATA protocol:
Conclusion
In this tutorial we explored different commands and methods which can be used to check the disk type and the disk interface type used to detect the disks in the server. But before you use these commands, you should be familiar with all the different disk and interfaces available.
Related Posts: how to check my hard disk is ssd or hdd. how to check if you have a solid state drive. what kind of hard drive do I have. how to check ssd. how to check disk type hdd or ssd. how to check disk interface type in Linux.
Related Posts
Didn’t find what you were looking for? Perform a quick search across GoLinuxCloud
If my articles on GoLinuxCloud has helped you, kindly consider buying me a coffee as a token of appreciation.

For any other feedbacks or questions you can either use the comments section or contact me form.
Thank You for your support!!
Источник
How to Check Disk SSD or HDD in Linux

There are different types of disk drives available among which most used are Hard drive (HDD) and Solid State Drive (SSD). Starting from the Kernel version 2.6.29, SSD is automatically detected by Linux systems.
This tutorial shows how to check the installed disk is SSD or HDD in a Linux system.
Method 1: Using lsblk command
Identification of the disk type can be done by using the disks with the rotational feature. lsblk command can be used to list all the connected disks and their respective rotational values as:
The output of the above command is ‘1’ for the ROTA which shows that the disk is HDD. In the case of SSD, the value of ROTA will be ‘0’.
Method 2: Check Rotational
Looking at the value of /sys/block/sdX/queue/rotational, the type of the disk can be identified where sdX is the drive name. If the value is 1 then you are using HDD while the value 0 indicates the type of disk as SSD. Run the following command to get the rotational value of the disk. In this example, sda is used to identify the disk type, you can use any drive’s name available in your system.
The output ‘1’ indicates the type of disk is HDD, for the SSD the value will be ‘0’
Method 3: Using smartctl
The disk type used in the Linux system can also be identified using the command-line utility tool smartctl. smartctl is part of the package smartmontools. Smartmontools is available in all Linux distributions including Ubuntu, Fedora, Centos, and RHEL.
Use the following command to install smartmontools in Linux:
Ubuntu
To start the service, run the command:
CentOS and RHEL
Fedora
Smartd service will be started automatically after the installation. If not, use the following command to start the service:
After installing the smartmontools package, use the following command to find if the disk is HDD or SSD.
Where, /dev/sda is the name of the drive.
If the disk is HDD, the output will be as:
If the disk is SSD, output will look like:
Conclusion
In this tutorial, we have learned how to check the disk is SSD/HDD in the Linux system.
Источник
How to Know if You’re Using SSD or HDD Parts in Linux
Gamers running powerful PCs, system administrators taking care of giant servers and people who are working with sealed mobile devices all have a tendency to run into the same issue. It’s easy to forget whether you’re using SSD or HDD parts. Disks largely come in two forms today, and solid-state drives have a tendency to lie about the underlying hardware in order to make sure that they can stay compatible with your operating system no matter what. As a result, it’s hard to tell if you have an electromechanical hard disk or a solid-state one.
Linux users can easily tell whether they have SSD or HDD components in their computer. You’ll need to open up a terminal window for this to work. KDE, LXDE, Cinnamon and MATE users can click on the Applications menu, then click on Terminal under system tools. The same goes for Xfce4 users with Whisker menu installed. Ubuntu Unity users will want to search for Terminal on the Dash, and pretty much everyone can hold down Ctrl, Alt and T to start one up.
Method 1: Using lsblk to Distinguish Between SSD and HDD Volumes
Since you won’t actually be changing anything, you’re not going to need root access for the following command. Simply type lsblk -o name,rota at the prompt and push the return key. You’ll receive a short chart that lists the various devices you have attached to your computer as well as the partitions cut on them. If there is a number 1 in the ROTA column, then the disk is a rotation electromagnetic hard drive.
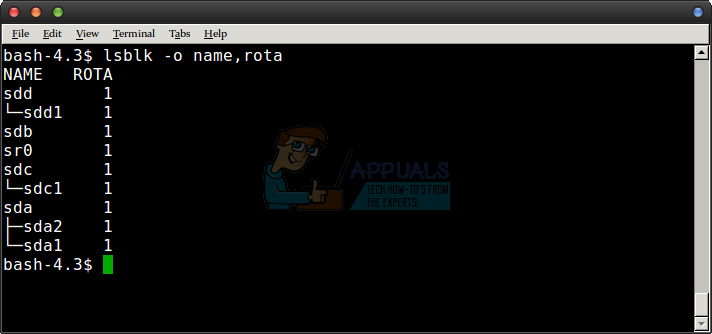
It’s also possibly another kind of rotational device. For example if the device name sr0 came up, then that was actually more than likely an attached optical drive. Partitions cut on rotational drives will also show up as rotational. So if you had a device called sda that featured the number 1 followed by sda2 and sda1 also having a value of 1, then you can be sure these are all on the same rotational disk. Any volume followed by a number 0 will instead be on a solid-state drive. This makes sense, since solid-state drives don’t spin, and therefore they’re never classed as rotational.
While this works for standard fixed drives you have attached to a machine, you may notice something funny going on when it comes time to look at external disks. This command usually features the correct information for external HDD and SSD volumes you attach via USB or IEEE 1394 ports, but you’ll often see that USB memory sticks are marked as being rotational. Stranger still, if you’re on an ultra-book running Linux that has an internal memory card reader you might notice that this is rotational as well.
Obviously, USB memory sticks and SDXC cards don’t spin around, but they do lie and present themselves as rotational disks. They often present themselves as removable ones, and if they’re formatted as a partionless disk they can even appear as floppy drives. Granted, the idea of a multi-terabyte floppy drive is laughable, but this does explain the weirdness.
Disk images that you might have mounted will appear to be genuine volumes. For instance, if you see loop0 and it reports to be a rotational HDD, then you’re just looking at a mounted ISO. It’s possibly a Debian or Ubuntu install image. You can also hypothetically mount disk images meant for a virtual machine, in which case you’d again see this sort of a message. The underyling file system won’t matter at all, by the way. You could even run this on a completely raw drive.
Method 2: Check HDD or SSD Status Using the /sys Directory
If you know the device name that you’re looking for, then you could look directly at information that Linux collects about it. Type cat /sys/block/sdb/queue/rotational and push the enter key. You could replace sdb with whatever device name you had wanted to look at.
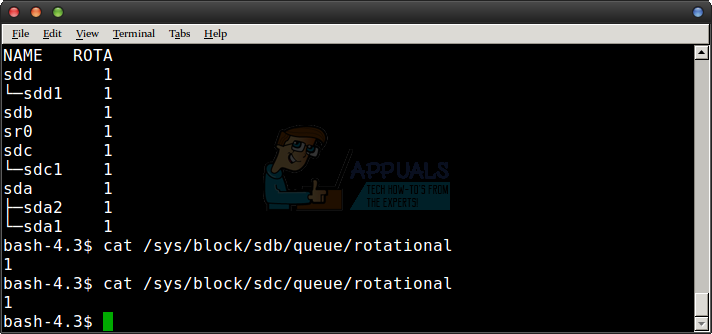
This is an excellent way to check if you’re only interested in a single volume. Once again, a value of 0 indicates the presence of SSD technology while a value of 1 indicates a rotational drive. Both of these commands are extremely easy to use, require no real playing around and don’t require you to have any sort of administrative privileges to run. They’re just the thing if you’re constantly adding and removing volumes from a particular installation.
Источник


