- Команда chown Linux
- Команда chown Linux
- 1. Синтаксис и опции
- 2. Использование chown
- Выводы
- Команда Chown в Linux
- Chown Command in Linux (File Ownership)
- В этом руководстве мы покажем вам, как использовать chown команду на практических примерах.
- Как пользоваться chown
- Как сменить владельца файла
- Как изменить владельца и группу файла
- Как изменить группу файла
- Как изменить владельца символических ссылок
- Как рекурсивно изменить владельца файла
- Использование справочного файла
- Вывод
- How To Use chmod and chown Command in Linux
- Understanding file permissions for chmod and chown command
- read (r), write (w), and execute (x) permission
- Viewing Linux/Unix file permissions and ownership
- – rw-r–r– file and d rwxr-xr-x directory permission explained
- Displaying file permission using the stat command
- chown command
- Linux chown command
- What is file «ownership»?
- Syntax
- Specifying the new owner
- Notes on usage
- Options
- Options
- Options
- Exit status
- Why change a file’s ownership?
- Hypothetical scenarios
- Groups in Linux
- Other operating system groups
- Examples
- Viewing ownership
- Changing ownership
- Related commands
Команда chown Linux
Основа философии Linux — все объекты операционной системы — это файлы, для предоставления доступа к тем или иным возможностям системы мы просто даем доступ пользователю к нужным файлам или убираем. Я более подробно рассказывал обо всех правах в статье права доступа к файлам в Linux, здесь же скажу только что у каждого файла есть три группы прав: для владельца, группы и всех остальных.
При создании файла ему тот пользователь, от имени которого он был создан становится его владельцем, а группой устанавливается основная группа владельца. Но владельца файла и группу можно менять, для этого используются команды chown и chgrp. В этой статье будет рассмотрена команда chown linux, а также основные примеры её использования.
Команда chown Linux
1. Синтаксис и опции
Синтаксис chown, как и других подобных команд linux очень прост:
$ chown пользователь опции /путь/к/файлу
В поле пользователь надо указать пользователя, которому мы хотим передать файл. Также можно указать через двоеточие группу, например, пользователь:группа. Тогда изменится не только пользователь, но и группа. Вот основные опции, которые могут вам понадобиться:
- -c, —changes — подробный вывод всех выполняемых изменений;
- -f, —silent, —quiet — минимум информации, скрыть сообщения об ошибках;
- —dereference — изменять права для файла к которому ведет символическая ссылка вместо самой ссылки (поведение по умолчанию);
- -h, —no-dereference — изменять права символических ссылок и не трогать файлы, к которым они ведут;
- —from — изменять пользователя только для тех файлов, владельцем которых является указанный пользователь и группа;
- -R, —recursive — рекурсивная обработка всех подкаталогов;
- -H — если передана символическая ссылка на директорию — перейти по ней;
- -L — переходить по всем символическим ссылкам на директории;
- -P — не переходить по символическим ссылкам на директории (по умолчанию).
Утилита имеет ещё несколько опций, но это самые основные и то большинство из них вам не понадобится. А теперь давайте посмотрим как пользоваться chown.
2. Использование chown
Например, у нас есть несколько папок dir и их владелец пользователь sergiy:

Давайте изменим владельца папки dir1 на root:
chown root ./dir1

Если вы хотите поменять сразу владельца и группу каталога или файла запишите их через двоеточие, например, изменим пользователя и группу для каталога dir2 на root:
chown root:root ./dir2

Если вы хотите чтобы изменения применялись не только к этому каталогу, но и ко всем его подкаталогам, добавьте опцию -R:
chown -R root:root ./dir3
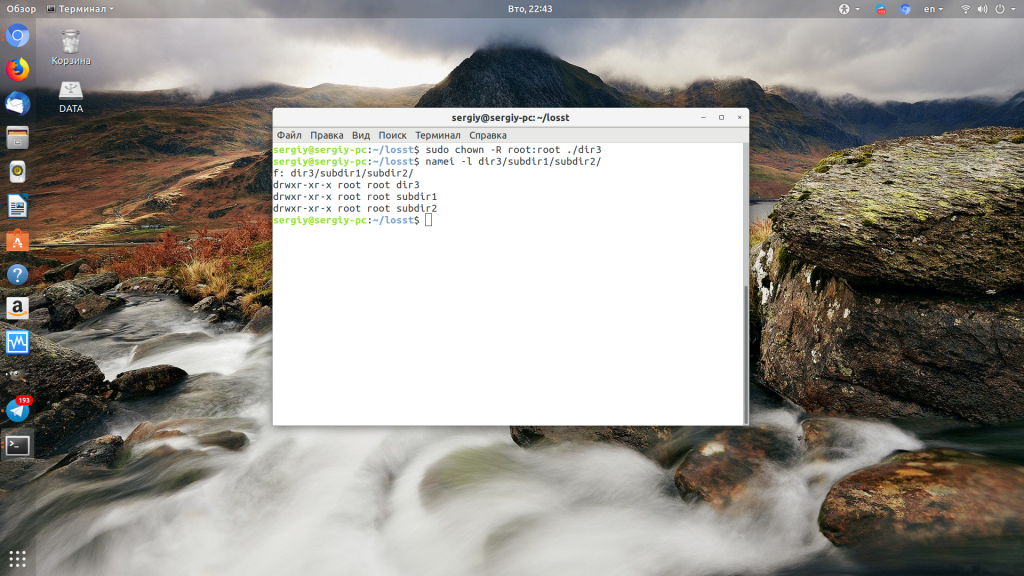
Дальше давайте изменим группу и владельца на www-data только для тех каталогов и файлов, у которых владелец и группа root в каталоге /dir3:
chown —from=root:root www-data:www-data -cR ./
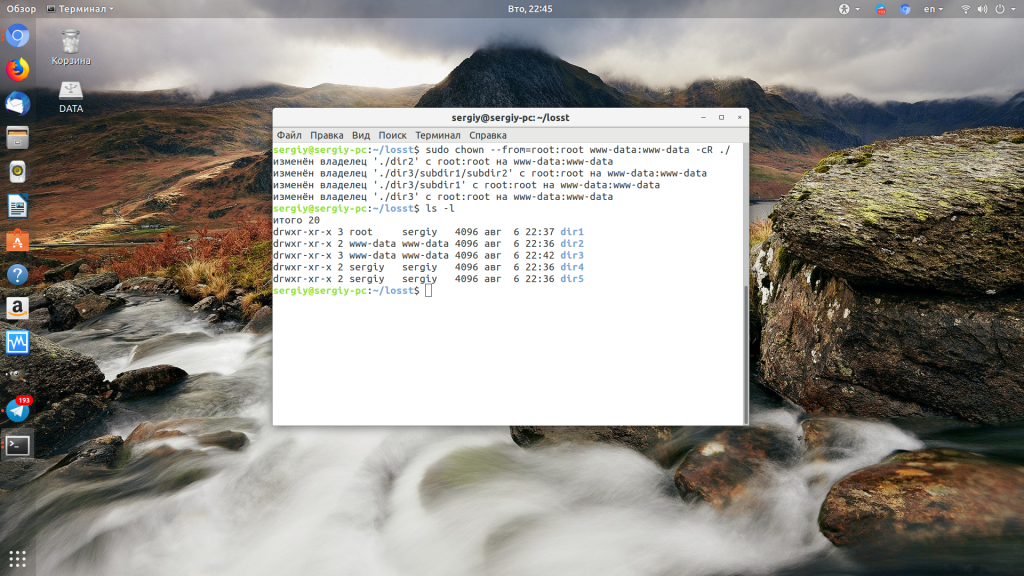
Для обращения к текущему каталогу используйте путь ./. Мы его использовали и выше. Далее указываем нужную группу с помощью опции —from и просим утилиту выводить изменения, которые она делает в файловой системе с помощью опции -c.
Выводы
Команда chown очень простая и позволяет только менять владельца и группу. Если вы хотите более подробно настроить права для владельца, группы и всех остальных, вам понадобится команда chmod. Права — довольно частая проблема при настройке работы различных программ, знание двух этих команд плюс ls и namei может помочь исправить много ошибок.
Источник
Команда Chown в Linux
Chown Command in Linux (File Ownership)
В этом руководстве мы покажем вам, как использовать chown команду на практических примерах.

Команда chown позволяет изменить владельца пользователя и / или группы для данного файла, каталога или символической ссылки.
В Linux все файлы связаны с владельцем и группой, и им назначены права доступа для владельца файла, членов группы и других.
Как пользоваться chown
Прежде чем перейти к использованию chown команды, давайте начнем с обзора основного синтаксиса.
В chown выражении команды принимает следующий вид:
- USER — Если указан только пользователь, указанный пользователь станет владельцем данных файлов, владение группой не изменится.
- USER: — Когда за именем пользователя следует двоеточие : , а имя группы не указывается, пользователь становится владельцем файлов, а принадлежность группы файлов изменяется на группу входа пользователя.
- USER:GROUP — Если указаны и пользователь, и группа (без пробелов между ними), пользовательское владение файлами изменяется на данного пользователя, а групповое владение изменяется на данную группу.
- :GROUP — Если пользователь не указан, а перед группой стоит двоеточие : , то только группа, владеющая файлами, будет изменена на данную группу.
- : Если задано только двоеточие : , без указания пользователя и группы, никаких изменений не производится.
По умолчанию в случае успеха chown не выводит никаких данных и возвращает ноль.
Используйте ls -l команду, чтобы узнать, кому принадлежит файл или к какой группе принадлежит файл:
Обычные пользователи могут изменять группу файла только в том случае, если они владеют файлом и только в группе, членом которой они являются. Административные пользователи могут изменять групповое владение всеми файлами.
Как сменить владельца файла
Чтобы изменить владельца файла, используйте chown команду, за которой следует имя пользователя нового владельца и целевой файл в качестве аргумента:
Например, следующая команда изменит владельца файла с именем file1 на нового владельца с именем linuxize :
Чтобы изменить владельца нескольких файлов или каталогов, укажите их в виде списка через пробел. Команда ниже меняет владельца файла с именем file1 и каталогом dir1 на нового владельца с именем linuxize :
Числовой идентификатор пользователя (UID) можно использовать вместо имени пользователя. Следующий пример изменит владельца файла с именем file2 на нового владельца с UID 1000 :
Если в качестве имени пользователя существует числовой владелец, то владение будет перенесено в имя пользователя. Чтобы избежать этого префикса, идентификатор с помощью + :
Как изменить владельца и группу файла
Чтобы изменить владельца и группу файла, используйте chown команду, за которой следует новый владелец и группа, разделенные двоеточием ( : ) без промежуточных пробелов и целевого файла.
Следующая команда изменит владельца файла с именем file1 на нового владельца с именем linuxize и группой users :
Если вы опустите имя группы после двоеточия ( : ), группа файла изменится на группу входа указанного пользователя:
Как изменить группу файла
Чтобы изменить только группу файла, используйте chown команду с двоеточием ( : ) и именем новой группы (без пробелов между ними) и целевой файл в качестве аргумента:
Еще одна команда, которую вы можете использовать для изменения групповой принадлежности файлов — это chgrp .
Как изменить владельца символических ссылок
Когда рекурсивный параметр не используется, chown команда изменяет групповое владение файлами, на которые указывают символические ссылки , а не сами символьные ссылки .
Например, если вы попытаетесь изменить владельца и группу символической ссылки, на symlink1 которую указывает ссылка /var/www/file1 , chown изменит владельца файла или каталога, на который указывает символическая ссылка:
Скорее всего, вместо смены целевого владельца вы получите ошибку «невозможно разыменовать symlink1: Permission denied».
Ошибка возникает из-за того, что по умолчанию в большинстве дистрибутивов Linux символические ссылки защищены, и вы не можете работать с целевыми файлами. Эта опция указана в /proc/sys/fs/protected_symlinks . 1 значит включен и 0 отключен. Мы рекомендуем не отключать защиту символических ссылок.
Чтобы изменить групповое владение самой символической ссылкой, используйте -h параметр:
Как рекурсивно изменить владельца файла
Чтобы рекурсивно работать со всеми файлами и каталогами в данном каталоге, используйте параметр -R ( —recursive ):
Если каталог содержит символические ссылки, передайте -h опцию:
Другими параметрами, которые можно использовать при рекурсивном изменении владельца каталога, являются -H и -L .
Если аргумент, переданный chown команде, является символической ссылкой, указывающей на каталог, эта -H опция заставит команду пройти по ней. -L указывает chown на прохождение каждой символической ссылки в каталог, который встречается. Обычно вы не должны использовать эти параметры, потому что вы можете испортить вашу систему или создать угрозу безопасности.
Использование справочного файла
—reference=ref_file Опция позволяет изменить пользователя и группы владельца указанные файлы , чтобы быть такими же , как в указанном отпечатком ( ref_file ). Если ссылочный файл является символической ссылкой, chown будут использоваться пользователь и группа целевого файла.
Вывод
chown утилита командной строки Linux / UNIX для изменения владельца файла и / или группы
Чтобы узнать больше о chown команде, посетите страницу руководства chown или введите man chown свой терминал.
Источник
How To Use chmod and chown Command in Linux
Understanding file permissions for chmod and chown command
One can use file permissions to control access to their files. Sysadmins can enforce a security policy based upon file permissions. All files have three types:
- Owner – Person or process who created the file.
- Group – All users have a primary group, and they own the file, which is useful for sharing files or giving access.
- Others – Users who are not the owner, nor a member of the group. Also, know as world permission.
read (r), write (w), and execute (x) permission
We can set the following permissions on both files and directories:
| Permission | File | Directory |
|---|---|---|
| r | Reading access/view file | Users can read file. In other words, they can run the ls command to list contents of the folder/directory. |
| w | Writing access/update/remove file | Users can update, write and delete a file from the directory. |
| x | Execution access. Run a file/script as command | Users can execute/run file as command and they have r permission too. |
| — | No access. When you want to remove r, w, and x permission | All access is taken away or removed. |
Please note that permission priority decided as follows by the kernel:
User permissions -> Group permissions -> Other permissions
It means user permission overrides group permission and group permissions overrides other permission.
Viewing Linux/Unix file permissions and ownership
Run the ls command:
ls -l
# Show information about a file named file1 #
ls -l file1
ls -l /path/to/file1
# Get information about a directory named dir1 #
ls -ld dir1
ls -l -d /path/to/dir1
For example, we can list permissions for /etc/hosts and /etc/ directory as follows:
ls -l /etc/hosts
Pass the -d option to ls to list directories themselves, not their contents:
From above outputs it is clear that the first character indicate the file type in drwxr-xr-x and -rw-r–r– and the next 9 characters are the actual file permissions.
– rw-r–r– file and d rwxr-xr-x directory permission explained
| First character | Description |
|---|---|
| — | Regular file. |
| b | Block special file. |
| c | Character special file. |
| d | Directory. |
| l | Symbolic link. |
| p | FIFO. |
| s | Socket. |
| w | Whiteout. |
Next nine characters are the file permissions divided into three sets/triad of three characters for owner permissions, group permissions, and other/world permissions as follows:
| Three permission triads defined what the user/group/others can do | First triad defines what the owner can do | Second triad explains what the group members can do | Third triad defines what other users can do |
|---|---|---|---|
| — rw- r— r— | Owner has only read and write permission ( rw- ) | Group has read permission ( r— ) | Others has read permission ( r— ) |
| d rwx r-x r-x | Owner has full permission ( rwx ) | Group has read and execute permission ( r-x ) | Others has read and execute permission ( r-x ) |
Displaying file permission using the stat command
Run the following command:
stat file1
stat dir1
stat /etc/passwd
stat /etc/resolv.conf
GUI displaying file permissions:
chown command
The chown command changes the user and/or group ownership of for given file. The syntax is:
Источник
Linux chown command
On Unix-like operating systems, the chown command changes ownership of files and directories in a filesystem.
This page describes the GNU/Linux version of chown.
What is file «ownership»?
Linux is designed to support a large number of users. Because of this, it needs to keep careful track of who is allowed to access a file, and how they can access it. These access rules are called permissions.
There are three major types of file permissions:
- User permissions. These permissions apply to a single user who has special access to the file. This user is called the owner.
- Group permissions. These apply to a single group of users who have access to the file. This group is the owning group.
- Other permissions. These apply to every other user on the system. These users are known as others, or the world.
When a file is created, its owner is the user who created it, and the owning group is the user’s current group.
chown can change these values to something else.
Syntax
Specifying the new owner
New ownership of file is specified by the argument new-owner, which takes this general form:
Specifically, there are five ways to format new-owner:
| new-owner form | Description |
|---|---|
| user | The name of the user to own the file. In this form, the colon («:«) and the group is omitted. The owning group is not altered. |
| user:group | The user and group to own the file, separated by a colon, with no spaces between. |
| :group | The group to own the file. In this form, user is omitted, and the group must be preceded by a colon. |
| user: | If group is omitted, but a colon follows user, the owner is changed to user, and the owning group is changed to the login group of user. |
| : | Specifying a colon with no user or group is accepted, but ownership isn’t changed. This form does not cause an error, but changes nothing. |
Notes on usage
- user and group can be specified by name or by number.
- Only root can change the owner of a file. The owner cannot transfer ownership, unless the owner is root, or uses sudo to run the command.
- The owning group of a file can be changed by the file’s owner, if the owner belongs to that group. The owning group of a file can be changed, by root, to any group. Members of the owning group other than the owner cannot change the file’s owning group.
- The owning group can also be changed using the chgrp command. chgrp and chown use the same system call, and are functionally identical.
- Certain miscellaneous file operations can be performed only by the owner or root. For instance, only owner or root can manually change a file’s «atime» or «mtime» (access time or modification time) using the touch command.
- Because of these restrictions, run chown as root, or with sudo.
Options
| Option | Description |
|---|---|
| -c, —changes | Similar to —verbose mode, but only displays information about files that are actually changed. For example: |
—verbose
—silent,
—quiet
—no-dereference
—recursive
Options
The following options modify how a hierarchy is traversed when the -R or —recursive option is specified.
| Option | Description |
|---|---|
| —preserve-root | Never operate recursively on the root directory /. If —recursive is not specified, this option has no effect. |
| -H | If a file specified on the command line is a symbolic link to a directory, traverse it and operate on those files and directories as well. |
| -L | Traverse all symbolic links to a directories. |
| -P | Do not traverse any symbolic links; operate on the symlinks themselves. This is the default behavior. |
If more than one of -H, -L, or -P is specified, only the final option takes effect.
Options
These options display information about the program, and cannot be used with other options or arguments.
| Option | Description |
|---|---|
| —help | Display a brief help message and exit. |
| —version | Display version information and exit. |
Exit status
chown exits with a status of 0 for success. Any other number indicates failed operation.
Why change a file’s ownership?
You should use chown when you want a file’s user or group permissions to apply to a different user or group.
Hypothetical scenarios
Here are examples of when you might use chown:
- You create a file, myfile.txt, using sudo or while logged in as root, so the file is owned by root. However, you intend the file to be used by your regular user account, myuser.
Use chown to change the owner:
- You own myfile.txt, but you want to give it to another user on the system named notme. You also want to change the owning group to that user’s group, notmygroup.
Use chown to change the owner and group:
- You just transferred an entire directory of files, otherfiles, from another computer. All the files and directories are owned by your username on the other system, and you want your current user and group to own them all.
Change the ownership of the directory and all its contents recursively, with the -R option:
The above command changes the ownership of every file, subdirectory, and subdirectory contents in otherfiles.
Groups in Linux
In Linux, a user is a member of multiple groups, but it has only one «current group». The user’s current group is the user’s group identity, or GID.
When the user creates a new file, the file’s ownership is set to the user’s UID (user identity) and GID (group identity). So when user carla starts writing a new document, the file is owned by carla, and also by her current group. She can change the file’s group ownership with chown, but only root can use chown to change the owner to someone else.
Also, each user has a configurable login group, which can be any of the user groups. So when carla logs in, her login group is her current group. The login group can be changed with the usermod command, using the -g option.
A user can change current group with the newgrp command. The change takes place in a subshell, and persists until the subshell is closed. Even if carla changes her current group with newgrp, it will be reset to her login group the next time she logs in.
You can check your current group using the id command with the -g option:
This is your numeric GID (the number of your current group). To see the name, specify the -n option:
To view all of your group memberships, use a capital G:
By default, every Linux user has a private group, with that user as the only member. So, when the user account jeff is created with the adduser command, a group named jeff is also created. Group jeff is jeff’s default login group, and has only one member (jeff).
Other operating system groups
Other operating systems use chown, but their groups may function differently.
In macOS X and BSD, for example, users don’t have private groups. Instead, all regular users belong to a general group called users.
In these operating systems, the options and functionality of chown may be similar, but different. If you’re using chown on a non-Linux operating system, make sure to run man chown to learn what the differences are.
Examples
Viewing ownership
Before you use chown, you may want to check the current ownership of a file. You can view a file’s ownership, permissions, and other important information with the ls command, using the -l option:
In the output, you see several fields of information listed, including the permissions and ownership of the file. It might not make sense at first, so let’s describe it in detail.
Here’s what the information means:
| Data | Field position | Description |
|---|---|---|
| — | Field 1, character 1 | File type: d for a directory, l (lowercase L) for a symbolic link, or — (a dash) for a regular file. |
| rwx | Field 1, characters 2—4 | User permissions. The owner can read («r«), write to («w«), and execute («x«) this file. |
| rw- | Field 1, characters 5—7 | Group permissions. The owning group can read and write to this file, but cannot execute it as a command. |
| r— | Field 1, characters 8—10 | Other permissions, also known as world permissions. Any other user on the system is allowed to read the file only. |
| 1 | Field 2 | Number of symbolic links to this file. If there are no symbolic links to the file, this number is 1, because the original file name is included in this count. If there were one symbolic link to the file, this number would be 2, or 3 for two symbolic links, etc. |
| hope | Field 3 | Name of owner. This is the name of the user who owns the file. When this user tries to access the file, access is restricted according to the user permissions. |
| hopeusers | Field 4 | Name of owning group. This is the user group who owns the file. When a user who is a member of this group tries to access the file, access is restricted according to the group permissions. |
| 12 | Field 5 | Size. This file contains 12 bytes of data. |
| Nov | Field 6 | Mtime (month). Abbreviated name of the month when the file’s contents were last modified. This file was last modified in the month of November. |
| 5 | Field 7 | Mtime (day of month). This file was last modified on the fifth day of November. |
| 13:14 | Field 8 | Mtime (time, or year). This file was last modified at 13:14 (1:34 P.M.) on November 5 of this year. If it was modified over a year ago, this field lists the year instead, for instance 2015. |
| myscript.sh | Field 9 | File name. The name of the file. |
So the important fields here are 1, 3 and 4. They tell us that user hope can read, write, or execute the file’s contents, and members of the group hopeusers can read or write to it.
Changing ownership
Change the owner of file.txt to user hope.
Change the owner of file1, file2, and file3 to user hope.
Here, the asterisk («*«) is a wildcard which the shell expands to a list of every file whose name begins with «file«. If the current directory contains four files named file1, file2, file3, and file4, all these files’ names are passed to the chown command, and their owners changed to user hope.
Change the owner of file or directory myfiles to user hope.
Change the owner of myfiles to user hope. If myfiles is a directory, chown will recursively (-R) search that directory, and change the owner of all files, subdirectories, and subdirectory contents.
Change the owners of file1 and file2 to user hope, and the owning groups to admins.
Change the owner of file1 to user hope, and the owning group to hope’s login group.
Change the owning group of file2 to group othergroup. Notice that this is the only command in these examples which may run without sudo.
If user hope runs the previous command but does not belong to group othergroup, the command fails, unless it is run with sudo.
Change the ownership of file1 to the user with numeric UID 1000, and the group with numeric GID 1001.
Same as the previous command. If user hope has UID 1000, and another user is named «1000» but has UID 1002, this command form (with the «+» signs) unambiguously changes the owner to hope.
Recursively change the ownership of directory Documents, and all files and subdirectories therein, to user hope, group hope.
Recursively change the ownership of the directory
/Documents/work, and all files and subdirectories therein, to match the ownership of the file or directory /home/hope/inbox.
In the above command,
(a tilde) is an alias in bash which represents your home directory. Your home directory can also be represented by the environment variable $HOME, as in $HOME/Documents/work.
Also, if any files change ownership (-c option), information will be printed to standard output:
Related commands
chgrp — Change the group ownership of files or directories.
chmod — Change the permissions of files or directories.
ls — List the contents of a directory or directories.
id — Display group IDs.
usermod — Modify a user’s account settings.
Источник


