- Звуковая подсистема Linux
- Linux что такое oss
- Установка OSS-Proxy
- Установка OSS4
- Open Sound System
- Contents
- Comparisons with ALSA
- OSS Advantages (users)
- OSS Advantages (developers)
- ALSA advantages over OSS
- Install
- Testing
- Volume Control Mixer
- Color Definitions
- Saving Mixer Levels
- Other Mixers
- Configuring Applications for OSS
- Applications that use GStreamer
- Applications that use OpenAL
- Audacity
- Gajim
- MPlayer
- VLC media player
- Other applications
- Tips and tricks
- Using multimedia keys with OSS
- Changing the Sample Rate
- A simple system tray applet
- Start ossxmix docked to the system tray on startup
- Gnome
- Record sound output from a program
- Suspend and Hibernation
- Changing the Default Sound Output
- Creative Sound Blaster X-Fi Surround 5.1 SB1090 USB
- ALSA emulation
- Instructions
- Settings for a specific driver
- Troubleshooting
- Troubleshooting HD Audio devices
- Understanding the problem
- Solution
- MMS sound cracking in Totem
- Microphone playing through output channels
Звуковая подсистема Linux
Улучшенная Архитектура Звука Linux, Advanced Linux Sound Architecture (ALSA) является звуковой подсистемой, выбранной для ядра версии 2.6. Открытая Звуковая Система, Open Sound System (OSS), звуковой уровень в ядре версии 2.4, в настоящее время устарел и не рекомендуется к использованию. Для перехода от OSS к ALSA последняя предоставляет эмуляцию OSS, которая позволяет приложениям, использующим API OSS, запускаться без изменений на ALSA. Звуковые ядра Linux, такие как ALSA и OSS, делают аудио приложения независимыми от базового оборудования, тогда как стандарты кодеков, такие как AC’97 и I2S, избавляют от необходимости написания отдельных звуковых драйверов для каждой звуковой карты.
Чтобы понять архитектуру звуковой подсистемы Linux посмотрите на Рисунок 13.3. Основными частями подсистемы являются:
• Звуковое ядро, которое является базовым кодом, состоящим из процедур и структур, доступных другим компонентам звукового уровня Linux. Как и уровни ядра, принадлежащие другим драйверным подсистемам, звуковое ядро обеспечивает уровень косвенности, что делает каждый компонент в звуковой подсистеме не зависящим от других. Ядро играет важную роль в экспорте API ALSA вышележащим приложениям. Узлами /dev/snd/* , показанными на Рисунке 13.3, которые создаются и управляются из ядром ALSA, являются: /dev/snd/controlC0 — узел управления (используемый в приложениях для управления уровнем громкости и тому подобному), /dev/snd/pcmC0D0p — устройство воспроизведения ( p в конце имени устройства означает playback, воспроизведение), и /dev/snd/pcmC0D0c — записывающее устройство ( c в конце имени устройства означает capture, захват). В этих именах устройств целое число после C является номером карты, а после D — номером устройства. ALSA драйвер для карты, которая имеет голосовой кодек для телефонии и стерео кодек для музыки, может экспортировать /dev/snd/pcmC0D0p для чтения аудио потоков, предназначенный для первого, и /dev/snd/pcmC0D1p для качественного музыкального канала для последнего.
• Драйверы аудио контроллера зависят от оборудования контроллера. Например, для управления аудио контроллером, находящимся в Южном мосте Intel ICH, используется драйвер snd_intel8x0 .
• Интерфейсы аудиокодеков, которые помогают взаимодействию между контроллерами и кодеками. Для кодеков AC’97 используйте snd_ac97_codec и модули ac97_bus .
• Уровень эмуляции OSS, который выступает в качестве посредника между приложениями, использующими OSS, и ядром с поддерживающим ALSA. Этот уровень экспортирует узлы /dev , изображающие поддержку уровня OSS в ядре версии 2.4. Эти узлы, такие как /dev/dsp , /dev/adsp и /dev/mixer , позволяют приложениям OSS работать поверх ALSA без изменений. Узел OSS /dev/dsp связан с узлами ALSA /dev/snd/pcmC0D0* , /dev/adsp соответствует /dev/snd/pcmC0D1* , а /dev/mixer связан с /dev/snd/controlC0 .
• Интерфейс procfs and sysfs для доступа к информации через /proc/asound/ и /sys/class/sound/ .
• Библиотека ALSA пользовательского пространства, alsa-lib , которая предоставляет объект libasound.so . Эта библиотека упрощает работу программиста приложения ALSA, предлагая несколько готовых процедур для доступа к драйверам ALSA.
• Пакет alsa-utils , который включает в себя такие утилиты, как alsamixer , amixer , alsactl и aplay . alsamixer или mixer используются для изменения громкости звуковых сигналов, таких как линейный вход, линейный выход или микрофон, а alsactl — для управления параметрами драйверов ALSA. aplay используется для воспроизведения звука через ALSA.
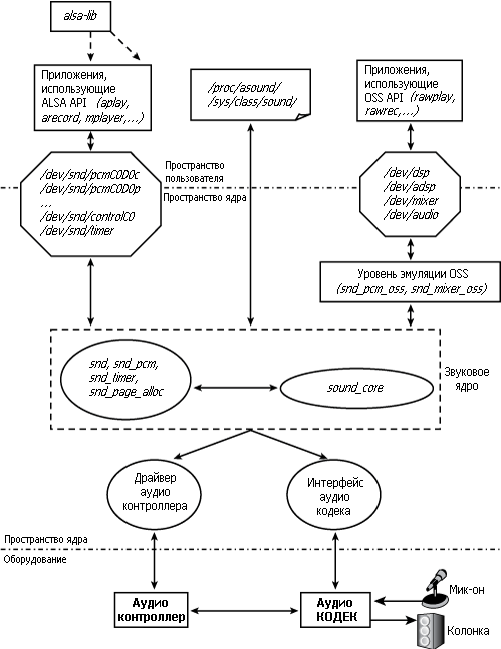
Рисунок 13.3. Звуковая подсистема Linux (ALSA).
Чтобы получить более полное представление об архитектуре звукового уровня Linux, давайте посмотрим на драйверные модули ALSA, работающие на ноутбуке, в тандеме с Рисунком 13.3 (→ используется для добавления комментариев):
bash> lsmod|grep snd
snd_intel8x0 33148 0 →Драйвер аудио контроллера
snd_ac97_codec 92000 1 snd_intel8x0 →Интерфейс аудио кодека
ac97_bus 3104 1 snd_ac97_codec →Шина аудио кодека
snd_pcm_oss 40512 0 →Эмуляция OSS
snd_mixer_oss 16640 1 snd_pcm_oss →Управление громкостью OSS
snd_pcm 73316 3 snd_intel8x0,snd_ac97_codec,snd_pcm_oss →Уровень ядра
snd_timer 22148 1 snd_pcm →Уровень ядра
snd 50820 6 snd_intel8x0,snd_ac97_codec,snd_pcm_oss, →Уровень ядра
soundcore 8960 1 snd →Уровень ядра
snd_page_alloc 10344 2 snd_intel8x0,snd_pcm →Уровень ядра
Источник
Linux что такое oss
OSS4 (Open Sound System) – драйвер звуковых карт для UNIX-подобных операционных систем.
Установка OSS-Proxy
Скачайте архив с демоном по адресу OSSProxy, распакуйте и установите используя команды:
Затем включите демон и предоставьте права для созданных им устройств:
Прокси демон будет запушен и звук в играх или приложениях пойдет через ALSA.
Установка OSS4
Ни в коем случае не устанавливайте пакеты из репозитория ( oss4-base oss4-dkms oss4-source oss4-gtk ). oss4-dkms , необходимый для корректной работы OSS4, не может установится так как не совместим с новым ядром. В данной инструкции будет описан способ установки OSS4 из исходных кодов.
Установите звуковой системой по умолчанию OSS . Для этого выполните в терминале:
Отредактируйте конфигурационные файлы PulseAudio для перенаправления звука на OSS :
Добавьте в конец файла
и сохраните файл.
Для того, чтобы лишние модули не загружались, добавьте их в черный список.
Допишите в конец файла
Сохраните файл. Выполните
Для отсутствия конфликтов удалите PulseAudio и ALSA:
Установите необходимые пакеты GStreamer для OSS4:
Чтобы приложения, требующие ALSA, пускали звук через OSS , выполните
и напишите в открывшийся файл
Установите пакеты, необходимые для сборки OSS4:
Получите исходные коды OSS4, скачав их через Mercurial. Для этого сначала установите Mercurial
Затем, скачайте исходники OSS4:
Создайте необходимые для сборки папки и удалите лишнее:
Источник
Open Sound System
The Open Sound System (or OSS) is an alternative sound architecture for Unix-like and POSIX-compatible systems. OSS version 3 was the original sound system for Linux, but was superseded by the Advanced Linux Sound Architecture (or ALSA) in 2002 when OSS version 4 became proprietary software. OSSv4 became free software again in 2007 when 4Front Technologies released its source code and provided it under the GPL license.
Contents
Comparisons with ALSA
Some advantages and disadvantages compared to using the Advanced Linux Sound Architecture.
OSS Advantages (users)
- Per-application volume control.
- Some legacy cards have better support.
OSS Advantages (developers)
- Support for drivers in userspace.
- Cross-platform (OSS runs on BSDs and Solaris).
- Smaller and easier to use API.
ALSA advantages over OSS
- Better support for USB audio devices.
- Support for Bluetooth audio devices.
- Support for AC’97 and HD Audio dial-up soft-modems such as Si3055.
- Better support for MIDI devices.
- Support for suspend.
- Better support for jack detection.
- Better support for modern hardware.
Install
Install the oss AUR package or the package with non-free drivers oss-nonfree AUR . There is also a development version of OSS available with the oss-git AUR package. This will install the OSS, run the OSS install script (temporarily disabling the ALSA modules) and install the OSS kernel modules. Since ALSA is enabled by default in the boot scripts, you need to disable it so it does not conflict with OSS. You can do this by blacklisting the soundcore module.
After blacklisting the module, you can enable the oss daemon to start at boot.
 This article or section is out of date.
In case you are not part of the audio group, add yourself and relogin for the changes to take effect:
In case OSS is not able to detect your card when starting it, run:
Testing
Test OSS by running:
You should be able to hear music during the test process. If there is no audio, try to adjust the volume or refer to the #Troubleshooting section.
If you want to hear sounds from more than one application simultaneously, you need vmix , OSS’s software mixer.
Check that vmix is enabled by running:
You should see a line like vmix0-enable ON|OFF (currently ON) . If you do not see any lines beginning with vmix , it probably means that vmix has not been attached to your sound device. To attach vmix , issue the command:
where device is your sound device, e.g. /dev/oss/oss_envy240/pcm0 .
To avoid having to issue this command manually in the future, you can add it to /usr/lib/oss/soundon.user , as suggested here.
If you get a «Device or resource busy» error, you need to add vmix_no_autoattach=1 to /usr/lib/oss/conf/osscore.conf and then reboot.
See which devices are detected by running:
You should be able to see your devices listed under Device Objects or Audio Devices. If the device that you want to use is not at the top of one of these sections, you have to edit /usr/lib/oss/etc/installed_drivers and place the driver for your device at the very top. It may be required to do a:
If this does not work, comment all drivers listed except the ones for your device.
Volume Control Mixer
To control the volume of various devices, mixers levels will need to be set. There are two mixers:
- ossmix: a command-line mixer, similar to the BSD audio mixer mixerctl .
- ossxmix: a GTK-based graphical mixer.
The basic ossxmix controls look like:
- One tab for each sound card
- The vmix (virtual mixer) special configurations appear at the top. These include sampling rate and mixer priority.
- These are your sound card jack configurations (input and output). Every mixer control that is shown here is provided by your sound card.
- Application vmix mixer controls and sound meters. If the application is not actively playing a sound it will be labeled as pcm08, pcm09. and when the application is playing the application name will be shown.
Color Definitions
For high definition (HD) audio, ossxmix will color jack configurations by their pre-defined jack colors:
| Color | Type | Connector |
|---|---|---|
| green | front channels (stereo output) | 3.5mm TRS |
| black | rear channels (stereo output) | 3.5mm TRS |
| grey | side channels (stereo output) | 3.5mm TRS |
| gold | center and subwoofer (dual output) | 3.5mm TRS |
| blue | line level (stereo input) | 3.5mm TRS |
| pink | microphone (mono input) | 3.5mm TS |
Saving Mixer Levels
Mixer levels are saved when you shut off your computer. If you want to save the mixer level immediately, execute as root:
savemixer can be used to write mixer levels to a file with the -f switch and restore by the -L switch.
Other Mixers
Other mixers that have support for OSS:
- Gnome Volume Control — for GNOME.
https://help.gnome.org/users/gnome-volume-control/stable/ || gnome
- Kmix — for KDE.
https://www.kde.org/applications/multimedia/kmix/ || kmix
- VolWheel — After the installation, set it to autostart as needed, then enable OSS support by right-clicking on the system tray icon, choosing Preferences and then changing:
- Driver: OSS .
- Default Channel: vmix0-outvol (find out what channel to use with ossmix ).
- Default Mixer: ossxmix .
- In the MiniMixer tab (optional), add vmix0-outvol and optionally others.
https://oliwer.net/b/volwheel.html || volwheelAUR
Configuring Applications for OSS
Applications that use GStreamer
If you have problems with applications that use GStreamer for audio, you can try removing pulseaudio and installing the gst-plugins-good package which is needed by oss4sink and oss4src .
Applications that use OpenAL
By default OpenAL uses ALSA. To change this, simply define the usage of OSS in /etc/openal/alsound.conf :
Audacity
If Audacity starts, but it complains that it cannot open the device or simply does not play anything, then you may be using vmix which prevents Audacity from having exclusive access to your sound device. To fix this, before running Audacity, run:
You can restore vmix after closing Audacity with:
Gajim
By default, Gajim uses aplay -q to play a sound. For OSS you can change it to the equivalent ossplay -qq by going to Edit > Preferences > Advanced, opening the Advanced Configuration Editor and modifying the soundplayer variable accordingly.
To use MOC with OSS v4.1 you must change OSSMixerDevice to /dev/ossmix in your configuration file (located in
/.moc ). For issues with the interface try changing the OSSMixerChannel by pressing w in mocp (to change to the sofware mixer).
MPD is configured through /etc/mpd.conf or
/.mpdconf . Check both of these files, looking for something that looks like:
If you find an uncommented (the lines do not begin with #’s) ALSA configuration like the one above, comment all of it out, or delete it, and add the following:
Further configuration might not be necessary for all users. However, if you experience issues (in that MPD does not work properly after it has been restarted), or if you like having specific (i.e. more user-configured, less auto-configured) configuration files, the audio output for OSS can be more specifically configured as follows:
- First, run:
- Look for the line that says something similar to /dev/dsp -> /dev/oss/ /pcm0 . Take note of what your is, and add these lines to your OSS audio_output in your MPD configuration file:
MPlayer
If you are using a GUI (SMplayer, GNOME MPlayer, etc.) you can select OSS as the default output in the settings dialogs. If you use MPlayer from the command-line, you should specify the sound output:
If you do not want to bother typing it over and over again add ao=oss to your configuration file (at
VLC media player
You can select OSS as the default output in the audio settings.
To set OSS support in Wine start:
and go to the Audio tab and select the OSS Driver .
Other applications
- If you can not get sound from an application not listed here, try looking at the Configuring Applications for OSSv4 page.
- Search for OSS specific packages with pacman or by looking in the AUR.
Tips and tricks
Using multimedia keys with OSS
An easy way to mute/unmute and increase/decrease the volume is to use the ossvol script.
Download the script and place it at /usr/bin/ossvol .
Once you installed it, type:
to toggle mute, or:
to see the available commands.
If you want to use multimedia keys with ossvol , see Extra keyboard keys and make sure they are properly configured. After that you can use, for example, Xbindkeys to bind them to the ossvol script. Add the following to your
and optionally change the multimedia keys with whatever shortcuts you prefer.
Changing the Sample Rate
Changing the output sample rate is not obvious at first. Sample rates can only be changed by root and vmix must be unused by any programs when a change is requested. Before you follow any of these steps, ensure you are going through a receiver/amplifier and using quality speakers and not simply computer speakers. If you are only using computer speakers, do not bother changing anything here as you will not notice a difference.
By default the sample rate is 48000hz. There are several conditions in which you may want to change this. This all depends on your usage patterns. You want the sample rate you are using to match the media you use the most. If your computer has to change the sampling rate of the media to suit the hardware it is likely, though not guaranteed, that you will have a loss in audio quality. This is most noticeable in down sampling (ie. 96000hz → 48000hz). There is an article about this issue in Stereophile which was discussed on Apple’s CoreAudio API mailing list if you wish to learn more about this issue.
Some example sample rates:
44100hz Sample rate of standard Red Book audio CDs. 88000hz Sample rate of SACD high definition audio discs/downloads. It is rare that your motherboard will support this sample rate. 96000hz Sample rate of most high definition audio downloads. If your motherboard is an AC’97 motherboard, this is likely to be your highest bitrate. 192000hz Sample rate of BluRay, and some (very few) high definition downloads. Support for external audio receiver equipment is limited to high end audio. Not all motherboards support this. An example of a motherboard chipset that would support this includes HD Audio.
To check what your sample rate is currently set to, run:
You are likely to see vmix0-rate (currently 48000) (Read-only) .
If you do not see a vmix0-rate (or vmix1-rate , etc.) being outputted, then it probably means that vmix is disabled. In that case, OSS will use the rate requested by the program which uses the device, so this section does not apply. Exception to this are Envy24 (and Envy24HT) cards that have a special setting envy24.rate which has a similar function (see the oss_envy24 manpage).
To change your sample rate:
- First, make sure your card is able to use the new rate. Run ossinfo -v2 and see if the wanted rate is in the Native sample rates output.
- As root, run /usr/lib/oss/scripts/killprocs.sh . Be aware, this will close any program that currently has an open sound channel.
- After all programs occupying vmix are terminated, run as root: vmixctl rate /dev/dsp 96000 replacing the rate with your desired sample rate (and ossmix envy24.rate 96000 if applicable).
- Run ossmix | grep rate and check for vmix0-rate (currently 96000) (Read-only) to see if you were successful.
- To make the changes permanent add the following to the soundon.user file:
and make it executable:
A simple system tray applet
For those wanting a very lightweight OSS system tray applet see this one.
- Download the script with whatever name you want (e.g. ossvolctl )
- Make it executable:
- And copy it to your /usr/bin :
Start ossxmix docked to the system tray on startup
Create an application launcher file named ossxmix.desktop in you local application launchers directory (
To have it autostart with your system, add it to the list in System Settings > System Administration > Startup and Shutdown > Autostart.
Gnome
As root create a file /usr/local/bin/ossxmix_bg with the following content:
Then go to System > Preferences > Start Up Applications and:
- Click Add, type OSSMIX in the Name field and /usr/local/bin/ossxmix_bg in Command field then click Add Button.
- Login and logout to see the changes.
Record sound output from a program
Suspend and Hibernation
OSS does not automatically support suspend, it must be manually stopped prior to suspending or hibernating and restarted afterwards.
OSS provides soundon and soundoff to enable and disable OSS, although they only stop OSS if all processes that use sound are terminated first.
The following script is a rather basic method of automatically unloading OSS prior to suspending and reloading afterwards.
Save the contents of this script (as root) into /usr/lib/systemd/system-sleep/50osssound.sh and make it executable:
An alternative would be to use s2ram for suspending. Just create a suspend script to /usr/bin/suspend and make it executable.
With this, all your apps should be fine.
Changing the Default Sound Output
When running osstest , the first test passes for the first channel, but not for the stereo or right channel, it sounds distorted/hisses. If this is what your sound is like, then it is set to the wrong output.
The left sounded good, the right and stereo were the distorted ones.
Let the test continue until you get a working output:
If this passed the test on all left, right and stereo, proceed to next step.
For the command to change the default output see this OSS wiki article. Change it to what works for you, for example:
For surround sound (4.0-7.1) choose dsp_multich , for only 2 channels, dsp is sufficient. See this for all available devices.
Creative Sound Blaster X-Fi Surround 5.1 SB1090 USB
This information is taken from the 4front-tech forum.
It is surprising to learn that the external card does not work just because of a missing true return value in the function write_control_value(. ) in ossusb_audio.c .
To fix this, a recompile of OSS is necessary, for now.
- Grab the latest OSS from AUR
- Extract it
- cd into the folder
- run makepkg —nobuild
- cd to src/kernel/drv/oss_usb/ and edit ossusb_audio.c : add a return 1; .
- should look like so:
- cd to src/kernel/setup and edit srcconf_linux.inc , search for -Werror and remove it, otherwise OSS will not compile.
- do makepkg —noextract
Now you must install the package. Remove OSS first if already installed.
ALSA emulation
You can instruct alsa-lib to use OSS as its audio output system. This works as a sort of ALSA emulation.
Note, however, that this method may introduce additional latency in your sound output, and that the emulation is not complete and does not work with all applications. It does not work, for example, with programs that try to detect devices using ALSA.
So, as most applications support OSS directly, use this method only as a last resort.
In the future, more complete methods may be available for emulating ALSA, such as libsalsa and cuckoo .
Instructions
- Install the alsa-plugins package.
- Edit /etc/asound.conf as follows.
Settings for a specific driver
If something is not working, there is a possibility that some of your OSS settings are driver specific or just wrong for your driver.
- Find out which driver is used
- Locate configuration file for device in:
- Try changing defaults. There are only few settings, and they are self explanatory
For example, the setting:
in oss_ich.conf turns on jack-sense (which is responsible for recognizing plugged headphones and muting the speaker). Other settings for jack-sense can be found in hdaudio.conf where you have to change the hdaudio_jacksense variable.
- Restart the oss daemon for changes take effects.
Troubleshooting
Troubleshooting HD Audio devices
Understanding the problem
If you have a HD Audio sound device, it is very likely that you will have to adjust some mixer settings before your sound works.
HD Audio devices are very powerful in the sense that they can contain a lot of small circuits (called widgets) that can be adjusted by software at any time. These controls are exposed to the mixer, and they can be used, for example, to turn the earphone jack into a sound input jack instead of a sound output jack.
However, there are also bad side effects, mainly because the HD Audio standard is more flexible than it perhaps should be, and because the vendors often only care to get their official drivers working.
When using HD Audio devices, you often find disorganized mixer controls, that do not work at all by default, and you are forced to try every mixer control combination possible, until it works.
Solution
Open ossxmix and try to change every mixer control in the middle area, that contains the sound card specific controls, as explained in the #Volume Control Mixer section.
You will probably want to setup a program to record/play continuously in the background (e.g. ossrecord — | ossplay — for recording or osstest -lV for playing), while changing mixer settings in ossxmix in the foreground.
- Raise every volume control slider.
- In each option box, try to change the selected option, trying all the possible combinations.
- If you get noise, try to lower and/or mute some volume controls, until you find the source of the noise.
- Editing /usr/lib/oss/conf/oss_hdaudio.conf , uncommenting and changing hdaudio_noskip=0 to a value from 0-7 can give you more jack options in ossxmix .
MMS sound cracking in Totem
If you hear various cracks or strange noises in Totem during playback, you can try using another backend such as FFmpeg. This will not fix the issue that somehow pops up in GStreamer when playing MMS streams but it will give you the option to play it with good sound quality. Playing it in MPlayer is simple:
Microphone playing through output channels
By default, OSS plays back the microphone through the speakers. To disable this in ossxmix find the Misc section and uncheck every input-mix-mute box.
Источник


