- Installing and using the Cisco AnyConnect client with Debian and Ubuntu for UCI VPN
- Introduction
- Summary
- Installing the Cisco AnyConnect client
- Connecting and Disconnecting
- Connecting (Graphical window)
- Connecting (via command-line)
- Connecting automatically via Command-line (w/o typing in your Username/Password)
- NOTE 1 — Connect-error
- To disconnect (gui)
- To disconnect (command-line)
- To exit (command-line)
- De-installation / Removal
- Additional Hints, Tips, and Handling of Errors and Problems Contributed by Users
- Contact / Feedback
- Acknowledgements
- Configure AnyConnect Secure Mobility Client for Linux using Client Certificate Authentication on an ASA
- Available Languages
- Download Options
- Contents
- Introduction
- Prerequisites
- Requirements
- Components Used
- Backgound Information
- Configure
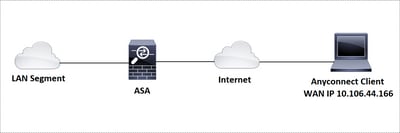
- Network Diagram
- Configurations
- Verify
- Troubleshoot
Installing and using the Cisco AnyConnect client with Debian and Ubuntu for UCI VPN
(Note: There is also an alternative method of installing UCI VPN support without using the Cisco client, but using the built-in Debian/Ubuntu openconnect and openvpn drivers, should you find the below method does not work for you, or if you prefer to use open-source non-proprietary software.)
Introduction
OIT has a good general VPN-Linux page with instructions on setting up the Cisco AnyConnect VPN client software for Linux, but I got tripped up in a couple of places and thought I’d pass on some heads-ups for other Debian and Ubuntu users.
I originally wrote this «How-To» for Ubuntu v10, and have updated it through v17.04. It should work for most or all Debian-derived distributions through 9.0 («Stretch»).
Please do write me to let me know how it went for you, and/or with any suggestions. I’d love to hear that it helped someone and/or any improvements that could be added.
Thanks to several for the help getting here.
Summary
In the instructions below, I’ll walk you through installing the Cisco VPN client on a Debian or Ubuntu system. When you’re done, you’ll have two commands available at the command-prompt, which you can run to connect to the campus VPN: ‘vpn’ (text mode) and ‘vpnui’ (graphical/windowing).
I used to also include instructions for getting VPN support to show up in the NetworkManager icon/applet in the system tray, for those who used a Gnome based desktop. I no longer do this, as it is too complicated these days to keep up with documenting the various desktop environments, and the changes (and unreliability) of NetworkManager. And it’s not really necessary anyway. If you get it going for yourself, though, Kudos to You! 🙂
Installing the Cisco AnyConnect client
- First, make sure you have the necessary Debian/Ubuntu support packages installed:
- Go to the UCI OIT Cisco Anyconnect/Linux instruction page.
- Download the 32 or 64 bit client as a .gz file.
- If you are usure whether you should use the 32 or 64 bit client: Most people are on 64-bit machines now. But if you are unsure, just run the uname command like this:As you can see from the above example, my machine has a 64-bit Intel (x86_64) based processor. If you see a ‘386’ somewhere, then you are on a 32-bit machine.
- From the command prompt, go to the directory you saved the file to, and unpack it and run, just like the OIT instructions. Note you might have to put in some back-slashes because the download file apparently comes with spaces in the file name these days:
- If you get the following message at the end instead: it most likely means you did not install the two Ubuntu packages up in step 1, above.
- However, if you have installed those two packages, and are still getting this error, then user Steve Murphy wrote me (2015-12-7) with the tip that running the following did install enough dependent packages as to make it work for him:However, while this may help some users, this normally should not be necessary, and was not in my testing.
/.bash_aliases file:(where you don’t actually type the «^D»: it means you hit Ctrl-D to finish).
If you want to edit your aliases file instead directly, you can run a simple editor, ‘nano’, which is usually available on Debian and Ubuntu systems:
Connecting and Disconnecting
Connecting (Graphical window)
And it should show ‘vpn.uci.edu’ already. Just click Connect.
If you get an error message about an untrusted server or certificate..
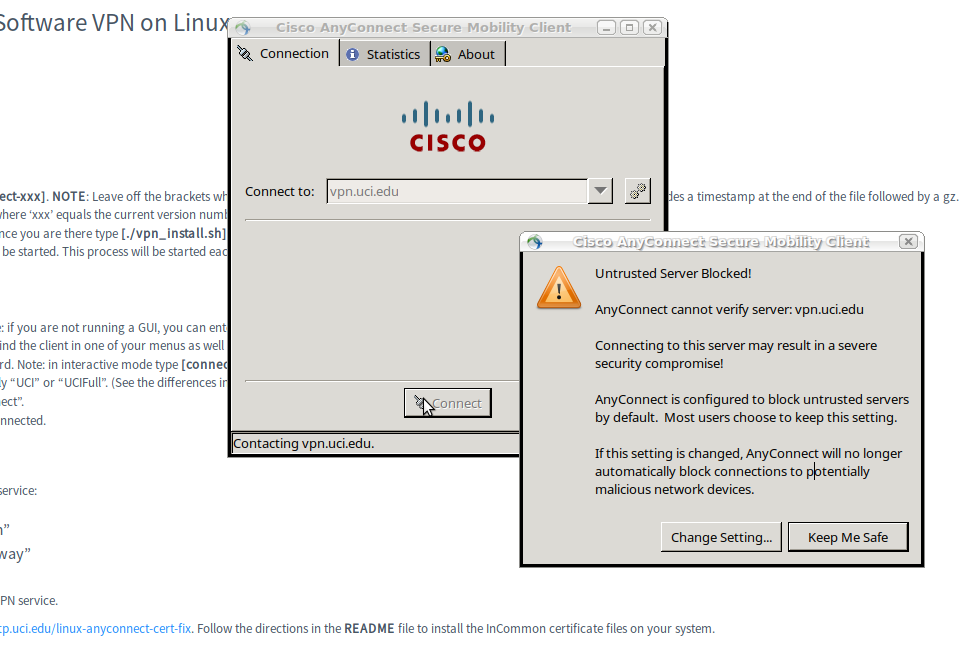
..you can fix that following the instructions from Robert in the section NOTE 1 — Connect-error, below.
(By the way, depending on how the installation went, and whatever of the Linux desktop environments you are using (Gnome, Unity, KDE, Mate, Cinnamon, XFCE, etc.) you may also find that the vpnui graphical client now also appears somewhere in your Applications menu. But don’t count on it! This is Linux, after all.. 🙂 )
Connecting (via command-line)
- To start the client from a command-line prompt in a terminal window, using the alias you made above:
- At the VPN> prompt, type connect vpn.uci.edu and press Enter. (If you get an error message about an untrusted server or certificate, you can fix that following the instructions from Robert in the section NOTE 1 — Connect-error, below.) Otherwise, you should now see:If you do not see this, but get a connect error instead, please see NOTE 1 — Connect Error below.
- Ignore the message about entering your UCInetID and password, for now.
- Choose one of the choices by number and press return — usually UCI or UCIFull. (See the differences in the Tunnels below.) For instance, for UCI, press 3 and hit Enter.
- Enter your UCInetID and password in the Username and Password boxes and press return.
- At the accept? [y/n]: prompt, type y and press Enter. You may get several notices the first time about the downloader performing update checks. At the end you should see a >> state: Connected message and a new VPN> prompt. You are now connected.
- Either leave the VPN> prompt open or if you want your terminal back just type quit at the VPN> prompt (the connection will remain active).
Connecting automatically via Command-line (w/o typing in your Username/Password)
I never (not yet?) figured out how to get the Cisco anyconnect software to run via script with command-line parameters sufficient for its running without having to type in your username (UCINetID) and password. I looked into the vpn command / executable supplied by Cisco (in the anyconnect-predeploy package) and running -h on it does not give much help.
Therefore, if you need something command-line and automated, I suggest you use the alternative method using open-source openvpn/openconnect software which I mentioned at the very top of this document. I include a way to do that in an automated way, and I find it works just as well and just as fast, but without having to install proprietary Cisco software. (This is the age of Ed Snowden’s warning to us all, after all.. :-/
NOTE 1 — Connect-error
In most cases I have seen, a connection is made. I have, however, seen the below error before only once. It was when the person was installing on a netbook (running Gnome) which was on campus and usingthe campus wifi system (though I don’t know if those factors were the cause). It didn’t matter if they answered y or n, they continued to get the error and be denied connection.
Update 2015-12-6: «Robert» wrote me with a solution to this:
- ..the connect error. can be resolved by sym-linking the cisco ca directory to the system ca directory as cisco only seems to include one root certificate by default. Or you can install the certificate chain from the VPN provider — sym-linking the system certs worked fine for me. Credit goes to: https://plus.google.com/+AndreasKotowicz/posts/2afhvvNZpE6
Thank you, Robert!
To disconnect (gui)
- Just click disconnect in the window
To disconnect (command-line)
- At the VPN> prompt, type disconnect and hit Enter.
To exit (command-line)
- At the VPN> prompt, type quit and hit return.
De-installation / Removal
- Run Cisco’s provided un-install script
- Optionally, also remove the cisco directory (if you don’t need the .log files that were left behind):
Additional Hints, Tips, and Handling of Errors and Problems Contributed by Users
Several people have written in to me with some additional tips and solutions which I’ll add here:
- From pierrechauffour:
- From zviad aburjania: This turned out to be a missing library fixable by:
- From zviad aburjania (2): (If that link no longer works, it is just recommended to start /opt/cisco/anyconnect/bin/vpnagentd first.)
From pascal müller:
Pascal researched and found that the error, anyconnect was not able to establish a connection to the specified secure gateway is a known problem with Cisco clients before version 4, when these earlier clients are installed on Ubuntu 16.04+. The solution is either to downgrade your Ubuntu, or upgrade your Cisco client. At my university we have upgraded to offering version 4 (anyconnect-predeploy-linux-64-4.3.05017-k9.tar.gz), and this supposedly works with the newer Ubuntus. I did not myself test the new version 4 Anyconnect client with Ubuntus 15.x and 16.x. But I have tested it today (April 27 2017) with my Ubuntu 17.04 system, and it works great.
Contact / Feedback
Please email me to let me know how this process went for you, and/or with any suggestions for improvement on this page itself. Thanks.
Acknowledgements
- Mike Iglesias and Sylvia Bass at UCI’s OIT for for putting up the link to here from their VPN-Linux page.
- a page at Georgia Tech (now defunct), from which part of this page (the old Section 2, no longer included) was originally adapted.
- Joe Remenak for clear, concise feedback on some additional steps (1 and 11) necessary now for the newer 64-bit Ubuntus.
- Tom Distler, for the Tux/Cisco image at the top of this page, which I mooched from his page, How to connect Linux to a Cisco VPN using a PCF file.
- James Condie at UCI, who encountered multiple problems with the latest changes in the 4.3.05017 version of Cisco’s install — but patiently stuck with it — thus encouraging me to update this page once again, and clarify a few additional things for newer Linux users.
- Philippe Moisan, who caught and reported an incompatibility with the find vpnagentd command above in Installation Step 8, for some versions of Linux, and offered also a fix: to put quotes around the «*vpnagentd*» which should work with all flavors of find.
Источник
Configure AnyConnect Secure Mobility Client for Linux using Client Certificate Authentication on an ASA
Available Languages
Download Options
Contents
Introduction
This document describes a configuration example for Adaptive Security Appliance (ASA) Cisco AnyConnect Secure Mobility Client access that uses client certificate for authentication for a Linux Operative System (OS) for an AnyConnect user to connect successfully to an ASA Headend.
Contributed by Dinesh Moudgil, Cisco HTTS Engineer.
Prerequisites
Requirements
This document assumes that the ASA is fully operational and configured to allow the Cisco Adaptive Security Device Manager (ASDM) or Command Line Interface (CLI) to make configuration changes.
Cisco recommends that you have knowledge of these topics:
Basic knowledge of ASA’s CLI and ASDM
SSLVPN configuration on the Cisco ASA Head End
Fundamental knowledge of PKI
Familiarity with Linux OS
Components Used
The information in this document is based on these software and hardware versions:
Cisco Adaptive Security Appliance ASA5585-SSP-20
Cisco Adaptive Security Appliance Software Version 9.9(2)36
Adaptive Security Device Manager Version 7.9(1)
AnyConnect Version 4.6.03049
Ubuntu OS 16.04.1 LTS
Note: Download the AnyConnect VPN Client package (anyconnect-linux*.pkg) from the Cisco Software Download (registered customers only) site. Copy the AnyConnect VPN client to the ASA’s flash memory, which is then downloaded to the remote user computers in order to establish the SSL VPN connection with the ASA.
The information in this document was created from the devices in a specific lab environment. All of the devices used in this document started with a cleared (default) configuration. If your network is live, make sure that you understand the potential impact of any command.
Backgound Information
For a successful client certificate authentication on Linux devices, AnyConnect secure mobility client supports the following certificate stores:
1. Linux OS (PEM) certificate store
2. Firefox (NSS) certificate store
This document is based on client certificate authentication using a Linux OS (PEM) certificate store.
1. To use Linux OS certificate store, PEM file-based certificates are placed in these directories.
| Entity | Path | Example |
| Certificate authority (CA) certificate | /opt/.cisco/certificates/ca | tactest: $ ls /opt/.cisco/certificates/ca |
| User certificate | /home/tactest/.cisco/certificates/client | tactest: $ ls /home/tactest/.cisco/certificates/client |
| User private key [Initially used to create CSR] : | /home/tactest/.cisco/certificates/client/private | tactest: $ ls /home/tactest/.cisco/certificates/client/private |
Note: By default, the path for installing client certificate and the private key is not present so it needs to be manually created using this command.
mkdir -p .cisco/certificates/client/private/
If you are using a Windows Certificate Authority,
1. Download the CA Certificate (Base64 encoded) with extension .cer
2. Download the User Identity Certificate (Base64 encoded) with extension .cer
3. Change the extension of certificates from .cer to .pem extension
2. To use Firefox (NSS) certificate store, user can import their certificate via Firefox.
The CA certificate for the ASA can be imported into NSS certificate store by AnyConnect client automatically if the user clicks “Always Connect” button on the certificate security warning dialog when browsing to ASA via HTTPS.
AnyConnect Linux uses Firefox certificate store (NSS) as default, if it fails then it would turn to use Linux OS certificate store.
Note: Currently, AnyConnect on a Linux OS doesn’t support GNOME Keyring so AnyConnect won’t able to use the certificate imported to the GNOME Keyring.
Please make sure there are no related certificates in Linux OS certificate store and Firefox (NSS) certificate store before importing a new user certificate.
Ensure that your files meet the following requirements:
- All certificate files must end with the extension .pem.
- All private key files must end with the extension .key.
- A client certificate and its corresponding private key must have the same filename. For example: client.pem and client.key.
For a clean start, please consider the following approach:
- Linux OS (PEM) certificate store:
A. Remove unnecessary PEM files under “/opt/.cisco/certificates”, but keep the “/opt/.cisco/certificates/ca/VeriSignClass3PublicPrimaryCertificationAuthority-G5.pem” certificate intact. This is the CA certificate AnyConnect relies on to perform the code signing verification.
B. Remove the user certificates that are not required from the path
Use firefox settings to inspect and delete related certificates imported by user or AnyConnect itself.
Configure
Network Diagram
Configurations
Linux Client Setup
Step 1. Download the Anyconnect package, extract the contents and install the Anyconnect application on the Linux client.
Step 2. Create a certificate signing request for the identity certificate on Linux client using OpenSSL.
Step 3. The CSR generated above can be used to request CA to issue a user identity certificate.
Step 4. Once the certificate is issued by CA, copy the certificate to the Linux client.
ASA CLI Configuration
This section provides the CLI configuration for the Cisco AnyConnect Secure Mobility Client for reference purposes.
Verify
Use this section in order to confirm that your configuration works properly.
Note: The Output Interpreter Tool (registered customers only) supports certain show commands. Use the Output Interpreter Tool in order to view an analysis of show command output.
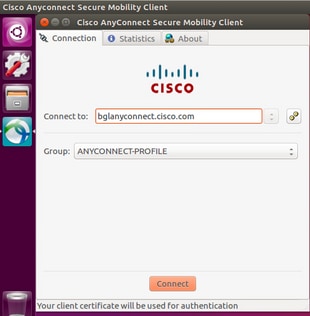
- On an Ubuntu OS 16.04.1 LTS, connect Anyconnect via GUI
If you wish to connect Anyconnect via command line on a Linux client, navigate to the following path:
Verify the Anyconnect client is able to establish connection:
Note: If Anyconnect GUI client is already opened and you try to connect Anyconnect via CLI, you get this error.
In this case, close the Anyconnect GUI client and then connect via Anyconnect CLI.
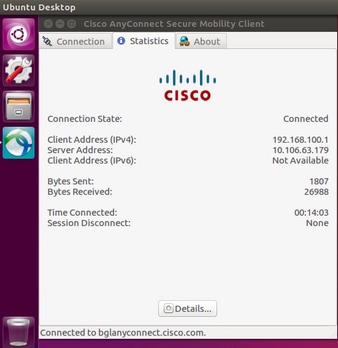
Once successfully connected, Anyconnect client details can be verified by navigating to Statistics tab in the Anyconnect GUI client
This command is used to confirm the CA and Identity certificates present on the Adaptive Security Appliance (ASA).
These show commands can be executed to confirm the status of AnyConnect client and its statistics.
In order to confirm if the Linux client has the certificate in the correct format (Base64 encoding with .pem extension), browse to the given path and use the following command:
If you get the following error it means that you are trying to view a DER-encoded certificate and it is not a PEM encoded certificate
Troubleshoot
This section provides the information you can use in order to troubleshoot your configuration.
Note: Refer to Important Information on Debug Commands before you use debug commands.
Caution: On the ASA, you can set various debug levels; by default, level 1 is used. If you change the debug level, the verbosity of the debugs might increase. Do this with caution, especially in production environments.
To troubleshoot an incoming AnyConnect client connection from Linux OS client, you can use the following:
- For AnyConnect process on an ASA
debug webvpn anyconnect 255
Here is a sample debug taken on an ASA from a working scenario:
- For client certificate authentication on an ASA
debug crypto ca 255
debug crypto ca messages 255
debug crypto ca transactions 255
Here is a sample debug taken for a successful client certificate authentication on an ASA:
- For the AnyConnect process on a Linux client
On a Linux device, Anyconnect logs can be found in the file named «syslog» at path:/var/log/
Here is a sample of working logs taken from a Linux client. The below command can be run to gather live logs for an Anyconnect client connection.
- DART(Diagnostic and Reporting Tool) on Linux Client
Similar to Windows and MAC, Linux client also has DART functionality. This can be used either using GUI and CLI.
Please note that DART needs to be run as an admin user in order to collect complete logs on a Linux client.
Step 1. DART can be executed from the command line by navigating to the following path:
Step 2. To execute DART from GUI, search for «anyconnect» on Linux GUI and click on Cisco DART and follow the instructions. The collected DART bundle is stored on the desktop.
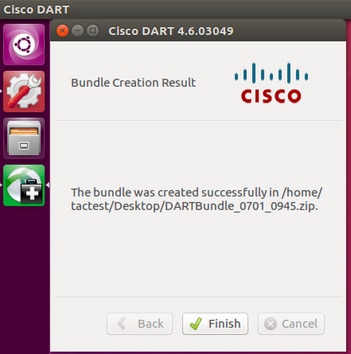
Step 3. To copy dart bundle from the Linux client to your workstation, use the command
scp username@10.106.44.166:/home/ /Desktop/DARTBundle_0701_0945.zip /Users/dmoudgil/Desktop/Ubuntu/
Here is a document for reference to DART on different OS: https://community.cisco.com/t5/security-documents/how-to-collect-the-dart-bundle-for-anyconnect/ta-p/3156025
Источник


