- 9 Commands to Check CPU Information on Linux
- CPU hardware information
- 1. /proc/cpuinfo
- 2. lscpu — display information about the CPU architecture
- 3. hardinfo
- 4. lshw
- 5. nproc
- 6. dmidecode
- 7. cpuid
- 8. inxi
- 9. Hwinfo
- Conclusion
- 15 thoughts on “ 9 Commands to Check CPU Information on Linux ”
- Understand Linux Load Averages and Monitor Performance of Linux
- How to Monitor Linux System Load Average
- Top Command
- Glances Tool
- Understanding System Average Load in Relation Number of CPUs
- Multi-processor Vs Multi-core
- If You Appreciate What We Do Here On TecMint, You Should Consider:
- ИТ База знаний
- Полезно
- Навигация
- Серверные решения
- Телефония
- Корпоративные сети
- Загрузка ЦПУ в Linux — насколько варит ваш котелок
- Методы проверки
- Проверяем загрузку процессора с помощью команды top
- Немного более модный способ: htop
- Прочие способы проверки степени загрузки ЦПУ
- Как настроить оповещения о слишком высокой нагрузке на процессор
- Заключение
9 Commands to Check CPU Information on Linux
CPU hardware information
The cpu information includes details about the processor, like the architecture, vendor name, model, number of cores, speed of each core etc.
There are quite a few commands on linux to get those details about the cpu.
In this post we shall take a look at some of the commonly used commands that can be used to get details about the cpu.
1. /proc/cpuinfo
The /proc/cpuinfo file contains details about individual cpu cores.
Output its contents with less or cat.
Every processor or core is listed separately the various details about speed, cache size and model name are included in the description.
To count the number of processing units use grep with wc
To get the actual number of cores, check the core id for unique values
So there are 4 different core ids. This indicates that there are 4 actual cores.
2. lscpu — display information about the CPU architecture
lscpu is a small and quick command that does not need any options. It would simply print the cpu hardware details in a user-friendly format.
3. hardinfo
Hardinfo is a gtk based gui tool that generates reports about various hardware components. But it can also run from the command line only if there is no gui display available.
It would produce a large report about many hardware parts, by reading files from the /proc directory. The cpu information is towards the beginning of the report. The report can also be written to a text file.
Hardinfo also performs a few benchmark tests taking a few minutes before the report is displayed.
4. lshw
The lshw command can display limited information about the cpu. lshw by default shows information about various hardware parts, and the ‘-class’ option can be used to pickup information about a specific hardware part.
The vendor, model and speed of the processor are being shown correctly. However it is not possible to deduce the number of cores on the processor from the above output.
5. nproc
The nproc command just prints out the number of processing units available. Note that the number of processing units might not always be the same as number of cores.
6. dmidecode
The dmidecode command displays some information about the cpu, which includes the socket type, vendor name and various flags.
7. cpuid
The cpuid command fetches CPUID information about Intel and AMD x86 processors.
The program can be installed with apt on ubuntu
And here is sample output
8. inxi
Inxi is a script that uses other programs to generate a well structured easy to read report about various hardware components on the system. Check out the full tutorial on inxi.
Print out cpu/processor related information
To learn more about the inxi command and its usage check out this post:
Inxi is an amazing tool to check hardware information on Linux
9. Hwinfo
The hwinfo command is a hardware information program that can be used to collect details about various hardware components on a Linux system.
It also displays information about the processor. Here is a quick example:
If you don’t use the «—short» option it will display much more information about each cpu core like architecture and processor features.
To learn more about the hwinfo command check this post:
Check hardware information on Linux with hwinfo command
Conclusion
Those were some of the commands to check CPU information on Linux based systems like Ubuntu, Fedora, Debian, CentOS etc.
For some more command examples on checking cpu information check this post:
How to Check Processor and CPU Details on Linux — Command Examples
Most of the commands are command line based and show text output. For a GUI interface use the program called Hardinfo.
It shows hardware details about various components in a easy to use GUI interface.
If you know of any other useful command that can display information about the CPU, let us know in the comments below.
A Tech Enthusiast, Blogger, Linux Fan and a Software Developer. Writes about Computer hardware, Linux and Open Source software and coding in Python, Php and Javascript. He can be reached at [email protected] .
15 thoughts on “ 9 Commands to Check CPU Information on Linux ”
Very nicely explained. I highly recommend it in my articles. thank you.
Thank you for the information, i learn lot in this article. 🙂
Thanks for the Information.
Hi everybody, someone know how to get same information regarding the hardware where I installed a phisical linux ?
Thank you for sharing, it helping lot.
lshw now (DISTRIB_DESCRIPTION=”Linux Mint 17.3 Rosa”) includes a line like below at the bottom of it’s listing:
configuration: cores=4 enabledcores=4 threads=8
How to get the number of real cores, not HiperThreading.
For example, for i7, real cores are 4, but logical are 8. There is some way without root ?
check this post for commands to check the number of real cores.
https://www.binarytides.com/linux-check-processor/
are we still catting into grep?
grep ‘core id’ /proc/cpuinfo
yo Silver Moon, nice write-up bro. absolutelly useful stuff there, though the number of CPUs can be fetched using just ‘grep -c processor /proc/cpuinfo’. take care 🙂
Thank you for the helpful information. You can not look for “unique values” with the “cat /proc/cpuinfo |grep ‘core id’” command on a multiprocessor system. The situation gets even worse with hyperthreading enabled CPU’s.
Источник
Understand Linux Load Averages and Monitor Performance of Linux
In this article, we will explain one of the critical Linux system administration tasks – performance monitoring in regards to system/CPU load and load averages.
Before we move any further, let’s understand these two important phrases in all Unix-like systems:
- System load/CPU Load – is a measurement of CPU over or under-utilization in a Linux system; the number of processes which are being executed by the CPU or in waiting state.
- Load average – is the average system load calculated over a given period of time of 1, 5 and 15 minutes.
In Linux, the load-average is technically believed to be a running average of processes in it’s (kernel) execution queue tagged as running or uninterruptible.
Note that:
- All if not most systems powered by Linux or other Unix-like systems will possibly show the load average values somewhere for a user.
- A downright idle Linux system may have a load average of zero, excluding the idle process.
- Nearly all Unix-like systems count only processes in the running or waiting states. But this is not the case with Linux, it includes processes in uninterruptible sleep states; those waiting for other system resources like disk I/O etc.
How to Monitor Linux System Load Average
There are numerous ways of monitoring system load average including uptime which shows how long the system has been running, number of users together with load averages:
The numbers are read from left to right, and the output above means that:
- load average over the last 1 minute is 1.98
- load average over the last 5 minutes is 2.15
- load average over the last 15 minutes is 2.21
High load averages imply that a system is overloaded; many processes are waiting for CPU time.
We will uncover this in the next section in relation to number of CPU cores. Additionally, we can as well use other well known tools such as top and glances which display a real-time state of a running Linux system, plus many other tools:
Top Command
Glances Tool
The load averages shown by these tools is read /proc/loadavg file, which you can view using the cat command as below:
On desktop machines, there are graphical user interface tools that we can use to view system load averages.
Understanding System Average Load in Relation Number of CPUs
We can’t possibly explain system load or system performance without shedding light on the impact of the number of CPU cores on performance.
Multi-processor Vs Multi-core
- Multi-processor – is where two or more physical CPU’s are integrated into a single computer system.
- Multi-core processor – is a single physical CPU which has at least two or more separate cores (or what we can also refer to as processing units) that work in parallel. Meaning a dual-core has 2 two processing units, a quad-core has 4 processing units and so on.
Furthermore, there is also a processor technology which was first introduced by Intel to improve parallel computing, referred to as hyper threading.
Under hyper threading, a single physical CPU core appears as two logical CPUs core to an operating system (but in reality, there is one physical hardware component).
Note that a single CPU core can only carry out one task at a time, thus technologies such as multiple CPUs/processors, multi-core CPUs and hyper-threading were brought to life.
With more than one CPU, several programs can be executed simultaneously. Present-day Intel CPUs use a combination of both multiple cores and hyper-threading technology.
To find the number of processing units available on a system, we may use the nproc or lscpu commands as follows:
Another way to find the number of processing units using grep command as shown.
Now, to further understand system load, we will take a few assumptions. Let’s say we have load averages below:
On a single core system this would mean:
- The CPU was fully (100%) utilized on average; 1 processes was running on the CPU (1.00) over the last 1 minute.
- The CPU was idle by 60% on average; no processes were waiting for CPU time (0.40) over the last 5 minutes.
- The CPU was overloaded by 235% on average; 2.35 processes were waiting for CPU time (3.35) over the last 15 minutes.
On a dual-core system this would mean:
- The one CPU was 100% idle on average, one CPU was being used; no processes were waiting for CPU time(1.00) over the last 1 minute.
- The CPUs were idle by 160% on average; no processes were waiting for CPU time. (0.40) over the last 5 minutes.
- The CPUs were overloaded by 135% on average; 1.35 processes were waiting for CPU time. (3.35) over the last 15 minutes.
You might also like:
In conclusion, if you are a system administrator then high load averages are real to worry about. When they are high, above the number of CPU cores, it signifies high demand for the CPUs, and low load averages below the number of CPU cores tells us that CPUs are underutilized.
If You Appreciate What We Do Here On TecMint, You Should Consider:
TecMint is the fastest growing and most trusted community site for any kind of Linux Articles, Guides and Books on the web. Millions of people visit TecMint! to search or browse the thousands of published articles available FREELY to all.
If you like what you are reading, please consider buying us a coffee ( or 2 ) as a token of appreciation.

We are thankful for your never ending support.
Источник
ИТ База знаний
Курс по Asterisk
Полезно
— Узнать IP — адрес компьютера в интернете
— Онлайн генератор устойчивых паролей
— Онлайн калькулятор подсетей
— Калькулятор инсталляции IP — АТС Asterisk
— Руководство администратора FreePBX на русском языке
— Руководство администратора Cisco UCM/CME на русском языке
— Руководство администратора по Linux/Unix
Навигация
Серверные решения
Телефония
FreePBX и Asterisk
Настройка программных телефонов
Корпоративные сети
Протоколы и стандарты
Загрузка ЦПУ в Linux — насколько варит ваш котелок
Понимать состояние ваших серверов с точки зрения их загрузки и производительности — крайне важная задача. В этой статье мы опишем несколько самых популярных методов для проверки и мониторинга загрузки ЦПУ на Linux хосте.
Онлайн курс по Linux
Мы собрали концентрат самых востребованных знаний, которые позволят тебе начать карьеру администратора Linux, расширить текущие знания и сделать уверенный шаг к DevOps


Методы проверки
Проверяем загрузку процессора с помощью команды top
Отличным способом проверки загрузки является команда top. Вывод этой команды выглядит достаточно сложным, зато если вы в нем разберетесь, то точно сможете понять какие процессы занимают большую часть ваших вычислительных мощностей.
Команда состоит всего из трех букв: top
У вас откроется окно в терминале, которое будет отображать запущенные сервисы в реальном времени, долю системных ресурсов, которую эти сервисы потребляют, общую сводку по загрузке CPU и т.д
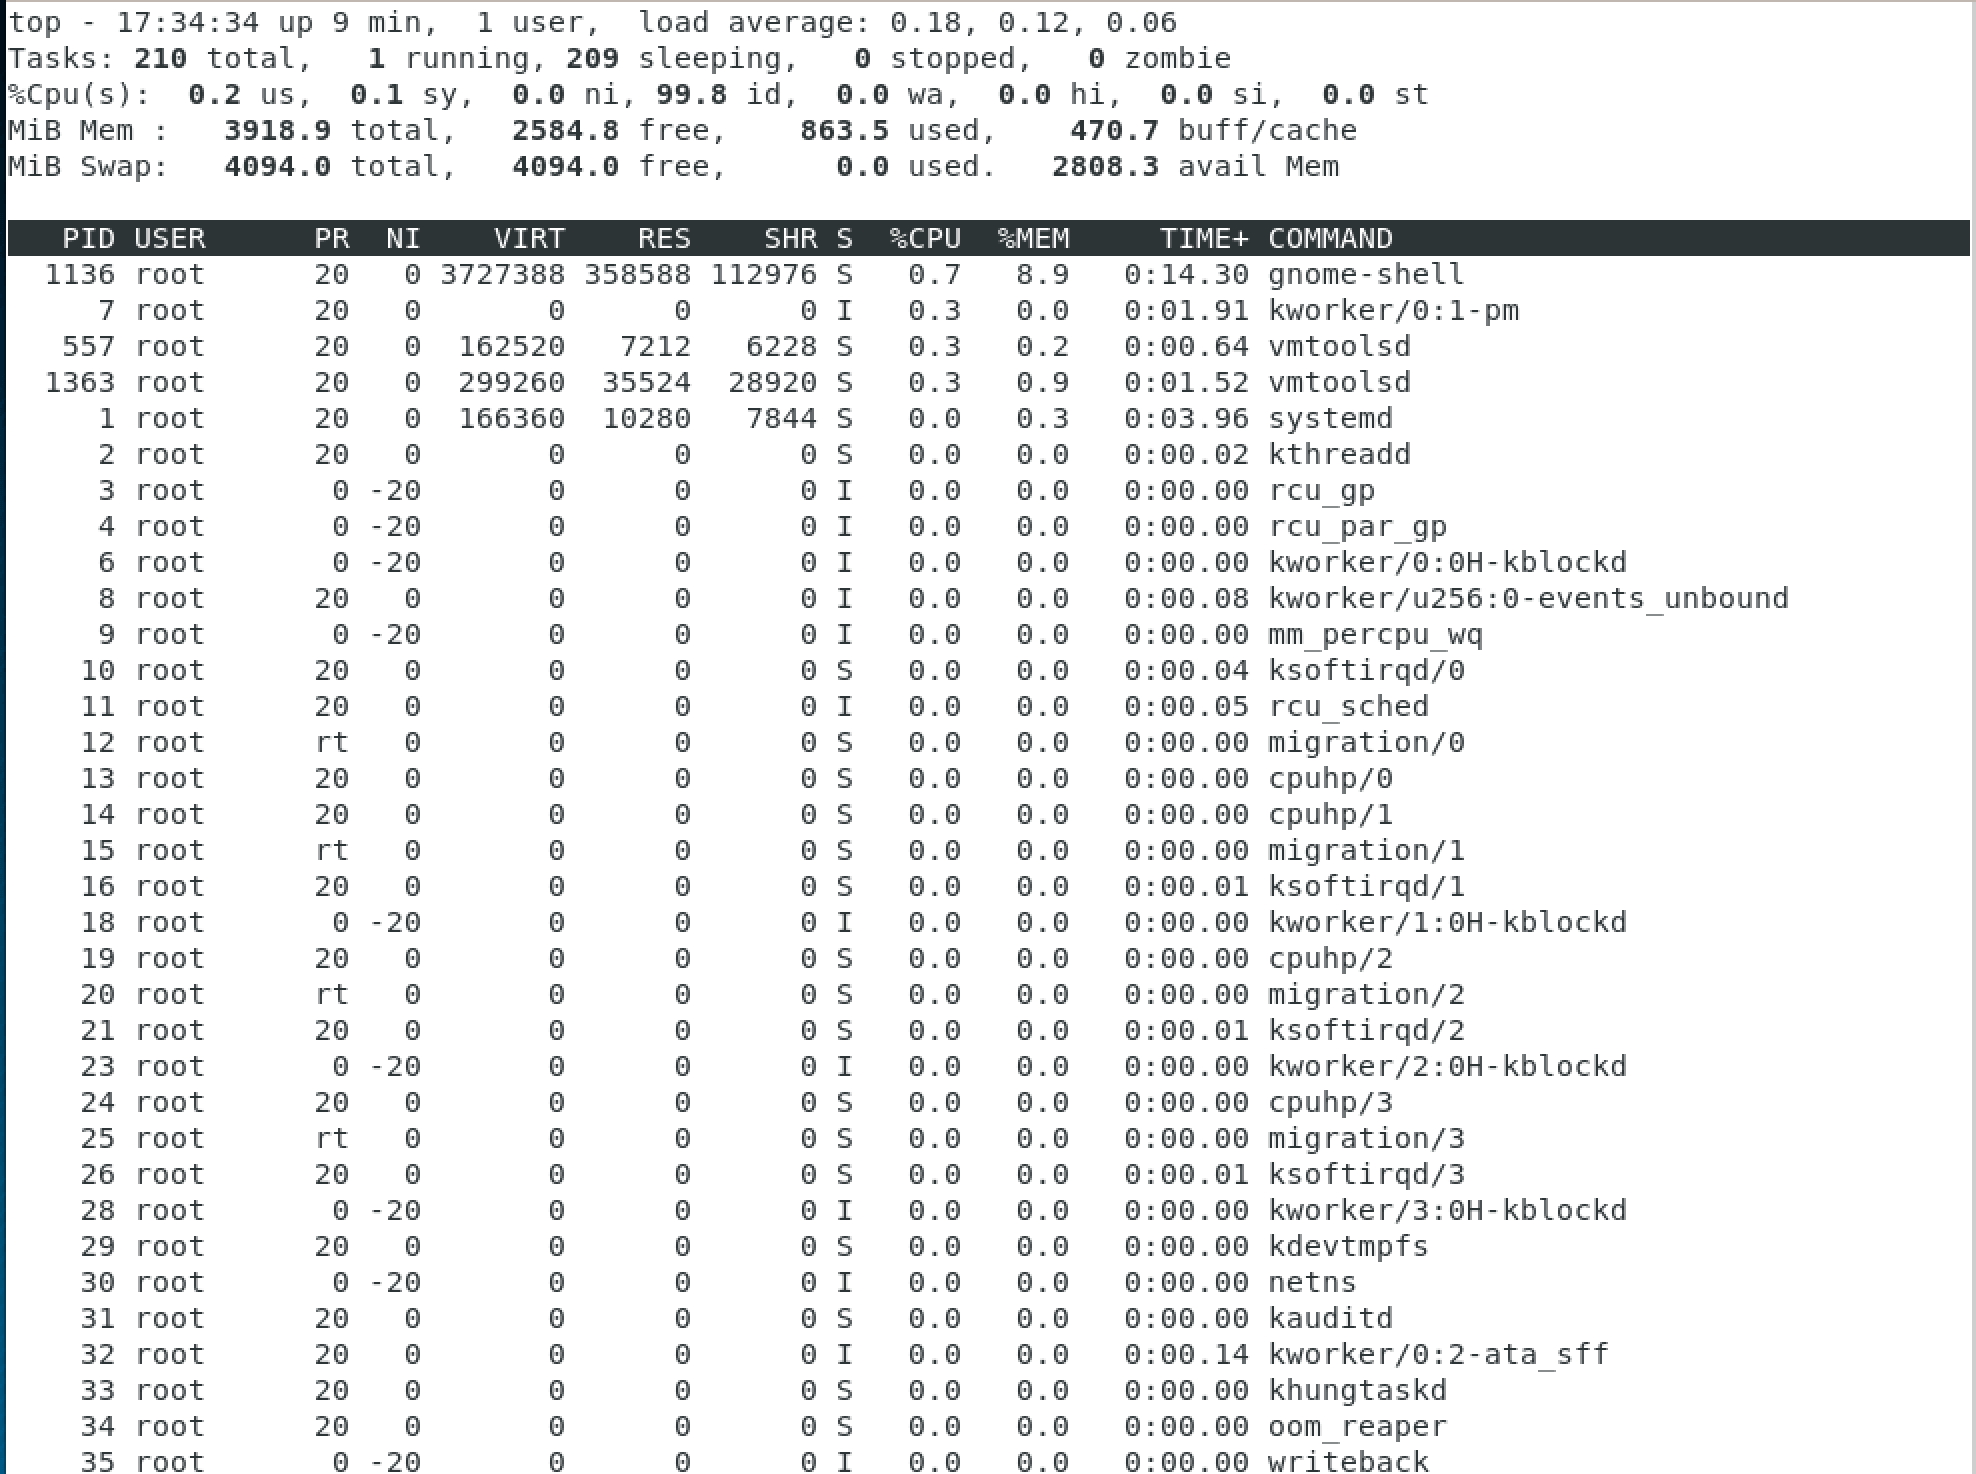
Будем идти по порядку: первая строчка отображает системное время, аптайм, количество активных пользовательских сессий и среднюю загруженность системы. Средняя загруженность для нас особенно важна, т.к дает понимание о среднем проценте утилизации ресурсов за некоторые промежутки времени.
Три числа показывают среднюю загрузку: за 1, 5 и 15 минут соответственно. Считайте, что эти числа — это процентная загрузка, т.е 0.2 означает 20%, а 1.00 — стопроцентную загрузку. Это звучит и выглядит достаточно логично, но иногда там могут проскакивать странные значения — вроде 2.50. Это происходит из-за того, что этот показатель не прямое значение загрузки процессора, а нечто вроде общего количества «работы», которое ваша система пытается выполнить. К примеру, значение 2.50 означает, что текущая загрузка равна 250% и ваша система на 150% перегружена.
Вторая строчка достаточна понятна и просто показывает количество задач, запущенных в системе и их текущий статус.
Третья строчка позволит вам отследить загрузку ЦПУ с подробной статистикой. Но здесь нужно сделать некоторые комментарии:
- us: процент времени, когда ЦПУ был загружен и которое было затрачено на user space (созданные/запущенные пользователем процессы)
- sy: процент времени, когда ЦПУ был загружен и которое было затрачено на на kernel (системные процессы)
- ni: процент времени, когда ЦПУ был загружен и которое было затрачено на приоритезированные пользовательские процессы (системные процессы)
- id: процент времени, когда ЦПУ не был загружен
- wa: процент времени, когда ЦПУ ожидал отклика от устройств ввода — вывода (к примеру, ожидание завершения записи информации на диск)
- hi: процент времени, когда ЦПУ получал аппаратные прерывания (например, от сетевого адаптера)
- si: процент времени, когда ЦПУ получал программные прерывания (например, от какого-то приложения адаптера)
- st: сколько процентов было «украдено» виртуальной машиной — в случае, если гипервизору понадобилось увеличить собственные ресурсы
Следующие две строчки показывают сколько занято/свободно оперативно памяти и файла подкачки, и не так релевантны относительно задачи проверки нагрузки на процессор. Под информацией о памяти вы увидите список процессов и процент ЦПУ, который они тратят.
Также вы можете нажимать на кнопку t, чтобы прокручивать между различными вариантами вывода информации и использовать кнопку q для выхода из top
Немного более модный способ: htop
Существует более удобная утилита под названием htop, которая предоставляет достаточно удобный интерфейс с красивым форматированием. Установка утилиты экстремально проста:
Для Ubuntu и Debian:
sudo apt-get install htop
Для CentOS и Red Hat:
yum install htop
dnf install htop
После установки просто введите команду ниже:

Как видно на скриншоте, htop гораздо лучше подходит для простой проверки степени загрузки процессора. Выход также осуществляется кнопкой q
Прочие способы проверки степени загрузки ЦПУ
Есть еще несколько полезных утилит, и одна из них (а точнее целый набор) называется sysstat.
Установка для Ubuntu и Debian:
sudo apt-get install sysstat
Установка для CentOS и Red Hat:
yum install sysstat
Как только вы установите systat, вы сможете выполнить команду mpstat — опять же, практически тот же вывод, что и у top, но в гораздо лаконичнее.

Следующая утилита в этом пакете это sar. Она наиболее полезна, если вы ее вводите вместе с каким-нибудь числом, например 6. Это определяет временной интервал, через который команда sar будет выводить информацию о загрузке ЦПУ.

К примеру, проверяем загрузку ЦПУ каждые 6 секунд:
Если же вы хотите остановить вывод после нескольких итераций, например 10, добавьте еще одно число:
Так вы также увидите средние значения за 10 выводов.
Как настроить оповещения о слишком высокой нагрузке на процессор
Одним из самых правильных способов является написание простого bash скрипта, который будет отправлять вам алерты о слишком высокой степени утилизации системных ресурсов.
Скрипт будет использовать обработчик sed и среднюю загрузку от команды sar. Как только нагрузка на сервер будет превышать 85%, администратор будет получать письмо на электронную почту. Соответственно, значения в скрипте можно изменить под ваши требования — к примеру поменять тайминги, выводить алерт в консоль, отправлять оповещения в лог и т.д.
Естественно, для выполнения этого скрипта нужно будет запустить его по крону:
Для ежеминутного запуска введите:
Заключение
Соответственно, лучшим способом будет комбинировать эти способы — например использовать htop при отладке и экспериментах, а для постоянного контроля держать запущенным скрипт.
Мини — курс по виртуализации
Знакомство с VMware vSphere 7 и технологией виртуализации в авторском мини — курсе от Михаила Якобсена
Источник


