- Linux connect with smb
- Linux connect with smb
- Connect to your Samba server from Linux
- How to configure Samba to use SMBv2 and disable SMBv1 on Linux or Unix
- Configure Samba to use SMBv2 and disable SMBv1 on Linux or Unix
- Disable SMBv1 on Linux or Unix when using Samba
- Configuration to enable SMBv2
- Understanding min and max protocol levels in smb.conf
- Restart the samba server
- Conclusion
Linux connect with smb
Машины с Linux (UNIX) могут также просматривать и монтировать SMB-ресурсы. Заметьте, что это может быть сделано когда сервером является либо машина с Windows, либо с сервером Samba!
Программа клиента SMB для UNIX-машин включена в дистрибутив Samba. Она обеспечивает ftp-подобный интерфейс командной строки. Вы можете использовать эту утилиту для переноса файлов между ‘сервером’ под управлением Windows и клиентом под Linux.
Большинство дистрибутивов Linux также включают полезный пакет smbfs, который позволяет монтировать и размонтировать SMB-ресурсы. Больше информации о smbfs можно получить дальше.
Для того, чтобы увидеть какие ресурсы доступны на данной машине, выполните команду:
где ‘host’ это имя машины, которую вы хотите видеть. Эта команда вернет список имен ‘сервисов’ — т.е. имен дисков или принтеров к которым может быть получен доступ. До тех пор, пока SMB сервер не будет настроен без управления доступом, он будет запрашивать у вас пароль. Введите в ответ на запрос пароль для пользователя ‘гость (guest)’ или ваш персональный пароль на этой машине.
Вывод этой команды должен выглядеть примерно так:
Browse list показывает другие SMB сервера в сети с доступными ресурсами.
Для использования клиента, выполните следующую команду:
где ‘service’ — имя машины и сервиса. Например, если вы пытаетесь обратиться к директории, которая доступна под именем ‘public’ на машине названной ‘zimmerman’, то имя сервиса должно звучать как \\zimmerman\public. Однако в следствии ограничений оболочки, вам необходимо спрятать обратный слэш, так что в итоге это командная строка выглядеть следующим образом:
где ‘mypasswd’ — символьная строка вашего пароля.
Вы получите приглашение smbclient:
Напечатайте ‘h’ чтобы получить помощь об использовании smbclient:
Если вы умеете использовать ftp, то вам не будут нужны справочные страницы о smbclient.
Хотя вы можете использовать smbclient для тестирования, вы скоро устанете использовать его в работе. Для работы вам скорее всего понадобится пакет smbfs. Smbfs поставляется с двумя простыми утилитами, smbmount и smbumount. Они работают подобно mount и umount для SMB-ресурсов.
Одно важное замечание: Чтобы использовать эти утилиты, у вас должна быть поддержка smbfs вкомпилированная в ядро!
Следующий пример показывает типичное использование smbmount для монтирования SMB-ресурса, названного «customers» с машины с именем «samba1»:
Запуск команды mount покажет вам, что ресурс смонтирован, точно также как и через экспорт NFS:
Пожалуйста прочитайте справочные страницы smbmount и smbumount для дополнительной информации о описанных выше операциях.
Источник
Linux connect with smb
Linux (UNIX) machines can also browse and mount SMB shares. Note that this can be done whether the server is a Windows machine or a Samba server!
An SMB client program for UNIX machines is included with the Samba distribution. It provides an ftp-like interface on the command line. You can use this utility to transfer files between a Windows ‘server’ and a Linux client.
Most Linux distributions also now include the useful smbfs package, which allows one to mount and umount SMB shares. More on smbfs below.
To see which shares are available on a given host, run:
where ‘host’ is the name of the machine that you wish to view. this will return a list of ‘service’ names — that is, names of drives or printers that it can share with you. Unless the SMB server has no security configured, it will ask you for a password. Get it the password for the ‘guest’ account or for your personal account on that machine.
The output of this command should look something like this:
The browse list shows other SMB servers with resources to share on the network.
To use the client, run:
where ‘service’ is a machine and share name. For example, if you are trying to reach a directory that has been shared as ‘public’ on a machine called zimmerman, the service would be called \\zimmerman\public. However, due to shell restrictions, you will need to escape the backslashes, so you end up with something like this:
where ‘mypasswd’ is the literal string of your password.
You will get the smbclient prompt:
Type ‘h’ to get help using smbclient:
If you can use ftp, you shouldn’t need the man pages for smbclient.
Although you can use smbclient for testing, you will soon tire of it for real work. For that you will probably want to use the smbfs package. Smbfs comes with two simple utilties, smbmount and smbumount. They work just like mount and umount for SMB shares.
One important thing to note: You must have smbfs support compiled into your kernel to use these utilities!
The following shows a typical use of smbmount to mount an SMB share called «customers» from a machine called «samba1»:
Issuing a mount command will now show the share mounted, just as if it were an NFS export:
Please see the manual pages for smbmount and smbumount for details on the above operation.
Источник
Connect to your Samba server from Linux
I have written a few articles on Samba here on Ghacks. And most people know how to connect to Samba shares via Windows. Generally speaking (when all is set up correctly) it’s just a matter of opening up Explorer and entering \\ADDRESS_OF_SAMBA_SERVER\SHARENAME to get to your Samba shares. But what about in Linux? How do you go about connecting to Samba shares with the same operating system that is running the Samba server?
One would think that an easy task. It actually is, once you know how it is done. Â And in this article I am going to show you two different ways of making the connection to your Samba server. You will need to have a working knowledge of how the Samba server is set up as well as a username/password configured on the Samba server. There are also a few steps to take on the desktop for one certain method of connection.
The two methods I will describe are: Using GNOME’s Connect To Server dialog and the command line. The latter will be used to show you how to set up auto mounting for Samba.
The graphical method
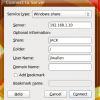 Figure 1
If you take a look at the GNOME Places menu you will see an entry labeled «Connect to server. «. This is what you want to use in order to connect to your Samba server. When you click on that a new window will open. From the Service type drop-down select «Windows share» (see Figure 1).
When you select that entry some of the configuration options will change. As you can see (in Figure 1), I have entered the necessary options to connect to a Samba server on my internal network. You will want to replace the information so it reflects your needs. The only tricky bit of information might be the Folder entry. If you are connecting to the root directory on the share you will not need to enter anything there. Say, for instance, you share is /media/samba/user. If you want to connect to that directory leave the Folder entry blank. Say, however, you want to connect directly to a sub-folder within that share — you can enter that folder here. This, of course, isn’t needed because you can always traverse the sub-directories with simple navigation. You can also choose to add a bookmark instantly, from in this window.
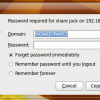 Figure 2
Once you have all of the information entered click Connect and you will be greeted with a new window that requires you to enter a password. Also, if you do not supply a Domain name in the previous window, you will be required to enter it here.
You can also set this up to remember your password either until you logout or until, well, forever. Once you have entered the password/domain click the Connect button and a new Nautilus window will open inside of your Samba Share.
Using the command line
Now we’re going to use the command line to accomplish a similar goal. The biggest difference is that we are going to actually mount the Samba share into another directory, very much the same way we would mount a second hard drive.
There are a few pieces to put together before we actually take care of the mounting. First let’s create a directory that the Samba share will be mounted to. So from the terminal window issue the following command:
sudo mkdir /media/samba
Now let’s make sure our users can read/write to this directory with the command:
sudo chmod -R u+rw /media/samba
Okay now let’s make sure we can see the Samba shares from the command line. We’ll do that with the smbclient command like so:
smbclient -L //SAMBA_SERVER_ADDRESS
Where SAMBA_SERVER_ADDRESS is the actual IP address of the Samba server.
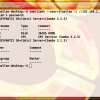 Figure 3
You will be prompted for your username and password. If you get an error it could be that the usernames don’t match on each end. If that’s the case you could add the -U switch to the command like so:
smbclient —user=jlwallen -L  //SAMBA_SERVER_ADDRESS
You should see output similar to that shown in Figure 3.
Now it’s time to try to mount the Samba share to the /media/samba directory. To do this issue the command:
sudo mount -t cifs //SAMBA_SERVER_ADDRESS/SHARE -o username=USERNAME /media/samba/
- SAMBA_SERVER_ADDRESS is the IP address of the Samba server.
- SHARE is the share name.
- USERNAME is the username to connect with.
If that works you can now make this an automated mount by adding the following line to your /etc/fstab file:
//SAMBA_SERVER_ADDRESS/SHARE   /media/samba   cifs  credentials=/etc/samba/user.cred 0 0
Where SAMBA_SERVER_ADDRESS is the IP address of the Samba server and SHARE is the share name.
Notice the user.cred file. This is one last thing we need to create. With your text editor create this file and place into it:
Where USER is the username to log in with and PASSWORD is the password to use for authentication. The final step is the give this new file the proper permissions with the command:
sudo chmod 600 /etc/samba/user.cred
You can ensure this works by issuing the command mount -a which should mount your Samba share.
Final thoughts
You should now have an auto-mounting Samba share — or the ability to easily connect your GNOME desktop to a Samba share. Samba is a very powerful tool that not only can share files with Windows machines, but with Linux machines as well.
Источник
How to configure Samba to use SMBv2 and disable SMBv1 on Linux or Unix
I am a new Linux user and for security reasons and to avoid ransomware, I would like to disable the SMB1 protocol in samba configuration on a CentOS Linux version 7 server. Is it possible to disable SMBv1 on a Linux or UNIX-like operating system?
| Tutorial details | |
|---|---|
| Difficulty level | Easy |
| Root privileges | Yes |
| Requirements | Samba on Linux or Unix-like OS |
| Est. reading time | 3 minutes |
Introduction: WannaCrypt/WannaCry targets the Microsoft Windows operating system. The attack spreads by phishing emails but also uses the EternalBlue exploit and DoublePulsar backdoor developed by the U.S. National Security Agency (NSA). If you are using older and unsupported operating systems such as Windows XP and Windows Server 2003, you will get infected. All of your files will be encrypted. To get back your files, you need to pay ransom payments in the cryptocurrency Bitcoin. Microsoft has released software updates for Windows XP and Windows Server 2003. You must apply those patches ASAP on Windows operating systems. In short Linux/Unix users are not affected by this attack. However, you must disable SMBv1 on Samba server running on Linux or Unix-like system.
Configure Samba to use SMBv2 and disable SMBv1 on Linux or Unix
Let us see how to disable SMBv1 on a Linux or Unix like systems.
Disable SMBv1 on Linux or Unix when using Samba
Samba is an open-source implementation of the SMB or CIFS protocol, which allows PC-compatible machines (especially Windows oese) to share files, printers, and other information with Linux and vice-versa.
- No ads and tracking
- In-depth guides for developers and sysadmins at Opensourceflare✨
- Join my Patreon to support independent content creators and start reading latest guides:
- How to set up Redis sentinel cluster on Ubuntu or Debian Linux
- How To Set Up SSH Keys With YubiKey as two-factor authentication (U2F/FIDO2)
- How to set up Mariadb Galera cluster on Ubuntu or Debian Linux
- A podman tutorial for beginners – part I (run Linux containers without Docker and in daemonless mode)
- How to protect Linux against rogue USB devices using USBGuard
Join Patreon ➔
Configuration to enable SMBv2
Edit smb.conf file, run:
$ sudo vi /etc/samba/smb.conf
Find the [global] section and append the following line:
min protocol = SMB2
Here is my updated file:
Fig.01: How to force SMB2 protocol in samba on Linux or Unix
Understanding min and max protocol levels in smb.conf
- client min protocol – This setting controls the minimum protocol version that the client will attempt to use.
- client max protocol – The value of the parameter (a string) is the highest protocol level that will be supported by the client.
- SMB2: Re-implementation of the SMB protocol. Used by Windows Vista and later versions of Windows. SMB2 has sub protocols available:
- SMB2_02: The earliest SMB2 version.
- SMB2_10: Windows 7 SMB2 version. (By default SMB2 selects the SMB2_10 variant.)
- SMB2_22: Early Windows 8 SMB2 version.
- SMB2_24: Windows 8 beta SMB2 version.
- SMB3: The same as SMB2. Used by Windows 8. SMB3 has sub protocols available. SMB3 has sub protocols available:
- SMB3_00: Windows 8 SMB3 version. (mostly the same as SMB2_24)
- SMB3_02: Windows 8.1 SMB3 version.
- SMB3_10: early Windows 10 technical preview SMB3 version.
- SMB3_11: Windows 10 technical preview SMB3 version (maybe final). By default SMB3 selects the SMB3_11 variant.
Hence setting the following gives best option:
See smb.conf here for more information.
Restart the samba server
Run the following command on CentOS 7/RHEL 7/Fedora Linux:
$ sudo systemctl restart smb.service
Run the following command on Debian 8.x/Ubuntu 16.04 LTS Linux:
$ sudo systemctl restart smbd.service
NOTE: Please note that Samba version 4.11 removes SMB1 protocol version by default. However, on an older Linux and Unix distro you need to disable it manually to avoid security issues.
Conclusion
And there you have it, SMBv1 disabled on a Linux or Unix samba server to avoid security issues. Please read our comment section below for detailed discussion.
🐧 Get the latest tutorials on Linux, Open Source & DevOps via
| Category | List of Unix and Linux commands |
|---|---|
| Documentation | help • mandb • man • pinfo |
| Disk space analyzers | df • duf • ncdu • pydf |
| File Management | cat • cp • less • mkdir • more • tree |
| Firewall | Alpine Awall • CentOS 8 • OpenSUSE • RHEL 8 • Ubuntu 16.04 • Ubuntu 18.04 • Ubuntu 20.04 |
| Linux Desktop Apps | Skype • Spotify • VLC 3 |
| Modern utilities | bat • exa |
| Network Utilities | NetHogs • dig • host • ip • nmap |
| OpenVPN | CentOS 7 • CentOS 8 • Debian 10 • Debian 8/9 • Ubuntu 18.04 • Ubuntu 20.04 |
| Package Manager | apk • apt |
| Processes Management | bg • chroot • cron • disown • fg • glances • gtop • jobs • killall • kill • pidof • pstree • pwdx • time • vtop |
| Searching | ag • grep • whereis • which |
| Shell builtins | compgen • echo • printf |
| Text processing | cut • rev |
| User Information | groups • id • lastcomm • last • lid/libuser-lid • logname • members • users • whoami • who • w |
| WireGuard VPN | Alpine • CentOS 8 • Debian 10 • Firewall • Ubuntu 20.04 |
Comments on this entry are closed.
man smb.conf:
SMB2: Re-implementation of the SMB protocol. Used by Windows Vista and later versions of Windows. SMB2 has sub protocols available.
You will prevent Windows 7 machines from connecting..
Hello
Thanks for this, it seems to create problems with Windows 10 clients:
[2017/05/18] smbd/negprot.c:694(reply_negprot)
No protocol supported !
We use port 139, this may be the problem or the old samba version we have. I have to check further
I had to revert this and can’t find another solution for the moment. (Still searching)
Hello.
I followed this, however, there’s a problem.
I have a samba server. I added the line on the smb.conf file.
After that, I could connect the server from Windows 10 machine, but not from Ubuntu(16.04/17.04) file manager and Android(using Total commander) machines.
It works find without “min protocol = SMB2”.
Any help?
I’ve found the following to work. It raises the bar i little extra, but so far, no complaints have been heard (SMB2_10 should be fine, unless you have Windows XP or older clients).
The client stuff is to make smbclient (if you use that) skip SMB 1 in negotiations. The client max protocol may appear weird, but if it’s not included, then its value will defaul to something lower than 2.1, and then it will conflict with “client min protocol = SMB2_10”.
server min protocol = SMB2_10
client max protocol = SMB3
client min protocol = SMB2_10
After appending “min protocol = SMB2” in global section on my smb.conf server, I no longer connect from my linux laptop. Error displayed: “Error: Connection timed out. Please select another viewer and try again.” in my caja file manager.
Am using Linux Mint 18.1 Mate as client, with Ubuntu 14.04.5 as server using samba 4.3.11.
Same error for setting “min protocol = SMB3”.
1) Kaspersky and Symantec have indicated that WannaCry can spread via SMBv2 as well:
2) SMBv2 has consequences — there aren’t POSIX/Unix Extensions for it, so it may not be suitable depending on what clients use your Samba server.
Depending on your needs, this is easy and did the trick for my network:
protocol = SMB3
Ugh, nevermind, that just sets the max protocol.
You saved my life!
Thanks so much…
How to do it for nethserver 6.9?
Server:
min protocol = SMB2
Client:
smbclient -U=username -N –command=”dir Directory/*” //192.168.0.1/Directory
Error:
protocol negotiation failed: NT_STATUS_INVALID_NETWORK_RESPONSE
Worked for me with Windows 10 and linux client
Sorry for dual posting, but i will not change the server settings. Can i use smbclient with SMB2?
thank you!
anouke@isurfer.de
For all those who had problems with SMB2 in Vista clients and above: the kernel version included in your system may contains an older cifs.ko kernel module that only supports SMB1 protocol. SMB2 (and later) protocols require a later cifs.ko and thus a later kernel. Try update kernel to support for SMB2 protocol in the cifs.ko kernel module and so can act as a SMB2 client.
cifs.ko kernel module and so can act as a SMB2 server.
Sorry, my text was confusing and incomplete. Please remove it so I can include a better text.
On RHEL6/RHEL7 system,
default: max protocol = NT1 (SMB1)
So “min protocol = SMB2” can be over max protocol? or which one is higher priority?
I tested on RHEL6 system (samba server 3.6). One of the windows client was unable to connect to samba server on linux. SMB1 was disabled on windows server because of security concerns like wannacry. And “max protocol” was not set explicitly on samba server. So “max protocol” was NT1(SMB1) as default.
I set “min protocol = SMB2” on samba server but client couldn’t negotiate with server on protocol (smbd[…]: No protocol supported !)
Finally we solved the problem by setting “max protocol = SMB2”
Note: SMB3 protocol is supported by samba server over 4.x
This seems to work and prevent the security scanner from barking on SMBv1 support
###
server min protocol = SMB2_10
client min protocol = SMB2
client max protocol = SMB3
Hello
I m trying to print from linux to windows Printer ( in Win10 version 1709) with samba protocol without using smbv1 activated ..
My Windows is used in administrator user
Can you help me ?
I’m tryning several things with client /server protocol but dont work ;-(
Thanks best regards….
Stefan’s reply is what fixed months of a headache for me
to /etc/samba/smb.conf
service smb restart; service winbind restart
(RHEL 6 server)
Fixed it’s connection to a hardened 2012 Server as well as a hardened Windows 10 Computer. I’m testing a RHEL6 client now!
When using IPA server the smb.conf contains config backend = registry so any changes to smb.conf will be ignored. You can view the current settings with net conf list and remove SMBv1 with net conf setparm global “server min protocol” SMB2
I had just performed a Samba server fresh install on Ubuntu 12.04 LTS. Samba version is 3.6.25, according to $smbstatus.
By default, any host connected is detecting SMB v1. The only way I found to be able to run SMB v2 on the server is adding the following line to the config file:
protocol = SMB2
Finally, it can be checked by running $testparm that this is the same than writing
max protocol = SMB2
Thanks to all for your help.
Thanks so much for this article. While things have moved on since 2017 the problems around Linux SMB still exist in 2021, and this gave me the clues I needed to fix and secure my installation.
Short version:
Servers – Ubuntu 20.04.2 LTS 5.8.0-53-generic #60
20.04.1-Ubuntu SMP
Clients a mixture of:
– Ubuntu 20.04.2 LTS 5.8.0-53-generic #60
20.04.1-Ubuntu SMP
– Ubuntu 20.04.2 LTS 5.4.0-72-generic #80-Ubuntu SMP
– Ubuntu Mate 20.04.2 LTS 5.4.0-73-generic #82-Ubuntu SMP
– Windows 10 Pro 20H2
Originally none of the devices could see remote shares on any other machine, with the Linux machines giving the error message “Ubuntu 20.04 failed to retrieve share list from server: Invalid argument”.
I added the following lines to /etc/samba/smb.conf in all Linux machines (servers and clients), and it all worked perfectly – all servers can now see shares on all clients, and vice-versa.
[global]
workgroup = MYHOUSE
client min protocol = SMB3
server min protocol = SMB3
The underlying issue seems to be the Linux SAMBA negotiation around the version of SMB to use, which fails to agree a protocol. If you restrict the Linux boxes to any of SMB1, 2, or 3 they all work fine with each other and with Windows 10. In more detail, it seems to be that excluding SMB1 (using your min – SMB2, max – SMB3 config) also solves the problem, but I opted to force SMB3 so I’m not relying on any part of the protocol negotiation, in case it breaks in the future!
Источник


