- Как скопировать файл в Linux через терминал
- Команда для копирования «cp»
- Синтаксис и опции команды «cp»
- Linux Copy File Command [ cp Command Examples ]
- cp Command Syntax
- Linux Copy File Examples
- Copy a file to another directory
- Verbose option
- Preserve file attributes
- Copying all files
- Recursive copy
- Linux copy file command with interactive option
- Verbose output with cp command
- Conclusion
- How to Copy and Paste Text, Files and Folders in Linux Terminal
- Copy and Paste Text
- Copy and Paste a Single File
- Copy and Paste a Folder and Its Contents
- Copy and Paste Multiple Files
- Copy and Paste All Files of the Same Type
- Move a File or Folder
- How can I Copy Files in a Folder into Another Folder on Linux Terminal
- File copying in terminal
- Cp Command
- mv command
- Rsync Command
- Final thoughts
- About the author
- Sidratul Muntaha
Как скопировать файл в Linux через терминал
При работе с Linux через терминал не редко приходится создавать копии файлов или копировать файлы из одной папки в другую. Например, это могут быть файлы конфигураций, которые используются для настройки программ, или просто документы пользователя. В данной инструкции мы расскажем, как скопировать файл в Linux через терминал и какие команды для этого потребуются. Статья будет актуальной для любого дистрибутива Linux, например, Ubuntu Linux или Debian
Команда для копирования «cp»
Для копирования файлов в Linux через терминал используется команда « cp » (от англ. «copy»). Команда « cp » представляет собой утилиту командной строки для копирования файлов и каталогов. Она поддерживает перемещение одного или нескольких файлов или папок с параметрами для создания резервных копий и сохранения атрибутов.
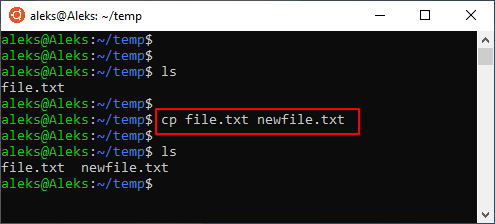
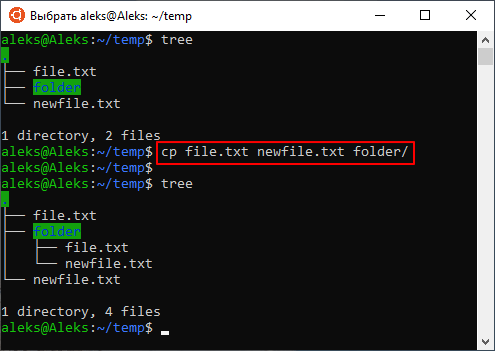
В общем случае, для того чтобы скопировать файл в Linux через терминал достаточно ввести команду « cp » и передать ей имя исходного и нового файла. Например, для того чтобы скопировать « file.txt » в новый « newfile.txt » нужно выполнить следующую команду:
Обратите внимание , по умолчанию команда « cp » всегда будет перезаписывать уже имеющиеся файлы копируемыми, но это поведение можно изменить с помощью опций, которые мы рассмотрим во второй части статьи.
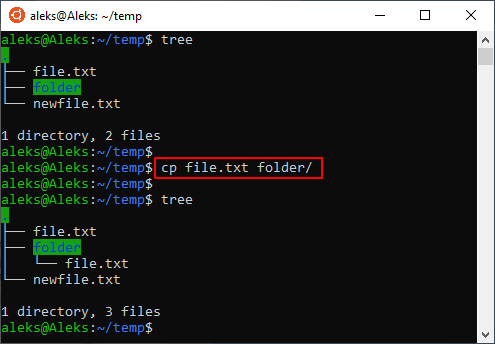
Таким же образом выполняется копирование файла в другую папку. Вводим команду « cp », указываем путь к файлу и затем каталог, в который его нужно скопировать. Например, для того чтобы скопировать « file.txt » в каталог « folder » нужно выполнить вот такую команду:
Естественно, если это необходимо, вы можете вводить полные пути к файлам и папкам, которые копируете командой « cp ». Например, копирование может выглядеть так:
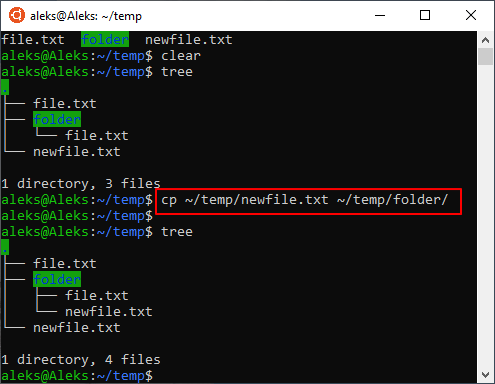
Еще один пример копирования с указанием полного пути:
При необходимости можно скопировать сразу несколько файлов. В этом случае сначала нужно перечислить файлы, а потом указать папку, в которую их нужно скопировать. Например, для того чтобы скопировать « file.txt » и « newfile.txt » в каталог « folder » нужно выполнить следующее:
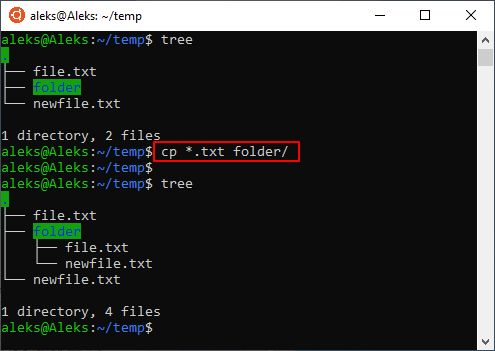
Аналогичное действие можно выполнить и с помощью маски. Например, для того чтобы скопировать все txt -документы в определенную директорию можно выполнить вот такую команду:
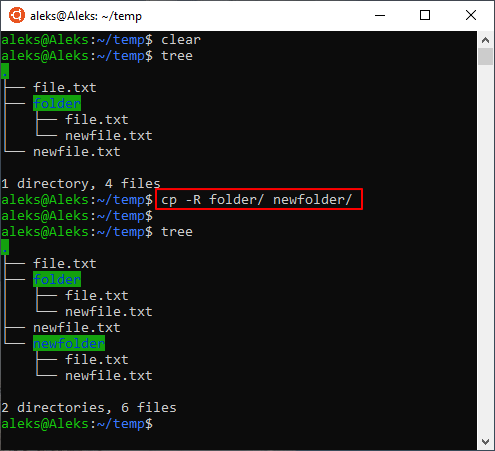
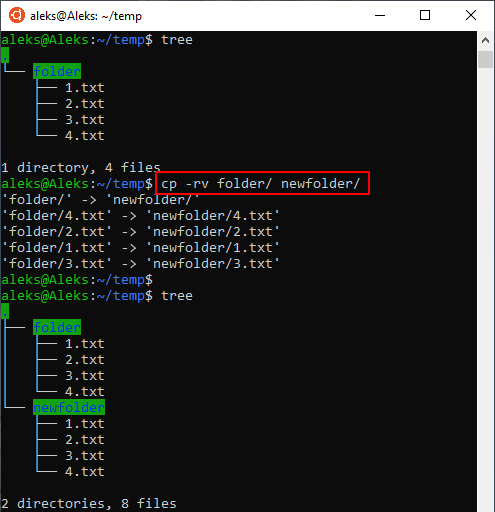
При копировании каталогов нужно добавлять параметр « -R », так как без этого « cp » будет выдавать ошибку. Поэтому, для копирования каталогов нужно ввести команду « cp -R » и указать исходный и новый каталог. Например, для того чтобы скопировать каталог « folder » в « newfolder » вам нужно выполнить вот такую команду:
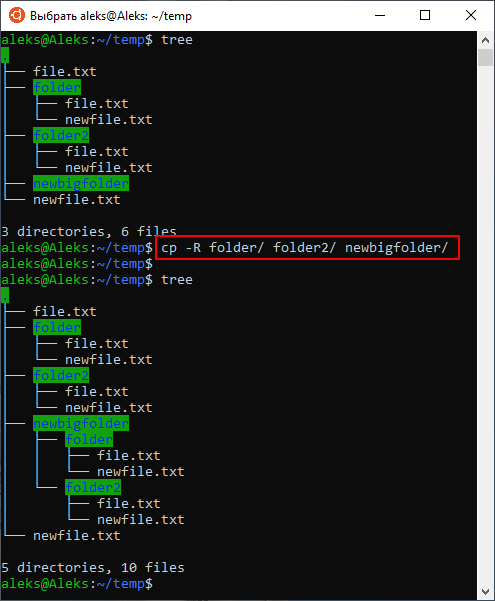
Как и в случае с файлами, папки можно копировать сразу по несколько штук. Для этого нужно ввести «cp», перечислить копируемые папки и указать каталог назначения. Например, для того чтобы скопировать папки « folder » и « folder2 » в « newbigfolder » нужно выполнить следующее:
Синтаксис и опции команды «cp»
Команда « cp » имеет множество опций, с помощью которых можно контролировать буквально все аспекты копирования файлов. Синтаксис команды выглядит следующим образом:
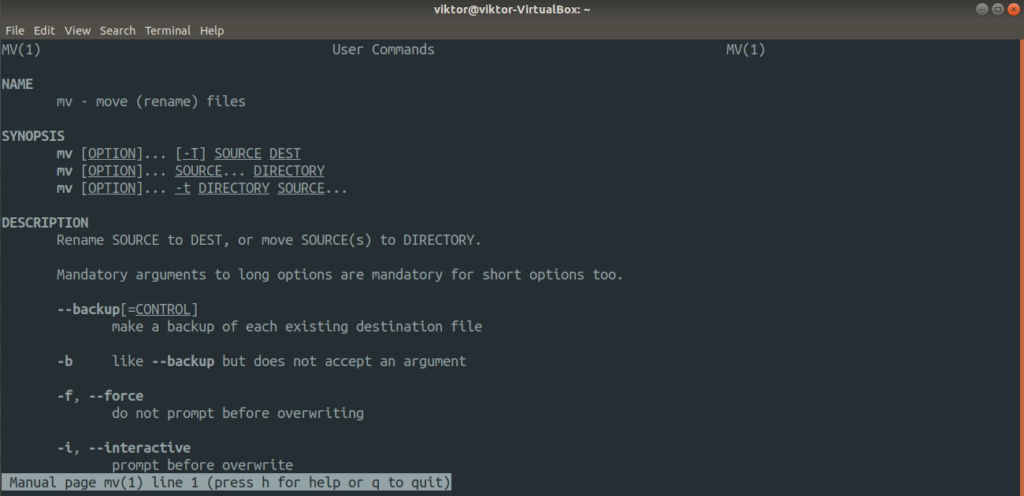
Самых опций у команды « cp » очень много, поэтому мы рассмотрим только самые простые и часто используемые. С остальными опциями вы сможете ознакомиться отдельно, выполнив в терминале Linux команду « man cp ».
Как уже было сказано, для выполнения команды копирования в терминале Linux сначала нужно ввести « cp », потом используемые опции, потом источник, и в конце место назначения. При этом опции из одной буквы можно соединять, например, вместо « -r -v » можно написать просто « -rv ».
Ниже мы рассмотрим несколько примеров копирования с опциями.
- cp -r folder/ newfolder/
Рекурсивное копирование каталогов. - cp -rv folder/ newfolder/
Рекурсивное копирование с выводом подробной информации. - cp -ri folder/ newfolder/
Рекурсивное копирование в интерактивном режиме с запросом на перезапись. - cp -rn folder/ newfolder/
Рекурсивное копирование без перезаписи. - cp -ru folder/ newfolder/
Рекурсивное копирование только новых файлов.
Источник
Linux Copy File Command [ cp Command Examples ]
cp Command Syntax
| Tutorial details | |
|---|---|
| Difficulty level | Easy |
| Root privileges | No |
| Requirements | Terminal app/Shell prompt |
| Est. reading time | 3 mintues |
The syntax is as follows to copy files and directories using the cp command:
cp SOURCE DEST
cp SOURCE DIRECTORY
cp SOURCE1 SOURCE2 SOURCE3 SOURCEn DIRECTORY
cp [OPTION] SOURCE DEST
cp [OPTION] SOURCE DIRECTORY
Where,
- In the first and second syntax you copy SOURCE file to DEST file or DIRECTORY.
- In the third syntax you copy multiple SOURCE(s) (files) to DIRECTORY.
Note: You need to type the cp command at the dollar sign ($) prompt. This prompt means that the shell is ready to accept your typed commands. Do not type the dollar ($) sign. You need to open the Terminal app to use cp command on a Linux.
Linux Copy File Examples
To make a copy of a file called file.doc in the current directory as newfile.doc, enter:
$ cp file.doc newfile.doc
$ ls -l *.doc
Sample outputs:
You can copy multiple files simultaneously into another directory. In this example, copy the files named main.c, demo.h and lib.c into a directory named backup:
$ cp main.c demo.h libc. backup
If backup is located in /home/project, enter:
$ cp main.c demo.h libc. /home/project backup
Copy a file to another directory
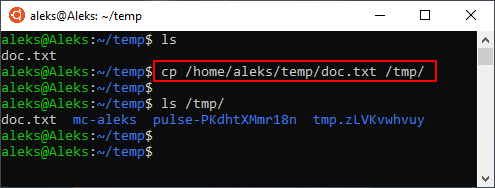
To copy a file from your current directory into another directory called /tmp/, enter:
$ cp filename /tmp
$ ls /tmp/filename
$ cd /tmp
$ ls
$ rm filename
Verbose option
To see files as they are copied pass the -v option as follows to the cp command:
Preserve file attributes
To copy a file to a new file and preserve the modification date, time, and access control list associated with the source file, enter:
$ cp -p file.txt /dir1/dir2/
$ cp -p filename /path/to/new/location/myfile
This option ( -p ) forces cp to preserve the following attributes of each source file in the copy as allowed by permissions:
- Modification time/date
- Access time
- File flags
- File mode
- User ID (UID)
- Group ID (GID)
- Access Control Lists (ACLs)
- Extended Attributes (EAs)
Copying all files
The star wildcard represents anything i.e. all files. To copy all the files in a directory to a new directory, enter:
$ cp * /home/tom/backup
The star wildcard represents anything whose name ends with the .doc extension. So, to copy all the document files (*.doc) in a directory to a new directory, enter:
$ cp *.doc /home/tom/backup
Recursive copy
To copy a directory, including all its files and subdirectories, to another directory, enter (copy directories recursively):
$ cp -R * /home/tom/backup
Linux copy file command with interactive option
You can get prompt before overwriting file. For example, if it is desired to make a copy of a file called foo and call it bar and if a file named bar already exists, the following would prompt the user prior to replacing any files with identical names:
cp -i foo bar
- No ads and tracking
- In-depth guides for developers and sysadmins at Opensourceflare✨
- Join my Patreon to support independent content creators and start reading latest guides:
- How to set up Redis sentinel cluster on Ubuntu or Debian Linux
- How To Set Up SSH Keys With YubiKey as two-factor authentication (U2F/FIDO2)
- How to set up Mariadb Galera cluster on Ubuntu or Debian Linux
- A podman tutorial for beginners – part I (run Linux containers without Docker and in daemonless mode)
- How to protect Linux against rogue USB devices using USBGuard
Join Patreon ➔
Verbose output with cp command
If you pass the -v to the cp, it makes tells about what is going on. That is verbose output:
cp -v file1 file2
cp -avr dir2 /backups/
Conclusion
This page explained cp command that is used for copying files under Linux and Unix-like systems. For more info see man pages: ls(1).
🐧 Get the latest tutorials on Linux, Open Source & DevOps via
Источник
How to Copy and Paste Text, Files and Folders in Linux Terminal

Copying and pasting is one of the most used actions on a computer. While it is easy to do so with the Ctrl + C and Ctrl + V keyboard shortcuts, on the Linux terminal it is not so straightforward. You have several options to get the job done. Here is how you can copy and paste text, files and directories in Linux terminal.
Also read:  How to Easily Rename Files in Linux
Copy and Paste Text
If you just want to copy a piece of text in the terminal, all you need to do is highlight it with your mouse, then press Ctrl + Shift + C to copy.
To paste it where the cursor is, use the keyboard shortcut Ctrl + Shift + V .
The Paste shortcut also applies when you copy a section of text from a Word document (or any other application) and want to paste it in the terminal. For example, you can copy a command from a web page in your browser and use the Ctrl + Shift + V shortcut to paste it in the terminal.
Copy and Paste a Single File
Any time you want to copy a file or folder in the Linux command line, the above keyboard shortcut won’t work. You have to use the cp command. cp is shorthand for copy. The syntax is simple, too. Use cp followed by the file you want to copy and the destination where you want it moved.

That, of course, assumes that your file is in the same directory you’re working out of. You can specify both.
You also have the option of renaming your file while copying it. Specify the new name in the destination.
Copy and Paste a Folder and Its Contents
In order to copy a folder and its contents, you’re going to need to tell the cp command to copy recursively. That’s simple enough with the -r flag.

All the rest of your syntax is exactly the same. The -r flag serves to tell cp that it’s working with a directory and should copy its contents.
If you want the paste action to overwrite existing files, you can add the -f flag:
Also read:  How to Compress Files with zstd Utility in Linux
Copy and Paste Multiple Files
You can also copy multiple files. The Linux command line lets you target multiple items at once with brackets <> . You can use them to list the names of each file to be copied separated by commas.

All three files of differing file types will be copied to the Documents directory.
Copy and Paste All Files of the Same Type
If you have a ton of files of the same type to copy, you can use the wildcard character * . The asterisk/wildcard tells the Linux command line to accept absolutely anything in that place. So, if you tell Linux to copy *.jpg , it’ll copy all JPG files, regardless of the name or whatever comes before the .jpg part.

If you want to use multiple file types, say JPG and PNG, you can use the brackets from before.
Move a File or Folder
If you came here looking to move a file from one place to another without making a duplicate, you can do that easily too, but moving a file requires the mv command. The syntax is very similar to cp.
Similarly, you can also rename it.
There is one major difference, though. You don’t need the -r flag to move a whole folder.
That’s all there is to it. You’re ready to start copying and moving your files from the command line. You can see that the command line way can be very efficient in some situations.
Want more pointers on the Linux command line? Here’s how to check sudo history or find out what the chmod 777 command does to your file permission.
Image credit: Copy – Paste by DepositPhotos
Источник
How can I Copy Files in a Folder into Another Folder on Linux Terminal
File copying in terminal
Copying the content of one directory into another is a very simple task. However, you have plenty of options of doing it. Linux is blessed with numerous tools to manipulate files and directories through various actions.
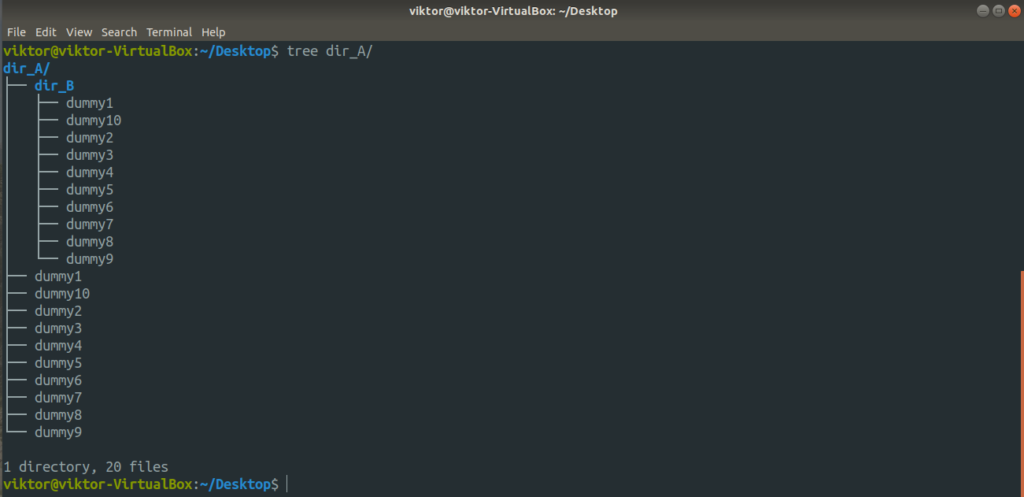
All the steps are demonstrated on Ubuntu 18.04.1. At first, let’s create a handful of dummy files to work with.

Now, let’s create the dummy files using touch.

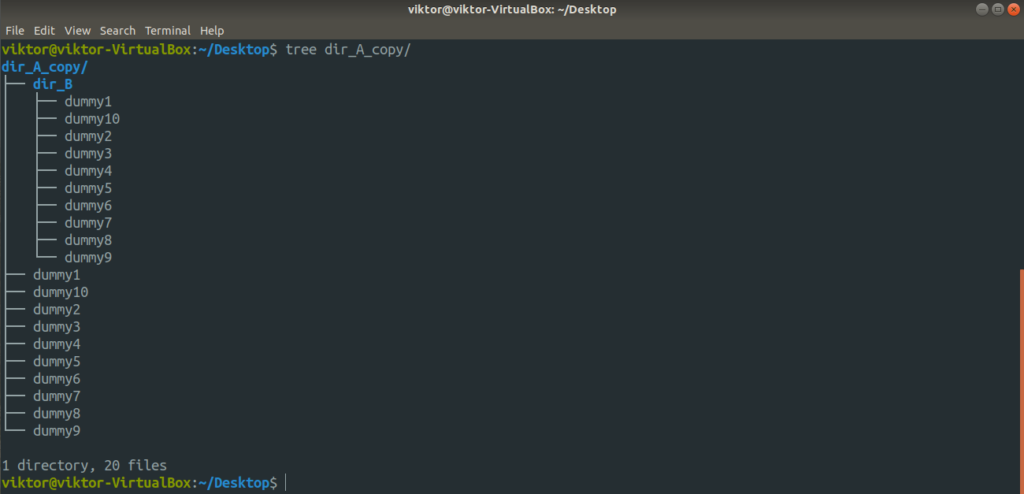
Let’s create another folder within dir_A with a handful of dummy files.

Now, the entire structure of the directory dir_A looks like this.
Cp Command
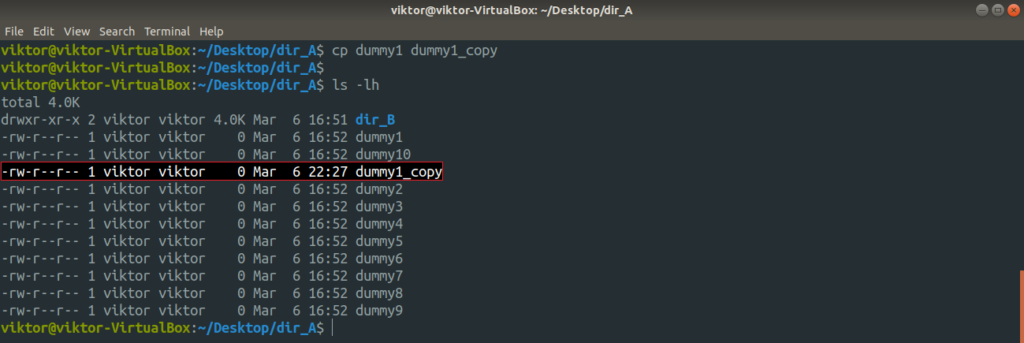
The cp command is, by far, the most common tool for copying files. It’s a tool that comes by default with any Linux system. Copying files and directories are the sole purpose of cp. It supports a wide range of features.
This is the basic structure of the cp command.
For example, let’s make a copy of the dummy1 file with the name dummy1_copy.
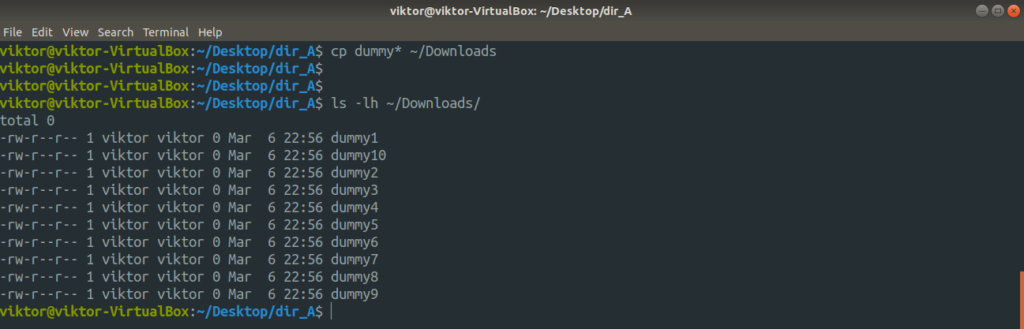
Now, let’s try copying multiple files at once. For such an operation, cp requires the destination be a directory. Here, I’ll be using wildcard expression to grab all the dummy files and put them into the
How about copying a directory?
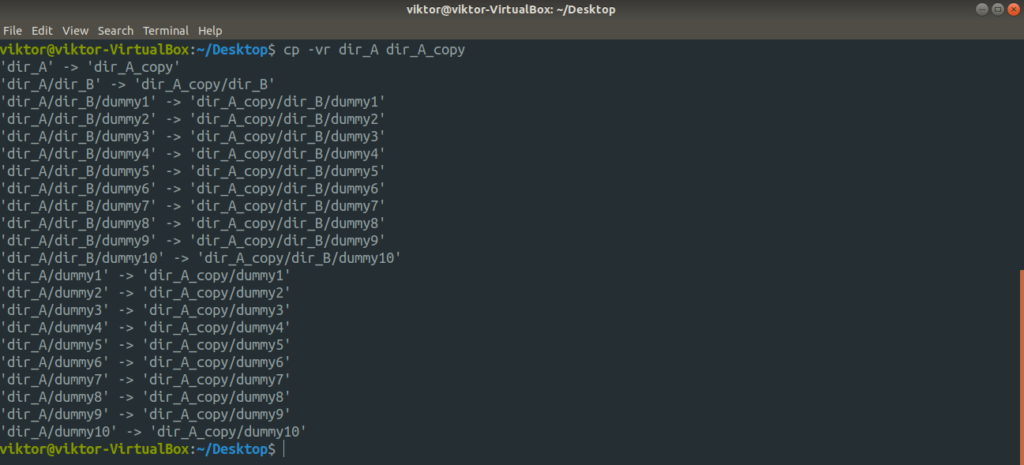
Here, we used two different flags. Let’s have a quick breakdown of them.
- -r: Stands for a recursive copy (including any hidden file(s)). Must-have flag if copying involves an entire directory or more.
- -v: Stands for verbose. The cp tool will output every single action it’s performing.
Want to follow the symbolic links? Add the “-L” flag.
Let’s say the destination directory already has a file with the same name. If you want to avoid overwriting, use the “-n” flag. It’ll ensure that in case of conflict, cp won’t overwrite the file.
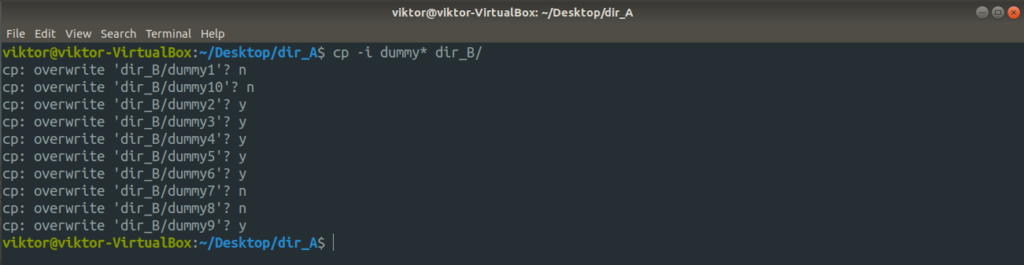
If you’re performing a sensitive copy/paste action, it’s better to have the finest control over what happens, right? In such a case, use the “-i” flag. It stands for an interactive mode where cp will ask for confirmation every time a conflict arises.
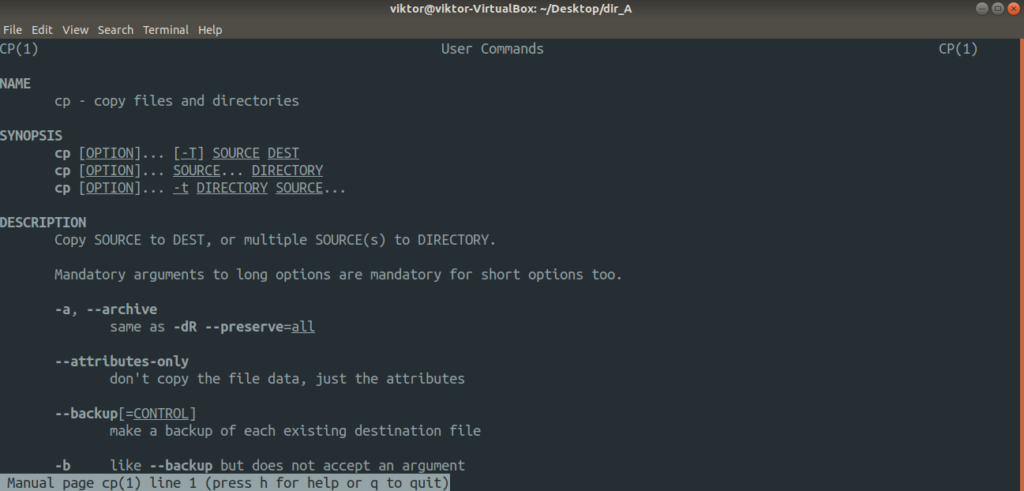
If you’re more interested, the man page is always one of the best documentation. Learn more about cp.
mv command
The mv tool is similar to the cp tool. However, instead of copying, mv moves files and directories. Compared to cp, it’s a simpler one.
The command structure of mv is similar to cp.
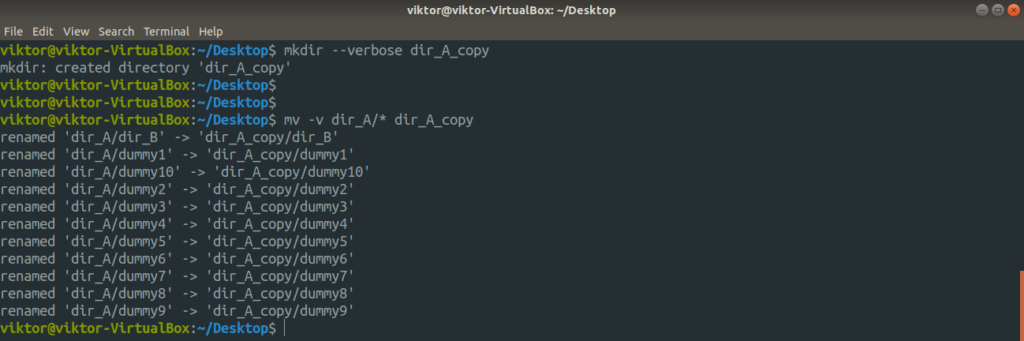
To move the contents of dir_A to dir_A_copy, run the following command.

Here, the “-v” flag is for verbose mode. If you want to move just the contents of dir_A, use the following one instead. In this case, the target directory must exist beforehand.
The mv tool doesn’t have much to work with. For all the available options, check out the man page.
Rsync Command
This is one of the most popular and powerful tools for file copying, used mostly for backup. It holds the ability to copy files over a remote connection. Unlike cp and mv, it also comes with a ton of advanced file copying options that offer the utmost customization of its behavior.
Rsync is mostly famous for its delta-transfer algorithm that dramatically reduces the amount of data that needs to be exchanged. In the case of remote syncing, this saves up a lot of bandwidth.
Rsync doesn’t generally come pre-installed in any Linux distro. However, because of its popularity, it’s now available on all the major Linux distros. Use Pkgs.org to find out the rsync package for your distro. Assuming that you got rsync installed, let’s get started.
First, the basic command structure of rsync. It’s quite similar to cp.
Before getting started, here are a handful of popular rsync arguments.
- -v: Verbose mode, outputs whatever action being performed on the console screen.
- -vv: Verbose mode with more details
- -r: Recursive mode, must be present if copying directories
- -z: Compress data
- -a: Archive data
- -n: Dry run, should be run in combination with verbose mode. Simply outputs the actions if the command was to run for real
- –delete: Delete the file(s) and directory(s) on the destination directory if the source directory doesn’t contain them any longer
- -no-whole-file: Forces rsync to use its delta transmission algorithm, no matter what. Useful in scenarios where you must ensure the least amount of data write.
- –remove-source-file: Delete source file(s) after copying.
Let’s check them out in action. First, the directory copy. Run the following command.
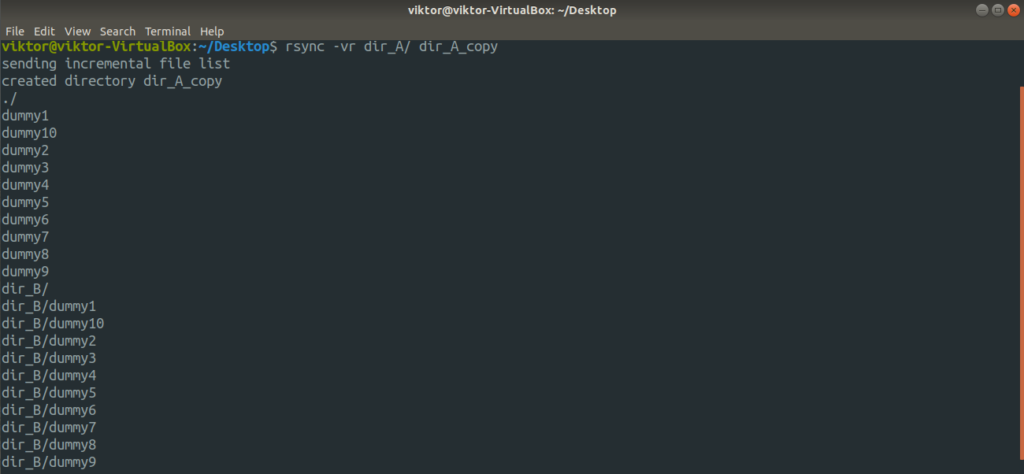
For further detailed output, let’s use the “-vv” flag.
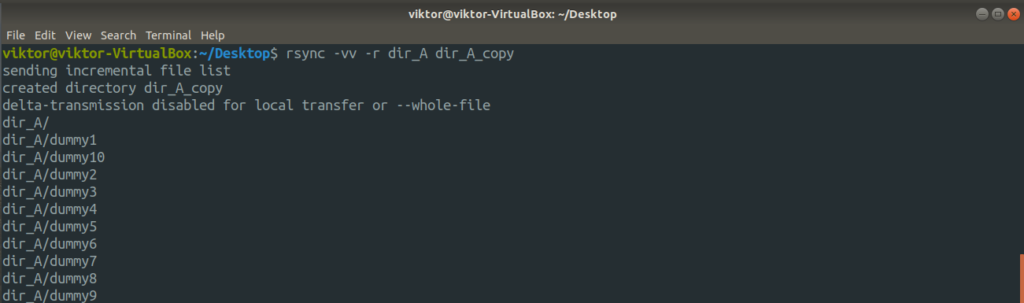
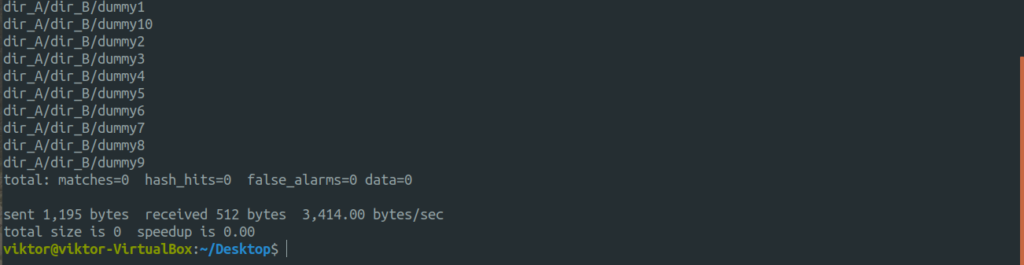
Now, let’s check out the cool part of rsync. We discussed how rsync intelligently copies only the files that are modified, saving bandwidth and disk write. It’s time to check it out in action. In this example, the action will be performed within the dir_A directory.

Despite delta-transmission enabled, rsync may not apply it when you’re performing local data transfer.
Now, let’s check out the dry run feature. Before running any rsync command for real, it’s always important that you test it out beforehand. This is where the dry run comes in. Rsync will output what will happen if the command was to actually run.


Rsync can also work with remote directories, no problem. All it needs is a proper SSH connection with SSH keys configured.
Want to perform a move operation? To put that in rsync’s perspective, rsync will copy the contents of the source directory and then, delete the source content.

Check out the result of the operation.

Final thoughts
The cp and rsync are the most common tools you can use for copying files in a folder on the Linux terminal. Both of them are also really good for scripting. Just make sure to test the functions out before implementation.
About the author

Sidratul Muntaha
Student of CSE. I love Linux and playing with tech and gadgets. I use both Ubuntu and Linux Mint.
Источник


