- How to Format a Drive as exFAT on Linux
- Method 1: Install Support for exFAT Volumes
- Method 2: Formatting a Drive to exFAT
- Создать и отформатировать exFAT-раздел из Linux
- Make an exFAT Bootable USB Flash Drive
- How to make an exFAT Bootable USB Flash Drive
- Make a Grub2 exFAT bootable USB Flash Drive from Windows
- I. Creating exFAT and fat32 Partitions on the USB drive
- II. Installing Grub2 for UEFI and BIOS on the USB drive
- Make a Grub2 exFAT bootable USB Flash Drive from Linux
- I. Partitioning the USB flash drive into two partitions
- II. Installing Grub2 on the USB for UEFI and BIOS Boot
- Booting ISO files from an exFAT partition
- How to Format a USB Disk as exFAT on Linux [Graphically and Command Line]
- Method 1: Format disk as exFAT using GNOME Disks tool
- Method 2: Format disk as exFAT in Linux command line (for advanced users)
- Did you succeed to create exFAT disk?
How to Format a Drive as exFAT on Linux
If you’re transferring files between computers running Windows and Linux, then you can either format drives with the exFAT or NTFS file systems to make things smooth. Since Windows, OS X, Linux and now several mobile devices like the Sony Xperia Z can read exFAT, you may prefer to use it exclusively. Even though it’s a proprietary file system, it’s optimized for flash media and external drives, which is making it popular with Linux users.
While Linux offers built-in support for NTFS volumes through the ntfs-3 driver, you more than likely don’t have support for exFAT as a file system. To remedy this, open up a terminal by pushing Ctrl+Alt+T. You might also want to search for the word terminal from the Ubuntu Dash. Those with the LXDE, Xfce4, KDE or GNOME desktop environments might want to click on the Applications menu, point to System Tools and then click or tap on Terminal to start.
Method 1: Install Support for exFAT Volumes
Once you’re there, you’ll want to type sudo apt-get install exfat-fuse exfat-utils and push enter. You’ll probably be prompted for your password. You’ll be then asked to install it, so type the letter y. If you were given a warning about it being already installed, then you have the packages and don’t need to do anything else.
Assuming the installation proceeded, you’ll be back at the prompt. You can now plug an exFAT drive into your system and expect it to mount like it was any other volume. You can work with it easily as a result and won’t need to do anything else if your only goal was to read a drive created on Windows 10 or something similar.
Method 2: Formatting a Drive to exFAT
If you don’t know the name of the drive that you need to format, then type sudo fdisk -l at the command line and push enter. You’ll see a full list of devices that are attached to your system. Pay very close attention to make sure that you don’t format the wrong drive. If you have a /dev/sda1 and so on device in your list, then this is very often what you boot GNU/Linux off of. You don’t want to format this.
We plugged a pretty good sized USB drive into our system and found it showing up as /dev/sdb, which you could easily format. Needless to say, proceeding is going to wipe the data structures off your drive so please make sure to have backups before you loose anything you want. Assuming you wanted to destroy everything on it and start fresh with a new exFAT file system, type sudo wipefs -a /dev/sdb so you can start fresh. Next, you’ll want to type sudo fdisk /dev/sdb and push enter so you can make a new partition table. Please make sure you’re working with the right device file to avoid mucking anything up.
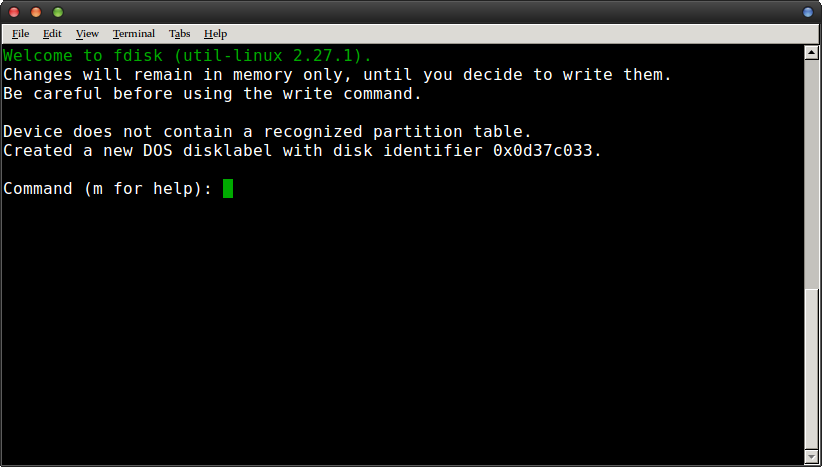
You’ll get a message about creating a new DOS table or something of the sort, which is simply safe to ignore.
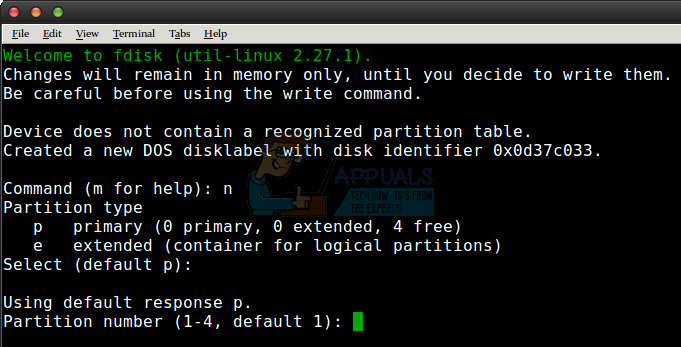
Now type the letter n and push enter.
Type enter again, then again to create a single partition.
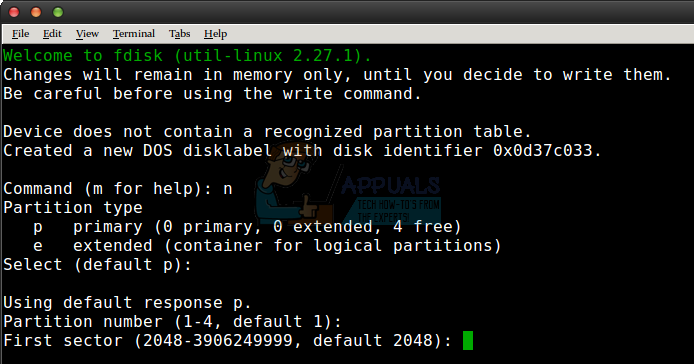
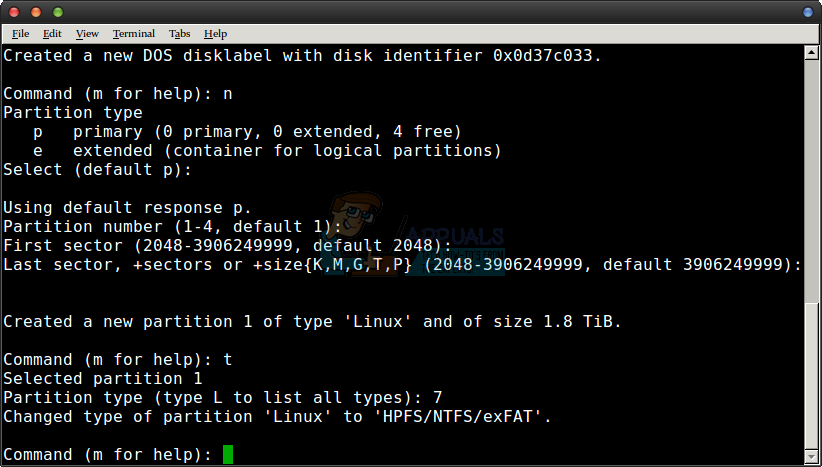
Type enter once more when asked about the first and last sectors. This will create one giant partition that takes over your whole disk, which is exactly what you want if you’re going to be plugging this into a macOS computer, a Windows 10 PC or any compatible mobile device. You might notice a problem though – the partition type is currently showing up as Linux, which you’re going to have a tough time reading on any of these kinds of machines!

Push the letter t and then push the enter key so you can change the type. You can then push 7 to the expected type. It should give you a message about HPFS/NTFS/exFAT, which is exactly what you want if you’re looking to format your external disk with exFAT on Linux.
Finally, you simply have to push the w key and you’ll be warned that “The partition table has been altered” before fdisk syncs all the data out to disk. Depending on how massive your drive is, this might take a few seconds. We were working with a disk that was 2 metric terabytes, which comes to 1.8 terabytes in binary. It still took the software less than maybe 10 seconds to shoot the relevant information out.
Источник
Создать и отформатировать exFAT-раздел из Linux
Можно ли создать и отформатировать exFAT-раздел из Linux?
Да, есть проект, реализующий exfat и связанные утилиты в relan / exfat .
Для форматирования раздела используйте mkexfatfs / mkfs.exfat like в большинстве файловых систем, например:
Что касается создания раздела в первую очередь, это то же самое, что и для любой другой файловой системы. Создайте раздел в вашем любимом менеджере разделов. Если у вас есть тип раздела MBR, установите его тип NTFS (то есть код 7 ).
Обратите внимание, что некоторые дистрибутивы упаковывают только модуль fuse, поэтому вам, возможно, придется собрать его самостоятельно.
Приведенное выше решение mkfs.exfat работает, если на диске уже есть раздел, например, купленный USB-накопитель. Используйте эту ссылку, если вы начинаете с чистого диска:
В командной строке процесс выглядит следующим образом:
Используйте команду lsblk, чтобы узнать, какой диск у вас есть. (например / dev / sdx)
Затем запустите parted и скажите, на каком диске вы хотите выполнить операции:
В режиме интерактивного разделения:
Теперь перезагрузитесь. И после перезагрузки сделать:
И в расстались интерактивном режиме типа:
Когда раздел создан, нажмите q, чтобы выйти из parted.
Теперь, когда флэш-накопитель содержит раздел, создайте файловую систему exFAT во вновь созданном разделе (заменив файловую систему ext4, которая работает только в Linux):
Лично я пропустил шаг «перезагрузки». Вместо этого я вытащил флешку (sdb ушёл) и после повторной установки выскочил как sdd. Если это не было очевидно, в sdx1 символом «x» может быть любая буква алфавита (обычно это a, b, c, d . ), но это зависит от вашей конкретной настройки.
Источник
Make an exFAT Bootable USB Flash Drive
Last updated: August 30, 2021
How to Make an exFAT bootable USB flash drive. First we will format the USB with multiple partitions. Next we install Grub2. And finally we boot from the flash drive to confirm it is bootable. This method works for both Legacy BIOS and EFI booting. UEFI boot requires the creation of a Fat/Fat32 partition, which is also covered in this segment.
Important Notes : The methods outlined below partition the USB drive with one exFAT partition for storing the ISO files and another Fat32 BOOT partition to be used for Grub booting. Windows will only automatically assign a drive letter to the first partition. Which in turn, makes the fat32 boot partition natively hidden from Windows.
Caveats : Legacy BIOS booting does not work on a select few finicky CSM booted systems. Secure Boot is also not supported via this method.
The Diskpart version packaged with Windows 7 and lower is not able to create multiple partitions on removable USB media. The process will fail to make the second partition. However Windows 11, 10, 8 should work fine.
On Linux systems, in order to exFAT format the first partition, the exFAT filesystem driver and utilities must be installed.
How to make an exFAT Bootable USB Flash Drive
Covered below are both the Windows and Linux methods to make a USB boot from exFAT. Simply toggle to switch to the exFAT Bootable USB method you prefer to use.
- Make an exFAT bootable USB using Windows
- Make an exFAT bootable USB using Linux
Make a Grub2 exFAT bootable USB Flash Drive from Windows
I. Creating exFAT and fat32 Partitions on the USB drive
1. To get started, Open a Command Prompt as admin.
1.) From the Windows ‘⌕ Type here to search’ box, type cmd.exe
2.) Then click Run as administrator.
2. Type the following and press enter to launch Disk Management Tool.
Note which Disk and drive letter belong to your USB.
3. Back at the command prompt, type diskpart
4. To select the disk, type the following replacing # with your USB disk number.
5. Then to wipe the disk, ( WARNING : all existing content will be deleted) type the following one line at a time;
6. Next to list the disk info so we can set size in the next step, type;
And then note the size of your select * Disk in MB.
7. Now to prepare the first exFAT partition, type the following;
8. Next to create and format the second partition as fat32, type;
9. Then, to verify the created partitions and volumes, type;
IMPORTANT : note which drive letter was assigned to your fat32 BOOT partition. You’ll need it when installing Grub2.
10. To leave diskpart, type;
II. Installing Grub2 for UEFI and BIOS on the USB drive
1. Download Grub2 from A1ive’s repository, and extract (using 7Zip) its contents to your Windows desktop.
Note: you’ll first need to extract the .tar file from the .gz, and then extract the contents of the .tar file. Once finished, you should have a grub folder containing the contents on your desktop.
2. Next to change to the grub directory, type or copy/paste the following;
3. To install Grub2 for BIOS and UEFI type or copy/paste the following,
(replacing X with your BOOT drive letter and # your Disk number),
and then press Enter.
Congratulations, you should have an exFAT bootable USB flash drive that is now able to Grub2 Boot from both Legacy BIOS and UEFI.
Make a Grub2 exFAT bootable USB Flash Drive from Linux
I. Partitioning the USB flash drive into two partitions
Partitioning the USB flash drive with an exFAT partition first to use for ISOs and storage. Then a secondary Fat32 BOOT partition to use for Grub booting.
1. Open a terminal Ctrl+Alt+T
2. To switch to super user (root), type
3. Type the following and then locate your USB
4. Now to unmount and wipe partition info, ( WARNING : erases all data) type the following (replacing X with the letter of your USB device);
Note: Repeat unmount /dev/sdX# for any additional mounted partitions.
5. Next to select your USB device, (replacing X ) type the following;
6. Then to create the first exFAT partition;
- type n and then press enter to create a new
- p to create a primary
- 1 to create the first primary partition
- just press enter to start at the default sector
- type –50M to set the size minus 50M (if prompted to remove signature, press Y)
- t for enabling type
- 7 to set the partition type to exFAT
7. Now to create the second fat32 partition;
- n to create a new
- p for primary
- 2 to create the second partition
- just press enter to start at the default sector
- then press enter once more to end at the default last sector
- t to enable type
- 2 to select the second partition
- 6 to set the type to fat
- a to make this partition active
- 2 again for the second partition
- w to write the information to disk and exit
8. Finally, to format the partitions, (replacing X ) type;
II. Installing Grub2 on the USB for UEFI and BIOS Boot
1. Type the following (replacing X with your actual USB letter)
2. Grab the latest a1ive Grub2 release, copy/paste or type;
3. Next to extract the files;
4. Then change to the grub i386-pc directory. And (replacing X ), install Grub2 on the target USB.
6. Change to the grub2 i386-efi directory, and install;
7. Next change to the x86_64 directory and install;
8. Finally, unmount and remove the created mountpoint;
If all went well, you should now have a Grub2 bootable USB Flash Drive. Utilizing exFAT for storage.
Upon completion, simply reboot your pc, select the USB drive from your BIOS or UEFI boot device menu, and then Boot. If all went well, you should be presented with Grub2!
Booting ISO files from an exFAT partition
Booting your select ISO files from a flash drive prepared as an exFAT bootable USB;
Grub can read from an exFAT filesystem using this method because it includes an exFAT driver module. However, to actually be able to boot from a Live ISO stored on the exFAT partition via loopback requires that the ISO distribution also include a driver during boot (at the time of this post most do not). Otherwise the path containing the ISO cannot be found once the boot process has been handed over.
Here are a couple of ways to circumvent this requirement;
(1) Use PartNew to create and mount the ISO to a partition.
(2) map —mem the ISO to a memory address.
(a) Set the linux and initrd paths and Proceed to boot the ISO.
This concludes the detailed procedure to create an exFAT bootable USB flash drive.
Источник
How to Format a USB Disk as exFAT on Linux [Graphically and Command Line]
Last updated October 29, 2020 By Dimitrios 66 Comments
Brief: This tutorial teaches you how to format a USB disk in exFAT format on Linux systems. Both GUI and command line methods have been discussed.
For a long time FAT has been the default choice of filesystem for formatting disks. It is compatible with pretty much all the major operating systems.
The one major problem with FAT filesystem is that you cannot transfer a file larger than 4 GB. This means even if your USB disk has 32 GB of free space, if you try to transfer a ISO image or some other file greater than 4 GB in size, the transfer will fail.
This creates a problem in situation like when you are creating a bootable USB of Windows in Linux. You cannot use NTFS and FAT filesystem has that 4 GB size restrictions.
To overcome the limitations of FAT filesystem, Microsoft came up with exFAT filesystem. And in this tutorial, I’ll show you how to format a USB disk in exFAT filesystem.
Prerequisite
Starting Linux kernel 5.4, exFAT filesystem support is enabled in Linux kernel itself. Check which Linux kernel version you are running. If it is kernel 5.4 or higher, you should be fine.
Otherwise, you’ll have to enable exFAT support explicitly. In Ubuntu-based distributions, you can use these packages for this purpose:
sudo apt install exfat-fuse exfat-utils
Method 1: Format disk as exFAT using GNOME Disks tool

Formatting a drive using GNOME Disks is a straightforward job. It comes preinstalled in a number of Linux distributions.
Plug in your external USB disk. Now, look for Disks in menu and open the GNOME Disks application. As a first step choose the drive that you want to format and follow the steps with me.
Warning: Pay attention to the disk you are selecting to format. Don’t format your main disk accidentally.
1. Gnome Disks 2
The commonly used file systems like Ext4, NTFS, FAT will appear first. To use exFAT, choose “Other” and then click on “Next“.
Final step: choose exFAT file system on this screen and then click Create. Job done!
See how easy it was to create a exFAT disk in Linux graphically? Now, let me show you the terminal method as well.
Method 2: Format disk as exFAT in Linux command line (for advanced users)
fdisk is a dialogue-driven command-line utility that creates and manipulates partition tables and partitions on a hard disk. In fact, it is considered one of the best partitioning tools for Linux.
Plug in your external hard disk then type the following command in the terminal:
This will list down all the hard disks and partitions in your computer. Identify the partition that you want to format in your external hard disk. Size of the disks should give you a hint. For me, the USB disk was labelled as /dev/sdb1.
Once you have identified your USB disk, format it as exfat using the command below. Replace /dev/sdXn with your disk’s device ID. LABEL is basically the name you want to give to your disk like Data, MyUSB etc.
Optionally, run fsck check to make sure the formatting has been done properly.
That’s it. Enjoy the exFAT disk.
Did you succeed to create exFAT disk?
I hope you find this tutorial simple enough, and a step forward to build a solid partitioning knowledge foundation.
Sometimes easy and simple tips and tricks will make you a better Linux in the long term. Our frequent readers know that first hand but if you discovered It’s FOSS recently, you may take the opportunity to explore our handy tutorials.
Don’t forget to subscribe and let me know your questions and suggestions in the comments below.
Like what you read? Please share it with others.
Источник


