- Как добавить пользователя в Sudoers в Ubuntu
- Добавление пользователя в группу sudo
- Добавление пользователя в файл sudoers
- Выводы
- Как создать sudo пользователя в Ubuntu
- 1. Добавление пользователя в Ubuntu
- 2. Установление пароля
- 3. Добавление пользователя в группу sudo
- 4. Переключение на sudo пользователя
- 5. Подтверждение прав sudo
- How to Create a Sudo User on Ubuntu and Debian
- Adding a sudo user in Ubuntu and Debian
- Step 1: Create a new user [if it doesn’t exist already]
- Step 2: Make it a sudo user
- Step 3: Verify sudo access
- How To Create a Sudo User on Ubuntu [Quickstart]
- Steps to Create a New Sudo User
- Related Tutorials
- How To Create a New Sudo-enabled User on Ubuntu 18.04 [Quickstart]
- Introduction
- Step 1 — Logging Into Your Server
- Step 2 — Adding a New User to the System
- Step 3 — Adding the User to the sudo Group
- Step 4 — Testing sudo Access
- Conclusion
Как добавить пользователя в Sudoers в Ubuntu
sudo — это программа командной строки, которая позволяет доверенным пользователям выполнять команды от имени пользователя root или другого пользователя.
В этой статье мы покажем вам два способа предоставить пользователю права sudo. Первый — добавить пользователя в файл sudoers . Этот файл содержит информацию, которая контролирует, каким пользователям и группам предоставлены привилегии sudo, а также уровень этих привилегий.
Второй вариант — добавить пользователя в группу sudo, указанную в файле sudoers . По умолчанию в дистрибутивах на основе Debian, таких как Ubuntu и Linux Mint, членам группы «sudo» предоставляется доступ sudo.
Добавление пользователя в группу sudo
В Ubuntu самый простой способ предоставить пользователю права sudo — это добавить пользователя в группу «sudo». Члены этой группы могут выполнять любую команду как root через sudo и sudo запрос на аутентификацию с помощью своего пароля при использовании sudo .
Мы предполагаем, что пользователь уже существует. Если вы хотите создать нового пользователя, ознакомьтесь с этим руководством.
Чтобы добавить пользователя в группу, выполните команду ниже от имени пользователя root или другого пользователя sudo. Убедитесь, что вы заменили «username» на имя пользователя, которому вы хотите предоставить разрешения.
Предоставления доступа sudo с помощью этого метода достаточно для большинства случаев использования.
Чтобы убедиться, что у пользователя есть привилегии sudo, выполните команду whoami :
Вам будет предложено ввести пароль. Если у пользователя есть доступ к sudo, команда выведет «root»:
Если вы получаете сообщение об ошибке «пользователя нет в файле sudoers», это означает, что у пользователя нет прав sudo.
Добавление пользователя в файл sudoers
/etc/sudoers доступа sudo пользователей и групп определены в /etc/sudoers . Добавление пользователя в этот файл позволяет вам предоставить индивидуальный доступ к командам и настроить собственные политики безопасности.
Вы можете настроить доступ пользователя sudo, изменив файл sudoers или создав новый файл конфигурации в каталоге /etc/sudoers.d . Файлы внутри этого каталога включены в файл sudoers.
Всегда используйте visudo для редактирования файла /etc/sudoers . Эта команда проверяет файл на наличие синтаксических ошибок при его сохранении. Если есть ошибки, файл не сохраняется. Если вы откроете файл в текстовом редакторе, синтаксическая ошибка может привести к потере доступа sudo.
Обычно visudo использует vim для открытия /etc/sudoers . Если у вас нет опыта работы с vim и вы хотите отредактировать файл с помощью nano , измените редактор по умолчанию, запустив:
Допустим, вы хотите разрешить пользователю запускать команды sudo без запроса пароля. Для этого откройте файл /etc/sudoers :
Прокрутите вниз до конца файла и добавьте следующую строку:
Сохраните файл и выйдите из редактора . Не забудьте изменить «имя пользователя» на имя пользователя, которому вы хотите предоставить доступ.
Другой типичный пример — разрешить пользователю запускать только определенные команды через sudo . Например, чтобы разрешить только команды mkdir и rmdir , вы должны использовать:
Вместо редактирования файла sudoers вы можете сделать то же самое, создав новый файл с правилами авторизации в каталоге /etc/sudoers.d . Добавьте то же правило, что и в файл sudoers:
Такой подход делает управление привилегиями sudo более удобным в обслуживании. Имя файла не имеет значения. Обычно имя файла совпадает с именем пользователя.
Выводы
Предоставление доступа sudo пользователю в Ubuntu — простая задача; все, что вам нужно сделать, это добавить пользователя в группу «sudo».
Если у вас есть вопросы, не стесняйтесь оставлять комментарии.
Источник
Как создать sudo пользователя в Ubuntu
Мы покажем вам, как создать пользователя sudo на Ubuntu 16.04. Sudo — это Linux-программа, которая позволяет привилегированным пользователям выполнять определенные команды в качестве суперпользователя или другого пользователя системы. Добавление пользователей в группу sudo на Ubuntu 16.04 — довольно простая задача, если вы следуете приведенному ниже руководству. Ubuntu Добавить пользователя в Sudoers в пять простых шагов. Давайте начнем.
1. Добавление пользователя в Ubuntu
Чтобы иметь возможность создать нового пользователя системы и позволить этому пользователю выполнять команды как суперпользователя или другого пользователя системы, вам необходимо подключиться к вашему серверу Linux через SSH и выполнить приведенную ниже команду. Вы должны заменить newuser фактическим именем пользователя, которого хотите добавить в свою систему.
Запуск команды adduser приведет к созданию новой учетной записи пользователя в системе в соответствии с информацией о конфигурации, определенной в файле /etc/adduser.conf. Команда adduser также позволяет использовать один или несколько параметров командной строки, например, указать домашний каталог пользователя, оболочку входа пользователя, группы и т. д. После запуска этой команды на экране вы увидите следующий вывод:
2. Установление пароля
Затем вам будет предложено ввести пароль для созданного пользователя:
Убедитесь, что вы используете надежный пароль для своей учетной записи. Следующий шаг — ввести основную информацию об учетной записи пользователя, такую как имя, номер телефона и т. д.
Как только вы подтвердите правильность введенной вами информации, учетная запись пользователя будет добавлена и будет готова к использованию.
3. Добавление пользователя в группу sudo
Весь смысл этого руководства состоит в том, чтобы помочь вам узнать, как разрешить определенному пользователю системы выполнять команды в качестве суперпользователя или другого пользователя системы. Для этого вам нужно добавить пользователя в группу sudo. У членов этой группы есть привилегии sudo. Замените newuser именем вашего системного пользователя в приведенной ниже команде и выполните его.
4. Переключение на sudo пользователя
Теперь переключитесь на этого пользователя:
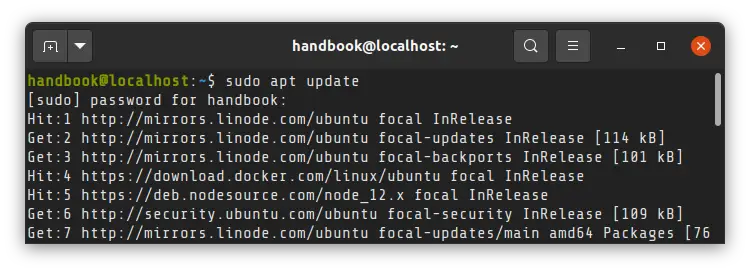
и запустите команду, которая запрещена для обычного пользователя, например:
Приведенная выше команда обновляет все системное программное обеспечение до последней версии, и вы увидите следующий результат:
5. Подтверждение прав sudo
Попробуйте выполнить ту же команду теперь с sudo:
Вам будет предложено ввести пароль. Введите пароль, указанный при создании пользователя системы. Если вы все сделали правильно, все ваше системное программное обеспечение будет обновлено.
Поздравляем, теперь у вас есть пользователь sudo, которого вы можете использовать для управления Ubuntu VPS.
Источник
How to Create a Sudo User on Ubuntu and Debian
As a sudo user, you can run commands and access files as root user but with your own password. You don’t need to know the root password or switch to root user. You just add sudo before the command to run it with root privilege.
In Ubuntu and Debian-based Linux systems, sudo is practically synonymous with root but in reality, sudo is much more than that.
But I am not going to go into details on sudo here. I’ll just show how you can add a sudo user to Ubuntu or Debian.
That was too short, right? Don’t worry! I explain the steps in detail.
Adding a sudo user in Ubuntu and Debian
I am using Ubuntu in this tutorial, but the steps mentioned here should apply to Debian and many other Linux distributions as well.
The commands used here are standard Linux commands and these should be installed on most Linux distributions by default. However, I am not sure if all Linux distributions have a group named sudo.
Let’s now get started on creating a sudo user or sudoer in Linux command line.
Step 1: Create a new user [if it doesn’t exist already]
Please check the users present on your Linux system. If the user that you want to grant sudo access doesn’t exist, the first step would be to create that user.
Keep in mind that the user will be a regular user when you create it. You add it to the sudoer list in the next step.
Note: Adding a new user will also create a user group named the same as the user in Ubuntu.
To create a user, one must be a sudoer or a root. This is to ensure that only people who are having rights over the system or in charge of protecting the system are creating new users and nobody else.
I am going to use adduser command here.
When you type your password, it will be invisible, but you can also use delete or backspace whenever you like. You may also use Ctrl+U Linux shortcut to delete the entire line and start from the beginning.
Here’s a sample screenshot for the creation of a new user named handbook:
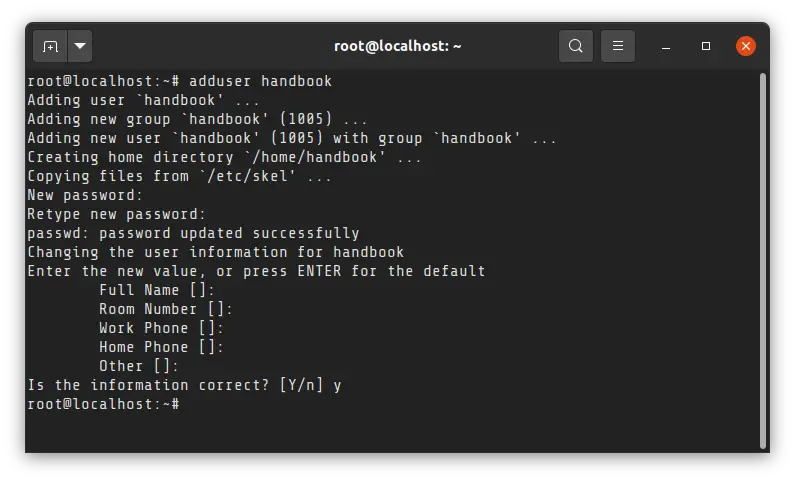
With the adduser command, the home directory for the user is also created.
It also asks for details for name, phone numbers, and others. You may enter the details if you want to, but it is not mandatory. After confirmation, the user will be created successfully.
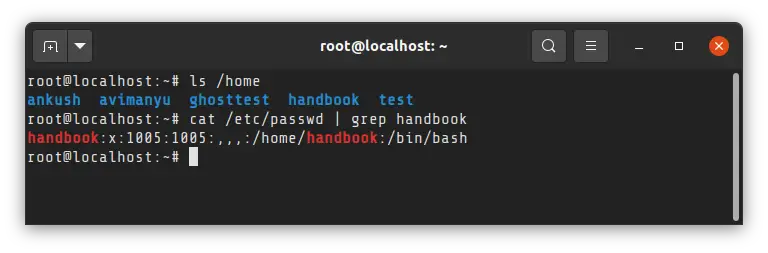
You may verify the creation of the new user by checking the content of the /home directory or grep on the username in /etc/passwd file.

Step 2: Make it a sudo user
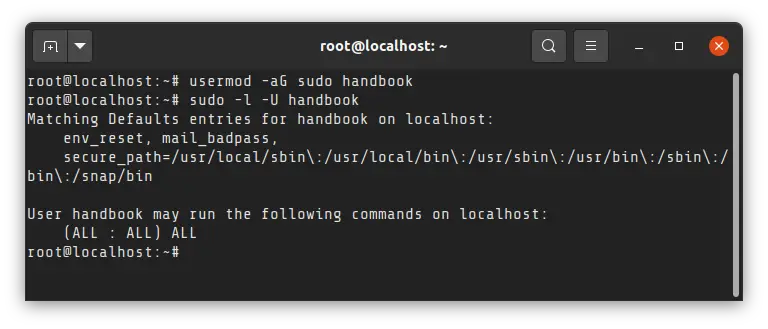
Once the user is created, he/she can be easily converted into sudo user by adding it to the sudo group. Yes, that’s it.
You must use -aG options. The a ensures that you are appending the group.
In the above command:
- usermod changes user’s properties and rights
- –a option tells to append the given group to the user without removing the user from existing groups. If you miss it, the user will be removed from other existing group and that will become a pain for you.
- Option -G lists the groups to which user is to be added. In our case, it is “sudo”. So it is added directly to the command.
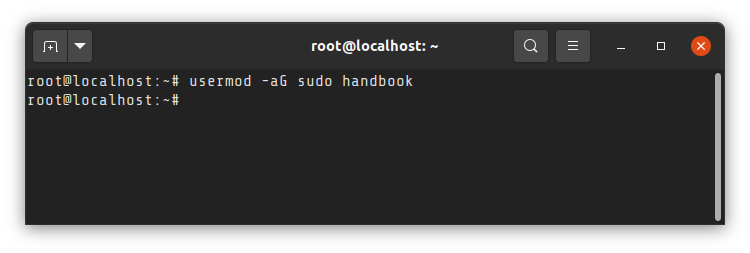
Successful addition doesn’t produce any output.

Step 3: Verify sudo access
Now, you should verify if the user has sudo access or not. My favorite way is to use this command:
At the end of this command’s output, you can see if you can run all commands as sudo (ALL : ALL) ALL.
Alternatively, you can change user in command line or simply log out and log in as the new sudo user and then try to run a command as sudo.
From this point, You can write any command that needed sudoer privileges by prepending the command with “sudo”.
That’s it. You successfully created a sudo user.
I hope you liked this quick tip. If you have any questions or suggestions, feel free to leave a comment below.
Источник
How To Create a Sudo User on Ubuntu [Quickstart]
Published on March 28, 2016
Please refer to our Ubuntu 18.04 version of this tutorial instead.
The sudo command provides a mechanism for granting administrator privileges, ordinarily only available to the root user, to normal users. This guide will show you the easiest way to create a new user with sudo access on Ubuntu, without having to modify your server’s sudoers file. If you want to configure sudo for an existing user, simply skip to step 3.
Steps to Create a New Sudo User
Log in to your server as the root user.
Use the adduser command to add a new user to your system.
Be sure to replace username with the user that you want to create.
Set and confirm the new user’s password at the prompt. A strong password is highly recommended!
Follow the prompts to set the new user’s information. It is fine to accept the defaults to leave all of this information blank.
Use the usermod command to add the user to the sudo group.
By default, on Ubuntu, members of the sudo group have sudo privileges.
Test sudo access on new user account
Use the su command to switch to the new user account.
As the new user, verify that you can use sudo by prepending “sudo” to the command that you want to run with superuser privileges.
For example, you can list the contents of the /root directory, which is normally only accessible to the root user.
The first time you use sudo in a session, you will be prompted for the password of the user account. Enter the password to proceed.
If your user is in the proper group and you entered the password correctly, the command that you issued with sudo should run with root privileges.
Related Tutorials
Here is a link to a more detailed user management tutorial:
Источник
How To Create a New Sudo-enabled User on Ubuntu 18.04 [Quickstart]
Published on March 23, 2020
Not using Ubuntu 18.04?
Choose a different version or distribution.
Introduction
The sudo command provides a mechanism for granting administrator privileges — ordinarily only available to the root user — to normal users. This guide will show you how to create a new user with sudo access on Ubuntu 18.04, without having to modify your server’s /etc/sudoers file. If you want to configure sudo for an existing user, skip to step 3.
Step 1 — Logging Into Your Server
SSH in to your server as the root user:
Step 2 — Adding a New User to the System
Use the adduser command to add a new user to your system:
Be sure to replace sammy with the user name that you want to create. You will be prompted to create and verify a password for the user:
Next you’ll be asked to fill in some information about the new user. It is fine to accept the defaults and leave all of this information blank:
Step 3 — Adding the User to the sudo Group
Use the usermod command to add the user to the sudo group:
Again, be sure to replace sammy with the username you just added. By default, on Ubuntu, all members of the sudo group have full sudo privileges.
Step 4 — Testing sudo Access
To test that the new sudo permissions are working, first use the su command to switch to the new user account:
As the new user, verify that you can use sudo by prepending sudo to the command that you want to run with superuser privileges:
For example, you can list the contents of the /root directory, which is normally only accessible to the root user:
The first time you use sudo in a session, you will be prompted for the password of that users account. Enter the password to proceed:
Note: This is not asking for the root password! Enter the password of the sudo-enabled user, not a root password.
If your user is in the proper group and you entered the password correctly, the command that you issued with sudo will run with root privileges.
Conclusion
In this quickstart tutorial we created a new user account and added it to the sudo group to enable sudo access. For more detailed information on setting up an Ubuntu 18.04 server, please read our Initial Server Setup with Ubuntu 18.04 tutorial.
Источник


