- ИТ База знаний
- Полезно
- Навигация
- Серверные решения
- Телефония
- Корпоративные сети
- Как установить или изменить User-Agent с помощью curl
- Curl User Agent
- Изменить User-Agent с помощью curl
- PHP cURL как установить значение User Agent ИЛИ как сделать так, чтобы сервера не блокировали запросы cURL?
- Связанные статьи:
- Curl Set User Agent Command on Linux or Unix
- Change user agent with curl
- Curl set user agent to “Firefox”
- Curl Set User Agent to Safari
- How to change user Agent with browser
- How to change user agent in Google Chrome
- How to change user agent in Firefox
- Bash variable in curl header as user agent
- 2 Answers 2
- Learn How to use Curl Command in Linux with Examples
- Retrieve Web Pages with curl command
- Display HTTP Response Headers
- Set User Agent in Curl Command
- Examples, Download Files with curl command
- Connect to FTP Server with curl Command
- Download Files From FTP Server.
- Upload Files to the FTP Server
- Linux Curl Command Tips and Tricks
ИТ База знаний
Курс по Asterisk
Полезно
— Узнать IP — адрес компьютера в интернете
— Онлайн генератор устойчивых паролей
— Онлайн калькулятор подсетей
— Калькулятор инсталляции IP — АТС Asterisk
— Руководство администратора FreePBX на русском языке
— Руководство администратора Cisco UCM/CME на русском языке
— Руководство администратора по Linux/Unix
Навигация
Серверные решения
Телефония
FreePBX и Asterisk
Настройка программных телефонов
Корпоративные сети
Протоколы и стандарты
Как установить или изменить User-Agent с помощью curl
2 минуты чтения
Строка User-Agent (UA) — это информация, включенная в заголовок HTTP, действующая от имени пользователя. Когда вы подключаетесь к веб-сайту из браузера, UA сообщает веб-сайту, из какого браузера поступает запрос, его номер версии и операционную систему.
Онлайн курс по Linux
Мы собрали концентрат самых востребованных знаний, которые позволят тебе начать карьеру администратора Linux, расширить текущие знания и сделать уверенный шаг к DevOps

Сервер может по-разному реагировать на определенных пользовательских агентов. Следовательно, вам может потребоваться изменить строку UA.
В этом руководстве вы узнаете, как установить или изменить пользовательский агент с помощью curl.

Curl User Agent
Когда вы используете curl для отправки HTTP-запроса, он отправляет информацию пользовательского агента в формате curl/version.number .
Последняя стабильная версия на момент написания — 7.72. 0. Следовательно, строка UA в HTTP-запросе будет: curl/7.72.0 .
Есть несколько способов установить или изменить пользовательский агент с помощью команды curl .
Изменить User-Agent с помощью curl
Чтобы изменить пользовательский агент curl на другой браузер, добавьте параметр -A с нужной строкой пользовательского агента:
Чтобы отправить запрос на веб-страницу example.com путем эмуляции пользовательского агента Firefox 81, вы должны запустить:
Вы также можете использовать параметр —user-agent со следующим синтаксисом команды:
В качестве альтернативы запустите параметр командной строки -H , который принимает один параметр дополнительного заголовка для включения в запрос curl:
Теперь вы должны знать, как изменить пользовательский агент с помощью curl и установить в нем нужный браузер. Это позволяет обойти возможные блокировки или изменения содержимого, которые могут появиться из-за использования curl.
Онлайн курс по Linux
Мы собрали концентрат самых востребованных знаний, которые позволят тебе начать карьеру администратора Linux, расширить текущие знания и сделать уверенный шаг к DevOps
Источник
PHP cURL как установить значение User Agent ИЛИ как сделать так, чтобы сервера не блокировали запросы cURL?
Некоторые сайты нормально открываются в браузере, но при попытке получить исходный HTML код с помощью cURL эти запросы могут отклоняться. Могут возвращаться коды ответов, например, 403, то есть доступ запрещён.
Чтобы понимать, как это исправить, нужно понимать причины, которых может быть несколько.
Программа cURL делает обычные HTTP запросы, которые не отличаются от запросов, которые делает ваш веб-браузер. Тем не менее веб-браузер может получить исходный код страницы, а запрос от cURL может быть отвернут. Обычно такое поведение веб серверов связано с защитой от ботов — программ, которые запрашивают страницы не для пользователя (как веб браузер), а для иных целей, например, инструментами для парсинга с целью сбора контента страницы, инструментами для поиска уязвимостей, инструментами для анализа содержимого и так далее. Некоторые веб мастера не заинтересованы в этих ботах, которые не несут никакой пользы, но при этом как минимум создают нагрузку на сервер, а в некоторых случаях используются для воровства контента или иной вредоносной активности.
Для этого они настраивают защиту от ботов, как правило, защита бывает двух видов:
- запрет на основе User Agent (агента пользователя). Очень простые защиты, которые очень легко можно обойти
- проверки на поддержку технологий JavaScript (боты очень часто не умеют работать с JavaScript — это же относится и к cURL), а также поддержку кукиз (хотя cURL может работать с кукиз, но если её специально на это не настроить, то она провалит тест). Такие тесты могут быть весьма сложные, код JavaScript устанавливает и проверяет кукиз и другие свойства браузера, содержимое веб страницы может быть загружено асинхронно средствами JavaScript и так далее — обычно такие защиты непросто обойти.
Начнём со случая, когда происходит блокировка на уровне пользовательского агента. На самом деле, cURL устанавливает своё значение User Agent, но в отправляемой на сервер строке указано, что запрос делает cURL, а также номер cURL.

С помощью curl_setopt можно установить произвольный User Agent примерно следующим образом:
Пример реального кода:
Возможны ситуации, когда сервер не принимает запросы по той причине, что в качестве реферера (страницы с которой пришёл пользователь, делающий запросы) ничего не указано. В этом случае вы можете настроить значение REFERER следующим образом:
Пример рабочего кода:
Некоторые простейшие защиты, основанные на установке веб-приложением (сервером) кукиз и затем последующей их проверке, можно обойти установив следующие опции:
Примечание: В текущей директории у вас должна быть создана папка COOKIES
- CURLOPT_COOKIEFILE: Имя файла, содержащего cookies. Данный файл должен быть в формате Netscape или просто заголовками HTTP, записанными в файл. Если в качестве имени файла передана пустая строка, то cookies сохраняться не будут, но их обработка все еще будет включена.
- CURLOPT_COOKIEJAR: Имя файла, в котором будут сохранены все внутренние cookies текущей передачи после закрытия дескриптора, например, после вызова curl_close.
Если ничего из вышеприведённого не помогло, то попробуйте настроить cURL так, чтобы она следовала перенаправлениям. Это может помочь, если страница, к которой обращается ваша программа, перемещена и от вас требуется перейти по новому адресу. В веб браузере это происходит автоматически и для большинства пользователей незаметно. По умолчанию cURL не выполняет редиректов, чтобы cURL переходила по редиректам используйте опции:
Опция CURLOPT_FOLLOWLOCATION означает: TRUE для следования любому заголовку «Location: «, отправленному сервером в своем ответе (учтите, что это происходит рекурсивно, PHP будет следовать за всеми посылаемыми заголовками «Location: «, за исключением случая, когда установлена константа CURLOPT_MAXREDIRS).
Связанные статьи:
Прошу помощи.
Есть адрес: https://new.faberlic.com/ru/search/autocomplete/SearchBox?term=502422
Он легко открывается вручную в браузере и выдает полную информацию.
Но при попытке открыть его с помощью php, например через file_get_contents или cURL, серевер возвращает по минимуму:
Впервые с таким сталкиваюсь.
Что еще интересно, немного другой запрос, с другим продуктом, открывается без проблем везде: https://new.faberlic.com/ru/search/autocomplete/SearchBox?term=545915
Приветствую! Первая ссылка даже в браузере мне показывать только .
Очень странно, у меня теперь тоже не открывается )
Возможно из кэша грузилось. Спасибо за быстрый ответ.
Источник
Curl Set User Agent Command on Linux or Unix
Change user agent with curl
The syntax is as follows for the curl command:
curl -A «user-agent-name-here» url
curl —user-agent «user-agent-name-here» url
curl -H «User-Agent: user-Agent-Name-Here»
Curl set user agent to “Firefox”
I am going to set user agent as “Firefox 59 on Windows NT 6.1”:
$ curl -A «Mozilla/5.0 (Windows NT 6.1; Win64; x64; rv:59.0) Gecko/20100101 Firefox/59.0» https://www.cyberciti.biz/
$ curl -I -A «Mozilla/5.0 (Windows NT 6.1; Win64; x64; rv:59.0) Gecko/20100101 Firefox/59.0» https://www.cyberciti.biz/faq/
The above command will log the following entry in my webserver. You can use the cat command or grep command or tail command as follows:
$ grep ‘IP address’ /var/log/nginx/access.log
$ tail -f /var/log/nginx/access.log
Sample outputs:
209.244.4.106 — — [08/May/2018:14:59:30 +0000] «GET /faq/ HTTP/2.0» 200 8183 «-» «Mozilla/5.0 (Windows NT 6.1; Win64; x64; rv:59.0) Gecko/20100101 Firefox/59.0»
Curl Set User Agent to Safari
curl -H «User-Agent: Mozilla/5.0 (Macintosh; Intel Mac OS X 10_13_1) AppleWebKit/537.36 (K HTML, like Gecko) Chrome/61.0.3163.100 Safari/537.36» url
How to change user Agent with browser
You can always use Firefox, Safari or Chrome to set user agent. So no need to use the curl command.
- No ads and tracking
- In-depth guides for developers and sysadmins at Opensourceflare✨
- Join my Patreon to support independent content creators and start reading latest guides:
- How to set up Redis sentinel cluster on Ubuntu or Debian Linux
- How To Set Up SSH Keys With YubiKey as two-factor authentication (U2F/FIDO2)
- How to set up Mariadb Galera cluster on Ubuntu or Debian Linux
- A podman tutorial for beginners – part I (run Linux containers without Docker and in daemonless mode)
- How to protect Linux against rogue USB devices using USBGuard
Join Patreon ➔
How to change user agent in Google Chrome
How to change user agent in Firefox
The User Agent Switcher extension adds a menu and a toolbar button to switch the user agent of a browser. Click here to download the same. Another option is to use the about:config page typed in url bar and set general.useragent.override. See this page for more info.
🐧 Get the latest tutorials on Linux, Open Source & DevOps via
Источник
Bash variable in curl header as user agent
I was trying to set the user agent dynamic from a bash variable. But it seems that is not that straight forward.
Since the header needs to be enclosed in single quotes if the header value contains spaces, we cannot avoid the single quotes for user agent header, but if we do that the variable wont be evaluated and if we replace it with double quotes, the spaces in ua string will create a lot of mess.
The recommended way is to create all the header, data, cookie variable out side of curl command and use it in a single shot. But does that mean we never ever wont be able to set the user agent variable alone in the curl command?
The command I’m trying to use now is given below,

2 Answers 2
The single quotes are simply shell syntax to prevent any sort of expansion inside the string; they are not part of the header itself. In this case, using double quotes would work just as well.
Storing the user agent in a variable is trivial:
Here, you must use double quotes to expand the value of $ua ; using curl . -H ‘$ua’ would send the literal 3-character string $ua as a header.
You have encountered a particular problem with word splitting in Bash, BashFAQ/050 has good examples on the subject.
You can run the following script to investigate the behavior.
Notice that output lines start + and User-Agent returned from httpbin.
Источник
Learn How to use Curl Command in Linux with Examples
Curl is a powerful utility that can use to both download and upload data to servers. The curl command in Linux Supports many kinds of protocols, including HTTP/HTTPS, FTP, SMTP, SMB and More.
This tutorial Mainly Focuses on HTTP and FTP Protocol. First we will see how to use curl command to retrieve data through the HTTP Protocol, Then we will use curl with FTP protocol to Download and Upload files.
Retrieve Web Pages with curl command
Let’s just run a simple curl command. Following example will retrieve example.com webpage and print html output to the Linux terminal.
The data of the example.com will be displayed to the Linux terminal. The output includes HTML Tags, it is not the result you see on the web browser.
Save Data to a File. curl command in Linux displays data to the terminal by default. To save data to a file, we need to use either -o flag (Lowercase 0) or -O flag (Uppercase o).
In the following example, we use -o option (lowercase 0). With -o option we specify the output file name.
This time output will not be sent to the Linux terminal. curl will retrieve the example.com and save it to the example.html file.
With The -O (Uppercase O) flag, we do not specify output file name. It will automatically create an output file with the same name as the remote file. But, The -O option require specific remote file name (For example, index.html or index.php).
This time curl command will download the «index.html» file from the example.com and save it as «index.html».
Also note that you can put command options before or after the URL, it Makes No difference.
It is also possible to save the data to a file using output redirection as shown below.
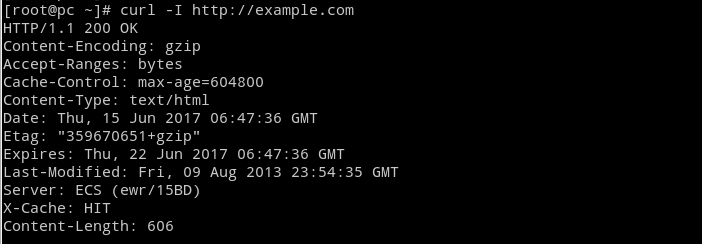
Display HTTP Response Headers
The curl command in Linux can display HTTP response-headers sent by the Web Server. To show response-headers, use the -I option.
This will dump the HTTP Headers as shown in following screenshot.
Set User Agent in Curl Command
Sometimes Web Server and Firewall blocks default curl user agent. One possible solution for this is to set different user agent with —user-agent Flag.
In the following example, curl will use Fedora-Firefox user agent to retrieve data from the website.
Examples, Download Files with curl command
Following example will download the ‘latest.zip’ file from the wordpress.org website and preserve the original file name:
In the following example, curl command in Linx will Download ‘latest.zip’ file from wordpress.org and save it as ‘wordpress.zip’:
Download images and save using output redirection:
Ask HTTP Server to provide compressed versions of the Data.
Connect to FTP Server with curl Command
Now let’s see how to use Linux curl command with FTP protocol. For the examples I will use following FTP Credentials.
- FTP Server : 192.168.1.10
- FTP Username : ftpuser
- FTP Password : ftp123
To specify username and password we use the -u option.
Download Files From FTP Server.
Following command will download ‘file1.txt’ From the FTP Server. We are going to use -O option (Uppercase o), So the original filename will be preserved.
In the following example, we will download the ‘file1.txt’ From the FTP Server and save it as ‘file2.txt’ using the -o flag (Lowercase o).
Upload Files to the FTP Server
To upload files, curl command in Linux use the -T option followed by the name of the file wants to upload.
Upload with a different filename. Following command will take ‘file1.txt’ and upload to the FTP Server as ‘file2.txt’.
Upload Multiple Files. To upload multiple files, put file names inside the curly brackets.
Linux Curl Command Tips and Tricks
Display Command Help:
Run curl command in Verbose Mode. Run the command with the -v / —verbose option to get more information:
Silent Mode. This opposite to verbose mode, Command will not show any error message or download progress.
Silent Mode with error messages enabled:
Display Progress bar With # tags:
Max File Size. the —max-filesize flag use to specify the maximum size (in bytes) of a file to download. If file is larger than the max size, curl command in Linux will not download the file.
Maximum Data Transfer Rate. The —limit-rate options set the maximum download or upload rate. By default speed is measured in bytes/second unless a suffix is appended (k for kilobytes, m for megabytes, g for gigabytes).
Following example will use maximum speed of 64 kilobytes per second.
Источник


