- Драйверы устройств в Linux
- Часть 11: Драйверы USB в Linux
- Обнаружение устройства USB в Linux
- Разбираемся в секции, описывающей устройство USB
- Регистрация драйвера USB для флеш устройства
- Подведем итог
- Writing USB Device Drivers
- Introduction
- Linux USB Basics
- Device operation
- Isochronous Data
- Conclusion
Драйверы устройств в Linux
Часть 11: Драйверы USB в Linux
Оригинал: «Device Drivers, Part 11: USB Drivers in Linux»
Автор: Anil Kumar Pugalia
Дата публикации: October 1, 2011
Перевод: Н.Ромоданов
Дата перевода: июнь 2012 г.
Эта статья, которая является частью серии статей о драйверах устройств в Linux, поможет вам начать писать ваш первый драйвер USB в системе Linux.
Флеш устройство Пагса было именно тем устройством, которым Светлана воспользовалась, когда они сели вдвоем за изучение мира драйверов USB в Linux. Самым быстрым способом с ним разобраться был обычный способ Пагса — выбрать устройство USB и написать для него драйвер для того, чтобы с ним поэкспериментировать. Поэтому они выбрали флэш устройство (т.е. USB флешку), которое было под рукой — JetFlash от Transcend, с ID поставщика 0x058f и ID продукта 0x6387 .
Обнаружение устройства USB в Linux
Независимо от того, есть ли драйвер для устройств USB в Linux системе или его нет, допустимое устройство USB всегда будет обнаруживаться в системе Linux в пространстве аппаратных средств и в пространстве ядра, поскольку система создана (и выполняет обнаружение) в соответствии со спецификациями протокола USB. Обнаружение в аппаратном пространстве осуществляется хост контроллером USB — как правило, соответствующем шинным устройством, аналогичным устройству PCI в системах x86. Соответствующий драйвер хост-контроллера обнаруживает устройство и транслирует информацию низкоуровнего физического слоя в конкретную информацию более высокого уровня протокола USB. Затем информация протокола USB, касающаяся устройства и, имеющая специальный формат, заносится в общий слой ядра USB (драйвер usbcore) в пространстве ядра, что позволяет обнаруживать устройства USB в пространстве ядра даже в том случае, когда отсутствует драйвер конкретного устройства.
Дальше — дело различных драйверов, интерфейсов и приложений (которые различны в различных дистрибутивах Linux) отображать обнаруженные устройства в пользовательском пространстве. На рис.1 показана иерархия подсистемы USB в Linux.
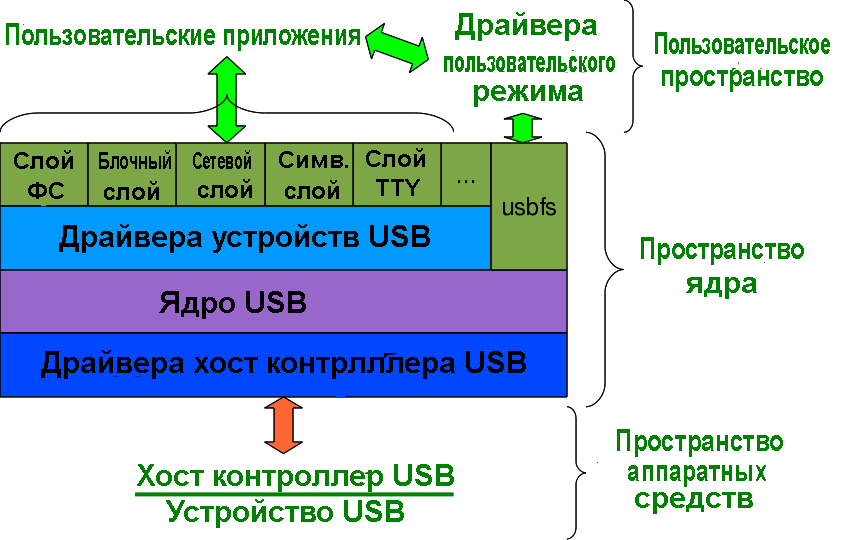
Рис.1: Подсистема USB в Linux
Краткий список всех обнаруженных устройств USB можно получить с помощью команды lsusb , которую следует запустить в роли пользователя root. На рис.2 приведен такой список как для случая с флэш устройством, так и без него. Параметр -v в команде lsusb позволяет получить более подробную информацию.
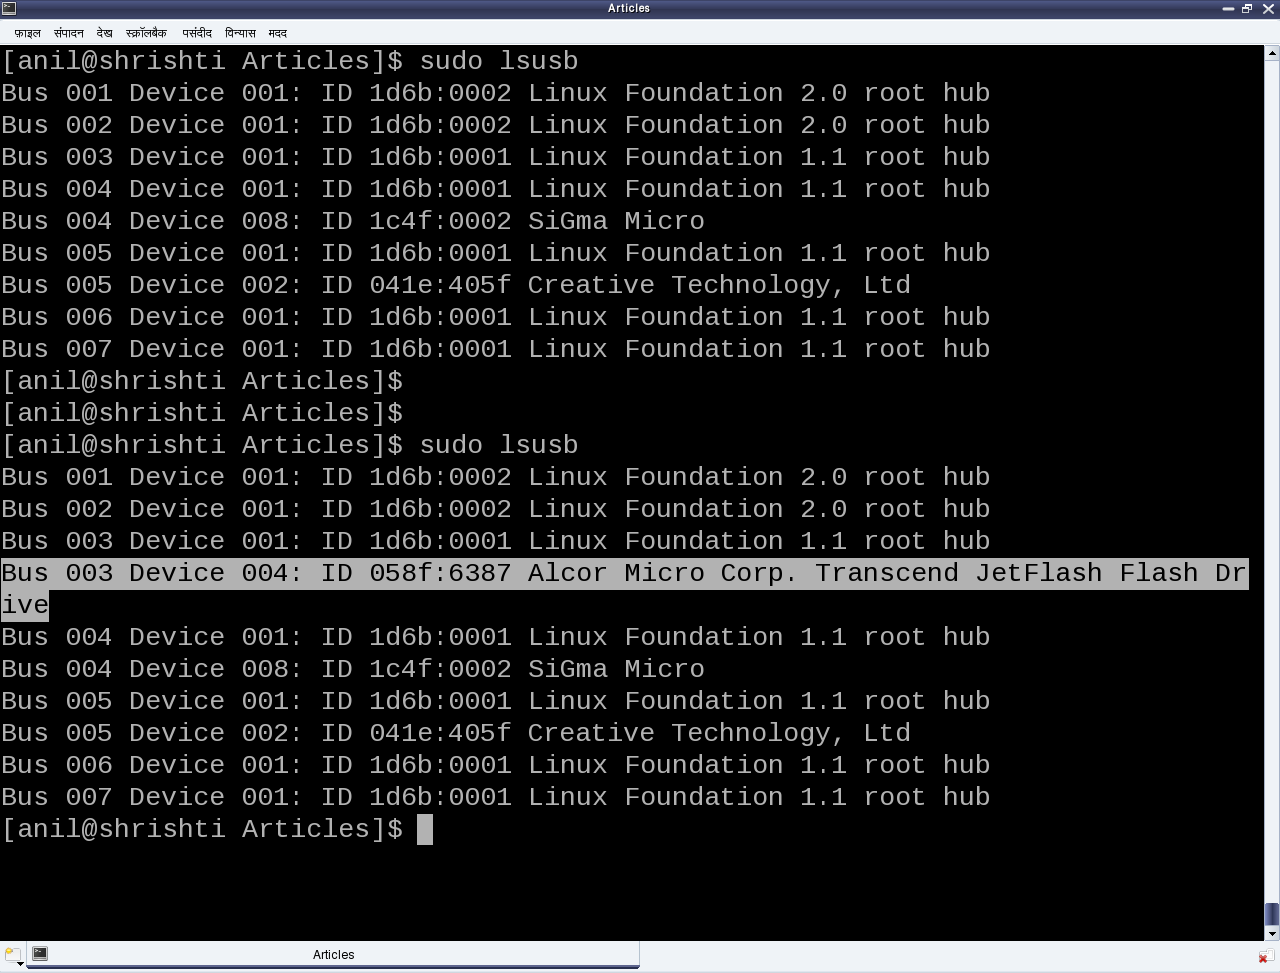
Рис.2: Информация, выдаваемая командой lsusb
Во многих дистрибутивах Linux, таких как Mandriva, Fedora, . , драйвер usbfs сконфигурирован так, что он загружается по умолчанию. В результате можно с помощью команды cat /proc/bus/usb/devices из директория /proc извлечь конкретную информации об обнаруженном USB-устройстве, представленную в удобном виде. На рис.3 показан типичный пример такой информации, которая находится в специальной секции, описывающей флэш-устройство. В списке обычно присутствует по одному такому разделу для каждого допустимого устройства USB, обнаруженного в системе.
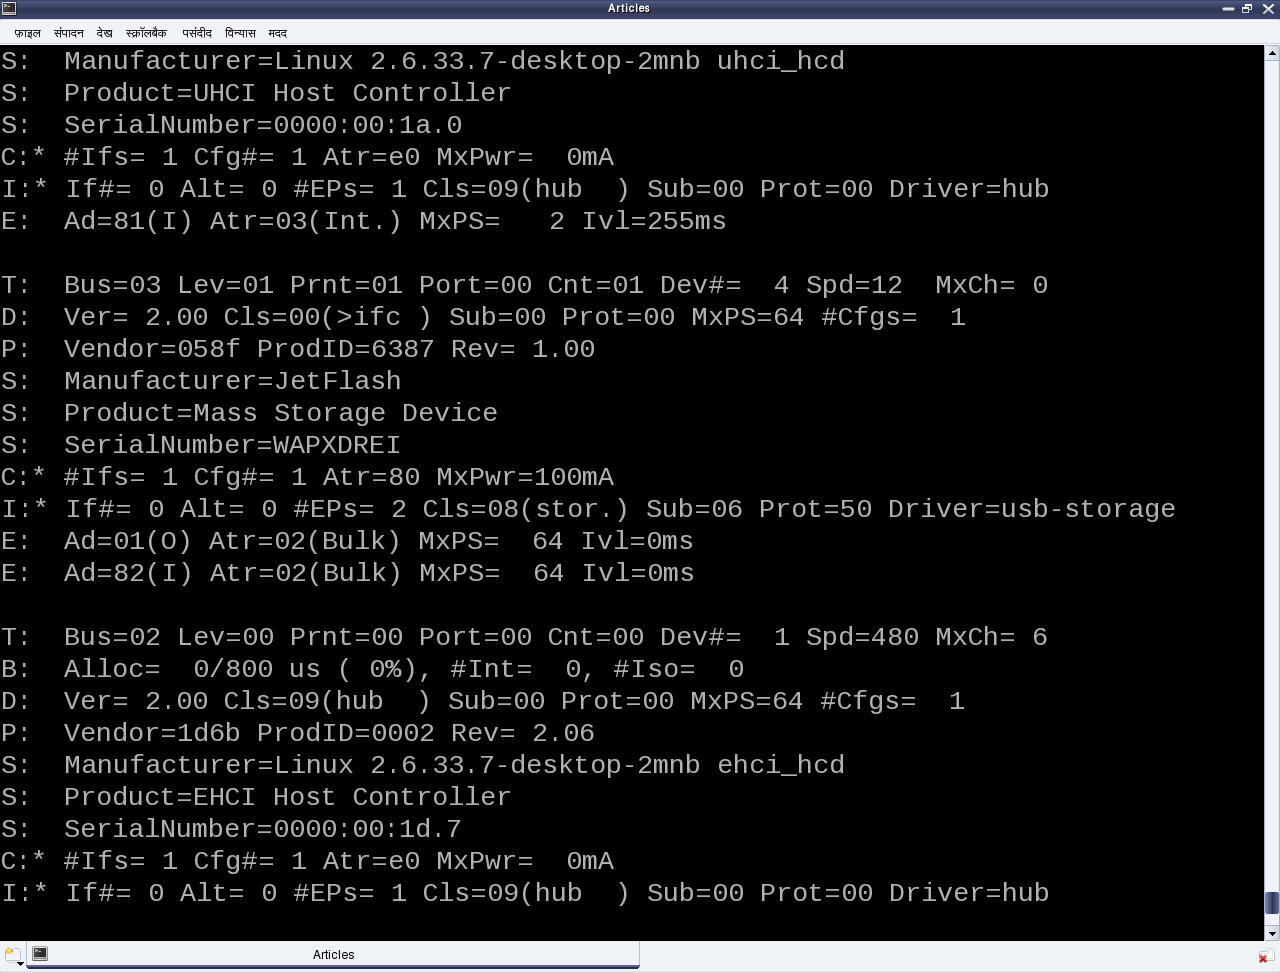
Рис.3: Фрагмент информации из proc, касающейся USB
Разбираемся в секции, описывающей устройство USB
Чтобы дальше разбираться с этими секциями, нужно в первую очередь понять, что такое допустимое устройство USB. Для всех допустимых устройств USB есть одна или несколько конфигураций. Конфигурация устройства USB похожа на профиль, причем в качестве конфигурации, используемой по умолчанию, обычно используется первая конфигурация. Таким образом, в Linux для каждого устройства по умолчанию поддерживается только одна конфигурация. Для каждой конфигурации в устройстве может быть один или несколько интерфейсов. Интерфейс соответствует функции, предоставляемой устройством.
Интерфейсов может быть столько, сколько есть функций, предоставляемых устройством. Так, скажем, устройство МФУ USB-принтер (многофункциональное устройство) может выполнять печать, сканирование и отправку факсов, и, скорее всего, для него будет, по крайней мере, три интерфейса, по одному для каждой из функций. Таким образом, в отличие от других драйверов устройств, драйвер USB устройства, как правило, связывается / пишется отдельно для каждого интерфейса, а не для устройства в целом — это значит, что для устройства USB может быть несколько драйверов устройств, причем для интерфейсов различных устройств может использоваться один и тот же драйвер, — хотя, конечно, для одного интерфейса не может быть более одного драйвера.
Вполне нормальной и достаточно обычной является ситуация, когда для всех интерфейсов устройства USB используется один и тот же драйвер USB. В записи Driver=. для директория proc (рис. 3) показано, что в драйвер отсутствует отображение интерфейса ( none ).
Для каждого интерфейса есть один или несколько источников / приемников данных. Источник / приемник данных (endpoint) похож на конвейер (pipe), используемый для передачи информации в зависимости от функции либо в интерфейс, либо из интерфейса устройства. В зависимости от типа информации, источники / приемники данных могут быть четырех типов: Control, Interrupt, Bulk и Isochronous.
Прим.пер.: Подробное описание указанных четырех типов источников / приемников данных будет приведено в следующей статье данной серии статей.
Согласно спецификациям протокола USB во всех допустимых устройствах USB должен быть неявно используемый источник / приемник данных с номером 0 (end-point zero) — единственный двунаправленный источник / приемник данных. На рис.4 приведена полная наглядная схема допустимого устройства USB, соответствующее приведенному выше объяснению.
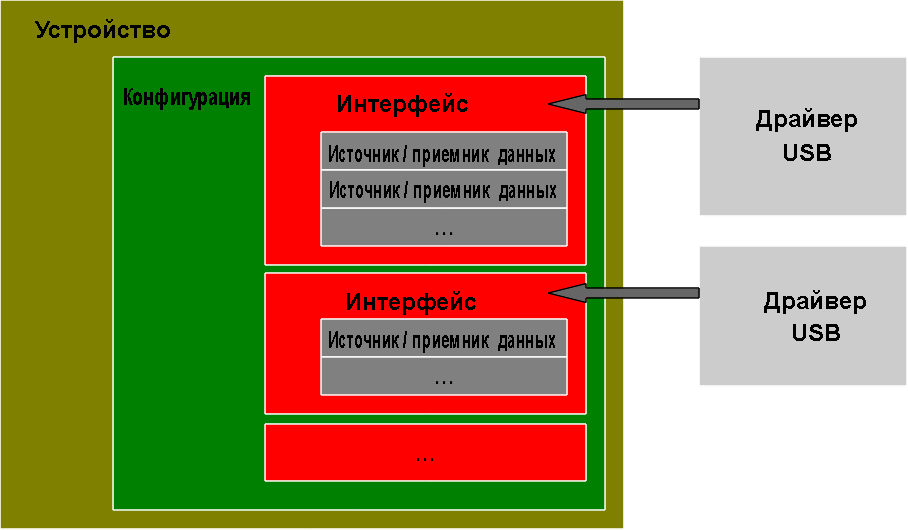
Рис.4: Общий взгляд на устройство USB
Вернемся обратно к секциям устройств USB (рис. 3) — первая буква в каждой строке соответствует различным частям спецификации устройства USB. Например, D — устройству, C — конфигурации, I — интерфейсу, E — источнику / приемнику данных (endpoint) и т.д. Подробнее об этом и о многом другом смотрите в исходном коде ядра в файле Documentation/usb/proc_usb_info.txt .
Регистрация драйвера USB для флеш устройства
«Похоже, для того, чтобы можно было самостоятельно написать первый драйвер USB, потребуется узнать много всего о протоколе USB, — конфигурацию устройства, интерфейсы, конвейеры передачи данных, четыре типа передачи данных, а также многие другие обозначения, например, T, B, S, …, которые есть в спецификации устройств USB» — вздохнула Светлана.
«Да, но ты не беспокойся — со всем этим можно будет разобраться подробнее позже. Давай со всем этим разбираться последовательно — возьмем интерфейс флеш устройства, связанного с драйвером нашего USB-устройства ( pen_register.ko )» — утешил Пагс.
Как и в любом другом Linux-драйвере, здесь также требуется конструктор и деструктор — используется тот же самый шаблон драйвера, который использовался для всех драйверов. Но содержимое будет другим, поскольку это драйвер слоя аппаратного протокола, т.е. горизонтальный драйвер в отличие от символьного драйвера, который был одним из вертикальных драйверов, рассмотренных ранее. Разница лишь в том, что вместо регистрации и отмены регистрации в VFS, здесь это должно выполняться на уровне соответствующего протокола — в данном случае — в ядре USB; вместо того, чтобы предоставлять интерфейс пользовательского пространства, например, файл устройства, он должен подключиться к реальному устройству в пространстве аппаратных средств.
Интерфейсы API для ядра USB выглядят следующим образом (прототип в
):
В структуре usb_driver в соответствующих полях должны быть указаны имя устройства, идентификационная таблица, используемая для автообнаружения конкретного устройства, и две функции обратного вызова, которые вызываются ядром USB при горячем подключении и отключении устройства, соответственно.
Собираем все вместе в файл pen_register.c , который будет выглядеть следующим образом:
Затем можно повторить обычные шаги, выполняемые для любого Linux драйвера:
- Собираем драйвер (файл .ko ) с помощью запуска команды make .
- Загружаем драйвер с помощью команды insmod .
- Выдаем список загруженных модулей с помощью команды lsmod .
- Выгружаем драйвер с помощью команды rmmod .
Но, что удивительно, результат не будет таким, как ожидалось. Используйте команду dmesg и загляните в директорий proc для просмотра различных журналов и прочих подробностей. Это связано не с тем, что драйвер USB отличается от символьного драйвера, — здесь есть одна проблема. На рис.3 показано, что у флэш-устройства есть один интерфейс (с номером 0), который уже связан с обычным драйвером usb-storage.
Теперь, для того, чтобы связать наш драйвер с этим интерфейсом, нам нужно выгрузить драйвер usb-storage (т. е. выполнить команду rmmod usb-storage ) и переподключить флэш-накопитель. Как только это будет сделано, результаты станут такими, как ожидалось. На рис.5 показан фрагмент информации из журналов и из директория proc . Снова подключите и отключите (в горячем режиме) флеш устройство и пронаблюдайте, как действуют вызовы probe и disconnect.
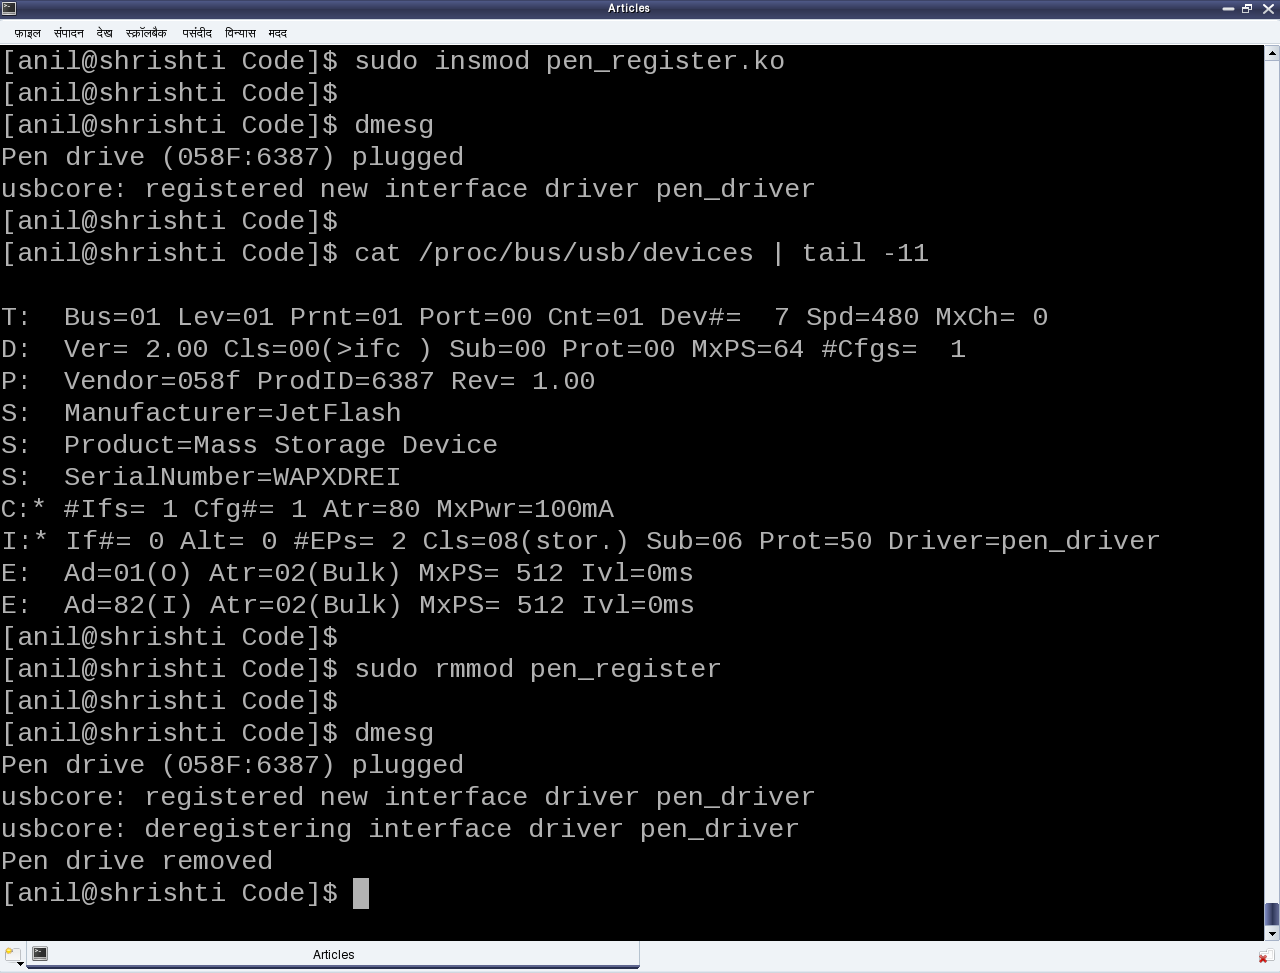
Рис.5: Флеш устройство в действии
Подведем итог
«Наконец-то! Что-то действует!» — облегченно сказала Светлана. «Но мне кажется, что для того, чтобы собрать полный драйвер устройства USB, здесь есть еще много того, с чем следует разбираться (например, с идентификационной таблицей, обратными вызовами probe и disconnect и т. д.)».
«Да, ты права. Давай разбираться со всем по порядку и с перерывами » — ответил Пагс, прервав самого себя.
Источник
Writing USB Device Drivers
Introduction
The Linux USB subsystem has grown from supporting only two different types of devices in the 2.2.7 kernel (mice and keyboards), to over 20 different types of devices in the 2.4 kernel. Linux currently supports almost all USB class devices (standard types of devices like keyboards, mice, modems, printers and speakers) and an ever-growing number of vendor-specific devices (such as USB to serial converters, digital cameras, Ethernet devices and MP3 players). For a full list of the different USB devices currently supported, see Resources.
The remaining kinds of USB devices that do not have support on Linux are almost all vendor-specific devices. Each vendor decides to implement a custom protocol to talk to their device, so a custom driver usually needs to be created. Some vendors are open with their USB protocols and help with the creation of Linux drivers, while others do not publish them, and developers are forced to reverse-engineer. See Resources for some links to handy reverse-engineering tools.
Because each different protocol causes a new driver to be created, I have written a generic USB driver skeleton, modelled after the pci-skeleton.c file in the kernel source tree upon which many PCI network drivers have been based. This USB skeleton can be found at drivers/usb/usb-skeleton.c in the kernel source tree. In this article I will walk through the basics of the skeleton driver, explaining the different pieces and what needs to be done to customize it to your specific device.
Linux USB Basics
If you are going to write a Linux USB driver, please become familiar with the USB protocol specification. It can be found, along with many other useful documents, at the USB home page (see Resources). An excellent introduction to the Linux USB subsystem can be found at the USB Working Devices List (see Resources). It explains how the Linux USB subsystem is structured and introduces the reader to the concept of USB urbs (USB Request Blocks), which are essential to USB drivers.
The first thing a Linux USB driver needs to do is register itself with the Linux USB subsystem, giving it some information about which devices the driver supports and which functions to call when a device supported by the driver is inserted or removed from the system. All of this information is passed to the USB subsystem in the usb_driver structure. The skeleton driver declares a usb_driver as:
The variable name is a string that describes the driver. It is used in informational messages printed to the system log. The probe and disconnect function pointers are called when a device that matches the information provided in the id_table variable is either seen or removed.
The fops and minor variables are optional. Most USB drivers hook into another kernel subsystem, such as the SCSI, network or TTY subsystem. These types of drivers register themselves with the other kernel subsystem, and any user-space interactions are provided through that interface. But for drivers that do not have a matching kernel subsystem, such as MP3 players or scanners, a method of interacting with user space is needed. The USB subsystem provides a way to register a minor device number and a set of file_operations function pointers that enable this user-space interaction. The skeleton driver needs this kind of interface, so it provides a minor starting number and a pointer to its file_operations functions.
The USB driver is then registered with a call to usb_register() , usually in the driver’s init function, as shown here:
When the driver is unloaded from the system, it needs to deregister itself with the USB subsystem. This is done with the usb_deregister() function:
To enable the linux-hotplug system to load the driver automatically when the device is plugged in, you need to create a MODULE_DEVICE_TABLE . The following code tells the hotplug scripts that this module supports a single device with a specific vendor and product ID:
There are other macros that can be used in describing a struct usb_device_id for drivers that support a whole class of USB drivers. See usb.h for more information on this.
Device operation
When a device is plugged into the USB bus that matches the device ID pattern that your driver registered with the USB core, the probe function is called. The usb_device structure, interface number and the interface ID are passed to the function:
The driver now needs to verify that this device is actually one that it can accept. If so, it returns 0. If not, or if any error occurs during initialization, an errorcode (such as -ENOMEM or -ENODEV ) is returned from the probe function.
In the skeleton driver, we determine what end points are marked as bulk-in and bulk-out. We create buffers to hold the data that will be sent and received from the device, and a USB urb to write data to the device is initialized.
Conversely, when the device is removed from the USB bus, the disconnect function is called with the device pointer. The driver needs to clean any private data that has been allocated at this time and to shut down any pending urbs that are in the USB system.
Now that the device is plugged into the system and the driver is bound to the device, any of the functions in the file_operations structure that were passed to the USB subsystem will be called from a user program trying to talk to the device. The first function called will be open, as the program tries to open the device for I/O. We increment our private usage count and save a pointer to our internal structure in the file structure. This is done so that future calls to file operations will enable the driver to determine which device the user is addressing. All of this is done with the following code:
After the open function is called, the read and write functions are called to receive and send data to the device. In the skel_write function, we receive a pointer to some data that the user wants to send to the device and the size of the data. The function determines how much data it can send to the device based on the size of the write urb it has created (this size depends on the size of the bulk out end point that the device has). Then it copies the data from user space to kernel space, points the urb to the data and submits the urb to the USB subsystem. This can be seen in the following code:
When the write urb is filled up with the proper information using the usb_fill_bulk_urb() function, we point the urb’s completion callback to call our own skel_write_bulk_callback function. This function is called when the urb is finished by the USB subsystem. The callback function is called in interrupt context, so caution must be taken not to do very much processing at that time. Our implementation of skel_write_bulk_callback merely reports if the urb was completed successfully or not and then returns.
The read function works a bit differently from the write function in that we do not use an urb to transfer data from the device to the driver. Instead we call the usb_bulk_msg() function, which can be used to send or receive data from a device without having to create urbs and handle urb completion callback functions. We call the usb_bulk_msg() function, giving it a buffer into which to place any data received from the device and a timeout value. If the timeout period expires without receiving any data from the device, the function will fail and return an error message. This can be shown with the following code:
The usb_bulk_msg() function can be very useful for doing single reads or writes to a device; however, if you need to read or write constantly to a device, it is recommended to set up your own urbs and submit them to the USB subsystem.
When the user program releases the file handle that it has been using to talk to the device, the release function in the driver is called. In this function we decrement our private usage count and wait for possible pending writes:
One of the more difficult problems that USB drivers must be able to handle smoothly is the fact that the USB device may be removed from the system at any point in time, even if a program is currently talking to it. It needs to be able to shut down any current reads and writes and notify the user-space programs that the device is no longer there. The following code (function skel_delete ) is an example of how to do this:
If a program currently has an open handle to the device, we reset the flag device_present . For every read, write, release and other functions that expect a device to be present, the driver first checks this flag to see if the device is still present. If not, it releases that the device has disappeared, and a -ENODEV error is returned to the user-space program. When the release function is eventually called, it determines if there is no device and if not, it does the cleanup that the skel_disconnect function normally does if there are no open files on the device (see Listing 5).
Isochronous Data
This usb-skeleton driver does not have any examples of interrupt or isochronous data being sent to or from the device. Interrupt data is sent almost exactly as bulk data is, with a few minor exceptions. Isochronous data works differently with continuous streams of data being sent to or from the device. The audio and video camera drivers are very good examples of drivers that handle isochronous data and will be useful if you also need to do this.
Conclusion
Writing Linux USB device drivers is not a difficult task as the usb-skeleton driver shows. This driver, combined with the other current USB drivers, should provide enough examples to help a beginning author create a working driver in a minimal amount of time. The linux-usb-devel mailing list archives also contain a lot of helpful information.
Источник


