- Linux / Unix Find Command Avoid Permission Denied Messages
- Find command basic syntax
- How to hide or fix find command permission denied messages
- How does it works?
- Exclude all “permission denied” messages from “find” command on Linux
- Conclusion
- Ошибка «Permission denied» в Linux
- Изменение прав в терминале
- Изменение прав в файловом менеджере
- В заключение
- Ubuntu Documentation
- Understanding and Using File Permissions
- Folder/Directory Permissions
- Permissions in Action
- Changing Permissions
- How to resolve permission denied Linux error
- What is permission denied Linux error?
- Example of Permission denied Linux error
- How to resolve Permission denied Error
- Resolving Permission denied error related to script execution:
- Resolving permission denied Linux error while listing or writing to a file
- Resolving permission denied Linux error for specific user
- Download Free book
Linux / Unix Find Command Avoid Permission Denied Messages
W hen I type find . -type d -name «foo» command I get Permission denied error messages. How do I exclude all “permission denied: messages from the find command under Linux or Unix like operating systems?
The find command is used to locate files on a Linux or Unix like operating system. The find command will search directory to match the supplied search criteria. You can search for files by
| Tutorial details | |
|---|---|
| Difficulty level | Easy |
| Root privileges | No |
| Requirements | find command+ Unix like os |
| Est. reading time | 2m |
type, name, owner, group, date, permissions and more. By default the find will search all subdirectories for you. Let us see how to hide and fix permission denied message when using the find on Linux or Unix-like system.
Find command basic syntax
The syntax is as follows:
find where-to-look criteria action
find /dir/to/search -name filetosearch
find /dir/to/search -name «*.c»
find /home/nixcraft/project/ -name «*.py» -print
In this example, find will search the /tmp directory for any files named “data*.txt” and display their pathnames:
Fig. 01: Find will show an error message for each directory on which you don’t have read permission.
How to hide or fix find command permission denied messages
In this above example, I do not have read permission for vmware-root and orbit-Debian-gdm directories. To to avoid this problem try the following syntax:
Sample outputs without permission denied spam from find command:
How does it works?
The 2>/dev/null at the end of the find command tells your shell to redirect the error messages (FD #2) to /dev/null, so you don’t have to see them on screen. Use /dev/null to to send any unwanted output from program/command. All data written on a /dev/null special file is discarded by the system. To redirect standard error to /dev/null and store file list to output.txt, type:
Exclude all “permission denied” messages from “find” command on Linux
There is one problem with the following command. It would filter out all error messages created by find command, not just the permission denied ones:
To avoid that try the following find command along with grep command on Linux or Unix-like systems:
In short you should use following syntax to skip “permission denied” errors messages when running find in Linux or Unix-based systems:
To store output to a file run:
- No ads and tracking
- In-depth guides for developers and sysadmins at Opensourceflare✨
- Join my Patreon to support independent content creators and start reading latest guides:
- How to set up Redis sentinel cluster on Ubuntu or Debian Linux
- How To Set Up SSH Keys With YubiKey as two-factor authentication (U2F/FIDO2)
- How to set up Mariadb Galera cluster on Ubuntu or Debian Linux
- A podman tutorial for beginners – part I (run Linux containers without Docker and in daemonless mode)
- How to protect Linux against rogue USB devices using USBGuard
Join Patreon ➔
Conclusion
You learned how to hide and fix permission denied messages when using the find command on your Linux, Unix, or macOS-based systems. Of course, we can also run the command as sudo when possible but avoid all this mess. Unfortunately, you will not get sudo or root access at all times. Hence, we talked about various methods here. For your ready references, sudo syntax would be as follows:
sudo find /dir/to/search -name «pattern» -action
sudo find / -name «jail.conf» -print
Please see find/bash command man page online or read it by typing the following man command:
man find
man bash
man zsh
man ksh
🐧 Get the latest tutorials on Linux, Open Source & DevOps via
| Category | List of Unix and Linux commands |
|---|---|
| Documentation | help • mandb • man • pinfo |
| Disk space analyzers | df • duf • ncdu • pydf |
| File Management | cat • cp • less • mkdir • more • tree |
| Firewall | Alpine Awall • CentOS 8 • OpenSUSE • RHEL 8 • Ubuntu 16.04 • Ubuntu 18.04 • Ubuntu 20.04 |
| Linux Desktop Apps | Skype • Spotify • VLC 3 |
| Modern utilities | bat • exa |
| Network Utilities | NetHogs • dig • host • ip • nmap |
| OpenVPN | CentOS 7 • CentOS 8 • Debian 10 • Debian 8/9 • Ubuntu 18.04 • Ubuntu 20.04 |
| Package Manager | apk • apt |
| Processes Management | bg • chroot • cron • disown • fg • glances • gtop • jobs • killall • kill • pidof • pstree • pwdx • time • vtop |
| Searching | ag • grep • whereis • which |
| Shell builtins | compgen • echo • printf |
| Text processing | cut • rev |
| User Information | groups • id • lastcomm • last • lid/libuser-lid • logname • members • users • whoami • who • w |
| WireGuard VPN | Alpine • CentOS 8 • Debian 10 • Firewall • Ubuntu 20.04 |
Comments on this entry are closed.
Both errors and warning are thrown into stderr is there any way we can identify that the command has a warning in it and not the error ??
Apart from checking the return code !!
Just use sudo (assuming you’re not running it in a script)
Источник
Ошибка «Permission denied» в Linux
Все операционные системы семейства Linux имеют четко разграниченные права доступа. В своей домашней директории пользователь может делать все, что ему угодно, до тех пор, пока укладывается в отведенные рамки. Попытка выйти за них приводит к появлению ошибки «Permission Denied».
Изменение прав в терминале
Рассмотрим вариант, в котором необходимо прочесть текстовый документ, созданный другим пользователем. Файлы TXT в Linux можно просматривать непосредственно в терминале с помощью команды «cat».
- Заходим в каталог с интересующим нас документом. Набираем команду «cat filename», подставляя вместо «filename» имя нужного файла. На скриншоте показана ошибка «Permission Denied», выглядящая в русской локализации как «Отказано в доступе».

Получаем ошибку «Permission Denied» при попытке просмотреть содержимое файла
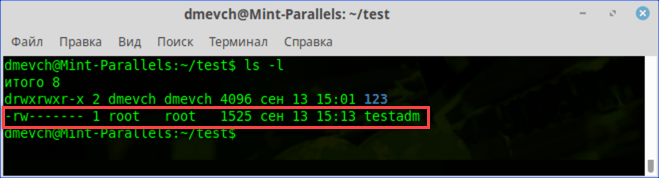
Проверяем права доступа к документу используя команду «ls -l»
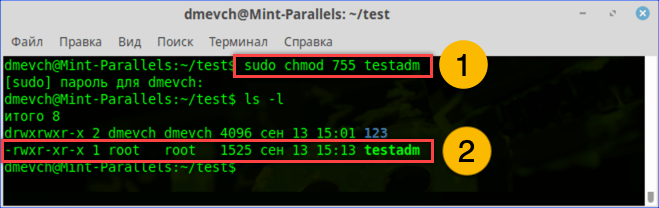
Используем команду «chmod» и административные права для получения доступа
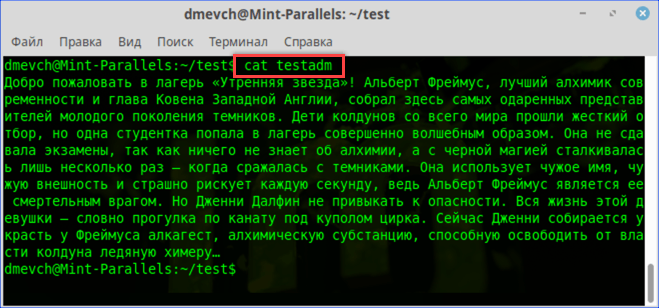
Просматриваем содержимое текстового документа командой «cat»
Изменение прав в файловом менеджере
Разберемся, как выполнить рассмотренную выше операцию в графическом интерфейсе, используя файловый менеджер из дистрибутива.
- Как видно на скриншоте, значок файла изначально имеет дополнительные символы, указывающие на то, что доступ у нему ограничен. При попытке посмотреть содержимое получаем графический вариант ошибки «Permission Denied».
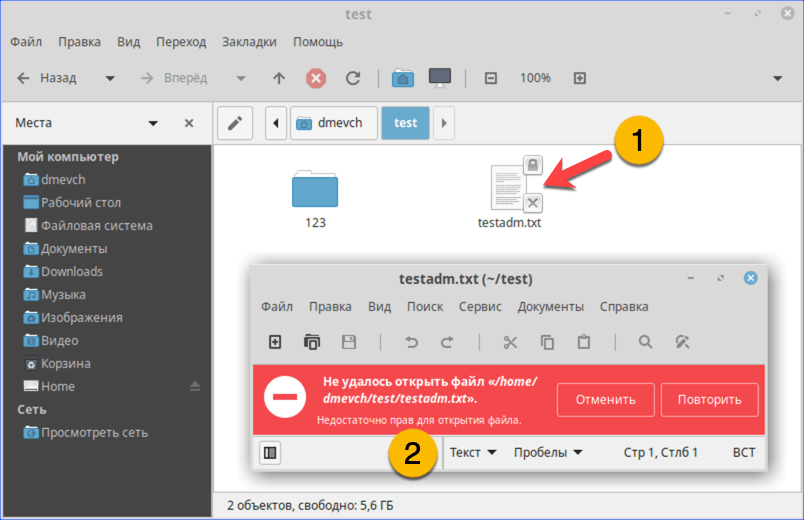
При попытке открыть текстовый документ получаем ошибку «Permission Denied»
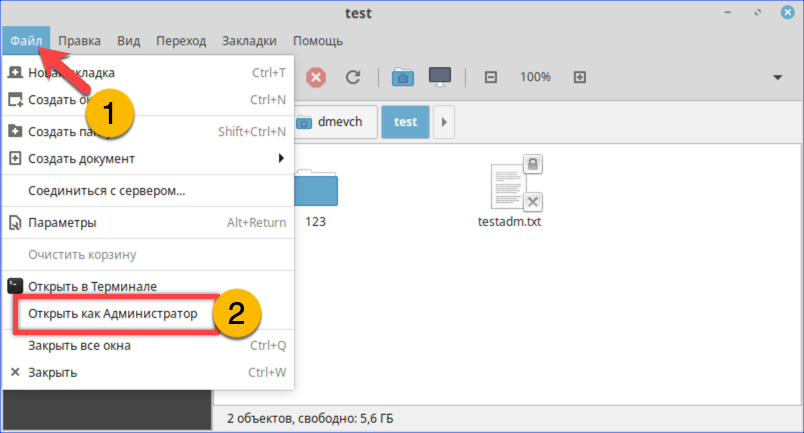
Открываем меню «Файл» и перезапускаем файловый менеджер от имени root
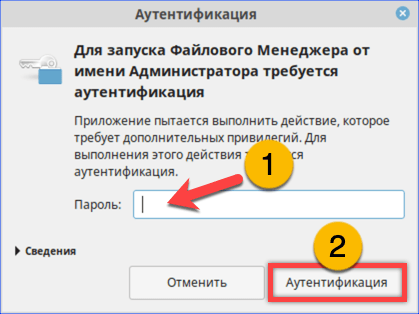
Набираем пароль root в окне аутентификации
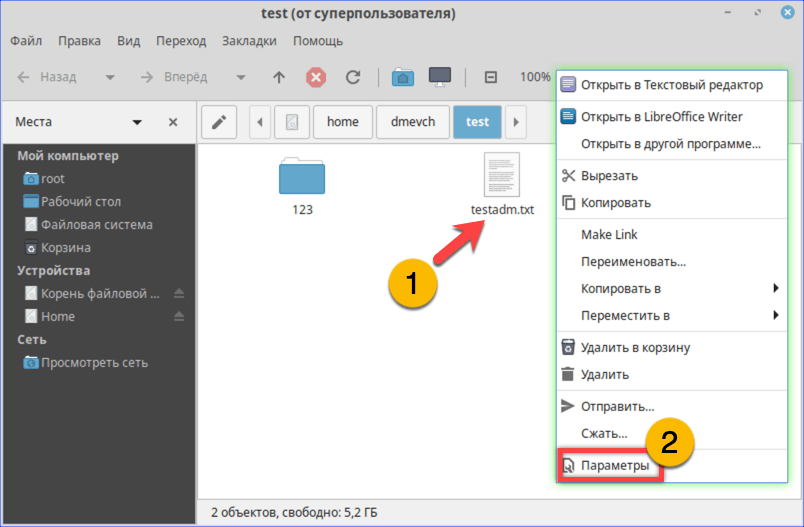
Открываем параметры файла с помощью контекстного меню
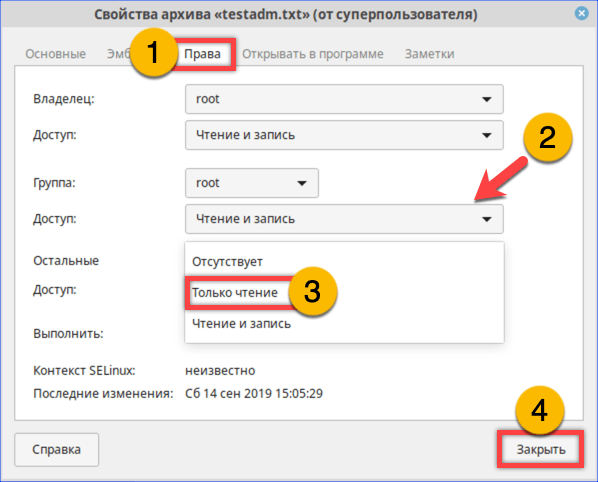
На вкладке «Права» разрешаем доступ для группы root и остальных пользователей
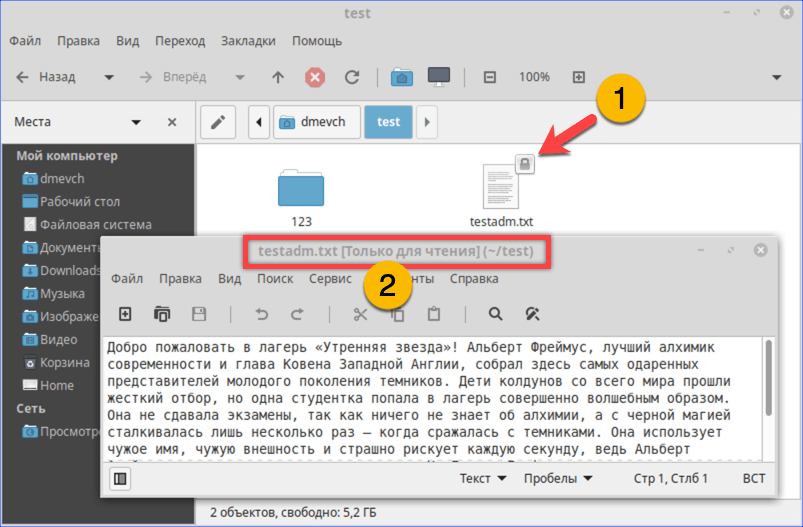
Открываем ранее недоступный файл в режиме чтения и изучаем содержимое
В заключение
Как видим, избавиться от ошибки Permission Denied достаточно просто. Решив изменить правда доступа к системным файлам, лишний раз убедитесь, что полностью уверены в своих действиях и понимаете последствия вносимых изменений.
Источник
Ubuntu Documentation
Understanding and Using File Permissions
In Linux and Unix, everything is a file. Directories are files, files are files and devices are files. Devices are usually referred to as a node; however, they are still files. All of the files on a system have permissions that allow or prevent others from viewing, modifying or executing. If the file is of type Directory then it restricts different actions than files and device nodes. The super user «root» has the ability to access any file on the system. Each file has access restrictions with permissions, user restrictions with owner/group association. Permissions are referred to as bits.
To change or edit files that are owned by root, sudo must be used — please see RootSudo for details.
If the owner read & execute bit are on, then the permissions are:
There are three types of access restrictions:
Permission
Action
chmod option
There are also three types of user restrictions:
User
ls output
Note: The restriction type scope is not inheritable: the file owner will be unaffected by restrictions set for his group or everybody else.
Folder/Directory Permissions
Directories have directory permissions. The directory permissions restrict different actions than with files or device nodes.
Permission
Action
chmod option
(view contents, i.e. ls command)
(create or remove files from dir)
(cd into directory)
read restricts or allows viewing the directories contents, i.e. ls command
write restricts or allows creating new files or deleting files in the directory. (Caution: write access for a directory allows deleting of files in the directory even if the user does not have write permissions for the file!)
execute restricts or allows changing into the directory, i.e. cd command
» height=»16″ src=»/moin_static198/light/img/icon_cool.png» title=»Info » width=»16″/> Folders (directories) must have ‘execute’ permissions set (x or 1), or folders (directories) will NOT FUNCTION as folders (directories) and WILL DISAPPEAR from view in the file browser (Nautilus).
Permissions in Action
Using the example above we have the file «/etc/hosts» which is owned by the user root and belongs to the root group.
What are the permissions from the above /etc/hosts ls output?
Changing Permissions
The command to use when modifying permissions is chmod. There are two ways to modify permissions, with numbers or with letters. Using letters is easier to understand for most people. When modifying permissions be careful not to create security problems. Some files are configured to have very restrictive permissions to prevent unauthorized access. For example, the /etc/shadow file (file that stores all local user passwords) does not have permissions for regular users to read or otherwise access.
Источник
How to resolve permission denied Linux error
This article will teach you quickly what is permission denied Linux error. And also what ways you can avoid permission denied error in Linux.![]()
What is permission denied Linux error?
This error comes when you try to list files or try execute the file inside the directory where you don’t have sufficient permission. Since Linux operating system is very particular about its security aspect.
Example of Permission denied Linux error
Let’s say you are a normal user who is trying to list or trying change the directory inside the /root file-system. Since you do not have sufficient permissions system will respond with permission denied error message as below:
One way to avoid such error is to switch to root user using su – command. However this solution is not recommended since it will gain unnecessary access to all the root file system.
How to resolve Permission denied Error
Resolving Permission denied error related to script execution:
Let’s say you have created a shell script for performing any task. but when you try to execute the script you may end with below error due absence of permission denied error.
Now to avoid such case you need to add execute permission “x” to the file myshell.sh using chmod command as below:
In the last output you can see that there is “x” (execution) permission added after chmod command. So next time when you try to execute the shell script , it will execute without any error.
Resolving permission denied Linux error while listing or writing to a file
In this type of permission denied error you try to list or write the file in which you do not have sufficient permission to do so as below:
If you look at the permissions of the “myfolder” directory using ls -l command you will come to know about the permissions.
As per the permission given in above output only owner of the directory who is root can have all permission that is read, write and execute. So in such case you need to change the permission of the directory to read using below chmod command:
Now this time when normal user manmohan try to list directory he will not get the permission denied error.
In case you want to have write permission on this directory you need to specify w flag as well in chmod command as below:
Same is applicable to file level permission as well.
One more way is to changing the ownership of the directory using chown command. Since in our example we are getting error for user manmohan we will change ownership of the directory “myfolder” using below command.
Since manmohan user is now the owner of the directory he can able to do any operation on the directory. In case you want to recursive permission do not forget to add -r while chown command as below:
Resolving permission denied Linux error for specific user
In above method of changing the permission using chmod is not suitable as per my opinion. Because when you give permission to others, it will be open for all the users within the system. Which is wrong in terms of security perspective. To resolve this error specific to user you can implement it using access control list or ACL. Follow my article on Access control list ACL for the same.
Download Free book
Get your free copy of Linux command line Cheat Sheet.
Источник


