- Linux для allwinner a13
- Linux для allwinner a13
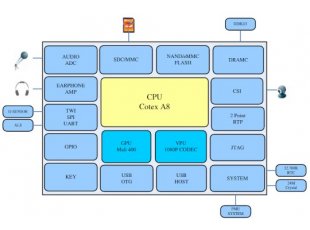
- Allwinner A13
- FEATURES
- DOCUMENTS
- SOFTWARE
- Related Products — People who bought this product also bought
- запуск linux на allwinner A13(prestigio multipad pmp3270b)
- A13-OLinuXino
- Contents
- Official Images from OLIMEX
- Linux
- Android
- Android for NAND
- Android for microSD card
- HOWTOs
- General
- Linux related
- Android related
- Python
- Scratch
- How to edit board configurations and definitions in the official Debian Linux?
- How to add STK1160 video capture driver support in Kernel 3.4
- Hardware
- Power supply
- Software
- Linux Commands
- Bare Metal programming — no OS
- Using an operating system — Nand flash
- Using an operating system — SD card
- Prebuilt images
- Build your own kernel and image onto SD card
- Setup and configure the installed debian image
- Installing UsbVideoClass(UVC) on A13-OLinuXino board
- Setup VLC player for video streaming on A13-OLinuXino board
- Creating a program to run on the A13-OlinuXino board
- Software links
- A13-SDK Android 4.0.3 ICS
- A13-SDK Android 4.1 JB
- Projects
- List of Contributors
Linux для allwinner a13
Большинсто китайских планшетов работает на процессорах AllWinner с видеопроцессором Mali-400.
Эти планшеты достаточно слабые, но всё же пользоваться можно.
Главным плюсом этих процессоров является то, что загрузка устройства начинается с MicroSD флешки.
Это позволяет запустить ОС с флешки, ну или просто прошить девайс.
Я хочу представить вам Lubuntu, который работает на наших планшетах.
Установка проста, но работаспособность не гарантируется.
Логин/Пароль к системе: linaro/yDckoo5y
За основу взят boot раздел Fedora 20 и root раздел Linaro 13.08. Ядро ситемы 3.4.75. Система локализована на русский язык. Установлено необходимое для повседневной работы ПО: Libre Office, Geany, менеджер архивов, BleachBin для чистки системы, Chromium browser, Firefox, Midnight commander, Gimp графический редактор, Gnome player, ssh, торрен-клиент Transmission, samba для расшаривания ресурсов и прочее. Папка /shared открыта по сети и служит для скачивания торрентов. Доступ к Transmission через веб-интерфейс http://localhost:9091 (login: user, без пароля). Если будете подключать внешний накопитель, то просто пропишите в файле /etc/fstab его монтирование в папку /shared и он станет доступен по сети, а торренты будут качаться на него.
ARMel — Поддерживает лишь программную реализацию (software floating point).
ARMhf — Имеет набор инструкций процессора, которые позволяют выполнять операции с плавающей точкой на аппаратном уровне (hardware floating point).
Сообщение отредактировал AndrewP_1 — 23.04.19, 08:30
 Endermen1234,
Lubuntu не заменяет андроид, она работает на флешке. О если вы захотите вы можете очистить память планшета (4гб). Linux работает независимо от android.
Я так понял у тебя A13? Тогда просто делай всё по инструкции. Ядро для твоего процессора есть в образе.
Тебе нужно только распоковать образ (через Linux) на флешку. И запустить скрипт выбора ядра. Выбирай нужное.
Главное измени вывод с hdmi поменяй на lcd. И поставь свое разрешение
Сообщение отредактировал BlackUnicorn71 — 14.08.15, 20:54
mdxl,
Всё дело в драйвере. В этих сборках не работает USB, поддерживается только MicroUSB. Возможно если добавить драйвер в ядро, то запустится.
Лучше всего не собирать ядро, а я взять рабочее из Android’a.
Установи андроид, достань ядро. (Нужен root)
Если Lubuntu запуститься с новым ядром, и будет работать USB, то радуйся. Запусти gparted и снеси нафиг все разделы из встроеной памяти с андроидом (system, data, cache, и т.д.)
Если есть Рут сделай так:
Запустите эмулятор терминала на планшете и введите команды «su», потом «mkdir /sdcard/nanda», потом «busybox mount /dev/block/nanda /sdcard/nanda».
Заберите файл script0.bin из «/sdcard/nanda/».
Переместите файл script.bin в корень boot раздела на флешке.
USB должны заработать. Попробывать стоит.
Пытаюсь поставить на ritmix rmd 1025 с процем Boxchip A10, работает только через HDMI. Как заставить работать экран?
Сообщение отредактировал lakroft — 24.08.15, 16:38
Используй тип 0 если на экран планшета или 3 для hdmi
Странно, у меня Busybox нормально монтирует раздел nanda как папку. У меня там Script0.bin и папка с изображениями зарядки и бута.
Ты использовал
Первый вариант монтирует лишь список, а второй монтирует сам раздел nanda
denaturat7,
Хм. А80Т мощная штука наверное. Но у тебя работать не будет.
Этот порт для устройств на AllWinner с видеопроцессором Mali-400. А у тебя PowerVR G6230.
Сообщение отредактировал BlackUnicorn71 — 25.08.15, 12:27
Источник
Linux для allwinner a13
Большинсто китайских планшетов работает на процессорах AllWinner с видеопроцессором Mali-400.
Эти планшеты достаточно слабые, но всё же пользоваться можно.
Главным плюсом этих процессоров является то, что загрузка устройства начинается с MicroSD флешки.
Это позволяет запустить ОС с флешки, ну или просто прошить девайс.
Я хочу представить вам Lubuntu, который работает на наших планшетах.
Установка проста, но работаспособность не гарантируется.
Логин/Пароль к системе: linaro/yDckoo5y
За основу взят boot раздел Fedora 20 и root раздел Linaro 13.08. Ядро ситемы 3.4.75. Система локализована на русский язык. Установлено необходимое для повседневной работы ПО: Libre Office, Geany, менеджер архивов, BleachBin для чистки системы, Chromium browser, Firefox, Midnight commander, Gimp графический редактор, Gnome player, ssh, торрен-клиент Transmission, samba для расшаривания ресурсов и прочее. Папка /shared открыта по сети и служит для скачивания торрентов. Доступ к Transmission через веб-интерфейс http://localhost:9091 (login: user, без пароля). Если будете подключать внешний накопитель, то просто пропишите в файле /etc/fstab его монтирование в папку /shared и он станет доступен по сети, а торренты будут качаться на него.
ARMel — Поддерживает лишь программную реализацию (software floating point).
ARMhf — Имеет набор инструкций процессора, которые позволяют выполнять операции с плавающей точкой на аппаратном уровне (hardware floating point).
Сообщение отредактировал AndrewP_1 — 23.04.19, 08:30
Endermen1234,
Lubuntu не заменяет андроид, она работает на флешке. О если вы захотите вы можете очистить память планшета (4гб). Linux работает независимо от android.
Я так понял у тебя A13? Тогда просто делай всё по инструкции. Ядро для твоего процессора есть в образе.
Тебе нужно только распоковать образ (через Linux) на флешку. И запустить скрипт выбора ядра. Выбирай нужное.
Главное измени вывод с hdmi поменяй на lcd. И поставь свое разрешение
Сообщение отредактировал BlackUnicorn71 — 14.08.15, 20:54
mdxl,
Всё дело в драйвере. В этих сборках не работает USB, поддерживается только MicroUSB. Возможно если добавить драйвер в ядро, то запустится.
Лучше всего не собирать ядро, а я взять рабочее из Android’a.
Установи андроид, достань ядро. (Нужен root)
Если Lubuntu запуститься с новым ядром, и будет работать USB, то радуйся. Запусти gparted и снеси нафиг все разделы из встроеной памяти с андроидом (system, data, cache, и т.д.)
Если есть Рут сделай так:
Запустите эмулятор терминала на планшете и введите команды «su», потом «mkdir /sdcard/nanda», потом «busybox mount /dev/block/nanda /sdcard/nanda».
Заберите файл script0.bin из «/sdcard/nanda/».
Переместите файл script.bin в корень boot раздела на флешке.
USB должны заработать. Попробывать стоит.
Пытаюсь поставить на ritmix rmd 1025 с процем Boxchip A10, работает только через HDMI. Как заставить работать экран?
Сообщение отредактировал lakroft — 24.08.15, 16:38
Используй тип 0 если на экран планшета или 3 для hdmi
Странно, у меня Busybox нормально монтирует раздел nanda как папку. У меня там Script0.bin и папка с изображениями зарядки и бута.
Ты использовал
Первый вариант монтирует лишь список, а второй монтирует сам раздел nanda
denaturat7,
Хм. А80Т мощная штука наверное. Но у тебя работать не будет.
Этот порт для устройств на AllWinner с видеопроцессором Mali-400. А у тебя PowerVR G6230.
Сообщение отредактировал BlackUnicorn71 — 25.08.15, 12:27
Источник
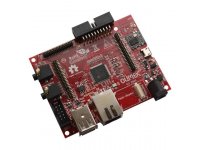
Allwinner A13

Olimex A13-SOM-256 Linux System on module with Allwinner A13 Cortex-A8 ARM processor and 256 MB RAM

Bootable micro SD card with Debian Linux image
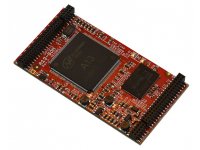
Olimex A13-SOM-512 Linux Android System on module with Allwinner A13 Cortex-A8 ARM processor and 512 MB RAM
Bootable micro SD card with Android image
- A13-SOM-512-ANDROID-SD
- A13-SOM-512-DEBIAN-SD
Olimex A13-SOM-WIFI WiFi shield for A13-SOM System on module
FEATURES
- ARM Cortex-A8 single core runing at up to 1.2Ghz
- GPU, VPU
- 16 bit DDR3L memory controller
- USB2.0 Host
- USB2.0 OTG
DOCUMENTS
SOFTWARE
- mainline Linux images for Debian 9 and Ubuntu 20.04 no hardware acceleration
- Allwinner Linux image with 3.4 kernel with hardware acceleration for GPU and VPU
Related Products — People who bought this product also bought
Evaluation board for STM32MP151 STM32MP153 STM32MP157 and A13 System on Modules SOM
Источник
запуск linux на allwinner A13(prestigio multipad pmp3270b)
всем доброго времени суток. кто нибуть помогите и обьясните как запустить Линукс на устройстве которое указано в заголовке темы. заранее спасибо

Довольно сложно запустить Линукс на устройстве, которое указано в заголовке темы.

Бессмысленно запускать Линукс на устройстве, которое указано в заголовке темы.

в чруте, чтобы не заморачиваться руками — в маркете есть куча аппов находящихся по запросу «linux installer» или типа того
Довольно легко запустить линукс на устройстве, указанном в заголовке темы.

глупо запускать линукс на тормозном арме
а можно по точней? как именно? только не chroot
chroot это не вариант(((
я вот нашел статейку на счет allwinner A10 http://habrahabr.ru/post/149598/ . а мне надо A13((
A13 это тот же A10, но с выпиленными HDMI и SATA.
Ну и держит максимум 512MB RAM
A13 это обрезанный A10. А вообще http://linux-sunxi.org/. Бери исходники оттуда6 дебустрапь дебиан, дальше там в принципе написано как сделать загружаемую флешку. Дальше можешь поиграть и оно бесполезно.
а обязательно собирать u-boot и ядро?? или можно взять от А10.
Надо. Да и нет там ничего сложного.
дело в том что я не могу скачать с гитхаба исходники. интернет слабый оч..и если сорвется связь то все занова качать
С гитхаба же можно стянуть зип с последними исходниками.
к вам прозьба. если у вас интернет нормальный ,не могли бы вы скачать и перезалить исходники куда нибуть и скинуть мне ссылочку. буду очень вам благодарен за помощь
да я то знаю что зип архивом можно. до гит докачку же не поддерживает.
собрал загрузчик и ядро. скачал img файл rootfs ..а как его распаковать.
нужным разархиватором взять и распаковать в корень флешки?
все сам разобрался. спасибо)
запустил Linux на планшете prestigio multipad pmp3270b,allwinner a13. исходники ядра и загрузчика взял с https://github.com/linux-sunxi . script.bin выдрал с nand планшета. по позже скину скриншоты и сделаю тесты на производительность.
Здравствуйте. Имею такой же планшет, но никак не получается запустить на нем Linux. Можете где-то выложить Ваш образ системы?

1) нужно сдампить файл c андройда (с помошью терминала и чего угодно)
2) нужно снять конфиг ddr3 (есть прога нужно запустить на живом андройде)
3)сконфигурировать uboot под конфиг (или найти подходящии)
4) собрать uboot и ядро положить рядом scirpt.bin на mmc флешку (первый раздел ) (fat или ext2)
5) прошить dd загрузчик на ммс
6) записать debbootstrap armhf на второй раздел
более подробно на #linux-sunxi в ирке на инглише и на вики проекта
единственное с чем могут быть проблемы это драйвера тача и камеры но все остальное будет работать с ООчень большим шансом на успех
Источник
A13-OLinuXino
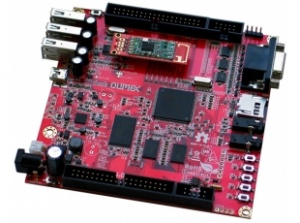
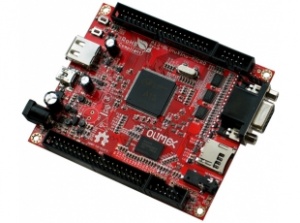
The A13 processor from Allwinner runs at 1GHz with a Mali400 GPU. It was designed for integration into tablets. Olimex has made several development board designs based around this chip. This wiki page contains information about hardware and software to help make use of these development boards.
The A13 based boards currently available are
- A13-OLinuXino-WIFI — Recommended if your developing software for the A13 for the first time as its the only one with network connectivity.
- A13-OLinuXino — This is the same as the WIFI version but without WIFI module and NAND flash. Note: Android requires NAND flash to run, so this board can’t run Android.
- A13-OLinuXino-MICRO — Similar to the A13-OlinuXino but with less extras
- A13-SOM-512 — System-on-Module A13 board recommended for users with experience in Allwinner development. Allows developing custom extensions with only the peripherals needed.
Contents
Official Images from OLIMEX
Linux
The official Debian images are suitable only for microSD card. Information on booting Debian from the NAND might be found at the forum.
Download methods and locations might be found below!
Please note that you might need different Debian Linux images for different boards with different hardware — you would need to inspect the DDR3 RAM memory and use the image suitable for your board. We use either HYNIX H5TQ2G83CFR, or SAMSUNG K4B2G0846Q.
Newest official Debian release (recommended):
Torrent of Debian release 11.3 suitable for boards with SAMSUNG K4B2G0846Q DDR3 RAM memory: A13 Debian Linux with kernel 3.4.90+, suitable for boards with SAMSUNG DDR3 RAM
Torrent of Debian release 10 suitable for boards with HYNIX H5TQ2G83CFR DDR3 RAM memory: A13 Debian Linux with kernel 3.4.90+, suitable for HYNIX DDR3 RAM
Instructions and required files for preparing the Debian images: building Linux for A13-OLinuXino and A13-OLinuXino-WIFI
The images include the following:
- Linux Kernel 3.4.90+
- LXDE desktop environment
- GCC 4.6
- dpkg
- git
- i2c-tools
- perl
- xorg
- Python 2.7
- vlc
- mplayer
- smplayer
- midori browser
- usb-modeswitch
- sshfs
- wvdial
- LCD and touchscreen support
- GPIO
- I2C
- SPI
- USB WIFI RTL8188CU, Ethernet AX88772B
- Audio
- PyA13 python module with GPIO,I2C,SPI support
- Default Login: root/olimex
Note: the A13-OLinuXino-SD card which we have on our webshop contain same image on 4GB Class10 fast micro sd-card, if you want to use this image please use Class10 fast card or the performance of Linux will slow down
The file A13_debian_34_75_WIFI_RALINK_GCC_GPIO_X_I2C_100KHz_UVC_TS_FTDI_video_release_9.7z is an archive of A13_debian_34_75_WIFI_RALINK_GCC_GPIO_X_I2C_100KHz_UVC_TS_FTDI_video_release_9.7z file.
So in order to write the image on SD card you have to unzip A13_debian_34_75_WIFI_RALINK_GCC_GPIO_X_I2C_100KHz_UVC_TS_FTDI_video_release_9.7z file:
For Windows use 7zip and then use Win32DiskImager.exe (http://sourceforge.net/projects/win32diskimager/) for image writing
For Linux use p7zip package. If you have no installed 7zip then type
Copy A13_debian_34_75_WIFI_RALINK_GCC_GPIO_X_I2C_100KHz_UVC_TS_FTDI_video_release_9.7z file in your directory and unzip it with
The output should be a new 4GB file named A13_debian_34_75_WIFI_RALINK_GCC_GPIO_X_I2C_100KHz_UVC_TS_FTDI_video_release_9.7z Put 4GB SD card in your card reader and type
Then press two times you will see a list of your sd devices like sda sdb sdc note that some of these devices may be your hard disk so make sure you know which one is your sd card before you proceed as you can damage your HDD if you choose the wrong sd-device. You can do this by unplugging your sd card reader and identify which «sd» devices remove from the list. Once you know which device is your sdcard like sda use this text instead of the sdX name in the references below:
The main tested onboard hardware modules are:
GPIO — they are located in /sys/class/gpio directory. Note that first you have to export GPIOs. For example: to add PB03
to make PB03 output
to make PB03 high level(3.3V)
to make PB03 low level(0V)
Full list with supported GPIOs is:
gpio12_pg9(GPIO2/pin10) is connected to on board LED and it is multiplexed with UART3_TX and gpio13_pg10(GPIO2/pin8) is multiplexed with UART3_RX Therfore if you want to use these ports like GPIO then UART3_TX and UART3_RX will not be available.
LCD — 4.3″(480×272), 7″(800×480), 10″(1024×600)
VGA — 800×600, 1024×768
Touch_screen — you need calibrate LCD touch screen usi it. Note that by default the X environment does not start like root user. In our case the X starts with user named olimex
Therefore if you want to use the touch screen in X environment then you have to run calibrate procedure like olimex user. For example type:
enter the olimex password:olimex
calibrate the touch screen and reboot the board
WEB camera A4TECH
USB_OTG — low/full/high USB host
USB_HOST_up — low/full/high USB host
USB_HOST_down — low/full/high USB host
- Linux Kernel 3.4.67+
- XFCE4 desktop environment
- Mplayer CLI
- GCC 4.6
- iceweasel WEB browser
- LCD and touchscreen support
- GPIO
- I2C
- SPI
- USB WIFI RTL8188CU, Ethernet AX88772B
- Audio
- apache2
- dpkg
- git
- i2c-tools
- perl
- vlc
- xorg
- Scratch
- GCC
- Python 2.7.3
- PyA13 python module with GPIO,I2C,SPI support
- OpenCV
- mono-complete
- Default Login: root/olimex
Android
Android for NAND
There are different images depending on the screen output settings. Also there are different images depending on the WIFI module placed. Latest hardware revisions use MOD-WIFI-RTL8188ETV and an updated image.
A13 Android NAND images with LCD 4.3″ 480×272 and touchscreen (torrents):
- Android_version — 4.0.3
- Baseband version — 1.2
- Kernel version 3.0.8+
- MOD-WIFI-RTL8188ETV wifi module
- LCD 4.3″ 480×272 pixels with backlight
- Touchscreen support
- Android_version — 4.0.3
- Baseband version — 1.2
- Kernel version 3.0.8+
- MOD-WIFI-RTL8188 wifi module
- LCD 4.3″ 480×272 pixels with backlight
- Touchscreen support
A13 Android NAND images with LCD 7″ 800×480 and touchscreen support (torrents):
- Android_version — 4.0.3
- Baseband version — 1.2
- Kernel version 3.0.8+
- MOD-WIFI-RTL8188-ETV wifi module
- LCD 7″ 800×480 pixels with backlight
- touchscreen support
- Android_version — 4.0.3
- Baseband version — 1.2
- Kernel version 3.0.8+
- MOD-WIFI-RTL8188 wifi module
- LCD 7″ 800×480 pixels with backlight
- Touchscreen support
A13 Android NAND images with LCD 10″ 1024×600 and touchscreen support:
- Android_version — 4.0.3
- Baseband version — 1.2
- Kernel version 3.0.8+
- MOD-WIFI-RTL8188-ETV wifi module
- LCD 10″ 1024×600 pixels with backlight
- Touchscreen support
A13 Android NAND image with VGA 800×600 support, torrents:
- Android_version — 4.0.3
- Baseband version — 1.2
- Kernel version 3.0.8+
- MOD-WIFI-RTL8188ETV wifi module
- VGA 800×600 pixels
- Android_version — 4.0.3
- Baseband version — 1.2
- Kernel version 3.0.8+
- MOD-WIFI-RTL8188 wifi module
- VGA 800×600 pixels
Android for microSD card
Torrent of Android release 3 with LCD support for microSD card (recommended):
- Android_version — 4.0.3
- Baseband version — 1.2
- Kernel version 3.0.8+
- Only LCD support — 800×480 pixels
Older (not recommended) releases:
Torrent of Android release 2 with LCD support for microSD card (not recommended, the USB OTG does not work properly due to fex error): A13-OLinuXino A13 Android for microSD card with video support for 800×480 LCD, release 2
HOWTOs
General
How to write the Debain image to a microSD card?
To write a Linux image to an SD card under Windows we use Win32 Disk Imager):
- Download Win32 Disk Imager Win32 Disk Imager
- Insert card
- Start program
- Select file
- Click «write»
To write a Linux image to an SD card under Linux:
For instance you have an image with the file name of «debian_2g.img». It would be downloaded to the SD card connected to a Linux machine using one of the following commands:
- # dd bs=4M oflag=sync if=debian_2g.img of=/dev/sdX
where X is the uSD card.
How to change VGA and LCD resolutions under Debian?
The default SD card setup is made with settings for 800×600 VGA video output. If you want to change to some other LCD or VGA resolution then you have to start change_display.sh script file in /root directory.
and press «Enter».
Then choose the resolution and the interface(LCD or VGA). Note that the selection of a specific resolution is done by navigating with the arrow keys and pressing «space» button. Make sure the asterisk marks your selection properly.
The supported resolutions are:
Important: initially the boards are calibrated for a specific display. If you re-write the image (no matter whether the SD card or the NAND memory) you might need to use a mouse to calibrate the display initially. It might be impossible to calibrate it via touching the display.
Linux related
How to build latest official Debian release
There are a number of unofficial guides to building the Debian, among them:
Sunxi u-boot loader The linux-sunxi git page contains a lot of sources for all Olimex Allwinner boards.
How to edit my MAC address?
However, it is very easy to change MAC under Debian.
All you have to do is:
1. turn off the network interface (it is off by default, can be turned off by “ifdown eth0”) 2. open /etc/network/interfaces with a text editor (for instance “nano /etc/network/interfaces”) 3. add the following line under eth0 definitions: “hwaddress ether 00:11:22:33:44:55”, where 00:11:22:33:44:55 is the desired MAC address. 4. save and turn on the network interface (“ifup eth0”)
You can think of own way implementing own MAC address (for instance storing a consecutive number in the small EEPROM and then loading it).
How to enable WIFI?
Note: in the previous Debian releases the Ethernet was auto-detected and initialized during boot BUT this was causing big delays in the start-up of the board if you didn’t want to use Ethernet or if there wasn’t Ethernet cable connected.
You can enable it by following these two steps:
1. To check under what name the LAN is associated write «ifconfig –a»
2. If, for example, it is under eth0 name, then write: «dhclient eth0»
This should enable the Ethernet and then SSH would also be available.
How to enable Ethernet?
Note: in the previous Debian releases the Ethernet was auto-detected and initialized during boot BUT this was causing big delays in the start-up of the board if you didn’t want to use Ethernet or if there wasn’t Ethernet cable connected.
You can enable it by following these two steps:
1. To check under what name the LAN is associated write «ifconfig –a»
2. If, for example, it is under eth0 name, then write: «dhclient eth0»
This should enable the Ethernet and then SSH would also be available.
Android related
How to compile new Android image?
Good guide shared by Akshay Mathur might be found here: pdf instructions available at GitHub
How to make code to run on power up?
You would need an application that works in kiosk mode. There is a lot of information available online on how to write an application capable of autostart.
How to access GPIOs?
There is an application we wrote to demonstrate how this can be done under Android. Please check the following two links:
How to add PWM support?
There is a separate article on the subject here: how to add pwm
Python
The Debian Linux Python package for A13-OLinuXino is called pyA13. It is installed in the default Debian image. More information and examples on how it can be used might be found here:
Scratch
There are a number of SCRATCH resources we have published. The following might be of interested for you if you are interested in SCRATCH or OpenCV:
How to edit board configurations and definitions in the official Debian Linux?
Do you want a custom video resolution output? Do you need a different port definition? Do you need to change the hardware defitions of the board?
You would need to edit the board’s script.bin/script.fex file. How to do it is described in a separate article: How_to_edit_board_configurations_and_definitions_in_the_official_Debian_Linux.
How to add STK1160 video capture driver support in Kernel 3.4
STK1160 driver backport by Dimitar Tomov
Hardware
Serial connection to A13 description of how to connect a computer to the A13 board over serial cable.
Power supply
The A13-OLinuXino can be partially powered over Micro USB, but to power all peripherals, a 6+ watt DC power supply between 6 and 16 volts can be used. The connector is a positive-center 2.5mm barrel plug. There is also an on-board connector for a Li-PO battery. Important note: A13-OLinuXino-MICRO works with +5V only! If you apply more than 5V you will damage the board.
Software
Linux Commands
Linux-Commands Brief Linux Command reference
Bare Metal programming — no OS
It is possible to program and debug code written directly on the chip without an OS such as linux or android.
The advantage is no kernel overhead and tighter control of the CPU operation.
Using an operating system — Nand flash
The Wifi version of the A13 board comes preprogrammed with android, which is held in the Nand flash.
The image in the Nand flash can be updated using the tools found at the following links:
to the NAND flash; to activate A13 bootloader do as follows: run Livesuit, disconnect the power supply and USB cable, then press HOME button, apply power supply, attach USB cable and release the button, Livesuit will detect the bootloader and will ask which file to program to the NAND flash.
Prebuilt images that can be programmed into the Nand flash can be found here.
Using an operating system — SD card
The A13 board can boot from an SD card. Just plug it in an imaged uSD card and connect power.
Note: The SD card can easily be corrupted if power is removed while the system is booting or writing to system files. To avoid this do not remove power while it is booting and shut the system down properly before disconnecting power.
Prebuilt images
Some prebuilt images have been created, follow the link below for details.
Build your own kernel and image onto SD card
Some developers want more control over the kernel and modules that are included. The link below shows directions to build your own kernel and image it onto an SD card.
Build Bootable SD Card with Debian Step by step instructions how to make SD card image with above Kernel and U-boot
Setup and configure the installed debian image
There are several settings that can be made for a particular hardware configuration in the script file.
The following link explains the script file as well as wifi or ethernet setup and GPIO settings
Installing UsbVideoClass(UVC) on A13-OLinuXino board
To work with USB Video Cameras you have to enable the UVC support in the kernel. The link below explains how to do it.
Setup VLC player for video streaming on A13-OLinuXino board
To setup video streaming you should first have installed UVC support so you can connect USB cameras to A13-OLinuXino.
Creating a program to run on the A13-OlinuXino board
Programming for A13 in debian Step by step instructions to make your first hello world program run on the A13 board running debian.
Software links
A13-SDK Android 4.0.3 ICS
The official Allwinner repository contains all official files, including the files required to build Android ACS 4.0.3 NAND image for A13-OLinuXino-WIFI.
A13-SDK Android 4.1 JB
This is version 1.5 of A13-SDK which builds Android 4.1 Jelly Beans image. It works slower than 4.0.3 and we personally do not see any advantage to use 4.1 vs 4.0.3
Projects
Projects people from the olinuxino community are working on or have finished and how they did it.
LINUX:
Build Bootable SD Card with Debian Run Debian and u-boot, Step by step instructions how to make SD card image.
Prebuilt SD card images running debian
Booting Linux for less than 1 second optimization made by Miroslav Bendik.
No OS
Bare Metal programming A13 Programming directly for the chip without an OS
List of Contributors
Henrik Nordstrom — a.k.a. hno, uboot for A13 development, A1X guru, Linux-Sunxi maintainer
Dimitar Gamishev — a.k.a. HEHOPMAJIEH, Linux kernel configuration for OLinuXino, Android images, LCD touchscreen
Alexandro Mery — a.k.a. mnemoc, Linux-Sunxi maintainer
Davide Fabbri — Linaro kernel and lubuntu image
Scott Anderson — A13 wiki maintainer
Источник


